Dsoon H8PLUS User manual

Trail Camera
User Manual
Model: H8PLUS


IMPORTANT NOTE
Congratulations on your purchase of one of the best trail
cameras on the market! We appreciate your business and
want to earn your trust. Please refer to the instructions in
this manual to ensure that you are completely satisfied
with this product.
Positive reviews from awesome customers like you help
others to feel confident about choosing Dsoon too. This
also helps us to continue providing great products. Could
you take 1 minute to share your happy experiences? We
will be forever grateful. Thank you in advance for helping
us out!
If your trail camera does not seem to be functioning
properly or if you are having photo/video quality issues,
please check the FAQ section on pages 23-34.
Problems are often due to something simple that was
overlooked, or require only changing one setting to solve.
If your problem continues after trying the solutions in the
FAQ section, please contact Dsoon Customer Service:

Contents
PACKAGE INCLUDES.................................................. 1
CAMERA OVERVIEW................................................... 2
QUICK START................................................................ 3
INSTALLATION..............................................................4
CAMERA OPERATION..................................................7
PARAMETER SETTINGS............................................. 9
USING THE WALL BRACKET..................................18
REVIEWING YOUR PHOTOS/VIDEOS.................20
TROUBLE SHOOTING/FAQ.....................................23
TECHNICAL SPECIFICATIONS.............................. 35
FCC COMPLIANCE STATEMENT............................37
WARRANTY AND DISCLAIMERS.......................... 39

PACKAGE INCLUDES
Trail Camera 32GB Micro SD Card USB Cable
Allen Wrench Mounting Strap Card Reader
User Manual Fixed Bracket Screw Plug Kit

INSTALLATION
Before you begin learning how to use your trail camera,
you will first need to install a set of 1.5V alkaline AA
batteries and insert a micro SD card. Please take the
time to read the following directions and cautions:
Loading Batteries
1.Open the two latches on the right side of the camera,
and then open the battery protection cover. For
maximum battery life, you should install 8 alkaline AA
batteries into the battery slots.(Removing the battery will
reset the camera time and date)
2.The camera may also be operated by just 4 batteries
installed in four consecutive slots on one side. Battery life
will be shorter with 4 batteries, but the camera will
operate normally. Whether you use 4 or a full set, be sure
to insert each battery with correct polarity (negative or
flat end against the long spring of each battery slot).
3.Recommends using a full set of new 1.5V alkaline AA
batteries. other batteries should not be used, as the
camera may not function correctly. Anytime you load or
unload batteries, make sure that the camera is OFF.

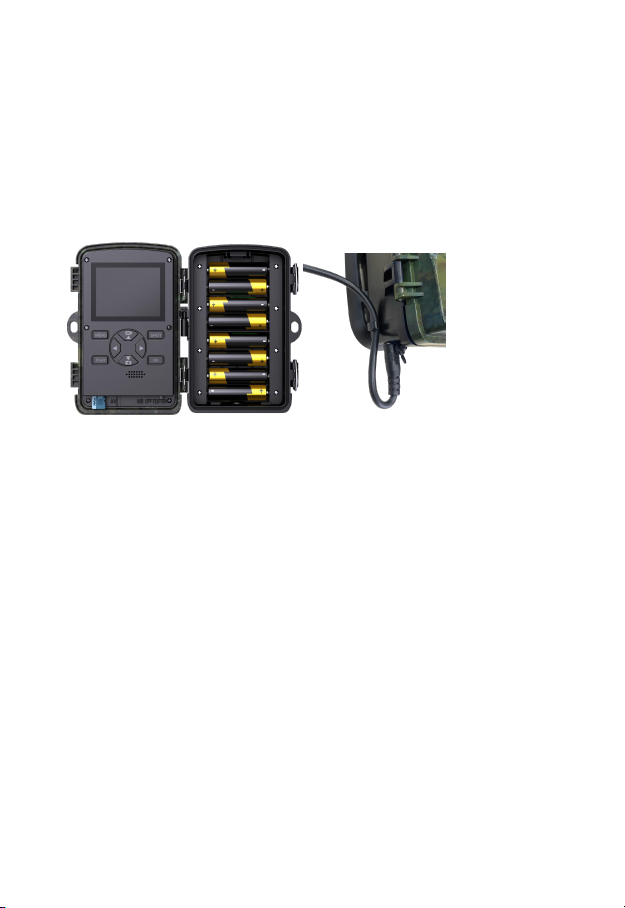
Using an external power source
you can connect an external 6V DC power source with at
least 1.5A to the DC Port at the bottom of the camera.
The power connector is a 3.5x1.35 mm coaxial DC power
plug with positive tip (inside pin) polarity. Leave internal
batteries in the camera during use.
Inserting the Micro SD Card
1.Insert the micro SD card (with the camera’s power
switch in the OFF position) before beginning to operate
the camera. Don’t insert or remove the micro SD card
when the power switch is in the ON position. The camera
uses a Micro SD memory card to save your photos (.jpg
format) or videos (.avi format). Micro SD/SDHC/SDXC
class 6 or higher speed cards, up to a maximum 512GB
are supported.
Tips:Use the
hook next to
the DC port
to fix the
external
power cord

2.Formatting the micro SD card before using it for the
first time is recommended, especially when a card has
been used in other devices. This can be done in “Format
memory card” in the camera menu. Make sure you
have backed up (saved to your computer) any files you
want to keep on a previously used card, as formatting
erases all files.
3.Insert the micro SD card into the card slot with its label
side upwards (see below). A “click”sound indicates that
the card is installed successfully. If the wrong side of the
card is facing up, you will not be able to insert it.
4.If the micro SD card is not installed correctly, "Memory
card missing" will appear on the LCD Display, and the
camera will not operate.
5.To take out the micro SD card, just gently push in the
card (do not try to pull it out without pushing in first). The
card is released from the slot and ready to be removed
when you hear the click.

CAMERA OPERATION
Once you’ve prepared your trail camera by properly
installing batteries and micro SD card, you could take it
outside, switch it ON mode and you might get some
great photos that are exactly what you wanted(The
camera works with factory default settings).
NOTE:
►Please remove the protective foil from the camera
before use for not affecting the camera effect.
►After setting the parameters to your preferences, be
sure to move the switch to ON mode to begin actually
taking photos or videos.
You can also set the shooting parameters you want in the
camera menu. Please take the time to read the following
directions:
There are three basic operation modes
● OFF Mode
Switch the Mode Button to OFF to turn off the camera.
This is the safe mode when Replacing the micro SD card
or batteries, or transporting the device.

● ON Mode
Switch the Mode Button to ON, the camera will take
photos or videos automatically (with its current settings)
when it is triggered by the PIR sensor’s detection of
activity in the area it monitors.
● TEST Mode
Switch the Mode Button to TEST to turn on the camera.
You can check and change the settings of the camera by
using its built-in LCD screen. You can also take photos,
record videos and play files manually.
Operation in TEST Mode
●Press the UP/DOWN key, then press the SHOT to
take a video/photo. Press the SHOT button again to stop
recording.
●Press the MENU key, the setup options will be showing
on the LCD screen. Or exit the setup menu.
●Press the UP/DOWN key, scroll to the next or
previous parameter.
●Press the RIGHT/LEFT key to change the setting.
●Press the OK key to save the new setting.
●Press the PLAY key to enter image review mode.

PARAMETER SETTINGS
Mode
Options:[Photo]: Capture photos with motion detection.
[Video]: Capture videos with motion detection.
[Photo & Video]: Capture both photos and videos with
motion detection.
Photo resolution
Set resolution for still photos. The higher resolution, the
better image quality, but takes more power and storage
space.
Options:[32MP:6480x4860P]/[20MP:5200x3900P]/[16
MP:4608x3456P]/[12MP:4000x3000P]/[8MP:3264x244
8P]/[5MP:2592x1944P]/[3MP:2048x1536P]/[1MP:1280
x960P].
Photo series
Selects how many photos will be taken in sequence per
trigger.(Burst Images)
Options:[1 photo]/[2 photos in series]/[3 photos in
series]/[10 photos in series].

Video resolution
Set the video resolution. The higher resolution, the better
video quality, but takes more power and storage space.
Options:[3840x2160P]/[2688x1520P-20FPS]/[1920x10
80P]/[1280x720P]/[1280x720P-60FPS]/[848x480P]/[7
20x480P]/[640x480P]/[320x240P].
TL video resolution
Set the resolution of time lapse video.
Options:[5200x3900P]/[4608x3456P]/[4416x3312P]/[4
000x3000P]/[3648x2736P]/[3264x2448P]/[3072x2304
P]/[2592x1944P]/[2048x1536P].
Video length
Set the length of each video clip recorded each time when
motion is detected.
Options:3-59 seconds or 1-2 minutes.
Audio recording
Opening this function, you'll be able to record sound
while recording a video.
Options:[On]/[Off].

Shot lag
1.The Shot lag is referring to is the time delay between
one shot and the next. It is different from the trigger
speed of a trail camera(the trigger speed is the amount of
time it takes for the trail camera to take and record the
photo once the camera detects an animal).
2.For example, if you set your Shot lag time on your
camera to a 5 second, when the camera captures the
action and finishes shooting, it will wait 5 seconds before
subsequent detection. You would collect 12 sets of
photos every minute.
3.If you are watching a deer moving through, set it for a
shorter time - a few seconds. If you are watching a bait
pile, set it longer as the deer are in the same spot for
some time. Otherwise you'll get loads of near identical
photos and a full memory card very quickly.
Options:5-59 seconds or 1-60 minutes.
Side motion sensors
The default setting is ON. The two side PIR sensors
provide wider sensing angle and enhance response time.
However, in some situations, you might have difficulties

removing the interfering twigs, or avoiding the sunlight.
If so, you'll have an option to turn off the side sensors.
Options:[On]/[Off].
Sensitivity motion sensors
This refers to how sensitive the camera is to objects that
pass in front of it. For interior areas and environments
with little interference, select High. Select Middle for
exterior areas and environments with a normal amount
of interference, and select Low for environments with a
high level of interference (Please note that the
temperature may also affect the sensitivity). The High
setting is suitable for warm ambient temperatures,
whereas Low should be selected for cold environments.
If you are looking for larger animals, such as deer or bear,
the sensitivity can be turned down quite liberally, as
larger animals are obviously easier to detect. However, if
you are after getting photos of a rare song bird that is
nesting near by, the High sensitivity might be your best
option.
Options:[Low]/[Middle]/[High].

Target recording time
You can set the camera to start recording at a specific
clock time(Make sure you set the date and time of the
camera accurately before using this setting). Select ON
and set the Start and End time for the active phase. The
settings made here apply to every day monitoring. The
camera will not record any images outside of the active
phase. For example, you may only be interested in
nocturnal animals, so you schedule your camera to only
work at night.
Options:[On]/[Off].
Time lapse
1.When Time lapse model is turned on, the PIR sensor is
not available, which means that the camera will not
detect. Instead, it takes photos or records video clips
automatically at your choice of intervals regardless of if
there is anything in front of camera or not.
2.It is very useful for picking up cold bodied animals that
may not trigger a PIR, or capturing images of activity that
are moving too slowly, or are too far away to trigger the

PIR. Such as big open areas or monitoring the flowering,
sunrise and sunset.
Options:[Normal]: Set the interval for taking photos or
videos regularly(According to the
"mode/resolution/photo series" you set). For example,
set the interval time to 1 hour, the camera will take a
photo every hour. If you want to observe that a plant
blooms, the camera will take 24 photos in 24 hours to
record the whole process of blooming.
[TL Video]: Set up to take a picture at regular intervals.
Unlike Normal mode, these sequence of images can then
be joined together into a video, effectively speeding up
whatever sequence of events has been recorded
[Off]: Turn off the time lapse mode.
●Interval Options: The default is 30-seconds, but can be
set anywhere from 3-seconds to 24-hour.
Language
Set the language display on screen.
Options:[English]/[German]/[Danish]/[Finnish]/[Swedis
h][Spanish]/[French]/[Italian]/[Dutch]/[Portuguese]/[S
implified Chinese]/[Traditional Chinese]/[Japanese].

Endless Capture
Memory Full Action: If you turned ON, trail cameras will
automatically delete the oldest photos and videos once
the micro SD card is full, and recording continues as
expected. If you turned OFF, your camera will stop
saving new data to your micro SD card once it is full.
Options:[On]/[Off].
Time & date
Options:[Set time&date]:Set the date and time of
camera. Use LEFT/RIGHT buttons to move to next field.
Use UP/DOWN buttons to change the setting, pressing
the OK button to save the changes. Removing the
battery will reset the time and date.
[Time format]:24h, 12h.
[Date format]:dd/mm/yyyy, yyyy/mm/dd, mm/dd/yyyy.
Photo stamp
Offer the Data-Stamp option supply users with info such
as date, time, moon phase and temperature the moment
the image was taken(only for photos).
Table of contents
Other Dsoon Scouting Camera manuals