manuals.online logo
Brands
  1. Home
  2. •
  3. Brands
  4. •
  5. DT
  6. •
  7. Media Converter
  8. •
  9. DT RV2 User manual

DT RV2 User manual

Popular Media Converter manuals by other brands

TR-Electronic CMS582M-4096/4096 IOL DMS 14H7 KRF Assembly instructions

TR-Electronic

TR-Electronic CMS582M-4096/4096 IOL DMS 14H7 KRF Assembly instructions

Korenix JetCon 2301S user manual

Korenix

Korenix JetCon 2301S user manual

StarTech.com ET91000LCOAM manual

StarTech.com

StarTech.com ET91000LCOAM manual

Alesis AI-3 Reference manual

Alesis

Alesis AI-3 Reference manual

Caton Vpro 5100 user guide

Caton

Caton Vpro 5100 user guide

Cypress CSC-5500 Operation manual

Cypress

Cypress CSC-5500 Operation manual

H&B TX-100 Installation and instruction manual

H&B

H&B TX-100 Installation and instruction manual

Bolin Technology D Series user manual

Bolin Technology

Bolin Technology D Series user manual

IFM Electronic Efector 400 RN30 Series Device manual

IFM Electronic

IFM Electronic Efector 400 RN30 Series Device manual

GRASS VALLEY KUDOSPRO ULC2000 user manual

GRASS VALLEY

GRASS VALLEY KUDOSPRO ULC2000 user manual

Linear Technology DC1523A Demo Manual

Linear Technology

Linear Technology DC1523A Demo Manual

Lika ROTAPULS I28 Series quick start guide

Lika

Lika ROTAPULS I28 Series quick start guide

Weidmuller IE-MC-VL Series Hardware installation guide

Weidmuller

Weidmuller IE-MC-VL Series Hardware installation guide

Optical Systems Design OSD2139 Series Operator's manual

Optical Systems Design

Optical Systems Design OSD2139 Series Operator's manual

Tema Telecomunicazioni AD615/S product manual

Tema Telecomunicazioni

Tema Telecomunicazioni AD615/S product manual

KTI Networks KGC-352 Series installation guide

KTI Networks

KTI Networks KGC-352 Series installation guide

Gira 0588 Series operating instructions

Gira

Gira 0588 Series operating instructions

Lika SFA-5000-FD user guide

Lika

Lika SFA-5000-FD user guide

manuals.online logo
manuals.online logoBrands
  • About & Mission
  • Contact us
  • Privacy Policy
  • Terms and Conditions

Copyright 2025 Manuals.Online. All Rights Reserved.

RV2 Video Processor
Fast Facts
Overview. The RV2 dedicated video processor and
collection device and the VGAC machine vision color
camera work together for video recording and tracking
tasks. Video is streamed from the camera to the
RV2 where it is processed and stored. In a complete
system, camera triggering is precisely synchronized
to an RZ processor (such as RZ2 or RZ5D) allowing
frame-by-frame correlation between video data and
other recorded signals.
This fast fact sheet provides basic reference information for the
RV2 Video Processor and related devices. See reverse for Synapse
set-up. See the System 3 Manual for more detailed information.
Hardware Setup. The RV2 receives timing pulses and
returns tracking information via a fiber optic connection
to a special DSP (RZDSP-V) on the RZ processor.
Connect the orange fiber optic cables from the port on
the back of the RV2 to the port on the back of the RZ,
labeled To RV2. The fiber optic cables are color coded to
prevent wiring errors.
Connect the gray camera power cable from the Power-1
port on the RV2 to the VGAC camera.
Connect a Gigabit Ethernet cable from the Camera-1
port on the RV2 to the VGAC camera.
RV2 to RZ Connection Diagram
Connect an Ethernet cable from the Network port on
the RV2 to either a local area network (LAN) or directly
to the PC running OpenEx.
The RV2’s default IP address is 10.1.0.42.
To access the RV2 file system through a PC you must
configure the PC TCP/IP settings and set the PC IP
address to 10.1.0.x, where x is any value, 1 - 254 except
42.
To access the RV2 file system through a lan network,
DHCP must be enabled ON THE NETWORK. *Do not
attempt to write to the RV2 while data is actively
streaming.
For more information on network configuration, see
the Video Processor section of the System 3 Manual
Optionally, connect a VGA cable from the Monitor port
on the RV2 to an external monitor.
RV2 PC and Network Connection Diagram
Possible connections to a PC (1) or LAN (2).
Important!: Make sure that all cables are
connected before powering on the RV2.
Power Button
Power Status
VGAC
WITH
[email protected]
www.tdt.com
User Interface. The RV2 LCD touch screen displays
live or stored video and can be used to configure RV2
options.
Four page selection tabs are located on the right side
of the screen.
Live. View the current image captured by the
camera, change camera settings and tracking
configuration.
Playback. Select and review stored videos.
Status. View IP address and other system
information.
Config. Reformat storage array, update firmware,
or reboot the system.
PC Tools. RVMap software is installed with TDT drivers. It
provides a simple visual interface to define regions and
targets for video tracking using video snapshots sent
from the RV2 to the PC (or over the network). Region
and target information is collected and transferred to
the RZ for storage.
The OpenScope video viewer supports synchronized
video playback.
See the Video Processor/RVMap Software section of
the System 3 Manual for more information.
Updating Firmware: The RV2 firmware can be updated
on the Config tab. Firmware is downloaded from the
TDT server and automatically installed on the RV2.
Connection to a DHCP enabled network that has internet
connectivity is required to retrieve any updates.
Storage ArrayType. The RV2 is equipped with 2 terabytes
of storage space and supports two RAID based array
types: Striped and Mirrored. The default array type is
Mirrored which provides data back-up in case of drive
failure. The RV2 storage array can be reformatted for
more recording capacity on the Config tab of the touch
screen interface. However, keep in mind that under
most conditions several months of video can be stored
on the mirrored array.
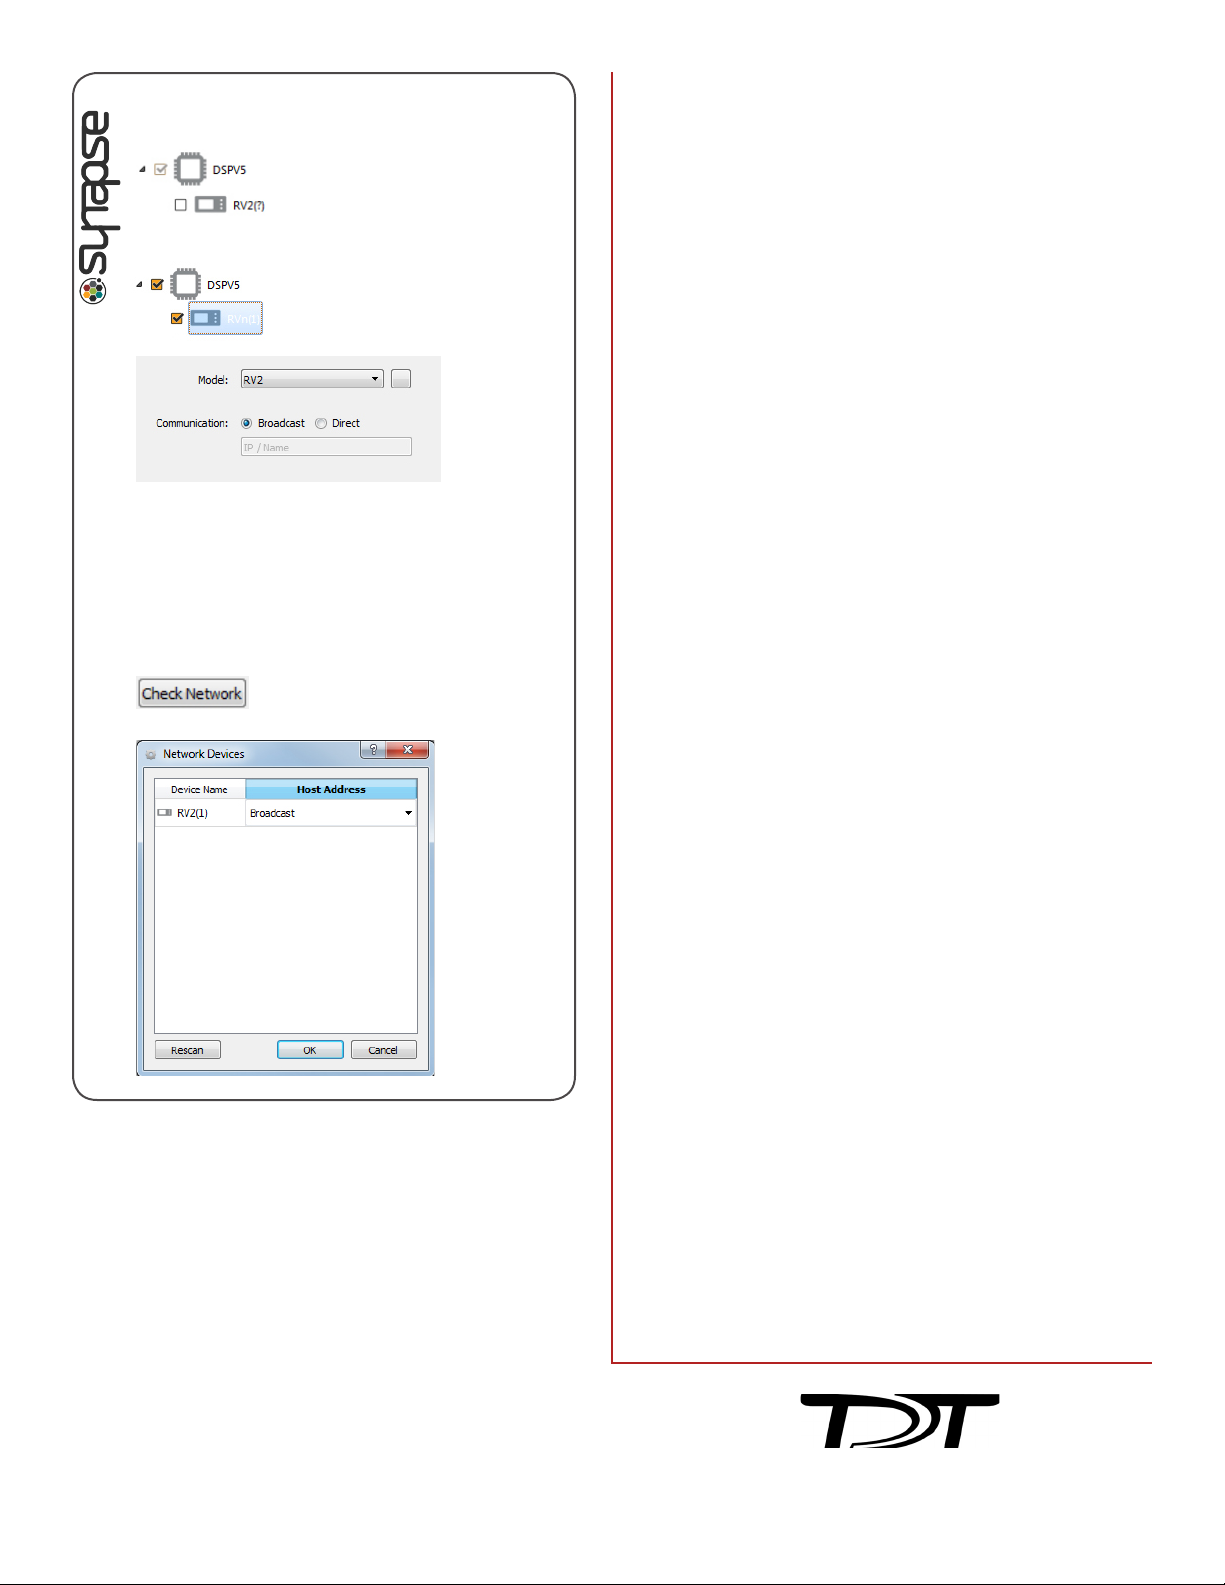
Synapse Configuration. The RV2 must be
configured in the Rig Editor.
Select Broadcast or Direct connection, then
enter the IP address.
Alternatively, click the Check Network button
and select the RV2 IP address in the Host
Address drop-down for the RV2 (1).
Device Address. Typically, the path or device address \\
RV2-0XXXX\ is used to access the RV2 storage array,
where XXXX is the device serial number. The name
should be verified on the Live tab of the touchscreen
interface. Alternatively, use the IP address which is
shown on the Settings tab.
The DSPS optical DSP should
be auto-detected. Click the
check box next to the RV2 icon
to enable the video tracker.
Click the icon in the tree to dis-
play configuration options.