DT SPT 2400 Series User manual

• SPT 2420
• SPT 2422
• SPT 2430
• SPT 2432
SPT 2400 Series
Super Pro Trainer with SmartLED
Owner’s Manual

2
TABLE OF CONTENTS
• Table of Contents .......................................2
• Introduction.................................................3
• Package Contents & Model Features..........4
• Transmitter Diagram ...................................5
• uttons, Parts & Functions..........................6-7
• Collar Parts & Functions .............................8-9
• LCD Screen Icons.......................................10
• SmartLED (battery indicator).......................11
• Charging the atteries ................................12
• Turning ON and OFF ..................................13
• Testing........................................................14-15
• Programming the Collar ..............................16
• Properly Fitting the Collar ...........................17
• Setting the Intensity Level...........................18
• Setting the Jump Level ...............................19
• Maintenance ...............................................20
• Important Safety Notes ...............................21
• Warranty.....................................................22
• FCC/IC/CE Compliance ..............................23
• Contact Information.....................................24

3
Congratulations and thank you for purchasing our SPT
2400 Series
TM
dog training system, perfect for
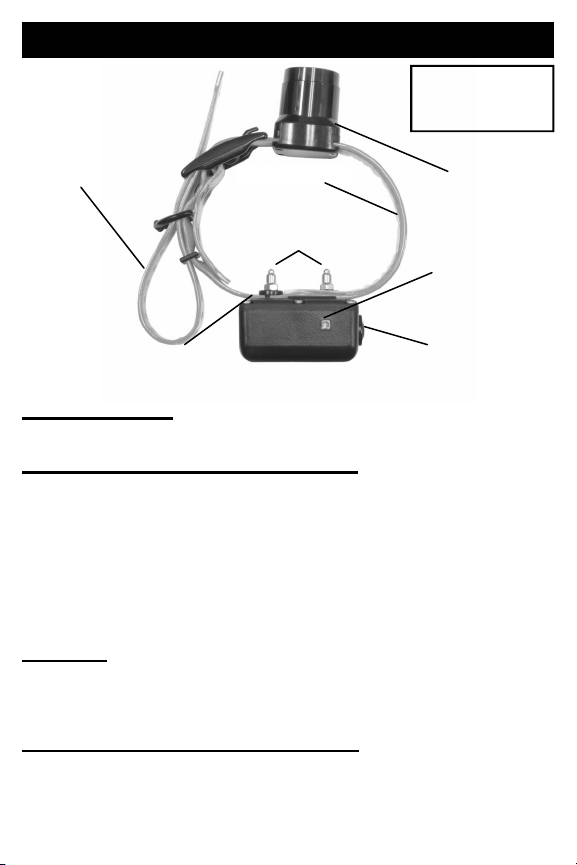
professional-level training. The collar’s MAXX-
Range™ Internal Antenna System, the industry’s only
internally woven antenna in the collar, gives this unit
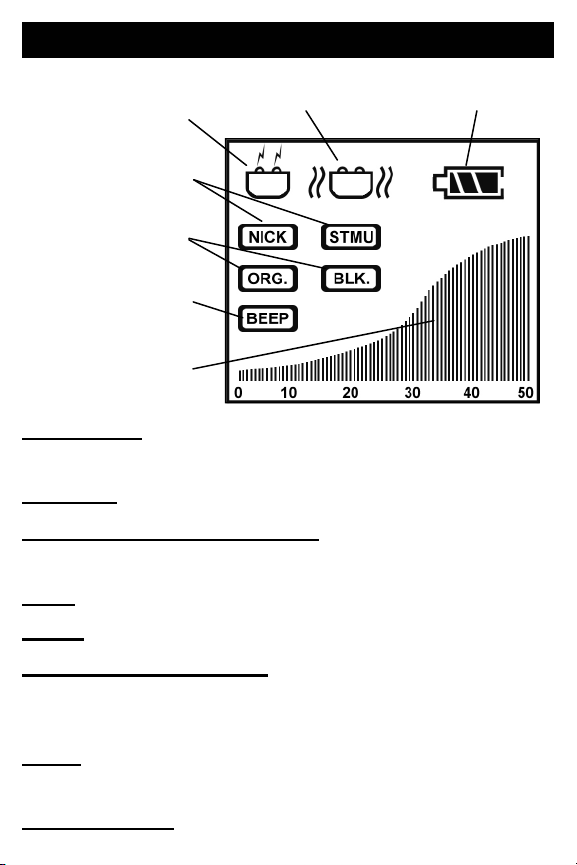
up to a 3.2 mile range. The convenient, Digital
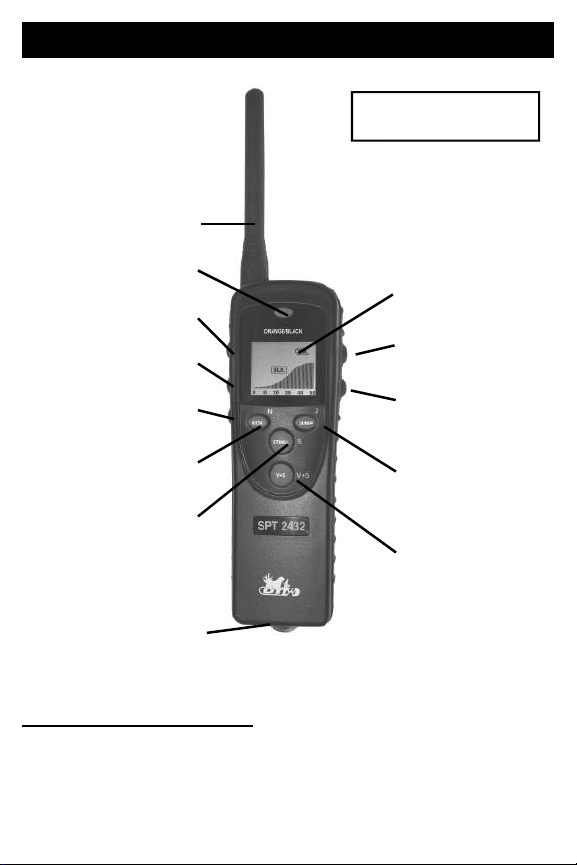
Transmitters feature an LCD display, showing the
current intensity level setting (between 0 and 50) as
well as which type of stimulation is being used. The
transmitter has battery life indicator, and displays
which collar is currently being controlled (on 2-Dog
models). This system also features our SmartLED light
which indicates how much battery charge is in the
collar battery. All models include Momentary “Nick”,
Continuous, and Jump stimulations as well as
Vibration Assist and Vibration + Stimulation. The SPT
2430 and 2432 add an integrated eeper with Locate,
Run & Point mode, and Point Only mode audible from
up to 450 yards away. The waterproof collar unit and
weather resistant transmitter are both rechargeable
with NiMH batteries. The SPT 2400 series is durable,
safe, and very humane when used correctly. The
automatic safety shut-off feature stops the stimulation
after 8 seconds to prevent prolonged stimulation.
Thank you for purchasing D.T. Systems.
INTRODUCTION
IMPORTANT NOTE:
Please read this wner’s manual in its entirety bef re
perating this unit. Sh uld y u have any questi ns
ab ut ur c llars r their perati n please c ntact
Cust mer Service (c ntact inf n back page).

4
PACKAGE CONTENTS
•
Transmitter with Antenna and Lanyard
•
Collar Receiver (two in 2-dog models)
•
Rechargeable NiMH atteries for both the Collar and
Transmitter (already installed)
•
attery Charger
•
Splitter Cable for simultaneous charging
•
Test Light
•
Owner’s and Training Manuals
•
Carrying Case
•
Digital Technology
•
Up to 3.2 mile range
•
50 intensity levels
•
LCD display on transmitter
•
Rechargeable NiMH batteries
•
SmartLED charging and battery life status indicator
•
MAXX-Range™ Internal Antenna System
•
Gentle Touch System™ Extra Mild Stimulation
•
Nick, Continuous, and Jump stimulations
•
Vibration Assist and Vibration + Stimulation
•
eeper - Locate, Run & Point mode, Point Only mode
audible from 450 yd. (SPT 2430 and 2432 only)
•
Waterproof collar and weather resistant transmitter
•
uilt in safety shut-off system
MODEL FEATURES

5
Transmitter
Battery Charging
Receptacle
L cate Butt n**
C ntinu us
Stimulati n Butt n
M mentary ‘Nick’
Stimulati n Butt n
SPT 2432 Transmitter sh wn
* SPT 2422 and 2432 only
** SPT 2430 and 2432 only
Transmitter Antenna - Always check that the
Antenna is securely fastened to the transmitter before
each use. Hand tighten only. Use caution when
attaching Antenna as over-tightening may cause
damage to the Antenna or antenna mount.
Run/P int M de
Butt n**
Vibrati n Butt n
Vibrati n + Stim
(V+S) Butt n
LCD Screen
Intensity Level Up
Butt n
C llar Selecting
Butt n*
Antenna
Jump Stimulati n
Butt n
Intensity Level
D wn Butt n
Transmitter Diagram

6
Intensity Selecti n Butt ns - The intensity
level can be set from level 1 to level 50. The
smaller increments between levels will help you
find the exact stimulation level for your dog
(see page 18).
Transmitter LCD Screen - The LCD Screen shows
information and status of functions (see page 10 for
more details).
BUTTONS, PARTS & FUNCTIONS
‘NICK’ Butt n - Pressing the ‘NICK’ utton makes the
collar emit a Momentary (or ‘Nick’) Stimulation.
C llar Selecting Butt n (2-D g m dels nly) -
Switching between collar units can be controlled by
pushing the Collar Selecting utton to the desired unit
(indicated by ‘ LK’ or ‘ORG’ icons).
Jump Butt n - Pressing the Jump utton makes the
collar give a ‘Jump’ Stimulation, making the intensity
level instantly “jump” to a user-programmed intensity
level (see page 19).
V+S Butt n - Pressing the V+S utton makes the col-
lar vibrate first and then adds simultaneous Stimula-
tion to the Vibration after a 1/2 second delay.
‘STIMU.’ Butt n - Pressing the ‘STIMU.’ utton emits
a Continuous Stimulation as long as the button is
being pressed (up to an 8 second safety cutoff).

7
BUTTONS, PARTS & FUNCTIONS
L cate/M de Butt ns (SPT 2430/2432 nly) - Press-
ing the Locate utton makes the eeper Horn emit a
loud beep. Pressing the Run/Point utton activates
the Run & Point mode on the Collar Receiver. Press-
ing it again changes the mode to the Point Only mode.
Pressing the Locate utton cancels Run/Point modes.
Battery Charging Receptacles - The battery
charging receptacles are located on the bottom of the
Transmitter and on the side of the Collar Receiver
facing the dog’s neck. After charging, always close
the jack with the rubber plug to prevent foreign
particles from getting inside the unit.
NOTE
The collar unit is still waterproof even if water gets into the
charging receptacle. However, if water should get in, we
recommend rinsing out the charging receptacle and allow-
ing it to dry, especially after use in salt water. This will pre-
vent premature corrosion in the metal pins inside that make
contact with the charger plug.
Vibrati n Butt n - Pressing the Vibration utton
makes the collar vibrate only.
NOTE
Range is optimized by holding the transmitter with a fully
extended arm as high over the head as possible. Alterna-
tively, range is lessened the lower the transmitter is held.

8
Beeper Wire*
C llar Receiver
COLLAR PARTS & FUNCTIONS
Beeper H rn (SPT 2430/2432 nly) - The eeper Horn is
attached to the collar belt. It will emit a loud tone audible
from up to 450 yards away.
C ntacts - Contacts should fit snugly against the dog’s
neck to ensure good contact with the skin. For more
information on the proper fit of the collar, see page 17.
*SPT 2430 /2432 only.
All other models will
not have Beeper Horn
or Beeper Wire.
Charging Receptacle
SmartLED Indi-
cat r Light
ON/OFF Butt n
C ntacts
C llar Belt with
MAXX-Range™
Antenna Beeper H rn*
ON/OFF Butt n - Turns the Collar Receiver unit ON and
OFF (see page 13).
C llar SmartLED Indicat r Light - When the Collar
Receiver is turned on, the SmartLED light will flash green
once every two seconds if the rechargeable battery has
51% to 100% charge left and flash red once every two
seconds if it has 21% to 50% charge left. The SmartLED
light changes to a double red flash when the battery needs
charging. The SmartLED light stays lit red while plugged
into the charger and turns green when charging is complete.

9
COLLAR PARTS & FUNCTIONS
CAUTION
If the collar belt is too long, we recommend looping the ex-
cess collar belt back around through the buckle. We DO
NOT recommend cutting the collar belt. Cutting the collar
belt can drastically reduce the range of your collar unit.
However, the collar belt can be cut up to about 3 inches
without greatly affecting the range.
C llar Belt with MAXX-Range™ Antenna - The
embedded MAXX-Range™ Antenna is woven into the
collar belt and runs along the entire length of the belt,
providing the range of an external antenna without the
drawback of sticking out from your dog. ecause it
wraps around the neck along with the collar belt, the
MAXX-Range Antenna provides 360˚ degrees of
signal reception and is not blocked by your dog’s
body, regardless of which direction your dog is facing.
Beeper Wire (SPT 2430/2432 nly) - The eeper
Wire provides power and communication from the
Collar Receiver Unit to the eeper Horn.
Unit Dimensi ns Weight
Transmitter 6” x 2” x 1 1/4” 7.4 oz.
Collar Receiver
8.2 oz. (with belt)
9.6 oz. (with beeper belt)
2 5/8” x 2” x 1 1/2”
Transmitter and ollar Unit Specifications

10
LCD SCREEN ICONS
Transmitter
Battery Status
Vibrati n
Stimulati n
Nick/Stim Indicat rs
Active C llar
Indicat rs
Beeper
Intensity Level
Transmitter Battery Status - Shows transmitter’s
battery level. Also comes on when charging.
Vibrati n - Shows when Vibration is being applied.
Stimulati n - Shows when an electrical stimulation is
being applied.
NICK - Shows when a Nick stimulation is applied.
STMU - Shows when a Continuous stim. is applied.
Active C llar Indicat r - ‘ LK’ (or ‘ORG’ on 2-dog
models) will show to indicate which collar unit is
currently being controlled.
BEEP - Shows when the Locate is being used or
when a Run/Point mode is active.
Intensity Level - ars graphically show intensity level.

11
Smart LED
*harging Error - If the SmartLED has a long blink every
other second while charging, the rechargeable battery pack
in the collar unit may need to be replaced. New batteries
may also initially give an error light. Contact D.T. Systems if
the problem persists after a few charging sessions.
SPT 2400 Series Collar Units are equipped with the
SmartLED battery status system. The SmartLED
system lets you know when the collar unit is charging
and when the charging is complete. It also gives you
a status on how much charge is remaining in the collar
battery during use, when it needs charging, and when
the batteries will need to be replaced.
Acti n LED COLOR/
PATTERN Status
Charging
Red Charging
Green Charging complete
Long Red blink
every other second Charging error*
Flashing Green 51%-100% charge left
Flashing Red 21%-50% charge left
Red double flash
or rapid flash
attery charge is low and
requires charging soon
While Unit
is On
NOTE
Earlier SPT models do not have the SmartLED system.
These models are still compatible with your unit, but their
LED light will not indicate charging and battery life status.

12
CHARGING THE BATTERIES
All SPT 2400 Series
TM
units are equipped with
rechargeable Nickel Metal Hydride (NiMH) batteries,
which are not memory sensitive and do not require
depletion before recharging. Although batteries come
partially charged from the factory, it is recommended
that they are given a full charge (about 12 hours)
before initial use.
NOTE
Rechargeable batteries typically last about 2-5 years on
average depending on use and care. Keep batteries away
from flammable substances. See page 20 for more infor-
mation on battery maintenance.
Battery Charging Pr cedure
1. Make sure the unit is off.
2. Plug the charger into a stan-
dard electrical outlet.
3. Connect the splitter cable to
the charger and plug the ends
into the appropriate units
(small end in transmitter, large end in collar). The
Collar SmartLED should light solid red while charging.
The Transmitter attery Status icon will blink and fill.
4. Charging is complete when the Collar SmartLED
turns green and the Transmitter attery Status icon is
blinking full (d n t charge m re than 12 h urs).
5. When charging is complete, disconnect the battery
charging cables from the receptacles, securely replace
the rubber battery receptacle covers, and test unit.
WARNING: DO NOT HARGE WHILE UNIT IS WET!

13
TURNING ON AND OFF
The Transmitter is always in a permanent sleep state.
The LCD screen will turn on when any button is
pressed. The green backlight will turn off after 5
seconds of inactivity and will turn on again any time a
button is pressed. The LCD screen will turn off after
approximately 30 minutes of inactivity and will turn on
again any time a button is pressed. You can manually
shut off the LCD screen by pressing and holding both
intensity level buttons simultaneously for a few
seconds. Be careful n t t accidentally change the
intensity level when shutting ff manually.
Turning the C llar Unit ON:
Press and hold the ON/OFF button. The SmartLED
Indicator will light solid red for one second. Release
the button when the SmartLED begins to flash. The
unit is now ON, and the SmartLED will flash
approximately every two seconds.
Turning the C llar Unit OFF:
Press and hold the ON/OFF button. The SmartLED
Indicator will light solid red for one second. Release
the button when the SmartLED begins to flash. The
unit is now OFF, and the SmartLED will no longer
flash.
NOTE
If the Transmitter attery Status icon is empty, or if the SmartLED
on the Collar Unit double-flashes red every other second while
ON, the unit will need to be recharged. If this happens soon after
a full charging session, the rechargeable batteries may need to be
replaced
.

14
T Test the Vibrati n and V+S:
A) Press the button on the left side of the transmitter
(Vibrate button) and the collar unit will vibrate only.
) Press the Vibration+Stimulation button on the front
of the transmitter (V+S utton) and the unit will
vibrate only for 1/2 a second. The tester will then
light while vibrating at the same time.
NOTE: efore testing, make sure that both units are fully
charged and the power to the Collar Receiver is “ON”.
T Test the Electr nic Stimulati n:
A) Place the tester firmly on the contacts
of the Collar Receiver.
) Set the intensity (note - an intensity
level setting of 4 or less might not be
enough to light the tester).
C) Push the ‘NICK’ or ‘STIMU.’ button.
D) The tester light will quickly flash once when the
Nick button is pushed and light repeatedly when the
Continuous Stimulation button is pushed (the test
light will be brighter at higher intensity levels).
TESTING
T Test the Jump:
A) Press the Jump button on the front of the transmit-
ter and test light brightness will reflect the user-
programmed Jump level (see page 19).
) The intensity level will return to its original setting
when the Jump button is released.
CAUTION: Always test the unit before placing the collar
unit on your dog to make sure your unit is in proper working
order. Do not test the unit while the collar is on your dog.

15
TESTING
T Test the Beeper:
(SPT 2430/2432 nly)
A) Press the top button located on the left side of the
transmitter (Locate button). The collar will beep
any time this button is pressed.
) Press the middle button on the left side of the
transmitter (Run/Point Mode button) to activate the
Run & Point mode. Press the button again to
change to Point Only mode. In the Run & Point
mode, the collar will beep every 4-5 seconds while
shaking the collar unit (simulating a dog on the
run), and every 1-2 seconds when keeping the
collar unit motionless (simulating your dog on
point). In the Point only mode, the collar will beep
only when the collar unit remains motionless.
C) Press the ’Locate’ button to cancel these modes.
NOTE:
If the collar unit is not responding to any signals
from the transmitter, the collar may need to be repro-
grammed to the transmitter (see page 16).
T Test the Range:
(NOTE: You will need someone to assist you. If you
are testing longer ranges, find a large, safe area with
clear line-of-sight. A 2-way communication device will
help when testing.)
A) Have one person control the Transmitter and other
person hold the collar unit with test light attached.
) Start moving apart and perform any of the previous
tests in this testing section.
C) Have a way to communicate results during testing.

16
PROGRAMMING THE COLLAR
If your current collar unit is not responding to the
transmitter, it may need to be reprogrammed to the
transmitter.
1. Select the desired Active Collar icon (’ LK’ or
’ORG’) on the Transmitter LCD screen.
2. Press and hold the power button on the Collar Re-
ceiver like the Collar Unit is being turned ON.
3. The SmartLED inside the Collar Receiver will light
up solid for about 1 second, followed by several
flashes. Do not let go of the button during this
step.
4. Continue to hold the button until the SmartLED
stays on solid. The Collar Receiver is now in the
Code Running Mode (the SmartLED will stay lit for
approximately 8 seconds while it is in this mode).
5. While the Collar Receiver is in the Code Running
Mode, press the NICK and CONT buttons on the
Transmitter simultaneously .
6. When the LED light blinks 3 times, the Collar ID is
programmed and the Collar Receiver is now ON.
NOTE – D n t release the butt n n the C llar
Receiver until after the SmartLED st ps flashing
and stays n s lid r the C llar Receiver will n t
g int the C de Running M de. The NICK and
CONT butt ns must be pressed simultane usly
while the SmartLED is lit s lid r the C llar Re-
ceiver will n t be pr grammed.

17
PROPERLY FITTING THE COLLAR
NOTE: Proper collar tightness and
position are very important to insure
safe and consistent collar use.
All electronic collars need to be
very snug around the dog’s neck
to work properly. They must be
just tight enough to allow the
“contacts” or electrodes to make
good contact on your dog’s skin.
If the collar is too loose, the
stimulation may not work properly because good/
consistent skin contact is not being achieved. This
can directly affect the performance of the collar unit
and whether or not the dog will receive the stimulation.
Always check for good contact to the skin if it appears
that your dog is not responding to the stimulation. A
loose collar can also result in skin irritations from
moving or rubbing too much against your dog’s neck
while they are running or training. A proper fit will help
prevent this from occurring.
•
Place the collar unit high and tight on your dog’s
neck with the collar receiver box centered below the
neck. Placing it at the wider base of the neck can
let it travel up to the narrower part of the neck while
your dog is moving, loosening as it goes.
•
It should be tight enough to fit two fingers between
the collar belt and your dog’s neck, but not tight
enough to restrict your dog’s breathing.

18
It is very important to set the correct intensity level on
your SPT 2400 series Training System before
beginning your training sessions to provide the proper
level of stimulation without over-stimulating your dog.
NOTE: All SPT collars have 50 intensity levels (1 is
the lowest and 50 the highest). The current Intensity
Level is shown on the LCD Display. To change
intensity levels at any time, simply press the Intensity
Level Up or Down buttons (on the right of the
transmitter). You can change the level one step at a
time by tapping the buttons, or you can rapidly change
levels by holding down a button.
1. Decrease the Intensity level so that the system is
set on Level 1.
2. Turn on the Collar and then fit it properly around
your dog’s neck (see page 17).
3. Press either the ‘NICK’ or the ‘STIMU.’ utton and
check for a reaction. Indications of your dog
feeling the stimulation include outward signs of
discomfort or confusion on it’s face, ears perking
up, changes in tail movements, etc.
4. Increase the Intensity Level in increments of one
until the dog feels the stimulation.
5. At this point, increase the Intensity Level by one or
two. This should be your dog’s ideal training level.
NOTE: S me d gs may require m re r less
stimulati n depending up n their individual
temperament and/ r size.
SETTING THE INTENSITY LEVEL

19
SETTING THE JUMP LEVEL
Jump stimulation is a great feature when regularly us-
ing two different stimulation levels in training. It is also
a great safety tool for emergency situations when your
dog is excited and cannot feel or ignores the normal
intensity level. Pressing the Jump button directly
rather than increasing the intensity level manually will
save precious time during these situations when your
dog may be heading towards imminent danger.
Setting the Jump Stimulati n Level:
1. Press and hold the “JUMP” button and an Intensity
Level uttons simultaneously (Intensity Up button
for increase, Intensity Down button for decrease).
2. Release only the Intensity Level button when ap-
proximate desired Intensity Level is met. Keep the
“JUMP” button depressed.
3. With the Jump button still depressed, you can now
tap the Up or Down Intensity Level button to fine
tune the level desired.
The Jump intensity setting will stay at this level until a
different Jump level is programmed. Changing your
normal intensity level will not affect the Jump setting.
When applying the Jump stimulation, the intensity
level will return to its normal setting when the Jump
button is released.
CAUTION
To avoid accidentally stimulating your dog, please make
sure that the collar is NOT on the dog while setting the
jump level. If the two buttons are not pushed at the EXACT
same time, you will run the risk of emitting a stimulation.

20
MAINTENANCE
It is very important to periodically clean your SPT 2400
Series
TM
systems for maximum performance.
Regular cleaning will also lengthen the life of your unit.
• Clean the collar box, belt and buckle with lukewarm
water and a mild anti-bacterial soap.
• Thoroughly clean the space between the electrodes
and the belt.
• Always allow the entire unit to completely dry before
charging/using.
NOTE
The Collar Unit should be rinsed with fresh, clean water
after use in wet conditions, especially salt water.
When storing your unit for extended periods of time:
• Do not store your unit with depleted batteries.
• Fully charge and test your unit about once a month.
• Do not store your unit in extreme temperatures.
• Store your unit in a dry environment.
CAUTION
Dispose of batteries properly by calling your local
waste service.
Battery Maintenance
To get the maximum performance and life out of your
rechargeable batteries:
• Use only the D.T. Systems charger provided with
your system.
• Unplug from charger once batteries have been fully
charged (d n t charge m re than 12 h urs).
This manual suits for next models
4
Table of contents
Other DT Pet Care Product manuals