Dualit DAB LITE RADIO Product information sheet

INSTRUCTION AND
GUARANTEE OF
THE DAB LITE RADIO
2008.03.18_DLR1GB_IB.qxp 19/03/2008 12:48 Page 1

2008.03.18_DLR1GB_IB.qxp 19/03/2008 12:48 Page 2

3
CONTENTS
DUALIT DAB LITE RADIO.................................
IN THE BOX.....................................................
SAFETY PRECAUTIONS....................................
QUICK START..................................................
KNOWING YOUR RADIO.................................
POWERING YOUR RADIO................................
USING MAINS POWER
INSERTING OR REPLACING BATTERIES
USING BATTERIES
CHARGE/LOW BATTERY STATUS LED
SETTING UP....................................................
ACCESSING CLOCK, ALARM & TIMER FUNCTIONS
SETTING THE CLOCK
SETTING THE ALARM
TURNING OFF THE ALARM OR SNOOZING
SETTING THE SLEEP TIMER (AUTO SHUT OFF)
SETTING THE EGG TIMER (COUNTDOWN)
LISTENING FOR THE FIRST TIME
CHOOSING DAB OR FM
DAB MODE.....................................................
SELECTING A STATION
MANUAL TUNING
CHANGING THE STATION LIST ORDER
FINDING NEW STATIONS
MAXIMISING SIGNAL STRENGTH
DISPLAY OPTIONS
USING YOUR RADIO IN A NOISY ENVIRONMENT
FM MODE....................................................... 17
TUNING INTO AN FM STATION
DISPLAY OPTIONS
STORING & RECALLING PRESETS................... 18
PRESETTING STATIONS (BOTH MODES)
AUTOSET PRESETS (DAB MODE ONLY)
RECALLING A PRESET STATION (BOTH MODES)
OUTPUTS....................................................... 19
HEADPHONE
BACKLIGHT
SERVICING & MAINTENANCE......................... 19
CLEANING
RECHARGEABLE BATTERY CARE
RESTORING FACTORY SETTINGS
TROUBLESHOOTING
DUALIT CUSTOMER HELPLINE
GUARANTEE
FUNCTION OVERVIEW................................ 23
4
4
4
5
6
8
10
13
2008.03.18_DLR1GB_IB.qxp 19/03/2008 12:48 Page 3

ALWAYS FOLLOW THESE SAFETY GUIDELINES AND
WARNINGS WHEN USING THE RADIO TO AVOID
PERSONAL INJURY OR DAMAGE TO THE RADIO.
• Do not plug the radio charger in before checking that
the voltage indicated on the power adaptor label is the
same as the mains voltage.
• Keep radio away from heat sources and direct sunlight.
• Do not place naked flames, such as lit candles, on or
near the radio.
• Use only the charger supplied to charge the batteries
or to use mains power.
• Insert batteries the correct way round as shown in the
battery compartment.
• Do not mix battery types, old and new batteries or
mAh values.
• Do not leave batteries in the radio if not being used for
a long period of time.
• Dispose of old batteries in an environmentally-friendly
manner.
• Do not handle a damaged or leaking battery. Contact
with the material can result in injury or burns to the
eyes or skin. Even if foreign substances are not
immediately visible, chemical changes in the material
can result in injuries at a later date.
Congratulations on purchasing your Dualit DAB Lite radio.
It will provide you with Dualit’s robust build quality, DAB
and FM listening functionality, and a deep, rich acoustic
sound plus a few extras courtesy of Dualit.
CAREFULLY READ ALL THE
INSTRUCTIONS BEFORE
USING THE RADIO.
KEEP THESE INSTRUCTIONS
IN A SAFE PLACE FOR
FUTURE REFERENCE.
DUALIT DAB LITE RADIO
IN THE BOX
SAFETY PRECAUTIONS
4
Before using the radio, please make sure the following
items are in the box:
••Dualit DAB Lite radio
••Cord and AC power adaptor with GB and EU plugs
2008.03.18_DLR1GB_IB.qxp 19/03/2008 12:48 Page 4

5
SAFETY PRECAUTIONS
• Do not use outside with charger.
• Allow a 3cm clearance around the radio housing when
in use.
• Inside the radio there are non-user serviceable parts.
• High volume listening through headphones can
damage hearing.
• Do not unscrew the casing or any other parts. This will
invalidate your warranty and is dangerous.
• When using batteries ensure the battery selector switch
is set correctly for the type of batteries you are using.
• Do not use the radio charger if the power cord is
defective.
• Always unplug the mains supply cord prior to cleaning
the radio and inserting or removing batteries.
• Never use liquid or aerosol cleaners or abrasive brushes
to clean the radio.
• To reduce the risk of fire or shock, do not expose the
radio or charger to water or moisture.
• This radio must not be cleaned with a water jet.
• It must not be exposed to steam or sand.
SAVE THESE INSTRUCTIONS
QUICK START
Want to tune in while you read the rest of the manual?
If you need help with 1 to 7 below, you’ll find more
information in the relevant section.
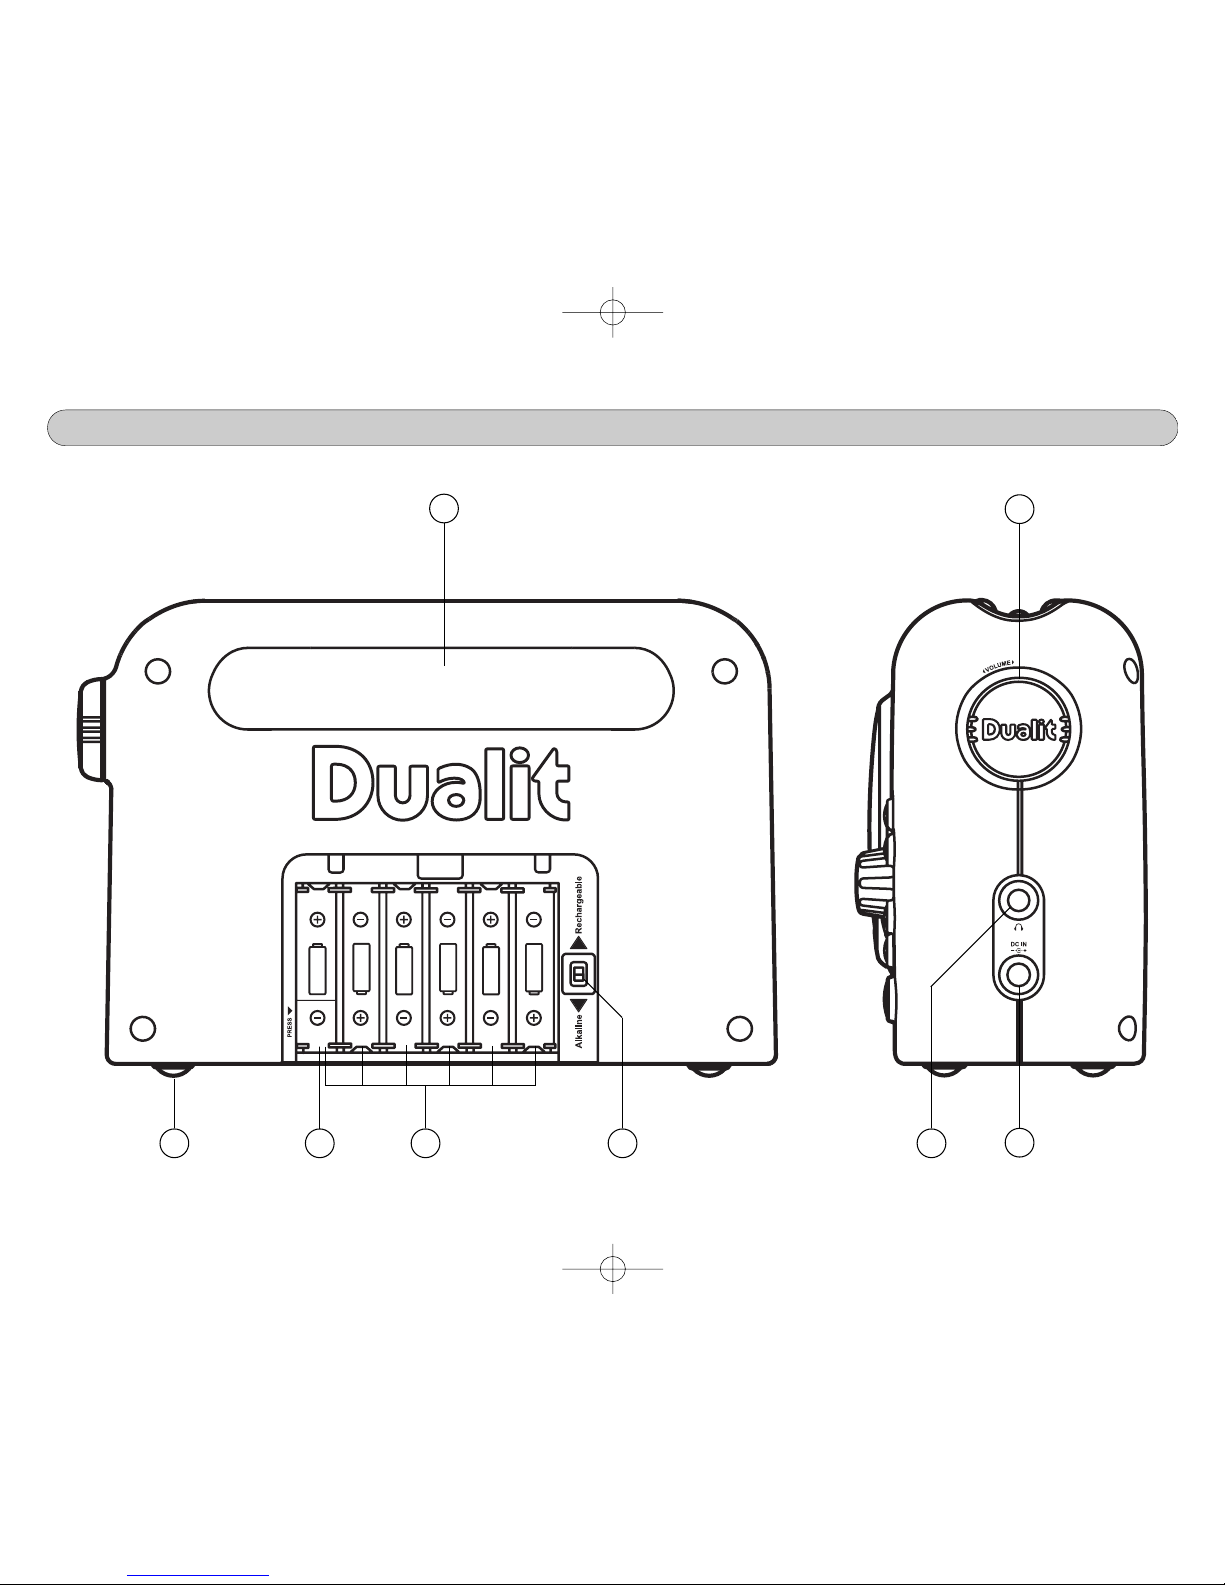
1. Plug in the adaptor or insert six batteries (alkaline or
rechargeable) to power your radio.
2. When using batteries ensure the battery
selector switch is set correctly for the type of
batteries you are using.
3. Extend the telescopic aerial.
4. Press the On/Off button. The radio will default to DAB
mode.
5. Your Lite radio will now perform a Quick Scan of
Band III DAB channels (first time of use only).
6. Turn the tuner knob to scroll through the stations and
press to select a station. Your chosen station will be
displayed on the LCD. Move the radio if necessary to
improve reception (this can be as little as 10 cm).
7. Adjust the volume using the volume knob on the
side.
Now sit back and enjoy while you explore all the other
functions of your Dualit Lite radio.
2008.03.18_DLR1GB_IB.qxp 19/03/2008 12:48 Page 5

6
KNOWING YOUR RADIO
Telescopic aerial
LCD screen
Preset shift
Presets (1 - 5)
Scan/autotune
Time/timer settings
Speaker
Change band
Information
Tuner knob
Power/battery status LED
Power ON/OFF
Carry handle
Volume knob
Non-slip feet
Battery ejector
Battery compartment
Rechargeable/alkaline battery
selector
Headphone socket
Power input for adaptor (DC IN)
1
2
3
4
5
SHIFT
SHIFT
BAND
BAND
INFO
INFO
TIMER
TIMER
SCAN
SCAN
1
2
3
4
5
6
7
8
9
10
11
12
21
18
17
16
15
13
14
3
4
5
6
7
8
9
10 11 12
19
20
2008.03.18_DLR1GB_IB.qxp 19/03/2008 12:48 Page 6

7
KNOWING YOUR RADIO
SHIFT
BAND INFO
TIMER SCAN
20
191817
13
15
14
16
2008.03.18_DLR1GB_IB.qxp 19/03/2008 12:48 Page 7

IMPORTANT: ENSURE THE BATTERY SWITCH INSIDE
THE BATTERY COMPARTMENT IS ALWAYS SET
CORRECTLY FOR THE BATTERIES YOU ARE USING.
••Make sure the radio is turned off and the AC power
adaptor is disconnected..Open the battery cover on
the back of the unit, It will remain attached to radio.
Flick the battery
switch to either
rechargeable or
alkaline,
depending on
the type of
batteries you
are using.
••Insert 6 x AA size batteries (either alkaline or NiMH
rechargeable, but do not mix battery types or mAH
values) into the spaces in the compartment,
put them in as shown in battery housing.
••To remove batteries, push down on the left hand
battery where it says PRESS. The top will tilt out
making it easy to remove.
8
POWERING YOUR RADIO
••Insert the power adaptor jack into the ‘DC in’ socket
on the right hand side of the radio. Plug the adaptor
into a mains plug socket.
••Whenever the adaptor is plugged into the radio and
switched on at the mains, the batteries are
automatically disconnected.
••The AC adaptor should be disconnected from the
mains supply and the radio when not in use,
but please note that this will erase all
alarm/timer functions you may have set.
USING MAINS POWER INSERTING OR REPLACING BATTERIES
SHIFT
BAND INFO
TIMER SCAN
ALIGN SLIDE LOCK REMOVE
••Select the correct plug type for your
region, either GB or EU plug.
Attach to the adapter body as
shown below. Ensure both sides
of the plug are aligned under the
grooves before locking into place.
or
GB EU
2008.03.18_DLR1GB_IB.qxp 19/03/2008 12:48 Page 8

9
POWERING YOUR RADIO
SHIFT
BAND INFO
TIMER SCAN
Your radio will take either alkaline batteries or NiMH
rechargeable batteries. If you anticipate using batteries on
a regular basis, then the use of rechargeable batteries is
recommended.
••Rechargeable batteries will automatically recharge
(fully charged in three hours) when your radio is
connected to the AC power adaptor, but turned off.
They will not recharge whilst the radio is
playing.
••Six new or fully charged batteries will provide
approximately 9 hours of listening (dependent on
volume level).
••A new rechargeable battery comes in a discharged
condition and must be fully charged before use.
On initial use (or after a prolonged period of storage)
the batteries may require three to four charge/
discharge cycles before achieving maximum capacity.
••To discharge, simply run the radio until it
completely discharges. Then recharge the
battery again. Failure to do so can significantly
shorten the battery's life.
USING BATTERIES
CHARGE/LOW BATTERY STATUS LED
••It is normal for a battery to become warm to the touch
during charging and discharging.
••We recommend that all batteries are taken out of the
radio if it is unlikely to be used for an extended period
of time. See page 20 for battery maintenance
information.
••If left in the compartment for a extended period of
time, or if the battery selector switch is set incorrectly
the battery may leak and become hazardous.
Use this table to determine the status of your batteries:
2008.03.18_DLR1GB_IB.qxp 19/03/2008 12:48 Page 9

ACCESSING CLOCK, ALARM & TIMER FUNCTIONS
SETTING UP
NOTE: TO USE THE TIME, DATE AND ALARM
FUNCTIONS YOUR RADIO MUST BE PLUGGED IN AT
THE MAINS. WHEN IT IS UNPLUGGED ANY STORED
SETTINGS WILL BE LOST.
The LCD will show time and date settings when the radio
is off but still connected to the AC power supply, or when
the radio is on and you have chosen to have time and
date on your display (see DAB or FM display options).
••To set clock, alarm, timer or sleep functions:
Press and hold TIMER for three seconds, turn TUNE to
scroll through functions and push to select.
The various options will be shown on the LCD display.
••To review status of the time settings:
Press TIMER once, turn TUNE to scroll through
functions and view the status of each.
There are four time functions:
1. clock, showing time and date.
2. alarm timer, with various options.
3. egg timer (countdown to a buzzer).
4. sleep timer (countdown to auto shut off).
10
SHIFT
BAND INFO
TIMER SCAN
The date, time and alarm functions are reviewed
and set using the TIMER and TUNER knob.
2008.03.18_DLR1GB_IB.qxp 19/03/2008 12:48 Page 10

SETTING THE CLOCK
SETTING UP
The radio will automatically set the clock when tuned into
a DAB station for approximately one minute, although in
certain areas you may have to tune into a ‘Digital One’
broadcast first.
You can also set the clock manually:
••Select ‘Set Clock’ (Page 10), turn the TUNE knob
clockwise or anti-clockwise to choose the relevant
hour, then press to select.
••You will now be able to choose and set the minutes.
Repeat this process to set the day, month and year.
••Once you have pressed in the TUNE knob to select
the year, the clock will be set. The display will show
the time and date when the radio is switched off and
mains power is connected.
••If you want to have the time and date showing whilst
the radio is playing, press the INFO button repeatedly
to scroll through the display options until the
bottom line of the LCD shows the time and date.
11
••After selecting ‘Set Alarm’ (page 10) turn the TUNE
knob clockwise or anti-clockwise to choose the
relevant hour, then press to select. Choose and set the
minutes in the same way.
••With the alarm time now set, turn the TUNE knob to
scroll through the mode options: DAB, FM radio or
buzzer.
Press the TUNE knob to select your preferred option.
••Now the alarm mode is set, cycle through the
frequency options: Once, Daily, Weekdays, Weekends
and Off.
Press in the TUNE knob to select the desired option.
Use the ‘Off’ option to deactivate an alarm setting you
no longer require.
••The alarm time, mode and frequency
are now all set. A bell symbol will
appear on the display when the alarm
is activated.
SETTING THE ALARM
SHIFT
BAND INFO
TIMER SCAN
2008.03.18_DLR1GB_IB.qxp 19/03/2008 12:48 Page 11

SETTING THE SLEEP TIMER (AUTO SHUT OFF)
TURNING OFF THE ALARM OR SNOOZING
SETTING UP
••To turn the alarm off when it comes on, press the
ON/OFF button. If you set the alarm frequency to
more than once (ie. daily, weekdays or weekends), it
will come on again at the same time on the
appropriate day.
••To activate Snooze mode, press any other button.
The alarm will go off again in five minutes.
The ‘bell’ will flash on the screen when snooze is
activated.
You can use Snooze mode for up to one hour with the
alarm set on radio, or half an hour with the alarm set
to buzzer. You can deactivate it using the ON/OFF
button.
12
We’ve included an ‘auto shut off’ which allows you to set
the radio to power down after you have gone to sleep.
••After selecting ‘Set Sleep’ (see page 10), turn the
TUNE knob clockwise or anti-clockwise to choose
how long you would like your radio to stay on for (up
to a maximum of two hours), then press to select.
The radio will automatically turn off when it has
counted down your required time.
Your Lite radio also has an ‘egg timer’ feature which allows
you to set it to count down to a buzzer.
••After selecting ‘Set Egg Timer’ (see page 10), turn the
TUNE knob clockwise or anti-clockwise to choose
how long you want the timer to count down (up to a
maximum of 99 minutes), then press to select.
The buzzer will automatically sound when it has
counted down your required time.
To turn off buzzer and return to radio listening, press
any button (except ON/OFF).
To turn off buzzer and radio, press ON/OFF button.
SETTING THE EGG TIMER (COUNTDOWN)
SHIFT
BAND INFO
TIMER SCAN
2008.03.18_DLR1GB_IB.qxp 19/03/2008 12:48 Page 12

LISTENING FOR THE FIRST TIME
SETTING UP
••The first time you use your Lite radio, a quick scan of
Band III DAB channels will be performed.
••The display will read ‘Fast Scanning’. The station
counter on the right hand side will increase as any new
stations are added to the radio’s station list and the bar
on the bottom will indicate progress.
If the station list is still empty after scanning, the
radio will display ‘No Signal’. If no station signals are
found, you may need to move your radio to a position
with better reception. As little as 10cm may be
enough.
••Pressing the BAND button will allow you to switch
between DAB and FM radio modes.
DAB (Digital Audio Broadcasting) offers digital sound
quality, added functionality and information.
FM offers a traditional analogue broadcasting medium
for those stations not yet using DAB.
13
••The top line of the display shows the name of the
station currently selected.
To select a new station, turn the TUNE knob to scroll
through the list of available DAB stations displayed on
the bottom line. Press the TUNE knob in to select the
station you require. The display may show ’Now
Tuning’ while the radio finds your new selection.
NOTE: IF AFTER
SELECTING A
STATION, THE
DISPLAY SHOWS
‘NOT AVAILABLE’, IT
MAY BE NECESSARY
TO MOVE THE RADIO
TO A POSITION WITH BETTER
RECEPTION.
SELECTING A STATION
CHOOSING DAB OR FM
DAB MODE
SHIFT
BAND INFO
TIMER SCAN
2008.03.18_DLR1GB_IB.qxp 19/03/2008 12:48 Page 13

CHANGING THE STATION LIST ORDER
MANUAL TUNING
DAB MODE
Manual tuning allows you to tune directly to the various
DAB Band III channels. UK DAB stations are located in the
range 11B to 12D.
••Press and hold the INFO button for three seconds
until ‘Station Order’ appears on the display. Turn the
TUNE knob until the display shows ‘Manual Tuning’
and press to select.
••Turn the tuner to find your desired frequency, then
press to select.
The open bar in the middle shows the minimum signal
strength needed for good DAB reception. The signal
strength bar will go up and down showing the
changing signal strength as you adjust the telescopic
aerial or move the radio around the room.
••As soon as a DAB signal is found, the display will show
the name of the DAB multiplex.
If you have selected a new radio station this will
automatically be added to the list stored in the radio’s
memory. Press the TUNE knob again to return to
normal tuning.
14
This feature allows you to change the order of the stations
listed in DAB mode. Press the INFO button and hold for
three seconds until ‘Station Order’ appears on the display.
Press the tuner knob in to select. There are 4 options:
••Fav station: Your 10 most popular stations are
listed first (in alphabetical order) followed by the
remaining stations (also in alphabetical order).
Fav to presets: Automatically sets the presets as
your favourite stations. This option will only become
available when ‘Fav station’ has been selected.
••Alphanumeric: Similar to alphabetical order, with
stations starting with 0 – 9 listed before ‘a, b, c…’.
••Active stations: Any station which failed to tune in
at the last attempt, or wasn’t found in the last scan is
marked as non-active (the station name is preceded by
a ‘?’ in the display). These are listed at the end, after
all the active stations.
••Prune: Removes all the non-active stations from the
list (use the ‘Scan’ feature to put them back if you
subsequently change locations).
2008.03.18_DLR1GB_IB.qxp 19/03/2008 12:48 Page 14

MAXIMISING SIGNAL STRENGTH
FINDING NEW STATIONS
DAB MODE
New stations may become available over time. You can
manually start an Autotune Scan by pressing the
SCAN button.
This will conduct a search of radio frequency signals and
automatically add any new stations to the memory. You
will see any new stations on the list when you rotate the
TUNE knob to select a station.
••To perform a scan of UK radio frequencies, press the
SCAN button and the display will show ‘Fast
Scanning’. Your radio will perform the same scan of
Band III DAB frequencies that it did when you first
switched it on. It will take about 20 seconds.
••If using the radio outside the UK, you will need
to perform a full scan of all Band III
frequencies. Press and hold the SCAN button
for three seconds, the display will show
‘Full Scanning’. This will take about one
minute.
15
DAB signal strength can vary greatly in different locations.
Use the signal strength indicator, to help position the radio
in the best position location.
••Press and release the TUNE knob until the display
shows the signal strength indicator.
••Move the radio around and carefully angle the
telescopic aerial to maximise reception, using the
signal strength bar display as a guide.
••The clear unfilled rectangle indicates minimum signal
level required for satisfactory reception; the higher the
number of solid rectangles the stronger the signal.
SHIFT
BAND INFO
TIMER SCAN
POOR
SIGNAL
GOOD
SIGNAL
VS.
2008.03.18_DLR1GB_IB.qxp 19/03/2008 12:48 Page 15

USING YOUR RADIO IN A NOISY ENVIRONMENT
DISPLAY OPTIONS
DAB MODE
In DAB mode, the radio offers seven display options. Keep
pressing the ‘INFO’ button to cycle through the various
options.
••Scrolling text – displays scrolling text message such
as artist/track name, phone in number, etc.
••Program type – displays type of station being
listened to e.g. Pop, Classic, News, Sport, etc.
••Multiplex name – displays name of multiplex broad
caster to which current station belongs eg.
BBC network.
••Time and date – displays current time and date eg.
12:00 25-12-2008.
••Station frequency – displays current station
frequency eg. 11D 222.06MHz.
••Audio type and bit rate – displays audio
information eg. 160kbps Stereo.
••Signal strength – displays current signal status.
16
Your Dualit Lite radio comes equipped with Dynamic
Range Control (DRC) to make it easier to hear when you
are in a noisy environment. With the radio on:
••Press and hold the ‘INFO’ button for three seconds
until the display shows ‘Station Order’.
••Turn the tuning knob until the display shows ‘DRC
Value’ and press to select. Turn the tuning knob to
scroll through the three DRC options:
DRC 0 (default – DRC is switched off and broadcast
DRC will be ignored).
DRC 1/2 (DRC level is set to 1/2 that sent by the
broadcaster).
DRC 1 (DRC is set as sent by the broadcaster).
••Press the TUNE knob to confirm the setting. The
display will return to normal tuning mode.
NOTE: NOT ALL DAB BROADCASTS USE THE DRC
FUNCTION. IF THE BROADCAST DOES NOT SUPPORT
DRC, THEN THE DRC SETTING IN THE RADIO WILL
HAVE NO EFFECT.
2008.03.18_DLR1GB_IB.qxp 19/03/2008 12:48 Page 16

DISPLAY OPTIONS
TUNING INTO AN FM STATION
FM MODE
You can scan up and down radio frequencies automatically
in FM mode.
••Press the SCAN button to start scanning up the radio
frequencies.
••The radio will stop when it finds a station with
sufficient signal strength. Keep pressing the SCAN
button until you reach the station you require.
••The display will show the station name if RDS (Radio
Data System) is available, or if not, its frequency.
••To scan down the radio frequencies, press and hold
the SCAN button for three seconds and repeat the
same process.
••When the waveband end is reached, the radio will
start scanning again from the opposite end of the
waveband.
••You can also tune your radio manually by rotating
the TUNE knob. The station frequency will be
displayed on the screen.
17
In FM mode, the radio offers four display options. Keep
pressing the INFO button to cycle through the various
options.
••Scrolling text – displays scrolling text message such
as artist/track name, phone-in number, etc. If the
station has no RDS service, display will
show ‘<Radiotext>’.
••Program type – displays type of station being
listened to e.g. Pop, Classic, News, Sport etc. If the
station has no RDS service , display will show
‘< Program Type >’.
••Time and date – displays current time and date
eg. 12:03 25-12-2008.
••Station frequency – displays current station
frequency eg. 101.9FM.
NOTE: WHEN TUNED INTO THE FM BAND,
ADDITIONAL INFORMATION IS ONLY DISPLAYED
WHEN THE RADIO IS ABLE TO RECEIVE RDS
INFORMATION FROM THE BROADCASTER.
2008.03.18_DLR1GB_IB.qxp 19/03/2008 12:48 Page 17

PRESETTING STATIONS (BOTH MODES)
STORING & RECALLING PRESETS
There are 10 memory presets in DAB mode and another
10 in FM mode. Presets 6-10 are accessed using the
SHIFT button before pressing presets 1-5.
••Tune to the required station as previously described.
••Press and hold
a preset button
(eg. 1) until the
display shows
‘Preset 1 saved’. The station will
be stored under the chosen
preset button.
For presets 6 to 10, press the
SHIFT button first, then hold a
preset button (eg. 1), the
display will show
‘Preset 6 saved’.
••Stations stored in the memories may be overwritten
any number of times by repeating this process. You
can also tune your radio manually using the TUNE
knob.
18
AUTOSET PRESETS (DAB MODE ONLY)
You can automatically set your DAB presets to your 10
most popular stations.
••Go to ‘Station Order’ and select ‘Fav station’ then
enter station order and select ‘Fav to presets’ option,
as shown on page 14. The 10 most popular stations
will automatically be set as your 10 presets.
••In either mode, press the required preset button and
the radio will tune to the station last stored in that
preset memory. The display will show the stored
station and its preset number.
••For presets 6 to 10, press ‘SHIFT’ before pressing
the required preset button e.g. to recall preset 6, press
the ‘SHIFT’ button and then preset ‘1’.
SHIFT
BAND INFO
TIMER SCAN
RECALLING A PRESET STATION (BOTH MODES)
2008.03.18_DLR1GB_IB.qxp 19/03/2008 12:48 Page 18

HEADPHONE
19
For private listening, connect headphones with a 3.5mm
connector to the socket on the right hand side of the
machine.
The radio speaker will then be muted so that all sound is
diverted through the headphones.
IMPORTANT: BEFORE PUTTING THE HEADPHONES
ON ALWAYS CHECK THE VOLUME LEVEL. YOU CAN
DAMAGE YOUR HEARING WITH PROLONGED
LISTENING AT HIGH VOLUME.
The display backlight will come on when any button is
pressed.
To conserve energy it will automatically go off after 12
seconds.
OUTPUTS
BACKLIGHT
CLEANING
••Unplug the radio and remove the batteries.
••Wipe the body with a soft cloth. Never use abrasives,
liquids, aerosol cleaners, brushes or scouring pads.
••For fast and easy cleaning with just water, use a micro
fibre cloth. Available from various retail outlets, these
cloths will clean all grease and dirt without smearing.
••This radio must not be immersed in water or cleaned
with a water jet.
SERVICING & MAINTENANCE
2008.03.18_DLR1GB_IB.qxp 19/03/2008 12:48 Page 19

SERVICING & MAINTENANCE
20
RESTORING FACTORY SETTINGS
If the radio fails to work properly or the display is showing
missing or incomplete letters and numbers, you may need
to restore factory settings. This will remove all favourites
and presets and restore the original factory settings.
NOTE: THIS CANNOT BE UNDONE.
••Press and hold down the ‘INFO’ button for three
seconds until ‘Station Order’ (DAB mode) or
‘Factory Reset’ (FM mode) are displayed.
In DAB mode you will need to turn the TUNE knob
until ‘Factory Reset’ is displayed. Press to select.
••A full reset will be performed and all presets, station
lists, time and alarm functions will be cleared.
••After a system reset, the radio will perform a
Quick Scan the first time you select DAB mode.
••In case of malfunction due to electrostatic discharge,
reset the radio (reconnection of power source may be
required) to resume normal operation.
RECHARGEABLE BATTERY CARE
There are a few simple steps you can take to insure that
you get maximum performance from your rechargeable
batteries:
••Break In new batteries - New batteries come in a
discharged condition and must be fully charged before
use. We recommended that you fully charge and
discharge the new battery three to four times to allow
it to reach its maximum rated capacity.
••Exercise the battery - Do not leave the battery
dormant for long periods of time. We recommend
using the battery at least once every two to three
weeks. If a battery has not been used for a long period
of time, perform the new battery break in procedure
described above.
••Battery storage - If you don't plan on using the
radio for a month or more, we recommend storing
the batteries outside the radio in a clean, dry, cool
place away from heat and metal objects. NiMH
batteries will self-discharge during storage; remember
to break them in before use.
2008.03.18_DLR1GB_IB.qxp 19/03/2008 12:48 Page 20
Other manuals for DAB LITE RADIO
1
Table of contents
Other Dualit Radio manuals