Ducar DGPW3200 User manual

Model: DGPW3200
Gasoline Pressure Washer
OPERATOR’S MANUAL

SAVE THIS MANUAL FOR FUTURE REFERENCE
This manual contains important information regarding safety, operation, and maintenance.
Introduction..............................................................................................................................................................................3
Safety Rules .............................................................................................................................................................................4
SafetySymbols.............................................................................................................................................................4
Safety Instructions .......................................................................................................................................................4
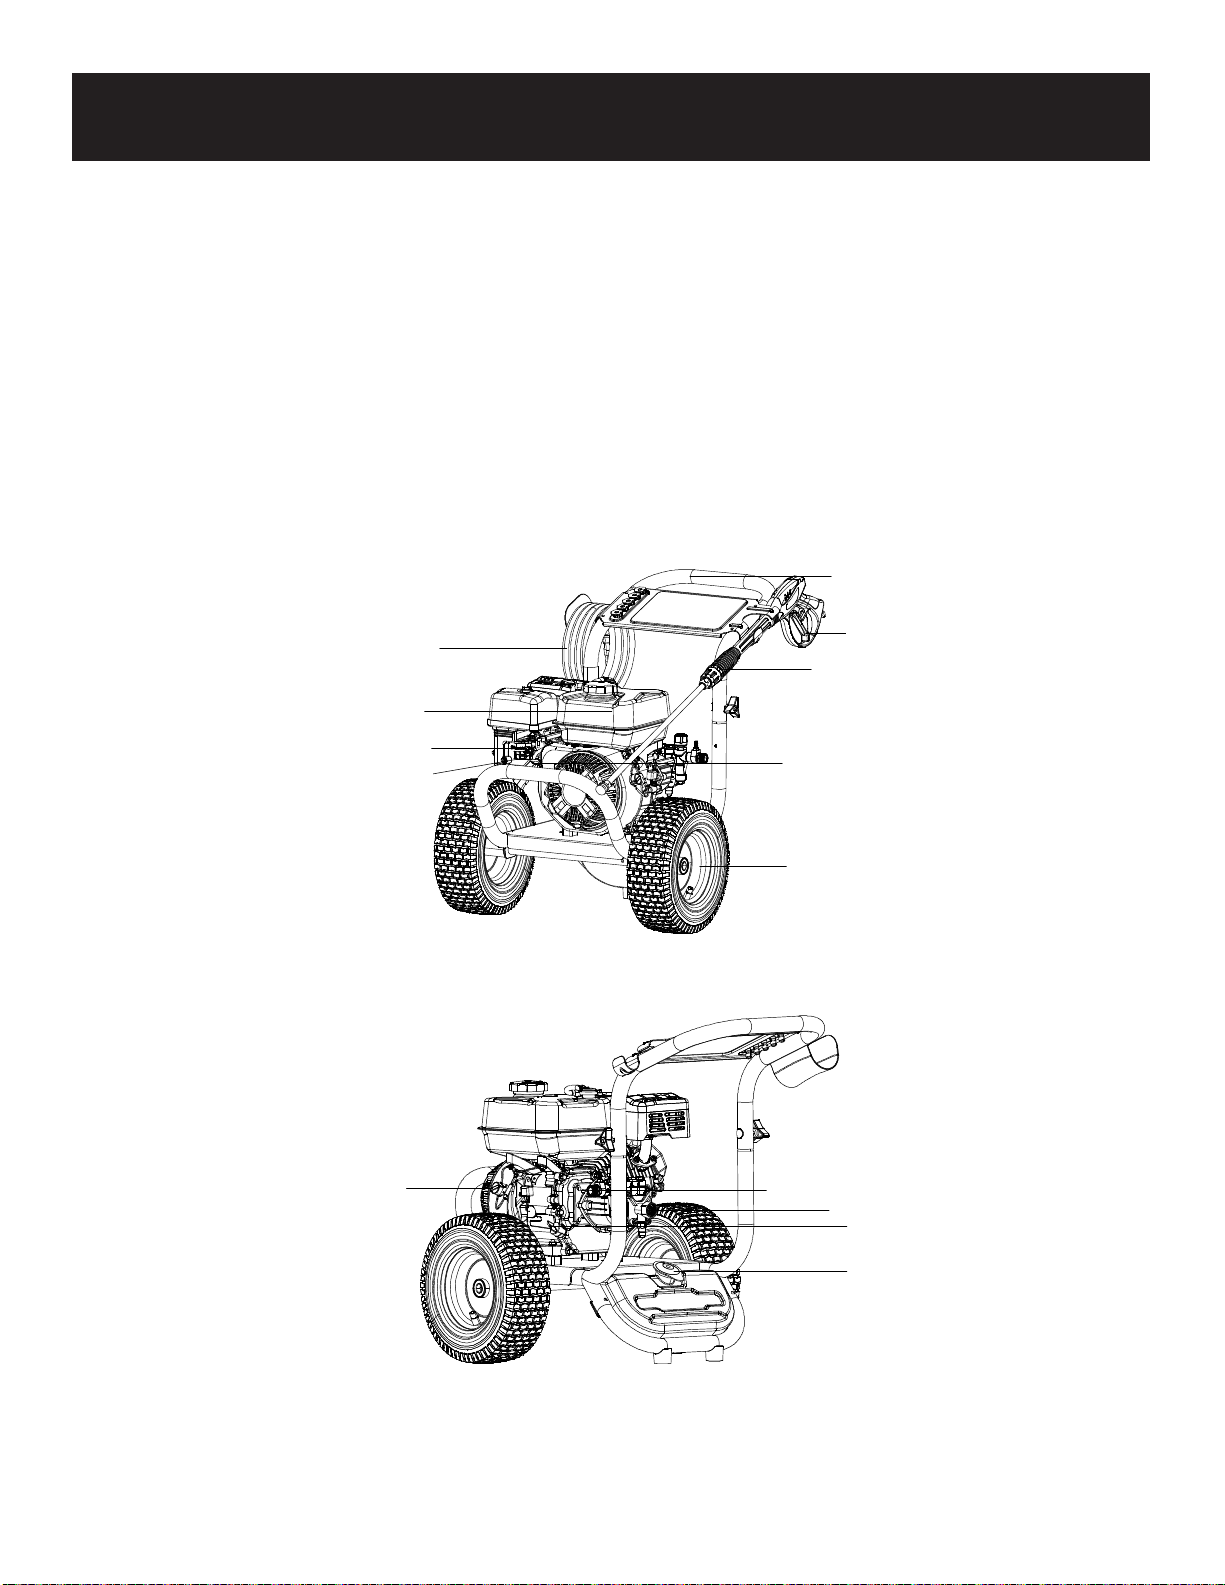
Pressure Washer Features .....................................................................................................................................................7
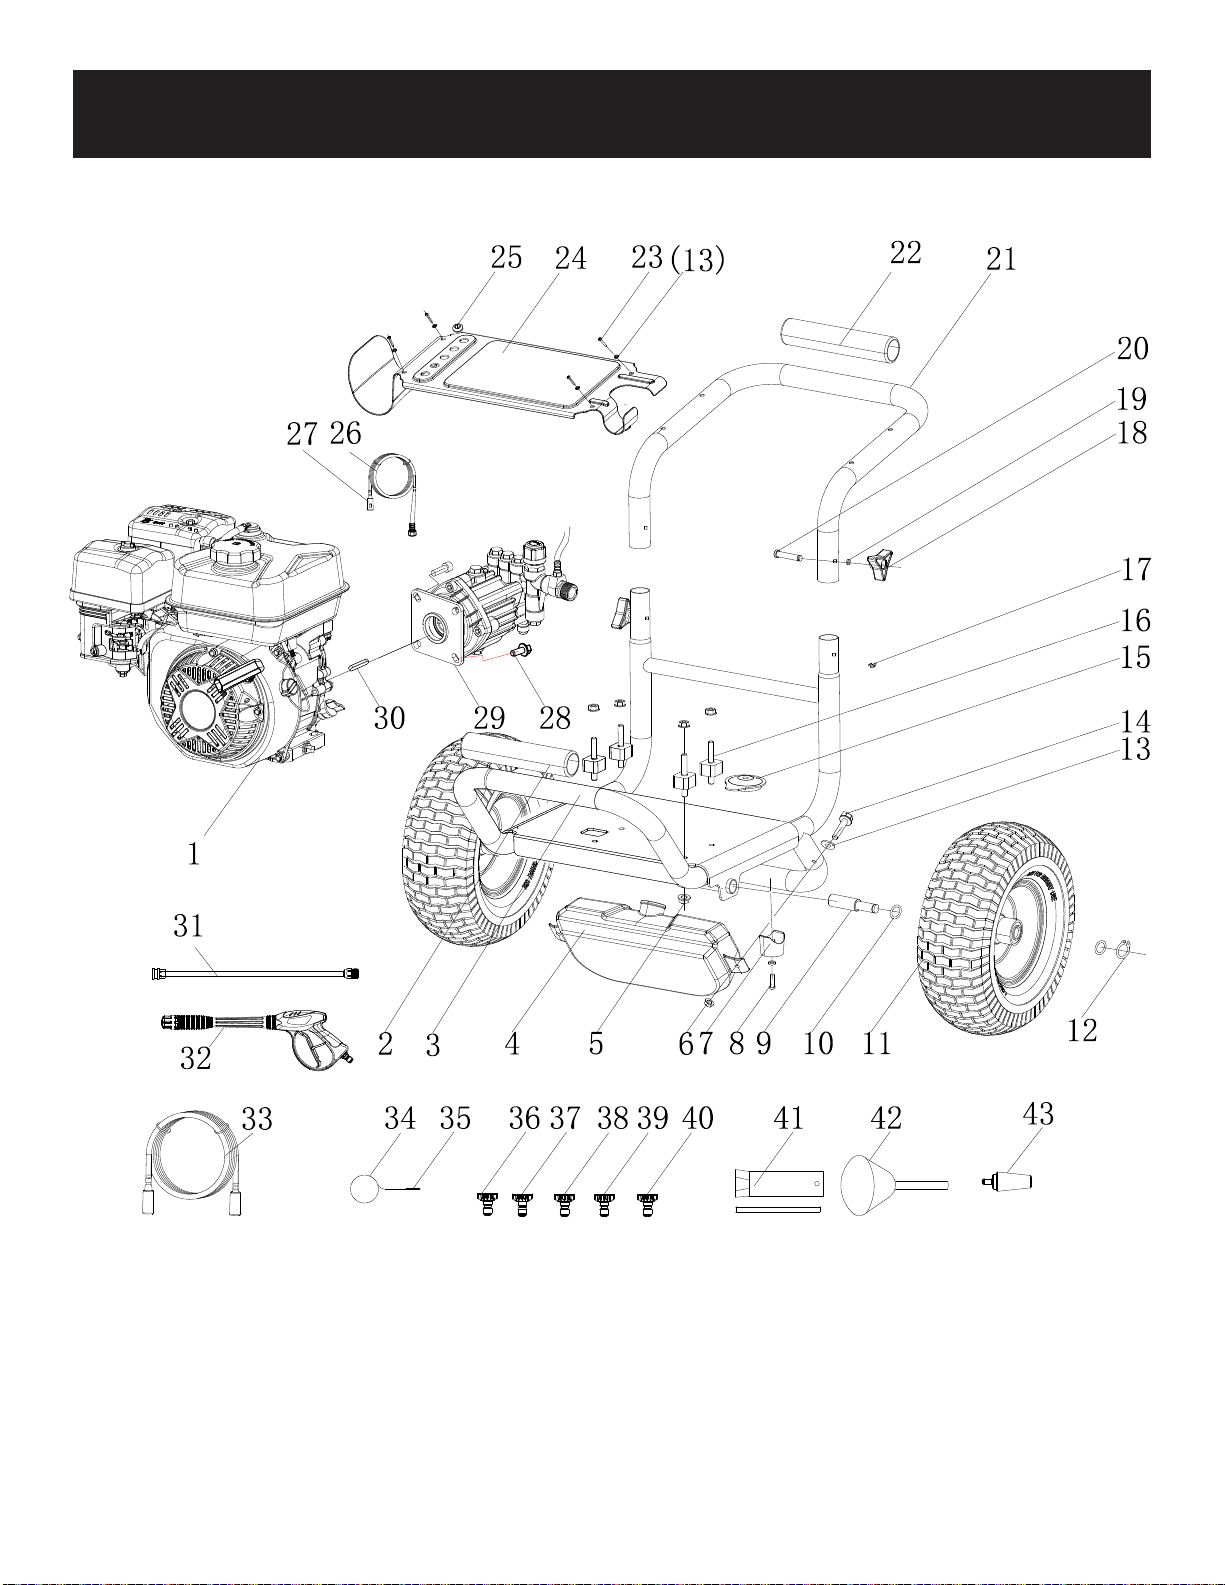
Pressure Washer Parts Assembly..........................................................................................................................................7
Pressure Washer Parts List ....................................................................................................................................................7
Assembly ...............................................................................................................................................................................10
Packing List ................................................................................................................................................................10
Unpacking...................................................................................................................................................................10
Attaching Foot Assembly............................................................................................................................................11
Install Handle..............................................................................................................................................................11
Attaching Upper and Lower Gun Hooks.....................................................................................................................11
Attaching Accessory Hook..........................................................................................................................................11
Attaching Spray Gun...................................................................................................................................................11
AddingEngineOilandFuel.........................................................................................................................................12
Operation................................................................................................................................................................................15
How to Start Pressure Washer ...................................................................................................................................15
How to Turn Off Pressure Washer ..........................................................................................................................16
HowtoUseSpray Gun ...............................................................................................................................................16
Using Spray Nozzle....................................................................................................................................................16
How to Apply Detergent ...........................................................................................................................................17
Maintenance ..........................................................................................................................................................................18
PreOperationSteps ...................................................................................................................................................18
After Each Use ...........................................................................................................................................................18
MaintenanceSchedule...............................................................................................................................................18
Changing Oil ..............................................................................................................................................................19
Engine Maintenance ..................................................................................................................................................19
How to Store .............................................................................................................................................................20
Troubleshooting ....................................................................................................................................................................21
TABLE OF CONTENTS
Diagrams ................................................................................................................................................................................22
Ec Declaration of Conformity ...............................................................................................................................................23
Warranty.....................................................................................................................................................................................3

3
INTRODUCTION
Thank you for purchasing this superior quality pressure washer from Ducar. When operating and maintaining this product
as instructed in this manual, your pressure washer will give you many years of reliable service.
ProductSpecifications:
Type DGPW3200
Rated Pressure 22 Mpa
Rated Flow 567 l/h
Max Water Inlet Temperature 50 ℃
Net Weight 35 kg
Max Inlet Water Pressure 0.55 Mpa
Detergent Tank Capacity 3 l
Engine Model DH212
Engine Displacement 212 cc
Engine Power 6.5 HP
No-Load Speed 3800 rpm
Load Speed 3400 rpm
Fuel Tank Capacity 3.6 l
Oil Capacity 0.6 l
The emissions control system for this pressure washer is compliant with all standards set by the Environmental Protection
Agency.
ProductApplications:
•This pressure washer is designed to remove dirt and mold from house siding, decks, garage floors, brick patios, and
cement walkways.
•This unit can be used to clean cars, motorcycles, boats, RV’s outdoor furniture, lawn equipment, and grills.
Shaft 19.05 mm
WARRANTY
Ducar power products are covered by a one-year limited consumer warranty.

Indicates a potentially hazardous
situation which could result in
seriousinjuryordeathifnotavoided.
WARNING!
CAUTION! Indicates a potentially hazardous
situation which could result in
damage to equipment or property.
Safety Symbols
Read and understand this manual in its entirety before operating this pressure washer.
Improper use of this pressure washer could result in serious injury or death.
WARNING!
Do not direct the jet against yourself or others in order to clean clothes or foot-wear.
WARNING!
Safety Instructions
This machine must be attended during operation. The manufacturer cannot anticipate every possible hazardous
circumstance that the user may encounter. Therefore, the Warning!s in this manual, on tags, and on affixed decals are not
all-inclusive. To avoid accidents, the user must understand and follow all manual instructions and use common sense.
SAFETY RULES
4
•Spray from this unit has extreme pressure and can ricochet back splashing water or propelling objects towards eyes.
•Never substitute eye protection with dry condition goggles.
WARNING!
This machine has been designed for use with the cleaning agent supplied or recommended
by the manufacturer. The use of other cleaning agents or chemicals may adversely affect
the safety of the machine.
WARNING!
Do not use the machine within range of persons unless they wear
protective clothing.
Slippery surface Risk of explosionRisk of fire
Risk of electric shock Hot surface Eye protection
Carbon monoxide
Never point the jet at
people, animals, the
device itself or live
electrical devices.
The unit is
not suitable
for use with
a drinking
water supply!
Safety footwear
•Pressure washer can create puddles and slippery surfaces. Never wear sandals, always wear protective footwear.
•Operate pressure washer from a level and stable surface.
•Do not operate from a ladder, scaffolding, or uneven surface as recoil from spray gun could cause you to fall.
•Do not over-extend yourself in attempt to reach a little further.

Never spray near a power source such as an electrical outlet. Making contact with
a power source could cause an electric shock or burn.
WARNING!
High pressure cleaners shall not be used by children or untrained personnel.
WARNING!
•Carbon monoxide gas is a poisonous, odorless gas that can cause headache, confusion, fatigue, nausea, fainting,
sickness, seizures, or death. If you start to experience any of these symptoms, IMMEDIATELY get fresh air and seek
medical attention.
•
WARNING! Do not use combustion engine powered machines indoors unless adequate
ventilation is assessed by national labour authorities.
SAFETY RULES
5
WARNING!
WARNING!
WARNING!
Water that has flowed through backflow preventers is considered to be non-potable.
WARNING!
For gas or oil-heated machines it is important to provide adequate ventilation and make
sure that the flue gases are properly discharged.
WARNING! Incorrect fuels shall not be used as they may prove hazardous
High pressure hoses, fittings and coupling are important for the safety of the machine. Use
only hoses, fittings and couplings recommended by the manufacturer.
WARNING! To ensure machine safety, use only original spare parts from the manufacturer or approved
by the manufacturer.
The machine shall be disconnected from its power source during cleaning or maintenance
and when replacing parts or converting the machine to another function.
WARNING! Do not use the machine if a supply cord or important parts of the machine are damaged,
e.g. safety devices, high pressure hoses, trigger gun.
WARNING! Ensure that any exhaust emissions are not in the vicinity of air intakes.
Never use indoors, in a covered area, or in a confined space, even if doors and windows are open.
Risk of explosion - Do not spray flammable liquids.
WARNING!

SAFETY RULES
6
WARNING! This machine can be used by people with reduced physical, sensory or mental capabilities
or lack of experience and knowledge if they have been given supervision or instruction
concerning use of the machine in safe way and understand the hazards involved.
•The high pressure stream of water produced can cut through skin and underlying tissue. Never squeeze the trigger or
point the spray gun at other people, animals, plants, or fragile objects such as glass, even if the engine is stopped.
•This unit is not a toy. Keep unit away from children and pets.
•Do not leave spray gun unattended while unit is running.
•Make sure the spray gun, nozzle, and accessories are attached correctly.
•Never attempt to repair high pressure hose, always replace.
•Never attempt to repair leaks with sealant, always replace O-ring or seal.
•Never attempt to connect or disconnect hose from pump or spray gun while system is pressurized.
•Always release water pressure from unit every time you stop the engine.
WARNING!
•Do not wear loose clothing or gloves.
•Remove jewelry or anything else that could be caught in moving parts.
•Tie back or wear protective head covering to contain long hair.
WARNING!
High pressure jets can be dangerous if subject to misuse. The jet must not be directed at
persons, live electrical equipment or the machine itself.
Moving parts can catch on clothing, jewelry, and hair.
•death.
•on the unit before starting the engine.
•Never smoke while operating or fueling this unit.
•
•
•When adding or draining fuel, unit should be turned off for at least 2 minutes to cool before removing fuel cap. If unit
has been running the fuel cap is under pressure, remove slowly.
•To keep fuel from spilling, secure unit so it cannot tip while operating or transporting.
•When transporting unit, disconnect the spark plug wire and make sure the fuel tank is empty with the fuel shutoff
valve turned to the off position.
WARNING!
alcohol, drugs, medication or you feel tired.
Stay alert and use common sense. Do not operate this unit if you are under the influence of
WARNING!
•
•Allow hot components to cool before touching.
WARNING! Avoid contacting hot areas of this unit.

PRESSURE WASHER FEATURES
7
A- High Pressure Hose
B- Fuel Tank
C- Choke
D- Fuel Valve Lever
E- Handle
F- Locking Trigger
G- Spray Gun
H- Pull Cord
I- No Flat Foam Filled Tiers
J- Engine Switch
K- High Pressure Hose Outlet
L- Water Inlet
M- Dipstick
N- Soap Tank
A
B
C
D
E
F
G
H
I
JKL
M
N

PRESSURE WASHER DGPW3200 PARTS ASSEMBLY
8

SPARE PARTS FOR THE DGPW3200 PRESSURE WASHER
9
NO. Description Qty
1ENGINE DH212 1
2FOAM GRIP 1
3FRAME 1
4SOAP TANK 1
5NUT M8 8
6NUT M6 2
7ANTI-VIBRATION MOUNT 2
8BOLT M6*30 2
9WHEEL SHAFT 2
10 FLAT WASHER 4
11 WHEEL 2
12 SNAP RING 2
13 WASHER,GOVERNOR ARM SHAFT 8
14 BOLT M6*45 2
15 SOAP TANK CAP 1
16 ENGINE MOUNT, VIBRATION ISOLATOR 4
17 CLIP 2
18 TRIANGULAR KNOB 2
19 FLAT WASHER 2
20 BOLT 2
21 HANDLE, FRAME 1
22 FOAM GRIP 1
23 BOLT M6*16 4
24 PANEL 1
25 NOZZLE HOLDER 5
26 SIPHON TUBE 1
27 SUCTION FLUID MESH 1
28 BOLT M8*20 4
29 WATER PUMP 1
30 FLAT KEY 1
31 WAND 1
32 SPRAY GUN 1
33 10M HOSE 1
34 NOZZLE CLEANER 1
35 SHEATH,NOZZLE CLEANER 1
36 0° NOZZLE (RED) 1
37 15° NOZZLE (YELLOW) 1
38 25° NOZZLE (GREEN) 1
39 40° NOZZLE (WHITE) 1
40 SOAP NOZZLE (BLACK) 1
41 SPARK PLUG SLEEVE 1
42 FUNNEL 1
43 ROTATING NOOZLE 1

ASSEMBLY
Packing List
•
•
•Pressure washer
•Spark plug wrench
•Operator’s manual
•Spray gun
Extension wand with quick-connect fitting High
pressure hose
•Spray nozzles (5) - 0°, 15°, 25°, 40° and soap nozzle
•funnel
•Nozzle cleaner
Do not attempt to assemble or operate this pressure washer until you have read and
understood this entire manual. If you have any problems assembling or operating this unit
WARNING!
Unpacking
1. Remove the high pressure hose from box.
2. After the high pressure hose has been removed, carefully open product by cutting down the sides of the box.
3. Remove the product, parts, and all accessories. Make sure all items listed on the packing list are included and not
damaged.
Do not operate this pressure washer if any of the parts are damaged or missing until the
part is replaced. Using this product with damaged or missing parts can cause damage to
the machine or result in serious injury or death.
WARNING!
10

ASSEMBLY
Install Handle (See fig 1 & 2)
•Install the wheel assembly into the frame sleeve on the side of the fuel tank. The wheel spring button is aligned with
the casing hole and pops out.
•Install upper frame (handle) onto the lower frame by sliding the handle over the two upright tubes on the lower frame
and pressing down firmly until the handle is seated and the two detent pins snap in place.
FIG 1
11
•Screw the spray wand and the trigger handle together until they are secure.
•nut on by turning clockwise until it is hand tight.
FIG 3FIG 4
Attaching the Spray Gun (See fig 3& 4)
FIG 2

ASSEMBLY
•Place pressure washer on a level surface.
•
•Carefully add between 520 ml (17.6 oz) of 4-Cycle engine oil (SAE10W30) to empty reservoir until oil reaches
•Be sure to replace both dipsticks before attempting to start the engine.
•To check oil, set pressure washer on a level surface, wipe dipstick clean, then reinsert dipstick without re-threading.
FIG 5
Adding / Checking Engine Oil (See fig 5)
•Set pressure washer on a clean and level surface in an area that is well ventilated.
•Remove fuel cap.
•Insert a funnel into the fuel tank and carefully pour gasoline into the tank until fuel level reaches 1 1/2 inches below the
top of the neck.
CAUTION!
CAUTION!
Adding Fuel (See fig 6)
FIG 6
12
To avoid spillage, fill below screen level. Do not overfill fuel tank as gasoline expands.

ASSEMBLY
•Run water through the hose for a few seconds to flush any debris from the hose.
•Inspect inlet screen and remove any debris.
•Connect hose to water inlet and tighten by hand. There must be a minimum of 10 feet of unrestricted hose between
pressure washer and faucet or shut off valve.
•Turn on water.
•Purge the system’s pump of air by releasing the safety and squeezing the trigger of the spray gun.
Do not run pump without connecting to the water supply and turning water on. Failure to
do so could damage the pressure washer. Failure to follow these instructions will void
product warranty. The unit is not suitable for use with a drinking water supply!
CAUTION!
Connecting Garden Hose to Pressure Washer (See fig8)
FIG 8
13
•Attach end of high pressure hose to the high pressure outlet on pump.
•Follow the same procedure with opposite end to attach high pressure hose to spray wand.
Connect High Pressure Hose to Pump (See Fig7)
FIG 7

Pre-Operation Check List
•Read and understand this operator manual in its entirety before operating pressure washer.
•Check oil level and add oil to the proper level if low.
•Check fuel level and add fuel if needed.
•Check connections of handle and all hoses to make sure they are secure.
•Check all hoses for kinks and damage.
Check flow of water supply and make sure it is adequate (2.8 - 5.6bar).
•
Do not run pressure washer with a damaged hose. Do not run pressure washer without
result. FAILURE TO FOLLOW THESE INSTRUCTIONS WILL VOID PRODUCT WARRANTY.
CAUTION!
Starting Pressure Washer (See Fig 9-10)
•Place pressure washer on a level surface.
•Turn on water.
•Make sure pump pressure adjustment is in the middle setting.
•Purge the system’s pump of air by releasing the safety and squeezing the trigger of the spray gun.
•Attach wand/lance to spray gun.
•Turn fuel valve to the ON position.
•Slide the choke lever to the “Choke” position.
•Turn the engine OFF/ON switch to the “ON” position.
•Holding the machine with your hand, pull the recoil handle (starter cord) slowly until resistance is felt, then pull rapidly. Squeeze
the Gun trigger and release the pressure after every failed attempt to start the pressure washer (This will reduce the back
pressure).
•Let engine run for several seconds and then gradually slide the choke lever to the RUN position as the engine warms up until the
choke is fully slid to the RUN position.
•Adjust pressure to the desired setting. Do not run the unit with the pump pressure adjustment set to maximum setting (button out).
OPERATION
•Carbon monoxide gas is a poisonous, odorless gas that can cause headache, confusion, fatigue, nausea, fainting,
sickness, seizures, or death. If you start to experience any of these symptoms, IMMEDIATELY get fresh air and seek
medical attention.
•
•
•When working in areas where vapors could be inhaled, use a respirator mask according to all of its instructions.
WARNING! from dissipating.
14
FIG 9FIG 10
ON
OFF
CHOCK
RUN
OFF ON

Stopping Pressure Washer (See Fig 11)
•Turn the on/stop switch to the OFF position.
•Turn the fuel valve to the OFF position.
•Turn off water and squeeze the trigger handle to release all water pressure.
OPERATION
•Always relieve pressure from spray gun before pulling starter cord, including every failed attempt to start engine.
•To avoid recoil, pull starter cord slowly until resistance is felt, then pull rapidly.
WARNING! Pull cord recoils rapidly and pulls arm towards engine faster than you can let go which
WARNING! Kickback forces result from pressing the trigger! Therefore, always hold the spray gun with
both hands! Pay attention to safe posture! Improper handling can lead to injuries!
could result in injury.
Using the Spray Gun (See Fig 12- 13)
•Flip the lock tab behind the trigger up or down until it clicks to apply or remove the safety. Pull back on the trigger to
begin operating pressure washer.
To stop water flow, release trigger.
•
FIG 12FIG 13
TRIGGER
SLOT
LOCK OUT
15
Using Spray Nozzle (See fig 14-15)
•To connect or disconnect spray tip, pull back on the quick-connect collar. Insert or remove spray tip then release collar.
•When spray tip is connected, pull on the spray tip to make sure it is secured.
•For general cleaning use the 40° spray tip. This option is for cement walkways.
FIG 11
ON
OFF

•For stripping, spot cleaning, blasting, and hard to reach areas use the 25° spray tip. This option is for removing paint,
rust, mildew, marine growth off boats, or grease stains. This option can be used for reaching second story surfaces, or
for the removal of paint, rust, oil stains, tar, gum, and other stubborn substances. Use extreme caution when using this
nozzle.
•For applying pressure washer safe detergent, use the black soap nozzle.
•The angle of the nozzles shown indicates the spray “fan shape” projected from the nozzle when the trigger of the spray
gun is pulled and high pressure water is passing through the nozzle. The pressure and flow will not change significantly
due to the various fan patterns (Nozzles).
OPERATION
FIG 15
SPRAY
WAND
NOZZLE
“CLICK”
FIG 14
Applying Detergent
•Rinse surface with cool water before applying cleaner.
•Prepare detergent as required by job. For best results follow detergent directions as supplied from manufacturer.
•Remove cap from detergent container and fill.
•Spray detergent on surface. For best results use long, even, and overlapping strokes. Allow detergent to set for about
3 minutes before rinsing, but do not allow detergent to dry on surface or it may cause streaking or cause damage to the
surface. Use good judgment.
•a bucket of clean water to remove detergent.
Only use mild, environmentally friendly detergents intended for use in pressure washers.
Ask at your specialist dealer about these special products. Never use aggressive chemicals
(eg bleach), abrasive detergents or similar to avoid damage to your health, the product and
the environment.
WARNING!
Avoid skin contact with detergents, in particular contact with eyes! If detergents gets in
your eyes flush your eyes with clean water and seek immediate medical attention!
WARNING!
Rinsing with the Pressure Washer
•
•Rinse from top to bottom using long, overlapping strokes.
Test a small area first to avoid surface damage.
Moving the Pressure Washer
•Turn the pressure washer off.
•Tilt unit towards you until it is balanced on its wheels.
•Roll machine to desired location. 16
0° 25° 40° Soap
15°

Regular maintenance will extend the life of this pressure washer and improve its performance. The warranty does not
cover items that result from operator negligence, misuse, or abuse. To receive full value from the warranty, operator must
maintain the pressure washer as instructed in this manual, including proper storage.
Before inspecting or servicing this machine, make sure the engine is off and no parts are
moving. Disconnect the spark plug wire and move it away from the spark plug.
Pre-operation Steps
Before starting the engine, perform the following pre-operation steps:
•Check the level of the engine oil and the fuel tank level
•
•Remove any debris that has collected on the pressure washer.
•
•
•Check water inlet screen for damage. Clean inlet screen if it is clogged.
•Check high pressure hose for damage.
•Check pump pressure adjustment : Make sure setting is in mid-way.
Briefly run garden hose to flush out any debris or insects.
Inspect the work area for hazards.
Remove Debris
•
•Use a damp cloth to wipe exterior surfaces. If dirt is caked on, use a soft bristle brush.
After Each Use
Follow the following procedure after each use:
•Shut off engine and turn off water supply. Release water pressure by pointing spray gun in a safe direction and
squeezing the trigger.
•Disconnect high pressure hose, spray gun, and nozzle. Drain water from items and use a rag to wipe down the outside
of the hose and spray gun.
•Empty the water from the pump by pulling the recoil starter 6 times.
•Store unit in a clean and dry area.
•Use of a pressure washer pump conditioner is recommended, follow the instructions provided by the manufacturer of
the pump conditioner.
WARNING!
MAINTENANCE
After First 5 Hours Change Engine Oil
After Each Use Check and Clean Water Inlet screen
Check High Pressure Hose
Check and Clean Detergent Siphoning Tube
Check Spray Gun for Leaks
Clean Debris
Check Engine Oil Level before starting
Annually (20 hr Use) Change Engine Oil (Service more often under dirty or dusty conditions)
Annually (50 hr Use) Check and CleanAir Filter
Annually (100 hr Use) Service or Replace Spark Plug
Maintenance Schedule
17

High Pressure Hose
•Inspect hose for cuts, bulges, or leaks which can develop from kinking or wear. If damage is found, immediately replace
hose.
•Inspect couplings for damage. Immediately replace hose if damage is found.
Spray Gun
•Make sure the spray gun is connected securely.
•Inspect the spray gun safety and make sure the spray gun trigger springs back upon release.
Spray Nozzle
If a pulsing sensation is felt while squeezing the trigger, the spray nozzle may be dirty or clogged and should be cleaned
immediately.
•To clean the nozzle, shut off the engine and turn off the water.
•Remove the nozzle from the spray wand making sure that the nozzle is pointing away from you and in a safe direction.
•Use the nozzle cleaner or a small paper clip to dislodge any foreign materials which are clogging or restricting the
spray tip.
•
•Reconnect the nozzle to the spray wand.
•Turn the water supply back on and start engine.
Never repair high pressure hose or use unit if hose is damaged. If hose is damaged replace
with identical Ducar part.
WARNING!
MAINTENANCE
Changing Engine Oil
Engine oil will drain better if the engine is still warm, but not hot.
•Shut off engine.
•
•Place an oil pan on the ground to catch oil. Remove oil plug then tilt pressure washer back and to the side to empty out
Oil Drain Plug
the oil from the crankcase.
•engine with new oil as instructed earlier in this manual underAdding/Checking Oil.
Once oil is completely drained, return the pressure washer to a level position and install the oil drain plug. Refill the
Clean the area around the oil fill cap/dipstick to keep out debris then remove oil fill cap/dipstick.
Checking Detergent Siphoning Tube
•Check the detergent siphoning tube for clogs, leaks, or tears.
•
•Replace siphoning tubes if damaged.
18
Nozzle Cleaner

Checking Spark Plug
•Disconnect the spark plug wire from the spark plug.
•Before removing the spark plug, clean the area around its base to prevent debris from entering the engine.
•Clean carbon deposits off the electrode with a wire brush.
•Check the electrode gap and slowly adjust to 0.80mm (0.031in.) if necessary.
•Reinstall spark plug and tighten to Torque 22.0 – 26.9 Nm (16-20 ft-lb).
•Reconnect spark plug wire.
•If spark plug is worn replace only with an equivalent replacement part. Spark plug should be replaced annually.
Repairing Leaking Connections
•Purchase O-Ring / Maintenance kits through the nearest authorized service center and follow instructions provided with
kit.
Air Filter
•
•
•
•.
.
WARNING!
Storing Pressure Washer
If storing pressure washer for 30 days or more follow the procedures below:
•Add fuel stabilizer to gasoline to keep gasoline from going stale and to prevent gum deposits from forming on the
carburetor. Run engine for a couple of minutes to circulate the fuel stabilizer.
•Add PumpSaver to protect pump from freezing or damage caused by mineral deposits.
•
•Disconnect the spark plug wire and clean the spark plug. Leave spark plug wire disconnected.
•
•Cover unit with a suitable protective cover to keep unit dry.
•Store unit in a frost-free area.
MAINTENANCE
•Never attempt to repair high pressure hose, always replace.
•Never attempt to repair leaks with sealant, always replace O-ring or seal.
WARNING! Water pressure produced by this unit can cut through skin and tissue leading to serious
injury and possible amputation.
19

Engine does not start 1. Out of fuel
2. Engine oil low
3. Spark plug wire disconnected
from spark plug
4. Bad spark plug
5. Spark plug wire has shorted
6. Ignition inoperative
1. Fill fuel tank
2. Add engine oil
3. Connect spark plug wire
4. Replace spark plug
5. Contact service center
6. Contact service center
1. Stale fuel or water in fuel
2. Spark plug producing weak spark
3. Excessively rich fuel mixture
1.
1. gasoline.
2. Contact service center
3. Contact service center
1.
Engine hard to start
Engine lacks power and vibrates
excessively
1. Out of fuel 1. Fill fuel tank
Engine quits during operation
PROBLEM CAUSE SOLUTION
1. Engine speed is too slow 1. Move throttle to fast. If this does
not correct problem, contact
service center.
Engine loses power when load is
added
Water pressure is weak 1. Water supply is restricted.
2. Water not turned on to full power
3. Not using high pressure nozzle
1. Inspect garden hose for kinks or
leaks. Make sure you are using
a large enough garden hose
(min. ¾ inch diameter)
2. Open water source all the way.
3. Change nozzle
TROUBLESHOOTING
Detergent and spray do not mix 1. Detergent hose is not submerged
or has disconnected
2. Black soap nozzle needed
1. Make sure hose is connected
2. Install soap nozzle
and submerged in the detergent.
Pump fails to produce pressure or
pressure is inconsistent 1. Water supply is restricted
2. Water not turned on full power
3. Nozzle is clogged
4. Spray gun leaks
5. Air in line
6. Inlet hose screen is clogged
7. Water supply is over 100°F
8. Pump is faulty
1. Inspect garden hose for kinks or
leaks. Make sure you are using a
large enough garden hose (Min.
¾ inch diameter)
2. Open water source all the way.
3. Clean nozzle
4. Check spray gun connection or
replace spray gun
5. Squeeze trigger handle to
remove air
6. Clean inlet
7. Use cool water supply
8. Contact service center
20
Table of contents
Other Ducar Pressure Washer manuals