Duke READYFLEX RFDU 22 User manual

P/N 229399
REV E 03/15/2022
MODELS
RFDU 22
RFDU 23
U.S. and Foreign Patents Pending
This manual is Copyright © 2021 Duke Manufacturing Co. All rights reserved.
Reproduction without written permission is prohibited. Duke is a registered
trademark of the Duke Manufacturing Co.
CAUTION: Please read this manual completely before attempting
to install, operate or service this equipment
Installation and
Operation Manual
WARNING for CA residents: go to www.dukemfg.com/prop65 for prop 65 warning

RFDU Operator’s Manual
2
TABLE OF CONTENTS
TO BE UPDATED
Manufacturer’s Introduction........................................................................................................................................3
Important Safety Instructions.................................................................................................................................. 4-5
Installation.......................................................................................................................................................................6
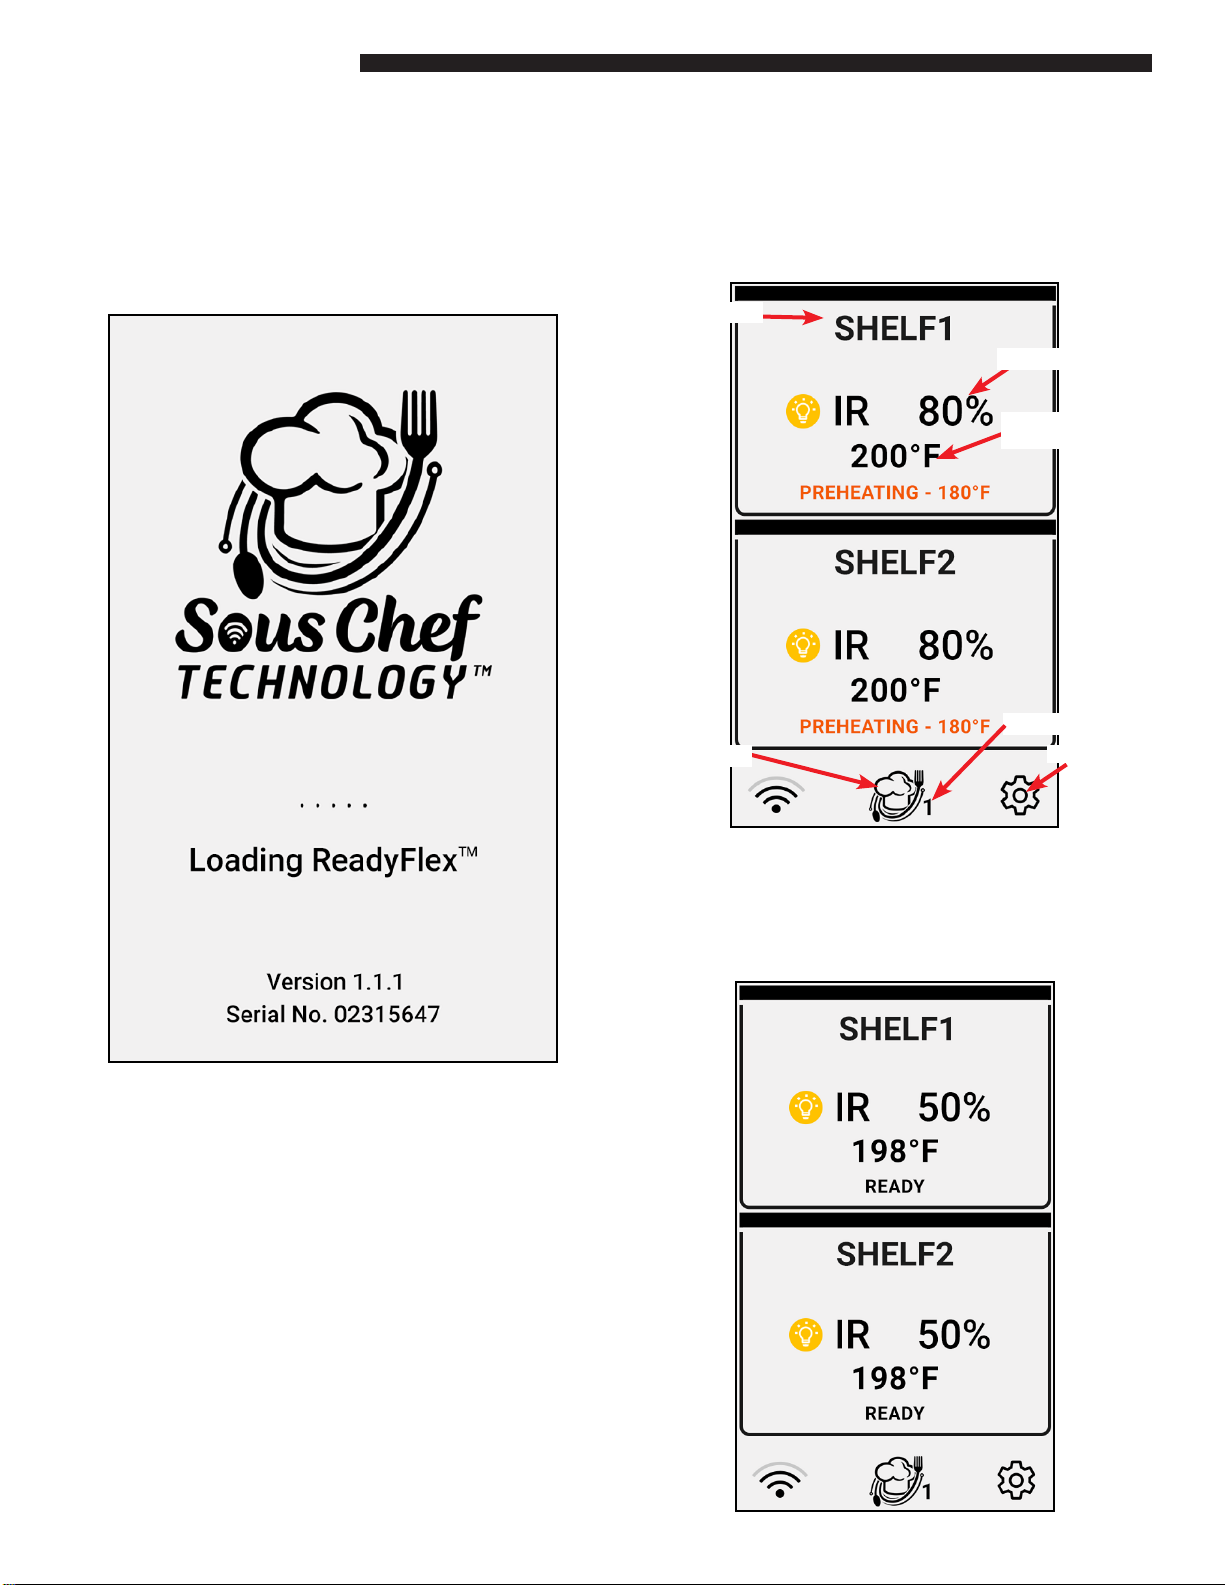
RFDU Operating Instructions.......................................................................................................................................8
Overview ............................................................................................................................................................................................. 8
Preheating .......................................................................................................................................................................................... 9
Faults..................................................................................................................................................................................................... 9
RFDU Daypart Menu ....................................................................................................................................................................... 9
Settings ..........................................................................................................................................................................10
Menu..................................................................................................................................................................................................10
Temp Mode.......................................................................................................................................................................................10
PHU Congurator...........................................................................................................................................................................10
RFDU Recipe Editor........................................................................................................................................................................11
Language ..........................................................................................................................................................................................11
Help.....................................................................................................................................................................................................11
About..................................................................................................................................................................................................12
Tools Menu........................................................................................................................................................................................12
Network .............................................................................................................................................................................................12
PHU Volume .....................................................................................................................................................................................15
Temperature Display .....................................................................................................................................................................15
Managers Menu..............................................................................................................................................................................15
Access.................................................................................................................................................................................................16
Temp Oset ......................................................................................................................................................................................16
IRDC Period.......................................................................................................................................................................................17
Sous Chel Technology Programming........................................................................................................................18
USB Programming........................................................................................................................................................19
Cleaning Guide .............................................................................................................................................................21
Temperature Check Procedure ..................................................................................................................................23
RFDU Specication.......................................................................................................................................................24
Wire Diagrams ..............................................................................................................................................................25

3
RFDU Operator’s Manual
MANUFACTURER’S INTRODUCTION
The ReadyFlex™ Display Unit (RFDU) delivers unsurpassed culinary performance for a broad variety
of food products in a exible, easy to use, easy to learn, adaptable format thus addressing the
needs of the restaurant operations and protability.
The Duke ideal holding curve, the DNA of the RFDU, has been developed, improved, and rened
since Duke introduced the rst product holding unit in 1999. Utilizing the innovative top and
bottom heat, extended hold times with improved food quality and consistency are achieved.
With the ReadyFlex™ Display Unit, you can oer new menu items without limitation on how to
hold them; change your recipes and hold congurations by daypart; from breakfast to lunch to
dinner. Independent top and bottom heat zones are programmable to dial in perfect recipes for
any food….no compromises.
The ReadyFlex™ Display Unit can hold 6 full-size sheet pans.
The easy to use, easy to learn touchscreen user interface is visual, smart, intuitive and colorful. In-
store control and programming is easy and fast - change to stored library recipes or program new
ones on the y. Daypart switching is simple and pre-programmed.
ReadyFlex™ Technology is ready to connect when (and if) you are. RFDU has built-in Wi-Fi,
Ethernet, USB and Mesh networking and connectivity to Bluetooth enable devices. RFDU is ready
to interact with 3rd party cloud and on-premise solutions.

RFDU Operator’s Manual
4
Throughout this manual, you will nd the following safety words and symbols that signify
important safety risks with regards to operating or maintaining the equipment.
Indicates a hazardous situation which, if not avoided, could
result in death or serious injury.
CAUTION
Indicates a hazardous situation which, if not avoided, could
result in minor or moderate injury.
CAUTION
Indicates Important Information
Indicates electrical shock hazard which, if not avoided, could
result in death or serious injury and/or equipment damage.
Indicates hot surface which, if not avoided, could result in
minor or moderate injury.
In addition to the warnings and cautions in this manual, use the following guidelines for
safe operation of the unit.
• Read all instructions before using equipment.
• For your safety, the equipment is furnished with a properly grounded cord connector. Do
not attempt to remove or disconnect the grounded connector.
• Install or locate the equipment only for its intended use as described in this manual.
• Do not use corrosive chemicals on this equipment.
• Do not operate this equipment if it has a damaged cord or plug, if it is not working
properly, or if it has been damaged or dropped.
• This equipment should be serviced by qualied personnel only. Contact the nearest
Duke authorized service facility for adjustment or repair.
• Do not block or cover any openings on the unit.
• Do not immerse cord or plug in water.
• Keep cord away from heated surfaces.
• Do not allow cord to hang over edge of table or counter.
IMPORTANT SAFETY INSTRUCTIONS

5
RFDU Operator’s Manual
IMPORTANT SAFETY INSTRUCTIONS
The following warnings and cautions appear throughout this manual and should be
carefully observed.
• Turn the unit o, disconnect the power source and allow unit to cool down before
performing any service or maintenance on the unit.
• The procedures in this manual may include the use of chemical products. You must read
the Material Safety Data Sheets before using any of these products.
• The unit should be grounded according to local electrical codes to prevent the
possibility of electrical shock. It requires a grounded receptacle with dedicated electrical
lines, protected by fuses or circuit breaker of the proper rating, in accordance with all
applicable regulations.
• Disposal of the unit must be in accordance with local environmental codes and/or any
other applicable codes.
• This appliance is not intended for use by persons (including children) with reduced
physical, sensory or mental capabilities, or lack of experience and knowledge, unless
they have been given supervision or instruction concerning use of the appliance
by a person responsible for their safety.
• Contains Transmitter Module FCC ID: 2AQ2Q-MUR1LVUFL
• Contains Transmitter Module IC: 27013-MUR1LVUFL
• This device complies with part 15 of the FCC Rules. Operation is subject to the following
two conditions:
1. This device may not cause harmful interference, and
2. This device must accept any interference received, including interference that may
cause undesired operation.
• This equipment complies with radiation exposure limits set forth for an uncontrolled
environment. This equipment should be installed and operated with a minimum
separation distance of 20cm between the radiator (enclosed antenna) and your body.
• This device is granted for use in Mobile only congurations in which the antennas used
for this transmitter must be installed to provide a separation distance of at least 20cm
from all person and not be co-located with any other transmitters except in accordance
with FCC and Industry Canada multi-transmitter product procedures.
• Changes or modications not expressly approved by the party responsible for
compliance could void the user’s authority to operate the equipment.

RFDU Operator’s Manual
6
UNPACKING UNIT
Inspect the shipping carton and/or container, carefully noting any exterior damage on the delivery receipt;
also note any damage not evident on the outside of the shipping container (concealed damage). Contact
the carrier immediately and le a damage claim with them. Save all packing materials when ling a claim.
Freight damage claims are the responsibility of the purchaser and are not covered by the warranty.
• Follow the instructions on the Carton Box for unpacking the unit.
• Inspect unit for damage.
• Report any dents or breakage to source of purchase immediately.
• Do not attempt to use unit if damaged.
• Remove all materials from unit interior.
• If unit has been stored in extremely cold area, wait a few hours before connecting power.
INSTALLATION CODES AND STANDARDS
In the United States, the RFDU must be installed in accordance with the following:
1. State and local codes.
2. National Electrical Code (ANSI/NFPA No. 70, latest edition) available from the National Fire Protection
Association, Batterymarch Park, Quincy, MA 02269.
3. Vapor Removal from Cooking Equipment, (NFPA-96, latest edition) available from NFPA.
4. Sealed to the counter upon which the equipment is placed per NSF/ANSI 4 standard.
In Canada, the RFDU must be installed in accordance with the following:
1. Local codes.
2. Canadian Electrical Code (CSA C22.2 No. 3, latest edition) available from the Canadian Standards
Association, 5060 Spectrum Way, Mississauga, Ontario, Canada L4W 5N6.
UNIT PLACEMENT
• Do not install unit next to, below or above source of heat such as oven or deep fat fryer.
• Install unit on level counter top surface.
• Outlet should be located so that plug is accessible when the unit is in place.
• Do not install unit in the direct path of
air-conditioned airow.
INSTALLATION

7
RFDU Operator’s Manual
The following minimum clearances must be maintained between the warmer and any combustible or non-
combustible substance:
Proper airow around unit will cool the electrical components. With restricted airow, the unit may not
operate properly and the life of the electrical components may be reduced. A 2”clearance is recommended
at the control side for longer control life expectancy.
ELECTRICAL SHOCK HAZARD UNIT MUST BE SAFETY GROUNDED, EARTHED.
DO NOT MODIFY, DEFEAT ELECTRICAL CONNECTIONS.
ELECTRICAL CONNECTIONS
BEFORE CONNECTING THE UNIT TO THE POWER SOURCE, VERIFY THAT THE
VOLTAGE AND PHASE OF THE POWER SOURCE ARE IDENTICAL TO THE VOLTAGE AND
PHASE INFORMATION ON THE DATA LABEL.
EARTHING INSTRUCTIONS
Connection of the unit to the mains supply MUST be performed by an authorized person in accordance
with codes, standards, and laws governing the installation site using properly rated all poles mains
protection, all poles mains disconnects, safety ground earthing, and shall be a minimum of 48” (1.2 meter)
long to allow the equipment to be moved for cleaning.
USA and non-EU Countries must use exible conduit within variances that may be required by local electric
codes or regulations. European Union (CE) installations must use HO7RN-F, 5G 2,5mm exible cordage.
The Mains Supply safety / earth ground wire must be longer than mains conductors at the unit’s
interconnections to prevent stress under pull.
EXTERNAL EQUIPOTENTIAL
Terminal provides a connection for bonding to equipment enclosure.
Unit Clearance
Right Side 2”
Left Side 2”
Rear OPEN
Floor 0”
INSTALLATION

RFDU Operator’s Manual
8
RFDU OPERATING INSTRUCTIONS
When the ReadyFlex™ Display Unit is turned on the
boot screen will appear rst for 2 or 3 seconds. This
will display the Duke Logo along with the rmware
version number of the RFDU.
RUNTIME SCREEN
After the RFDU has loaded the runtime screen will
load. Dierent types of information are found on
the runtime screen. Details below.
When the unit rst boots each well will contain a
preheating icon. This indicates the well is heating
to temperature. When the recipe temperature is
reached the preheat icon will clear and the well will
be ready for use.
OVERVIEW
Recipe Name
Current Recipe
Top IR Duty Cycle
Bottom Heat
Setpoint
Menu Selector Setting Icon

9
RFDU Operator’s Manual
PREHEATING
RFDU OPERATING INSTRUCTIONS Continued
When the RFDU rst boots each well will contain a
preheating icon. This indicates the well is heating
to temperature. When the recipe temperature is
reached the preheat icon will clear and the well will
be ready for use.
FAULTS
On occasion faults may occur on the RFDU. If a fault
occurs an indicator will appear on the well.
1. Bottom Heater High Temperature Fault
2. Bottom Heater Low Temperature Fault
3. CAN Error Fault
Each fault will display an indicator that is unique for
the top of fault that has appeared.
To choose another menu, select the Menu
Selector. This will display the Menu screen.
Select another Menu number and then back to
the runtime screen.
1– Breakfast 2– Lunch 3– Dinner
RFDU DAYPART MENU
BOTTOM HEATER HIGHBOTTOM HEATER LOW
CAN ERROR

RFDU Operator’s Manual
10
SETTINGS
Several Settings are available on the RFDU. To enter the Settings menu click on the cog icon ( ) which is
found in the lower right hand corner of the runtime screen.
“Temp Mode” will display an option where the
temperature mode can be changed from the
default of Fahrenheit to Celsius.
NOTE: Any temperature throughout the control will
display in the selected temperature mode.
RFDU OPERATING INSTRUCTIONS Continued
The “Menu”option is allows you to select the
number Menus (or dayparts) you want to be
available (1 to 3).
Menu
Temp Mode
PHUCongurator
When the user loads the “RFDU Cong” menu
option within Settings the following screen will
appear.
In the same way as the runtime screen the unit’s
conguration (for example 2X1) will be detected
and displayed.
The PHU cong option allows the recipe mapping
of each well to be modied for each menu.
When an individual well is pressed a list of available
recipes will appear available for selection within the
zone, for example:

11
RFDU Operator’s Manual
RFDU OPERATING INSTRUCTIONS Continued
Use the left and right navigation buttons to scroll
through the available recipes for this RFDU. To
assign a new recipe to the well, simply select the
desired recipe.
Select to exit without making a change.
Select to save and update the RFDU
Conguration.
“Language” Setting. This is reserved for future use
and will allow RFDU users to change the language
display on all screens.
Language
RFDU Recipe Editor
Selecting the “Recipe Cong” option will display
the list of local recipes currently stored on the unit.
These are sorted alphabetically
Key information on each recipe is displayed on this
screen view. This includes the Recipe Name, IR Duty
Cycle (IRDC) %, the Bottom Temperature, and Lid
Status.
NOTE: Code is only for units with Timer Bars
Page navigation buttons can be used on each
screen to navigate through each set of recipes.
The “+” icon can be used to add a new local recipe.
Selecting on an existing recipe will load the recipe
in edit mode.
Each of the 4 recipe elds can be modied here.
IRDC% can be adjusted in 5% increments from 0
to100
Bottom Temp can be adjusted in 5F increments
from 140F to 280F
When selecting Help option the Help screen will
load with a QR code. When scanned this will link to
this manual hosted on the cloud.
Help

RFDU Operator’s Manual
12
RFDU OPERATING INSTRUCTIONS Continued
Tools Menu
The following congurations are available on the TOOLS
menu.
The “About” screen will detail specic settings
available to the RFDU.
About
This will include the unit’s serial number, API key,
rmware version along with the unique network
MAC address used for both WiFI and Ethernet
connectivity.
Network
The Network Cong option will allow the RFDU
network connection to be congured. After
selecting “Network Cong” the following screen will
load.
Network Cong can be set to“Read Only” mode if
the access is locked within Tools menu. Alternatively,
if “Network” is unlocked in the Access menu then
changes can be made to the selected network.
The RFDU supports both WiFi and Ethernet connec-
tions. In each network mode, both automatically
assigned IP addresses (DHCP) and manually entered
static IP addresses are supported.
To modify Network Settings rst ensure that Net-
work Settings are unlocked in the Access Menu
(they are by default). Then enter the“Network” op-
tion found within the“Tools” menu.

13
RFDU Operator’s Manual
RFDU OPERATING INSTRUCTIONS Continued
The current network selection will be highlighted,
either Ethernet or WiFi. For example:
To change to WiFi select the WiFi icon ( ) near the top
of the Network Cong screen. A list of available WiFi
SSID’s will then appear.
To connect to a WiFI SSID click on the SSID name.
The Wi SSID password will then be required.
Press anywhere within the“Enter Password” box
to load the on-screen keyboard to enter the WiFi
password.

RFDU Operator’s Manual
14
RFDU OPERATING INSTRUCTIONS Continued
Once entered select “OK” on the on-screen keyboard
followed by the check button to attempt to join
the WiFi SSID.
If the WiFi password is incorrect the RFDU will not
join the WiFi network. If the WiFI password is correct
the RFDU will join the network and the RFDU will be
connected.
If the RFDU is currently connected to a WiFi network
the connected SSID will be displayed in blue.
To disconnect from the WiFi select the disconnect
icon ( ) in the lower left hand corner of the RFDU
or alternatively click on another WiFi SSID to join
a dierent WiFI network (WiFi password entry will
then be required).
The “DHCP”toggle is available for both ethernet
and WiFI connections. By default DHCP will be
selected. Instead of being assigned an IP address
automatically a static IP address will allow the
network settings (IP Address, Subnet Mask, Default
Gateway, Primary DNS Server, Secondary DNS
Server) to be manually congured and saved.
Selecting on any of the 5 Network Settings will load
an on-screen numeric keypad where the IP address
details can be entered manually.
Once entered select the check button to save
the newly entered settings.

15
RFDU Operator’s Manual
RFDU OPERATING INSTRUCTIONS Continued
PHUVolume
The PHU Volume option will either enable or disable
sound on the RFDU.
The slider can be moved either on or o.
Select to save and update the PHU Volume
Conguration.
Select to exit without making a change.
Temperature Display
The Temp Display option will either enable or
disable the temperature display on the RFDU run
screen.
The slider can be moved either on or o .
Manager Menu
The MANAGER menu is PIN code protected and
allows the 'manager' access to the ACCESS, TEMP
OFFSET and IRDC Period functions.
Selecting "MANAGER" the following screen will be
displayed.
Enter PIN "8429" and select and the following
screen will be displayed.

RFDU Operator’s Manual
16
RFDU OPERATING INSTRUCTIONS Continued
Access Menu
The ACCESS menu allows a number of conguration
options to be “locked” or unable to be changed. When
selected the following screen will appear.
Each of the Recipe Cong, Menu, Temp Mode
(C/F), Network and PHU Cong can be locked or
unlocked.
For example, if “Recipe Cong”is locked when the
Recipe Cong option described previously is loaded
it will be in “VIEW MODE” only. Modications such
as editing existing recipe settings, delete a recipe or
adding a new recipe will not be available.
Temp Oset
The Temperature Oset function will allow the
temperature oset to be adjusted per ZONE on the
selected RFDU.
After selecting the “TEMP OFFSET”function the
following screen will appear.
The screen displays the well or shelf conguration,
SHELF 1 and SHELF 2 actual bottom heatsink
temperatures and the current temperature oset
values. Each well or shelf can be individually
selected for editing.

17
RFDU Operator’s Manual
RFDU OPERATING INSTRUCTIONS Continued
Temp Oset - Continued IRDC Period
The IRDC Period is the total period time of the IR
in seconds. Therefore, for a IRDC Period of 180
seconds, it is 180 seconds from the IR ON time to
the next IR ON time. For example, with an IRDC
Period of 180 seconds and an IRDC Percent (recipe)
of 65%, the IR will be on for 120 seconds (65% of
180 seconds) and o for 60 seconds, repeating. The
programming range is 0 to 360 seconds.
The edit icon ( ) will load the oset editor screen
for either“Shelf 1 Temperature Oset” or “Shelf 2
Oset”.
Once again the current temperature will be
displayed. The current oset value will also be
displayed.
The and can be selected to increase the oset
value by 1F each press. The oset range is between
-20F and 20F.
Select to exit without making a change. Select
to save and update the oset value.

RFDU Operator’s Manual
18
Sous ChefTechnology Programming
The ReadyFlex™ Holding Unit can have its recipes
and well programming updated locally on the RFDU
Control as mentioned in previous sections. Recipes
and well programming can also be updated via
Duke’s cloud solution – the Sous Chef Cloud. The
Sous Chef Cloud requires the user’s Account Name
to be dened along with a user login and password.
This can be created via the Sous Chef Cloud
registration process without the assistance of Duke
Customer Service. An option exists for this purpose
on the souscheftech.com landing page – “Create an
Account”.
The ReadyFlex™ Holding Unit can then be added
to the account using its serial number and API key
which can be found on the unit itself.
After logging onto the Sous Chef Cloud all con-
nected devices within the account will be displayed.
Multiple RFDU’s are possible to be loaded within the
account.
RFDU OPERATING INSTRUCTIONS Continued
After selecting the “Dashboard” icon to connect to a
specic RFDU the programming grid will appear. As
this is a connected unit the unit conguration will
be detected automatically, for example a 2x2 RFDU
conguration appears below.
The RFDU programming grid will be color coded per
zone. Recipes programmed within each zone will
be required to be of the same top temperature and
bottom temperature.
Three MENU’s are available for selection for each
well. The three menu’s may be used as BREAKFAST,
LUNCH or DINNER. The “All Day”option can be used
when the well holds the exact same recipe for the
entire day.
To program a well select the dropdown boxes next
to each MENU. A list of available recipes will be
displayed.

19
RFDU Operator’s Manual
RFDU OPERATING INSTRUCTIONS Continued
The “SHOW LEGEND” button can also be used to
display the full recipe list for the full account.
When grid programming has been completed a
completely programmed PHU looks like the below.
After programming the wells two options are then
available. “DOWNLOAD PHU CONFIGURATION
FILE” will create a local RCP formatted le with the
programming. Alternatively, the “SAVE button” can
selected. This will update the well programming on
the unit instantly from the Sous Chef Cloud to the
RFDU unit itself. This is a real-time recipe program
update.
Another option available within the Sous Chef
Cloud is to be able to view the online RFDU Recipe
List. This is available by selecting “Recipes” under
“Equipment Dashboard”on the Sous Chef Cloud
side menu.
A list of local recipes found on the RFDU will appear
here.
These can be edited, added, or deleted using
the appropriate function which will update the
connected RFDU local recipe set in real-time.
Selecting “Create Recipe”will load the following
form where a new recipe can be added. Fields
between “add” and “edit” are the same.
Fields consist of Recipe Name, Bottom Temp, Top
Temp, Cook More enabled, Cook More Message ID,
Cook more time, enabled/disabled and lid enabled/
disabled. When nished adding or editing select the
“SAVE” button. The updated recipe list will be sent
to the connected RFDU where it is updated in real
time.
USB Programming
In some cases the connected RFDU unit may not be
online and connected to the Sous Chef Cloud. If this
is the case the RFDU recipe and programming set-
tings can be modied on the actual unit UI or alter-
natively the RFDU Oine Congurator menu option
can be used on the Sous Chef Cloud.
This can be found under“Recipe” menu on the side
menu of the Sous Chef Cloud.

RFDU Operator’s Manual
20
RFDU OPERATING INSTRUCTIONS Continued
For the user’s Account an “oine recipe set” will
always be available to the user. This information
will be saved and be readily available if a USB le is
required to be created.
The RFDU Congurator is available for well
programming.
As the unit is not connected the RFDU congura-
tion, for example 2x2, 2x4 will not be automatically
detected.
Instead a list of available congurations will be
available for programming.
These include:
When a selected PHU conguration is selected the
appropriate programming grid will appear. For
example a 2x4 will appear as:
This can then be programmed in the same way as
the online RFDU. For example:
When nished select “DOWNLOAD PHU
CONFIGURATION FILE” option. This will create a
RFDU “RCP” le which contains both the recipe list
and well mapping settings.
This le can then be copied to the“root” directory of
a USB ash drive.
Plug this same USB drive into the USB port on an
RFDU and if the conguration is correct both the
recipe list and well programming will be uploaded
on the unit itself. A conrmation message will ap-
pear on the RFDU display when a new recipe set has
been successfully loaded.
This manual suits for next models
1
Table of contents
Other Duke Indoor Furnishing manuals
Popular Indoor Furnishing manuals by other brands

Coaster
Coaster Nightstand 302352 Assembly instructions

Roveconcepts
Roveconcepts DRESDEN Assembly instructions

Habitat
Habitat Otani manual

Office Star Products
Office Star Products Space 39006 operating instructions

Costway
Costway HW65409 user manual

Coaster
Coaster California 300345KW Assembly instructions

Badger Basket
Badger Basket 98855 Assembly instructions

Coaster
Coaster 724287 Assembly instructions

Bontempi Casa
Bontempi Casa FIANDRE 20.44 Assembly instructions

Next
Next 989718 Assembly instructions

Classic Exhibits
Classic Exhibits Symphony SYM-411 Setup instructions

Desert
Desert S188-LAW/4/11 Assembly instructions