Solwise DMP1120w User manual

Solwise
DMP1120w Media Player
User Manual

- 1 -
Table of Contents
1. Introduction………………………………………………………………….…..2
1.1 Hardware……….……………………………………………..…………4
1.2 Application features….………………………………………………..….4
1.3 Device Compatibility………………………………………………………..4
2. Terminology………………………………………………………………….….5
3. DMP Overview………………………………………………………………….6
4. The A/V Streaming system……………………………………………………7
4.1 What’s in the box……………………………………………..…………7
4.2 A/V System Overview………………………………………………..….7
5. DMP Setup……………………………………………………………………….12
5.1 Indicators………………………………………………………………..…12
5.2 Cable Connections…………………………………………………..…..12
5.3 Memory Cards………………………………………………………..….13
5.4 Power up……………………………………………………………..…..14
5.5 Remote Control…………………………………………………………..15
6. Operation Setup Section………………………………………….…………..16
6.1 Wire Setup………………………………………………………….……16
6.2 Wireless Setup……………………………………………………..……18
6.3 Playback Options……...……………………………………………..……20
6.4 Device Setup………………………………………………………..……21
7. Content Navigation Modes…………………………………………………….22
7.1 List Mode…………………………………………………………….……23
7.2 Audio Preview Mode……………………………………………….……23
7.3 Photo Preview Mode……………………………………………….……23
7.4 Video Preview Mode………………………………………………….…24
8. Content Play Modes…………………………………………………………...24
8.1 Audio Play Mode…………………………………………………..…….24
8.2 Photo Play Mode……………………………………………………..….24
8.3 Video Play Mode……………………………………………………..….24
8.4 Subtitle Support…………………………………………………………….25
9. Trouble Shooting…………………….………………………………………...27

- 2 -
1. Introduction
Watch downloaded movies, download and store movies on your PC
then watch them on your TV from the comfort of your living room. No
need to burn movies from your hard disk to CD or DVD, just the ease
and convenience of wireless access with fingertip control. The Wireless
Multimedia player supports MPEG1, MPEG2, MPEG4, DivX and Xvid
video formats.
Enjoy PC music anywhere at home. Stream music files from your PC
and listen to them in high quality in any room on your audio system.
Keep your music collection stored on your PC's hard disk. Use your
remote control to select songs according to artist, album or genre. You
can play songs from online music services, and even listen to Internet
Radio without a PC. The Wireless Multimedia player supports WMA and
MP3 music formats, and so you have access to all your downloaded
songs.
Share your digital photos. Relax on the couch and look at your holiday
photos with the whole family or friends. Simply store your photo
collections centrally on a PC and enjoy them anytime on your TV. If you
have a high-definition TV input on an LCD or plasma TV, your digital
photos will be brought to life!
Smart and simple: The Wireless Multimedia player is easily installed,
thanks to a user-friendly step-by-step approach. All the steps needed to
install it are displayed on your TV screen.
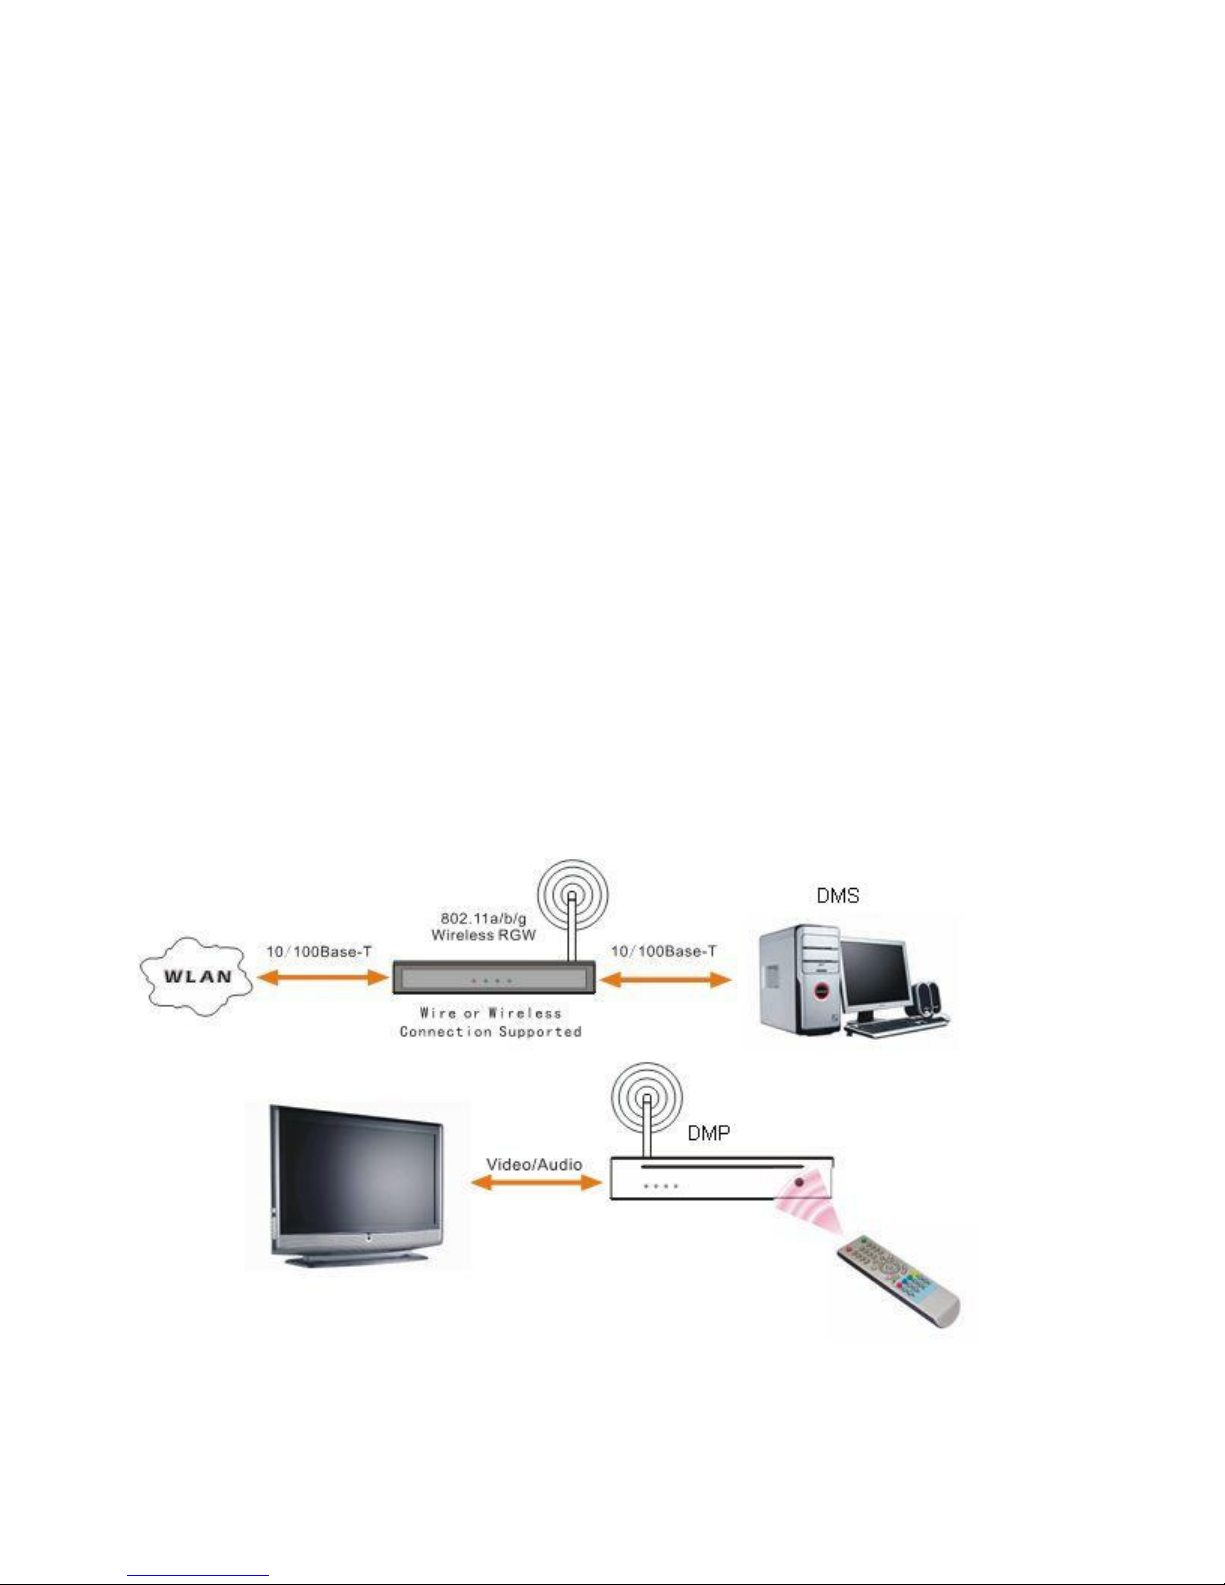
Wireless convenience. You can access multimedia content from other
PCs in your house. The media manager works on most PCs, including
older types. So with just one Wireless Media player you can access
content on several PCs, and there's no need to copy files across. The
2.4 GHz wireless link between the multimedia player and your router or
access point means you don't have to lay cables or drill holes through
walls.

- 3 -
Important Notice
This DMP (Digital Media Player) operates with a PC using either
Windows XP SP2 or Windows Vista. Windows Media Player 11 must
be installed, you may be required to upgrade version 11 on Windows XP,
instructions below.
It will also connect and play media from any DNLA compliant NAS
(Network attached storage) server.
Note:The OS version of computer must be windows XP SP2(Windows XP Service
Pack 2) or Windows Vista. If your Winows XP OS version of computer is SP1,
please update to SP2.
Refer to website: http://www.microsoft.com/windowsxp/sp2/default.mspx
Mac users and Linux users can also use the DMP, but you will need to
download some Media Player software. Some examples in the table
below. Any UPnP or DNLA compliant software should be ok.
Server Price Windows
Mac
Linux
Music
Photo
Video
Transcoding
Allegro Media Server
39.95 X X X
Cidero Internet
Radio Station Server
(Java)
Free X X X X X X
Cyber Media Gate
(Java) Free X X X X X X
Cyberlink Digital
ome Enabler Kit 79.95 X X X X
Elgato Eyeconnect 49.95 X X X X
Fuppes Free X X X X X X
Geexbox Free X X X
GMediaServer Free X X X X
MediaTomb Free X X X X X
MythTV Free X X X X X
Nero Media ome 79.99 X X X X X
On2Share 19.95 X X X X
Orb Free X X X X X
Rhapsody 12.99/mo
nth X X X X
SimpleCenter
Premium 19.99 X X X X X
Tversity Free X X X X X
TwonkyMedia 39.95 X X X X X X X
uShare Free X X X X
Windows Media
Connect Free X X X X X
Yahoo Music Jukebox
Free X X

- 4 -
1.1 Hardware
External Interfaces
• Ethernet (10/100)
• 802.11g WiFi
• USB2.0 FS HOST
• Flash card reader MS/SD/MMC/CF
• AV outputs
Video
• Composite (yellow RCA)
• SCART interface.
• Y/PbPr/YCbCr
Audio
• L/R Stereo (RW RCAx2)
• Digital audio out (Optical output)
1.2 Application Features
Browse for and play back content stored on PCs or other DLNA servers on the network,
or from local media
• Network content browsing dependent on DLNA media server's "presentation" of the
available content
• Local content browsing (Thumb drive, Flash cards) based on simple hierarchical folder
organization (file system)
1.2.2 Trick mode support
• Multi speed FF/FR/Skip ahead/Skip back
• Pause/Play/Stop
• Zoom/Rotate on photos
1.2.3 File Search
1.2.4 Photo Slideshow
1.2.5 Music+Photo Slideshow
Device setup
- Control over most aspects of device operation
- Accessed through "Setup" button on remote control
- Networking
• Simple, intuitive - "leads" user through initial connect process
• Prioritizes on Wired; if no Wired, then attempts to connect via Wireless
• Automatically identifies and auto prompts user on SSID select and security key entry
when connecting to a secure network
• Networking
• Display
- 4:3 or 16:9 format
- PAL or NTSC
- 480i/480p output
• Three display/viewing modes:
- Preview Mode.
• Video – highlighted video file in list plays in preview window.
• Photo – highlighted photo file in list displays in preview window, along with basic file
information.

- 5 -
• Music – highlighted music file in list plays, with ID3 tag info displayed in preview
window.
- List Mode
- Thumbnail Mode
1.3 Device Compatibility
1.3.1 Display resolution
- Standard Definition AV processing and output (480i/480p)
- NTSC or PAL
1.3.2 File format support
- Files can be from USB, Flash cards, or over the network. Only caveat is some network
media servers limit what file types they make available.
Video
• MPEG1/MPEG2/MPEG4(SP)/MPEG4(ASP)/ MJPEG
• DIVX(3.x,3.x,5.x,6.0)/XVID(include GMC and QPEL)
- Audio
• PCM/WAV/MP3/AAC
• JPEG (max. 5120x3840)
1.3.3 DLNA Media Player
-Network Protocols
• TCP/IP stack
• UPnP
• DHCP
• Static IP
• Auto IP
• DLNA v1.0 player/control point
• Works with DLNA-compliant Media Servers
• Tested with Microsoft WMP11, WMP10+WMC2.0, Philips PMM, TwonkyVision, ORB
and Tversity
• Can interoperate with up to 5 servers at the same time
Networks
- 802.11 WiFi
• .11b/g
• WEP or WPA2 security
- 802.3 Ethernet
• Supports 10/100Mb connectivity to either 10 Mbit or 100 Mbit networks
2. Terminology
A/V Audio/Visual
EN Ethernet
EN cable 10/100BaseT En patch cable(straight through type)
MAC The unique 12 character hexadecimal address of an EN device
NC No Connection
O/S Operating System
PC Pentium based Personal Computer running XP O/S
PCA Printed Circuit Assembly
PCB Print Circuit Board
R/C Remote Control (infrared)
RGW Router Gateware
WiFi 802.11a/b/g/n Wireless Ethernet

- 6 -
3. DMP Overview
Front View:
Side View:
Back View

- 7 -
4. The A/V Streaming System
4.1 What’s in the box
The system includes the following components:
DMA Unit
Remote Control with 2 AAA battery
12V DC Power Adapter
Wifi Mini PCI card
Built in Wifi antenna
AV cable
CD
4.2 A/V System Overview
The typical A/V Streaming system requires the following equipment:
802.11b/g compatible wireless router with10/100 Ethernetport(s)
A PC running Vista, XP Home or Professional Operating system
Or a DNLA compliant server
Mac and Linux users will require additional Media server software
Microsoft Digital Media Server (DMS) software installed on the PC
NTSC or PAL Display/TV with Composite video inputs
Typical Digital Media Player System

- 8 -
Hint:Using a wireless connection for both the DMP and the Server PC
doubles the media data traffic over the connection. While this rate is
achievable with 802.11b/g technology in ideal conditions, it can cause
undesirable interruptions in some movie viewing situations. To avoid this,
use a wired network connection between the Server PC and the wireless
Router/Gateway (RGW). Alternatively, a wireless 802.11 AD HOC
connection can be set up directly between the PC and the DMA.
4.3.1 Download and install Windows Media player 11 (If Required)
IMPORTANT: The DMA uses your wireless network and Windows Media player 11 to access the pictures
on your computer. If you do not have Windows Media player 11 on your computer, or you have an earlier
version, the software CD packed with your DMA automatically lets you install Media player 11.
Begin the download. You must be connected to the Internet.
If you already have Windows Media player 11, or higher, on your computer. Go to set up media sharing.
[1] Let me install Windows Media player now
[2] Your browser opens and you are connected to the Microsoft Windows Media player download
page: http://www.microsoft.com/windows/windowsmedia/player/11/default.aspx.
[3] Click Download NOW.
Do not close the Windows Media player installer window during the installation.
TIP—if an error screen appears, click OK on the error, then click Cancel on the Digital Picture Frame
Installer screen. Restart the installation by ejecting the CD and reloading it.
Continue with the download of Windows Media player 11.
3
4

- 9 -
[4] Click Run to start the download.
The download usually takes less than a minute with high-speed Internet access. Dial-upconnections take
longer.
A progress screen appears as the installation files are downloaded to your computer. TIP—if the
progress screen does not appear, click Click here if your download did not begin
[5] Click Run again.
A progress screen appears as the installation files are extracted on your computer.
[6] In the Validate your copy of Windows screen, click to confirm that you have a valid copy of
Microsoft Windows operating system.
[7] In the Thank you screen, click I accept to accept the supplemental license for Windows Media
player 11.
The installation begins. A progress screen appears and monitors the installation. The Windows Media
player 11 Welcome screen opens.
4.3.2 Set up Windows Media player 11
Windows Media player is installed! Now choose your settings.
[1] On the Welcome screen, select Custom Settings .
We strongly recommend that you select Custom Settings If you choose Express settings, the setup will
take significantly longer.
[2] Click Next.
[3] In the following setup screens (Select Privacy Options; Customize the Installation Options; Select
the Default Music and Video Player ), we recommend that you accept all options as they are presented,
and then click Next.
[4] If the Choose an Online Store screen appears select, Don’t set up a store now. We strongly
recommend that you. Do not choose to set up a store now. If you do, the setup will take significantly longer
(up to an hour).
[5] Click Finish.
A progress screen monitors the setup. When the setup is complete, Windows Media
player 11 opens and displays available media files.
4.3.3 Share media in Windows Media player 11
Set up Media Sharing so your frame and Windows Media player recognize each other.
[1] Open Windows Media player 11 (if you already had Windows Media player 11 Installed and
5

- 10 -
bypassed the installation.
[2] Click the Library button in the top menu bar.
[3] Select Media share from the drop-down menu.
[4] In the Media Sharing screen, select Share my media.
[5] Click OK
4.3.4 Add media files to share
[1] Click Menu Library, click Submenu Add to Library.
[2] Then click Advanced Option.
[3] Click Add button to select folder of media files.
DMA SERVER
Click Here

- 11 -
5. DMP Setup
5.1 Indicators

- 12 -
5.2 Cable connection options
5.2.1 Connect the TV using one of the cables.
5.2.2 Audio connections options
SCART Cable
YUV
Cable
RCA
Cable

- 13 -
5.2.3 Power connection
5.3 Memory cards
Memory Card Support – Many popular memory cards are supported:
CF - Compact Flash I and II Type
SD(TM) - Secure Digital Card
MS - Memory Stick(R)
MS Pro - Memory Stick PRO(R)
MMC - Multimedia Card(TM)
You will find that most cameras have CF, SD, MS or MMC formats.
SD slot CF slot
MS/MS Pro/SD/MMC COMPACT Flash (Type I & Type II)
Content can be audio, photo or video, and will appear in the Media Sources list once the
memory card is inserted and recognized.
L/R Cable
Optical Wire
Adapter

- 14 -
5.4 Power up
Connect the DMP power adapter. Power on the display, and point the remote control towards
the front panel of the DMP unit and press the POWER button on the R/C. When on servers
are available or set up, the display will appear as follows:
To set up the network connection, refer to the Network Connection Setup section.
The DMP unit provides memory card support. If a memory card with content is installed, it will be identified in the
Media Sources display.
5.5 DMP Remote
The DMA Remote control (R/C) uses infrared so it must be aimed toward the front of the DMP
enclosure. The remote has the following keys and functions for navigating the Setup interface
Networks
Computer01:Owner
SERVER
Computer02
Item 0 Media Sources
Media Sources
Networks
Computer01:Owener
SERVER
CF Card
USB DEVICE
Item 0 Media Sources
Media Sources
CF Card

- 15 -
ITEM
KEY ID DESCRIPTION ITEM KEY ID DESCRIPTION
1 POWER Power device on/off 15 AUDIO Toggles between available audio
languages
2 Digits 0-9:Press to enter number
directly 16 SUBTITLE This button toggles between available
subtitle languages
3 VOL- Decrease volume 17 ROTATE Rotate the photo display
4 UP Cursor up/ move up one entry 18 ZOOM Zoom video or photo
5 PLAY/PAUS
E Play or pause a file 19 SETUP Enter SETUP menu
6 LEFT Cursor left/ Skip up one page
or top of top page 20 DISPLAY Toggle time counter on/off
7 PREV Go to previous file 21 REV Fast reverse
8 NEXT Go to next file 22 FWD Fast forward
9 DEFAULT Restore setup setting as
default setting. 23 DOWN Cursor down/ move down one entry
10 HOME Return to main menu 24 RIGHT Cursor right/ Skip down one page or
bottom of last page
11 REPEAT Select repeat mode 25 STOP Stop playing
12 M-SLIDE Enable slide show mode 26 OK Confirms selection of an item in the
menu
13 SLOW
Press SLOW during playback
to obtain a slow motion
playback
27 VOL+ Increase volume
14 RESUME
Remember where you stopped
viewing a media file and press
the key to resume play at that
point
28 MUTE Mute volume
6. Operation Setup Section
6.1 Wired Setup
If you are using a wired network connection, and your network router system is set for DHCP
mode, there is no need to change any Network Settings. If using Static IP mode, press
SETUP key on the remote control to navigate to the Setup Main Menu screen.
To use the remote control unit to operate the
DMP player, insert two batteries (size AAA)
making sure that the + and – ends of the
batteries are matched to the +/– marks
printed inside the battery compartment.
Exit Setup
Playback Options
Setup Main Menu

- 16 -
Press the Down Arrow key to highlight the Wired Network line and press OK.
The following screen indicates the current IP settings. To change these settings, select the
TCP/IP Button (See page 20):
Select Network
Wired Network
IP onfiguration: Automatic [DHCP/Auto IP]
IP Address: 192.168.0.4
Subnet Mask: 255.255.255.0
Select Network
Cancel
Referesh
Wired Network
Defaut
Server02
Server03

- 17 -
Once connected, available server(s) active on the network will be displayed as below. the
“Networks” line on the Media Sources page.
NOTE: Some servers require newly discovered DMA devices on the network to be authorized.
Check the server software interface on the PC to make sure the new DMA device has been
properly authorized.
6.2 Wireless setup
To setup a wireless network connection, from the Network Setup screen select the
Wireless Type A or B/G by moving the cursor down to the desired Wireless network type and
press OK:
Available Server
Networks
Computer01:Owener
SERVER
Computer02
Item 0 Media Sources
Media Sources

- 18 -
Select Network
Default
Secure wireless infrastructure network [WPA TKIP]
802.11b/g channel 4
IP configuration: Automatic [DHCP/Auto IP]
IP Address: 192.168.3.114
Subnet Mask: 255.255.255.0
TCP/IP OKSecurity
The DMP will search for available advertised Network names and display them. Move
the cursor highlight down to the desired Network name and press OK:
Note: The previously used network will appear at the top of the list.
If the selected wireless network has security enabled the Pass- phrase entry screen will
popup where you may enter the pass- phrase. Alternatively, selecting the SECURITY button
will bring up the Pass -phrase entry screen. Enter the Pass -phrase character string and
highlight OK button and press OK key.
Select Network
Cancel
Wired Network
List Wireless B/G Networks
List Wireless A Networks
Select Network
Cancel
Referesh
Wired Network
Defaut
Server02
Server03
PASSWORD
Enter WPA Passphrase
Cancel
OKShift Erase

- 19 -
TCP/IP Settings
Done
Configuration Mode Static
Static IP Address 0.0.0.0
Static Subnet Mask 255.255.255.0
Static Gateway Address 0.0.0.0
Static DNS Address 0.0.0.0
TCP/IP Settings
Done
Configuration Mode DHCP
Note. This unit will not support ASCII characters of WEP wireless security
If the IP configuration of unit does not match the setting of wireless router, please use remote
to focus the TCP/IP button on Select Network page, then press OK key on the remote to
enter TCP/IP Settings page.
If the TCP/IP configuration mode of wireless router is set as static, so the TCP/IP settings of
unit must be match the setting of wireless router.
The Static Subnet Mask, Static Gateway Address and Static Dns Address’s settings
according wireless router setting.
Static IP Address should be in the same range as the router
If the TCP/IP configuration mode of wireless router is set as DHCP, the TCP/IP settings of
unit must be set as DHCP.
TCP/IP Settings
Done
Configuration Mode
Static
DHCP
Table of contents
Popular Media Player manuals by other brands

Audiovox
Audiovox A-MBR-1500-AUD Installation guide & user manual

Motorola
Motorola BMC9012 user guide

LaCie
LaCie 301487U - LaCinema PLAY - Digital AV Player user manual

Creative
Creative ZEN user guide

Sony
Sony Walkman NWZ-W274S quick start guide

Conceptronic
Conceptronic Media Giant System backup & recovery