Elan ViA! dj User manual

TM

ELAN HOME SYSTEMS
INSTALLATION MANUAL
Page 1 © ELAN Home Systems 2003 • All rights reserved. 01/03
IMPORTANT INFORMATION . . . . . . . . . . . . . . . . . . . . . . . . . . . . . . . . . . . . . . . . . .2
I.THE VIA!DJ AUDIO & VIDEO OUTPUTS
The VIA!dj Display . . . . . . . . . . . . . . . . . . . . . . . . . . . . . . . . . . . . . . . . . . . . . . .2
The VIA!dj Output Screen . . . . . . . . . . . . . . . . . . . . . . . . . . . . . . . . . . . . . . . . .3
II. AUDIO,VIDEO AND IR CONNECTIONS
Audio Connections . . . . . . . . . . . . . . . . . . . . . . . . . . . . . . . . . . . . . . . . . . . . . . .4
Video Connections . . . . . . . . . . . . . . . . . . . . . . . . . . . . . . . . . . . . . . . . . . . . . . .4
IR Connections . . . . . . . . . . . . . . . . . . . . . . . . . . . . . . . . . . . . . . . . . . . . . . . .4-5
III.TELEPHONE AND ETHERNET CONNECTIONS
Built-In Dial-Up Modem Connections . . . . . . . . . . . . . . . . . . . . . . . . . . . . . . . . .5
Setting Up the VIA!dj’s Built-in Modem . . . . . . . . . . . . . . . . . . . . . . . . . . . . . . . .6
a) Using the built-in Internet account . . . . . . . . . . . . . . . . . . . . . . . . . . . . . .6
b) Using an existing Internet account . . . . . . . . . . . . . . . . . . . . . . . . . . .6-7
Configuring the VIA!dj for an Ethernet Connection . . . . . . . . . . . . . . . . . . . . . . .7
Recommended Network Configuration . . . . . . . . . . . . . . . . . . . . . . . . . . . . .7
Configuring the VIA!dj’s Ethernet Settings . . . . . . . . . . . . . . . . . . . . . .7-8
Router or Gateway with DHCP Server Software . . . . . . . . . . . . . . . . . . .8
Manual Settings . . . . . . . . . . . . . . . . . . . . . . . . . . . . . . . . . . . . . . . .8-10
Confirming VIA!dj™ Network Connection . . . . . . . . . . . . . . . . . . . . . . . . . .10
IV. RECORDING CDS
DTS 5.1 Encoded CDs . . . . . . . . . . . . . . . . . . . . . . . . . . . . . . . . . . . . . . . .13
V. ADVANCED SETTINGS
Proxy Server Settings . . . . . . . . . . . . . . . . . . . . . . . . . . . . . . . . . . . . . . . . . . . .14
Controller Settings . . . . . . . . . . . . . . . . . . . . . . . . . . . . . . . . . . . . . . . . . . . . . .14
Remote Diagnostics . . . . . . . . . . . . . . . . . . . . . . . . . . . . . . . . . . . . . . . . . . . . .14
VI. HARDWARE AND SOFTWARE TOOLS
Bulk-Loading CDs Into the VIA!dj . . . . . . . . . . . . . . . . . . . . . . . . . . . . . . . . . . .13
XiVA™-Producer . . . . . . . . . . . . . . . . . . . . . . . . . . . . . . . . . . . . . . . . . . . . .13-14
XiVA™-Stor/ XiVA™-Utilities . . . . . . . . . . . . . . . . . . . . . . . . . . . . . . . . . . . . . ..14
VIA!dj RS232 Protocol . . . . . . . . . . . . . . . . . . . . . . . . . . . . . . . . . . . . . . . . . . .14
TECHNICAL SUPPORT . . . . . . . . . . . . . . . . . . . . . . . . . . . . . . . . . . . . . . . . . . . .14
TABLE OF CONTENTS

ELAN HOME SYSTEMS
© ELAN Home Systems 2003 • All rights reserved. 01/03 Page 2
INSTALLATION MANUAL
IMPORTANT
The VIA!dj Installation Manual details the audio, video, IR,
telephone and Ethernet connections required for installing the
VIA!dj.
The VIA!dj User’s Guide (enclosed with the unit) must also
be read in its entirety by the dealer/installer in order to
fully understand the VIA!dj’s operation and complete the
installation properly.
I.
THE VIA!dj AUDIO & VIDEO OUTPUTS
The VIA!dj has four separate pairs of audio outputs. The three analog outputs (labeled 1, 2 and 3
on the VIA! display) are used for whole-house audio distribution. The fourth output (labeled HT on
the VIA! display) is a digital output which can be used to send a digital audio signal to the digital
input on a surround sound processor or A/V receiver in a Home Theater. The Output select but-
tons are located in the top right corner of the VIA! Touch Panel display.
Each of the three analog outputs can be accessed independently by any VIA! Touch Panel in any
zone. This is the equivalent of having three separate sources connected to the audio distribution
system, each one loaded with the homeowner’s entire music collection, each one capable of being
independently accessed from any zone in the house. Because the music is digitally stored on the
VIA!dj’s hard drive, any song, even the same song, can be selected in any zone simultaneously.
For example: If you are listening to a song on output 1 in one room and a person in another room
selects the same song on output 2, that person would hear that song from the beginning. The
song in your room would continue uninterrupted.
THE VIA!dj DISPLAY
Because the VIA!dj has only one video output, it is important to understand what you may be
viewing on a VIA! Touch Panel at any given moment.
•When first selecting something to play from a VIA! Touch Panel, the music you hear and the
album details displayed will match up.
•If a person in another zone selects the same VIA!dj output that you are listening to, they will
automatically be listening to the same music and viewing the details that you are. Your music
will continue uninterrupted.
•If a person in another zone selects a different VIA!dj output, your music will continue uninter-
rupted but the album on your VIA! Touch Panel will now reflect the selection that was made
by the person in the other zone.
•If you wish to once again view the album details of the music you have selected, simply
press Active.
The Active button re-syncs the video display to the audio output selected in your zone.
USERS GUIDE

THE VIA!dj OUTPUT SCREEN
ELAN HOME SYSTEMS
INSTALLATION MANUAL
Page 3 © ELAN Home Systems 2003 • All rights reserved. 01/03
1Indicates the Output currently selected
2Re-syncs the video display to the audio
output selected in your zone
3Used to select VIA!dj analog outputs
1, 2 and 3. The highlighted output
coincides with the album details
currently being displayed.
4Used to select the Digital audio output in
a home theatre
5Cover art of the album currently selected
by the highlighted output
6ELAN Zone mute
7ELAN Zone volume up and down
8Return to VIA! Graphics
9Play
10 Next track
11 Stop
12 Pause
13 Used to toggle between time remaining
and time elapsed
14 Previous track
15 Press to return to the previous screen
16 Press to return to the Library screen
17 Randomly plays tracks from albums,
genres and playlists
18 Repeats the selected album, genre or
playlist

ELAN HOME SYSTEMS
© ELAN Home Systems 2003 • All rights reserved. 01/03 Page 4
INSTALLATION MANUAL
II.
AUDIO, VIDEO AND IR CONNECTIONS
1. Audio Connections
a. Wholehouse Audio Distribution—Connect the VIA!dj’s ANALOG audio outputs 1, 2 and 3
to any three source inputs on the System6, Z•630 PreAmp Controller or HD Source Input
Card.
b. Home Theater Audio—Connect the VIA!dj’s coaxial or optical DIGITAL audio output to a
digital audio input on a A/V receiver, preamp or surround sound processor.
2.Video Connections
The VIA!dj has three types of video outputs; all are continuously active.
a. Wholehouse Video Distribution—Connect the VIA!dj’s Composite Video Output to a
Z•880 Video Controller input. This enables the VIA!dj’s composite video signal to be sent to
multiple VIA! Touch Panels and televisions around the home.
b. S-Video—if desired, the S-Video output of the VIA!dj may be connected to a television with
an S-Video input. S-Video signals have certain length restrictions. Consult your television’s
instruction manual for details.
c. VGA—if desired, the VGA output of the VIA!dj may be connected directly to a computer
monitor, compatible HDTV, projector or plasma display. Having a monitor located near the
VIA!dj controller can facilitate setup and programming.
3. IR Connections
Both the VIA!dj and the Z•880 Video Controller need to receive IR commands from the ELAN
system controller. Both the VIA!dj and the Z•880 have a front panel IR window and a rear panel
3.5mm IR input jack. Either may be used.

a. HD System—The HD IR card (HDC2060) has two IR ‘ALL’ ports. Using either miniature IR
emitters (ELAN IR2040) or 3.5mm ‘mini-to-mini’ interconnect cables (ELAN IR2043),
connect the HD IR card’s ‘ALL’ ports to the VIA!dj and the Z•880.
b. Z•630—The Z•630 has only one IR ‘ALL’ port. An ELAN Dual IR Emitter (IR2042) can be
plugged into the Z•630’s ‘ALL’ port and the emitters placed over the IR windows of
the VIA!dj and the Z•880. A second alternative would be to use a ‘Y’ adapter and 3.5mm
‘mini-to-mini’ interconnect cables (ELAN IR2043).
c. System6—SAME AS Z•630.
III.
TELEPHONE AND ETHERNET CONNECTIONS
The VIA!dj downloads CD information and cover art from the internet. In order for it to do this, the
VIA!dj must be connected to either a telephone line or a home network.
BUILT-IN DIAL-UP MODEM CONNECTIONS
(RJ11 TELEPHONE LINE JACK)
The VIA!dj is equipped with a built-in dial modem which can be connected directly to a standard
telephone line using the RJ11 Telephone Line jack.
ELAN HOME SYSTEMS
INSTALLATION MANUAL
Page 5 © ELAN Home Systems 2003 • All rights reserved. 01/03
If the Z•880 Video
Controller is being
serially controlled,
there is no need to
make the IR
connections to it.
Only the VIA!dj
would need to
respond to IR
commands from the
ELAN controller.
NOTE:
If using an ELAN Z•600
Communications
Controller, HDC2050 HD
Series Telephone
Interface Card, or AVEC
AV-L2, the VIA!dj and all
other peripheral devices
that connect to the
phoneline should be
connected in front of
(before) the ELAN system.
IMPORTANT NOTE:

ELAN HOME SYSTEMS
© ELAN Home Systems 2003 • All rights reserved. 01/03 Page 6
INSTALLATION MANUAL
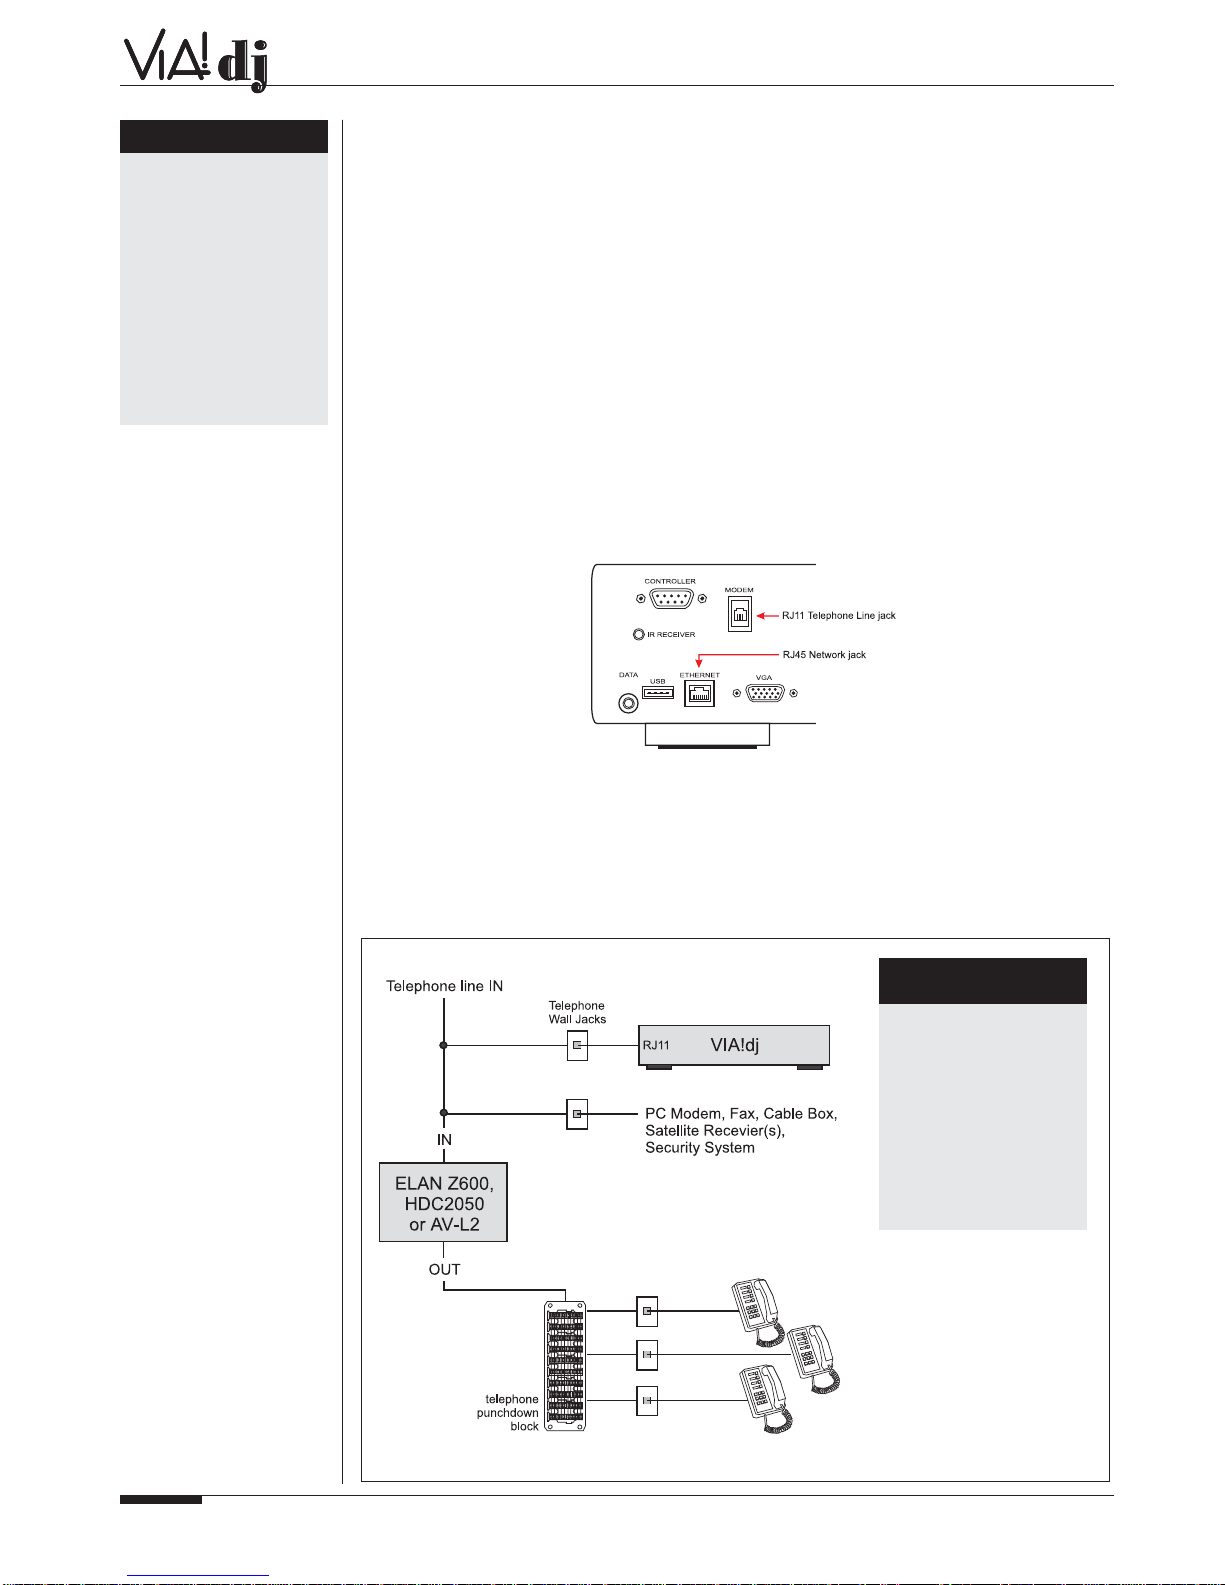
SETTING UP THE VIA!dj’s BUILT-IN MODEM
1. From the Main Menu select Settings
2. From the Settings Menu select System Settings
3. From the System Settings menu select Internet Access
4. From the Internet Access menu, highlight Access Mode, then press Edit
5. From the Access Mode menu, highlight Modem the press ✔Select. This will return you to
the Internet Access menu. All the other information on this screen will be filled in automatically
when you first dial out.
6. Press <Back to return to the System Settings menu.
7. From the System Settings menu select Modem Settings.
8. Should you wish to change the Number of Retries (factory default is 3) or the Dial Mode
(factory default is Tone), highlight these functions and press Edit. Use the remote control
and/or the front panel grid to change the value of the setting.
9. Press <Back twice to return to the Settings Menu
10. From the Settings Menu select Internet Account
11. From the Internet Account menu highlight Account Type and press ✔Update.
12. Press ✔Cont. to continue
13. You will be given three options: a) Use built-in Internet account, b) Use your existing Internet
account, and c) Do not connect to Internet
a) Use built-in Internet account
NOTE: If the homeowner wishes to use the built in internet account, the
Registration Details section must be completed first. If this was not previously
done you will have to back out and fill in the Registration Details before going any
further (see Registering Your VIA!dj in the VIA!dj User’s Guide, pg.12, for further
details).
•Highlight Use built-in Internet account and press ✔Select
•Read the Terms and Conditions screen. Note the current cost of using the built-in
Internet account service. This rate is subject to change.
•Press ✔Accept if you wish to continue
•You will be asked to connect your telephone line to the modem connection and press
✔Register to continue
•` The VIA!dj will now attempt to dial out to the built-in Internet account
•After you register (or agree to register later), the VIA!dj will fill in the account informa-
tion and you simply need to select update.
b) Use your existing Internet account
IMPORTANT NOTE: Internet Service Providers (ISPs) that require your computer
be loaded with proprietary software in order for you to log on to the Internet
(i.e AOL, CompuServe, Earthlink, etc.) are not compatible with hard-drive music
servers such as the VIA!dj because there is no way to load that software into the
unit.
There are many ISPs available in your local area or nationally that do not require
proprietary software to log on to the Internet (i.e. MSN and WorldCom). An Internet
account must be established with one of these types of ISPs in order for the VIA!dj
to access the internet using it’s built-in dial-up modem.
NOTE:To complete this section you will need the following information regarding
the homeowner’s existing Internet account: screen name, password and access
telephone number
•Highlight Use existing Internet account and press ✔Select
•Using the remote control and/or the front panel grid, enter account user name,
account password, and account telephone number. Press Next after completing
each entry. These are all required fields.

•You will be asked to connect your telephone line to the modem connection and press
✔Register to continue
•The VIA!dj will now attempt to dial out to the existing Internet account
•After you register (or agree to register later), the VIA!dj will fill in the account information
and you simply need to select update.
c) Do Not Connect to the Internet
If you do not wish to register the unit or to look up album information at this time you can
select Do not connect to Internet.
CONFIGURING THE VIA!dj FOR AN ETHERNET CONNECTION
Recommended Network Configuration
When connecting the VIA!dj to a broadband connection (Cable Modem or DSL), it is highly
recommended that an Ethernet router or gateway is used in the home network. In addition to the
security benefits of the firewall protection that the router provides, the router allows multiple
devices in the home to share a single IP address from the ISP. When choosing a router for the
installation, it is easiest and preferred to use hardware that contains DHCP (Dynamic Host
Configuration Protocol) server software for dynamic IP addressing of the home’s network devices.
Configuring the VIA!dj’s Ethernet Settings
In order to properly configure the VIA!dj to work with a broadband connection, the following
settings have to be entered either automatically (DHCP enabled router) or manually.
•IP Address
•IP Mask
•Gateway
•IP DNS
ELAN HOME SYSTEMS
INSTALLATION MANUAL
Page 7 © ELAN Home Systems 2003 • All rights reserved. 01/03
Recommended Network Configuration

ELAN HOME SYSTEMS
© ELAN Home Systems 2003 • All rights reserved. 01/03 Page 8
INSTALLATION MANUAL
To enter this information:
1. From the Main Menu select Settings
2. From the Settings menu select System Settings
3. From the System Settings menu select Internet Access
4. From the Internet Access menu confirm that the Access Mode is set to Ethernet. If it is not,
press Edit and select Ethernet.
5. Press < Back to return to the System Settings menu.
6. From the System Settings menu select Ethernet Settings
7. From the Ethernet Settings menu select Mode and press Edit
At this point, you will have to choose what mode of operation the VIA!dj will use:
A: Router or Gateway with DHCP Server Software
If a router containing DHCP server software is used, set the Mode in the Ethernet Settings menu
to DHCP. The IP Address, IP Mask, and Gateway settings will be automatically assigned to the
VIA!dj by the router. Just plug in the RJ-45 and that’s it! You will notice in the VIA!dj’s Ethernet
Settings menu that the IP Address, IP Mask, and Gateway are all set automatically and now say
Assigned IP Address, Assigned IP Mask, and Assigned Gateway. This is the function of the
DHCP server software in the broadband router. If these fields are blank or the connection does
not seem to be working, a simple re-boot of the VIA!dj should correct this.
B: Manual Settings
If the home does not have a router containing DHCP server software, or if there is a reason that
the IP address must be set manually, then the four settings above will have to be entered manual-
ly. The first step in this type of installation is to determine the network settings of all PCs already
on the network. It is important that the IP address that is chosen for the VIA!dj does not con-
flict with IP addresses already assigned to other devices.
The necessary information can be found on any computer on the network by going to
Start>Settings>Control Panel>Network Settings or Network Connections.
Alternately, you can use the DOS shell command "ipconfig /all" to determine the computer’s
network settings. Either of these methods will allow you to see the computer’s IP address, subnet
mask, router address (gateway), and DNS servers.
All of this data, except for the last digit in the IP address, can be manually entered into the VIA!dj’s
Ethernet settings. The IP address for the VIA!dj will be the same first three digits of the computer,
and the fourth digit must be unique.

ELAN HOME SYSTEMS
INSTALLATION MANUAL
Page 9 © ELAN Home Systems 2003 • All rights reserved. 01/03
To enter this information:
1. From the Main Menu select Settings
2. From the Settings menu select System Settings
3. From the Ethernet Settings menu highlight Mode and press Edit
4. From the Mode menu, highlight Manual and press ✔Select. This setting will be saved and
you will be returned to the Ethernet Settings menu.
5. From the Ethernet Settings menu select Manual Ethernet Settings
6. From the Manual Ethernet Settings menu, highlight IP Address and press Edit.
7. Using the remote and/or front panel grid, set the first three IP Address numbers to the same
first three numbers as the PC, and make the last number unique. For example: If the PC is
192.168.1.100, then the VIA!dj will be 192.168.1.XXX, where Xcan be any number not
already in use on the home network.
8. Press OK when done.
Note: If there is a DHCP server in the network but you are required to set the
VIA!dj’s Ethernet settings manually for some reason, it is important that the last
number of the VIA!dj’s IP address is not within the range of the DHCP server. The
DHCP server’s range can be determined by going into the setup configuration for
the particular device. (see the Installation Manual for your router)
9. From the Manual Ethernet Settings menu, highlight IP Mask and press Edit
10. Using the remote and/or front panel grid, set the IP Mask to the same number as the
Subnet Mask obtained from the PC.
11. Press OK when done.
12. From the Manual Ethernet Settings menu, highlight Gateway and press Edit.
13. Using the remote and/or front panel grid, set the Gateway to the same number as the
Default Gateway obtained from the PC.
14. Press OK when done.
15. From the Manual Ethernet Settings menu, highlight IP DNS 1 and press Edit.
16. Using the remote and/or front panel grid, set the IP DNS 1 numbers to the same ones as the
DNS Server obtained from the PC.
17. Press OK when done.

ELAN HOME SYSTEMS
© ELAN Home Systems 2003 • All rights reserved. 01/03 Page 10
INSTALLATION MANUAL
NOTE: Depending on the customers ISP, there may only be one DNS Server number
available. This is normal and should not cause any problems.
18. Repeat steps 15, 16 and 17 for IP DNS 2 if available.
CONFIRMING VIA!dj NETWORK CONNECTION
If you are experiencing problems with the network connection to the VIA!dj, there is a useful
command that can be entered from a PC to confirm whether or not the unit is communicating on
the network.
That command is called PING, and it can be typed in a DOS shell or a command prompt. Once
you know the IP address of the VIA!dj (this can be determined from the Ethernet Settings menu),
just type the following command at a DOS prompt:
PING X.X.X.X where X.X.X.X is the IP Address of the VIA!dj you are troubleshooting.
Below is an example of a successful PING response from a properly connected VIA!dj:
Successful PING to IP Address 192.168.1.105
Note that there were 4 attempts to contact the VIA!dj at IP Address 192.168.1.105 and at each
attempt the VIA!dj sent back a “Reply”. The statistics at the bottom of the screen indicate that
there were 4 “packets” sent, that all 4 were received, and none were lost.
The following is an example of a PING command issued to a VIA!dj that the network could not
detect:
Unsuccessful PING to IP Address 192.168.1.103
Note that there were 4 attempts to contact the VIA!dj at IP Address 192.168.1.103, but 0 packets
were received and 4 packets were lost. Instead of a “reply” you get a “Request timed out”: This is
an indication that the either VIA!dj is not wired correctly to the network, or that the VIA!dj’s
Ethernet Settings have not been properly configured.

IV.
RECORDING CDs
The VIA!dj allows you to record CDs at four compression rates. As shown in the table below, the
higher quality options use more space in the VIA!dj’s hard drive:
One of the unique features of the VIA!dj is its 192Kb/s Variable Bit Rate (VBR) recording option.
At this setting, the VIA!dj actually analyzes the content of the music being recorded and adjusts
the sampling rate according to the detail and nuances of particular passages. This gives you a
high-quality recording at 1/6 the hard drive space of an uncompressed CD. This setting is ideal for
whole-house audio distribution systems where the music is primarily being played over in-wall
and/or in-ceiling speakers.
NOTE: When recording a CD, the initial transfer of data is uncompressed.The actual
compression of the data (at whatever Recording Quality option has been selected) takes
place only when the VIA!dj is not playing music.This is important to know as, if you
attempting to record multiple CDs, you may receive a message saying that there is not
enough space on the hard drive to continue recording. If this occurs, you will need to let
the VIA!dj ‘stand’ for a period of time while it compresses the recorded data and frees up
hard disc space.We suggest that you recommend to your client that , if recording multiple
CDs, they do their recording in the evening and let the VIA!dj compress the data overnight
while the VIA!dj is not playing. This only applies to CDs loaded into the VIA!dj’s CD tray.
This does not apply to bulk-loading methods. See Section VI, pg. 14-15, Bulk-Loading
CDs Into the VIA!dj.
DTS 5.1 ENCODED CDs
The VIA!dj can record DTS 5.1 encoded audio CDs. These CDs must be recorded uncompressed
and can only be played out of the VIA!dj’s digital output, which should be connected to a surround
sound processor.
The VIA!dj cannot record:
•Copy protected CDs
•Non-audio CDs
•CD-ROMs that have not been ‘closed’
•HDCD
•CD-i
•SACD
•DVD video or audio
NOTE: To insure 100% audio integrity, recording time may slow down in order to correctly
record the audio information from CDs that may have impurities on them such as finger-
prints, dust, scratches, etc. Also, the VIA!dj uses a great deal of its processing power while
in RECORD mode.You may therefore experience slightly longer delays when accessing
music from the VIA!dj’s hard drive while it is recording.
See the VIA!dj User’s Guide for step-by-step instructions on recording CDs.
ELAN HOME SYSTEMS
INSTALLATION MANUAL
Page 11 © ELAN Home Systems 2003 • All rights reserved. 01/03
SETTING RECORDING APPROX. TOTAL APPROX. SIZE APPROX. TOTAL
(KILOBYTES QUALITY HOURS OF OF A CD FILE AS CAPACITY AS
PER SECOND) RECORDING TIME COMPARED TO COMPARED TO
TO UNCOMPRESSED TO UNCOMPRESSED
128Kb/s Good 2,600 hrs. 1/10 10x
192Kb/s (VBR) High 1,750 hrs. 1/6 6X
320Kb/s Very high 500 hrs. 1/4 4X
Uncompressed Best 240 hrs. — —
(original CD quality)

ELAN HOME SYSTEMS
© ELAN Home Systems 2003 • All rights reserved. 01/03 Page 12
INSTALLATION MANUAL
V.
ADVANCED SETTINGS
PROXY SERVER SETTINGS
On the Internet Access menu there is an option called Proxy Server Settings. If the VIA!dj can
not retrieve album information from the Internet, it is possible that the homeowner’s ISP uses a
different site, or a Proxy Server, to access web sites. If this is the case you will need to contact
the ISP and get the Proxy Server’s address. This information, plus the user name and password,
must then be entered in the Proxy Server Settings menu.
CONTROLLER SETTINGS
XiVALink Options
On the System Settings menu there is an option called Controller Settings. It is possible to use
other manufacturer’s touch panels to control the VIA!dj by connecting them to the Controller port
on the dj’s rear panel. The default Transmission Speed of this port is set at 38,400. A second
Transmission Speed (9600) can be selected by going to Controller Settings>XiVALink
Options>Transmission Speed> Edit.
If using another manufacturer’s touch panel to control the VIA!dj, the Ethernet Mode must be set
to Manual, and the dj’s IP Address must be entered. See Configuring the VIA!dj’s Ethernet
Settings, page 8-10, section B, Manual Settings.
Infrared Options
On rare occasions, a VIA!dj IR command may ‘clash’ with another IR-controlled device, causing
that component to react when a VIA!dj command is issued. Should this occur it is possible to
change the VIA!dj’s IR ‘Code Bank’ in the hope that a different bank will not interfere with other
components. To change the IR Code Bank go to System Settings>Controller Settings>Infrared
Options>Select> Edit and select a different Code Bank. This will not effect VIA!dj operation.
REMOTE DIAGNOSTICS
Remote Diagnostics allows Imerge Technical Support to dial-up a VIA!dj and check its
configuration and settings.
•This trouble-shooting procedure can only take place after ELAN Technical Support has been
contacted and has been unable to diagnose and rectify the problem with the VIA!dj.
•This procedure requires that the VIA!dj’s built-in modem be connected to a phone line. This
procedure can not be done through the Ethernet port.
Should Imerge need to dial-up a VIA!dj, the unit must be set to receive an incoming call. This is
done by going to System Settings>Remote Diagnostics>Select and pressing YES to the
question "Set modem to receive incoming call from technical support?".
Once this option has been selected it is important that all other devices on the phone line that
might ‘pick up’ the phone before the VIA!dj answers it be turned off or disconnected. Imerge
Technical Support can then be contacted (ELAN Tech Support will give you the phone number
once we have determined that we can not resolve the issue) and they will call back the VIA!dj.
Once the procedure has been completed, it is important that you press STOP on the VIA! Touch
Panel or the VIA!dj’s front panel to return the unit to normal operation. You will then need to
re-boot the VIA!dj. Don’t forget to re-connect or turn on all the other telephone devices!

VI.
HARDWARE AND SOFTWARE TOOLS
BULK-LOADING CDS INTO THE VIA!dj
Although the homeowner has the luxury of recording new CDs directly to the VIA!dj’s hard drive by
using the CD tray on the front of the unit, this is obviously not an acceptable method for loading
entire music collections consisting of hundreds of CDs.
For a fast and convenient solution for loading media onto your client’s VIA!dj, ELAN recommends
the XiVA™ MediaLoader.
MediaLoader allows you to automate the process of extracting and encoding audio from up to
200 CD's at a time – a valuable service that you can offer your client!
The XiVA™ MediaLoader package consists of:
• The Powerfile C200S—a PC-controlled 200-disc CD changer with FireWire cable, and
MediaLoader Software
Key Features:
• Load up to 200 CDs in a single operation
•Up to 6X speed
• Variety of formats – both MP3 and uncompressed
•Low maintenance operation – just load and go!
Requirements:
•PC running Windows® XP and a minimum of 1Gb free hard disk space
•Compatible IEEE 1394 FireWire card*
The MediaLoader package is a collaborative product developed and manufactured by Imerge Ltd.
and PowerFile Inc. and is not sold by ELAN Home Systems. It can only be purchased by going to
www.powerfile.com/xiva. MediaLoader is available to authorized ELAN or registered XiVA
dealers only.
*If your PC does not have a FireWire (IEEE1394) PCI Card it is also available for purchase at
www.powerfile.com/xiva.
XIVA™-PRODUCER
XiVA™ Producer is a Windows®-based PC application to be used with XiVA™-based products,
such as the VIA!dj. It allows the end-user to easily and quickly browse, edit, and control the data
associated with albums and tracks on the VIA!dj from a PC connected to an Ethernet network.
ELAN HOME SYSTEMS
INSTALLATION MANUAL
Page 13 © ELAN Home Systems 2003 • All rights reserved. 01/03

Album titles, artist names and genres can be edited, tracks names changed and single tracks or
entire albums deleted. It allows the user to create, edit and delete playlists, control playback of
music on any output and transfer audio tracks from PC to the VIA!dj. It also allows you to transfer
MP3 files from a PC.
Requirements: PC running Windows® 98, ME, NT, 2000 and XP
XiVA™ Producer software is a Free download available from www.xiva.com
XIVA™-STOR/ XIVA™-UTILITIES
The XiVA™-Stor PC is a combination of 240Gb of removable storage (enough for the largest
media collection!) and XiVA™-Utilities, the powerful backup and restore software application. With
a single command the backup process with transfer the entire media collection from a VIA!dj to
the PC over an Ethernet connection.
Key Features:
•Backup up to 240Gb of data
•Removable drives for a "per client" solution
•Low maintenance operation – backup or restore with a single command
•Compatible with XiVA™ MediaLoader CD loading solution
XiVA™-Stor/ XiVA™-Utilities is available from Imerge Ltd. For more information go to
www.imerge.co.uk or in the U.S call 703-331-5563.
VIA!dj RS-232 PROTOCOL
The VIA!dj can also be controlled using an RS-232 serial controller such as the ELAN SC4
System Controller. The RS232 protocol for the VIA!dj can be found on the ELAN website,
www.elanhomesystems.com.
TECHNICAL SUPPORT
TECH SUPPORT HOURS
Monday - Friday: 8:00am - 7:00pm Eastern Time
Saturday: 9:00am - 2:00pm Eastern Time
HOW TO CONTACT US
ON-Site at a job: 1-800-622-3526
Other Tech calls: 1-859-269-7760
FAX: 1-859-266-4655
EMAIL: [email protected]
WEBSITE
www.elanhomesystems.com/dealer (must have password)
ELAN HOME SYSTEMS
© ELAN Home Systems 2003 • All rights reserved. 01/03 Page 14
INSTALLATION MANUAL

© ELAN Home Systems 2003 • All rights reserved. 01/03 • First Edition • P/N: 9900076
Other manuals for ViA! dj
3
Table of contents
Other Elan Media Player manuals