Dura Electric Curtis Stone Parts list manual

AIRFRYER PRESSURE COOKER
USAGE INSTRUCTIONS
PRESSURE
COOK
SAUTE
STEAM
SLOW COOK
ROAST
PRESSURE
KEEP WARM
CANCEL
TEMPTIME
START
STOP
DELAY
TIME
BROIL
DEHYDRATE
AIRFRYER
AIRFRY
™

2 3
IMPORTANT SAFEGUARDS
1. BEFORE USING YOUR AIRFRYER PRESSURE COOKER, READ ALL
INSTRUCTIONS CAREFULLY.
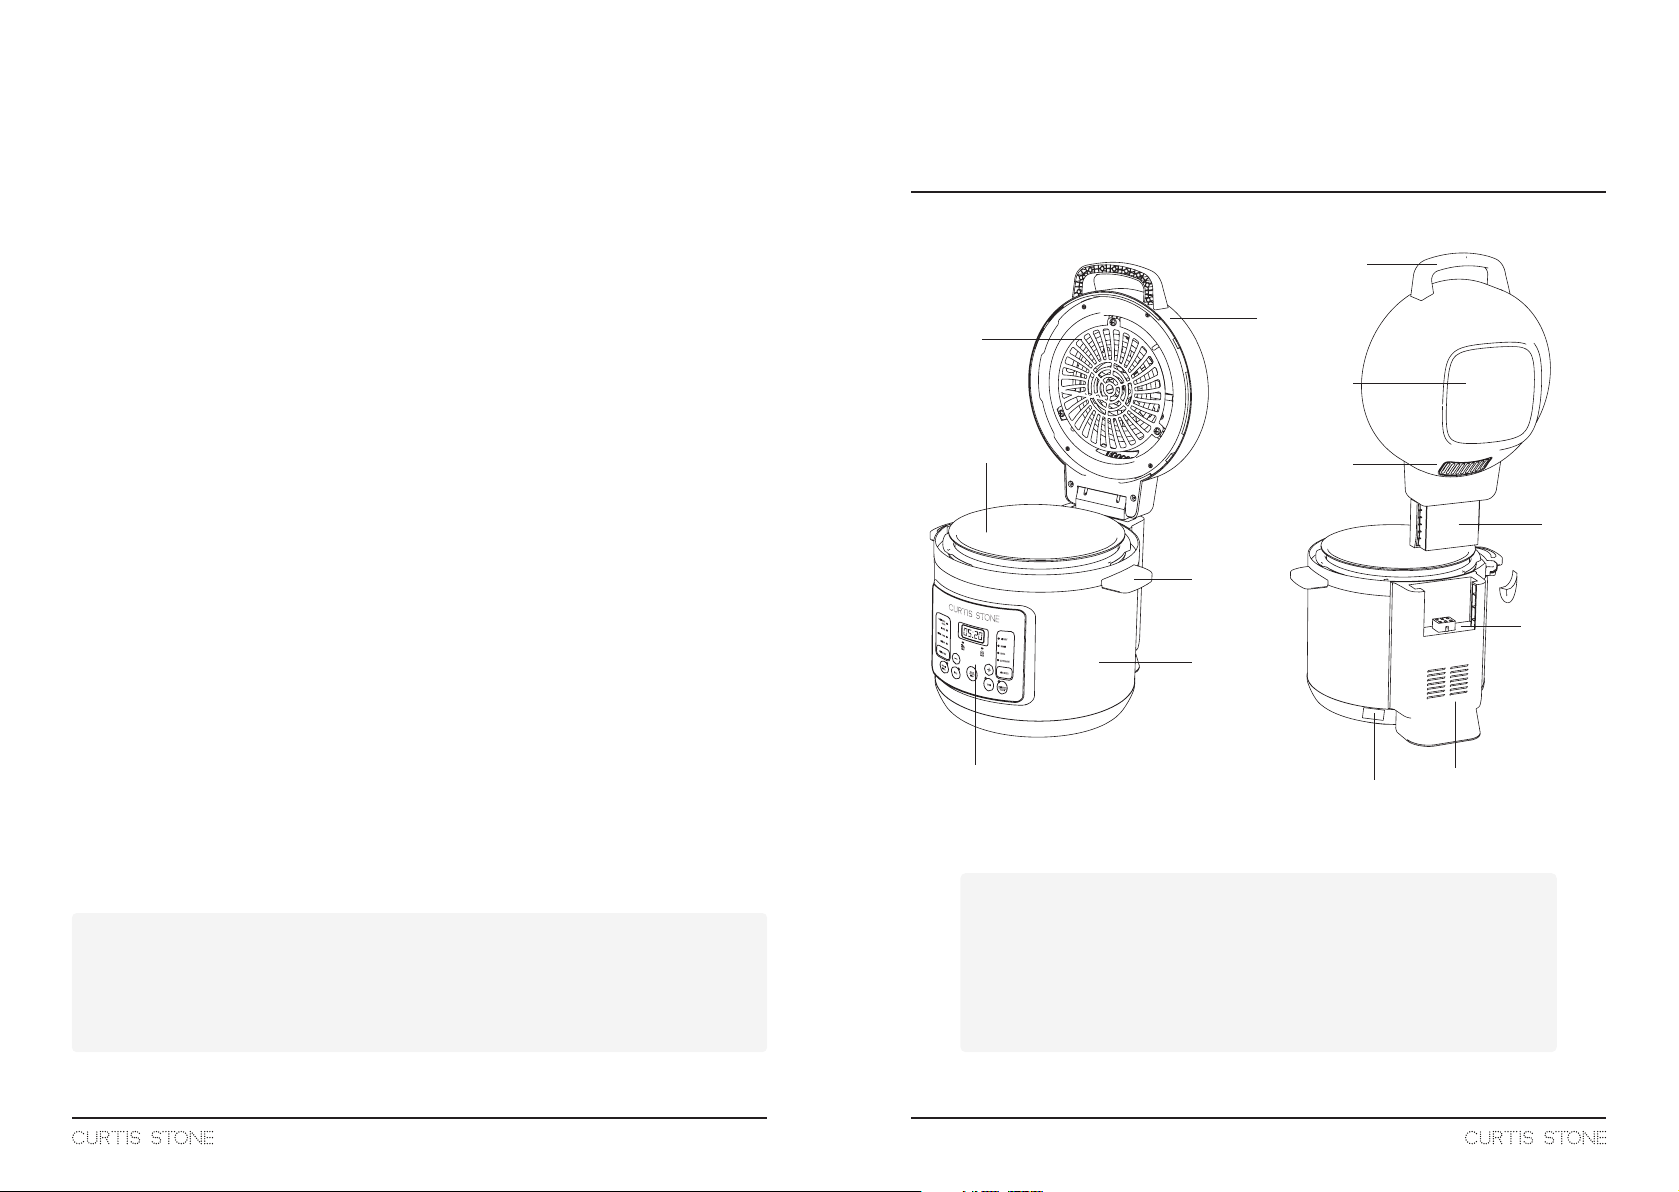
2. When using the air frying mode, always place the foods in the Airfry Basket
to fry them to avoid contact with the heating elements.
3. DO NOT pour oil in the Airfry mode, because it may result in a fire hazard.
4. When the product is working, DO NOT cover the air inlet and outlet of the
air fryer lid.
5. DO NOT touch the lid after the product has been worked.
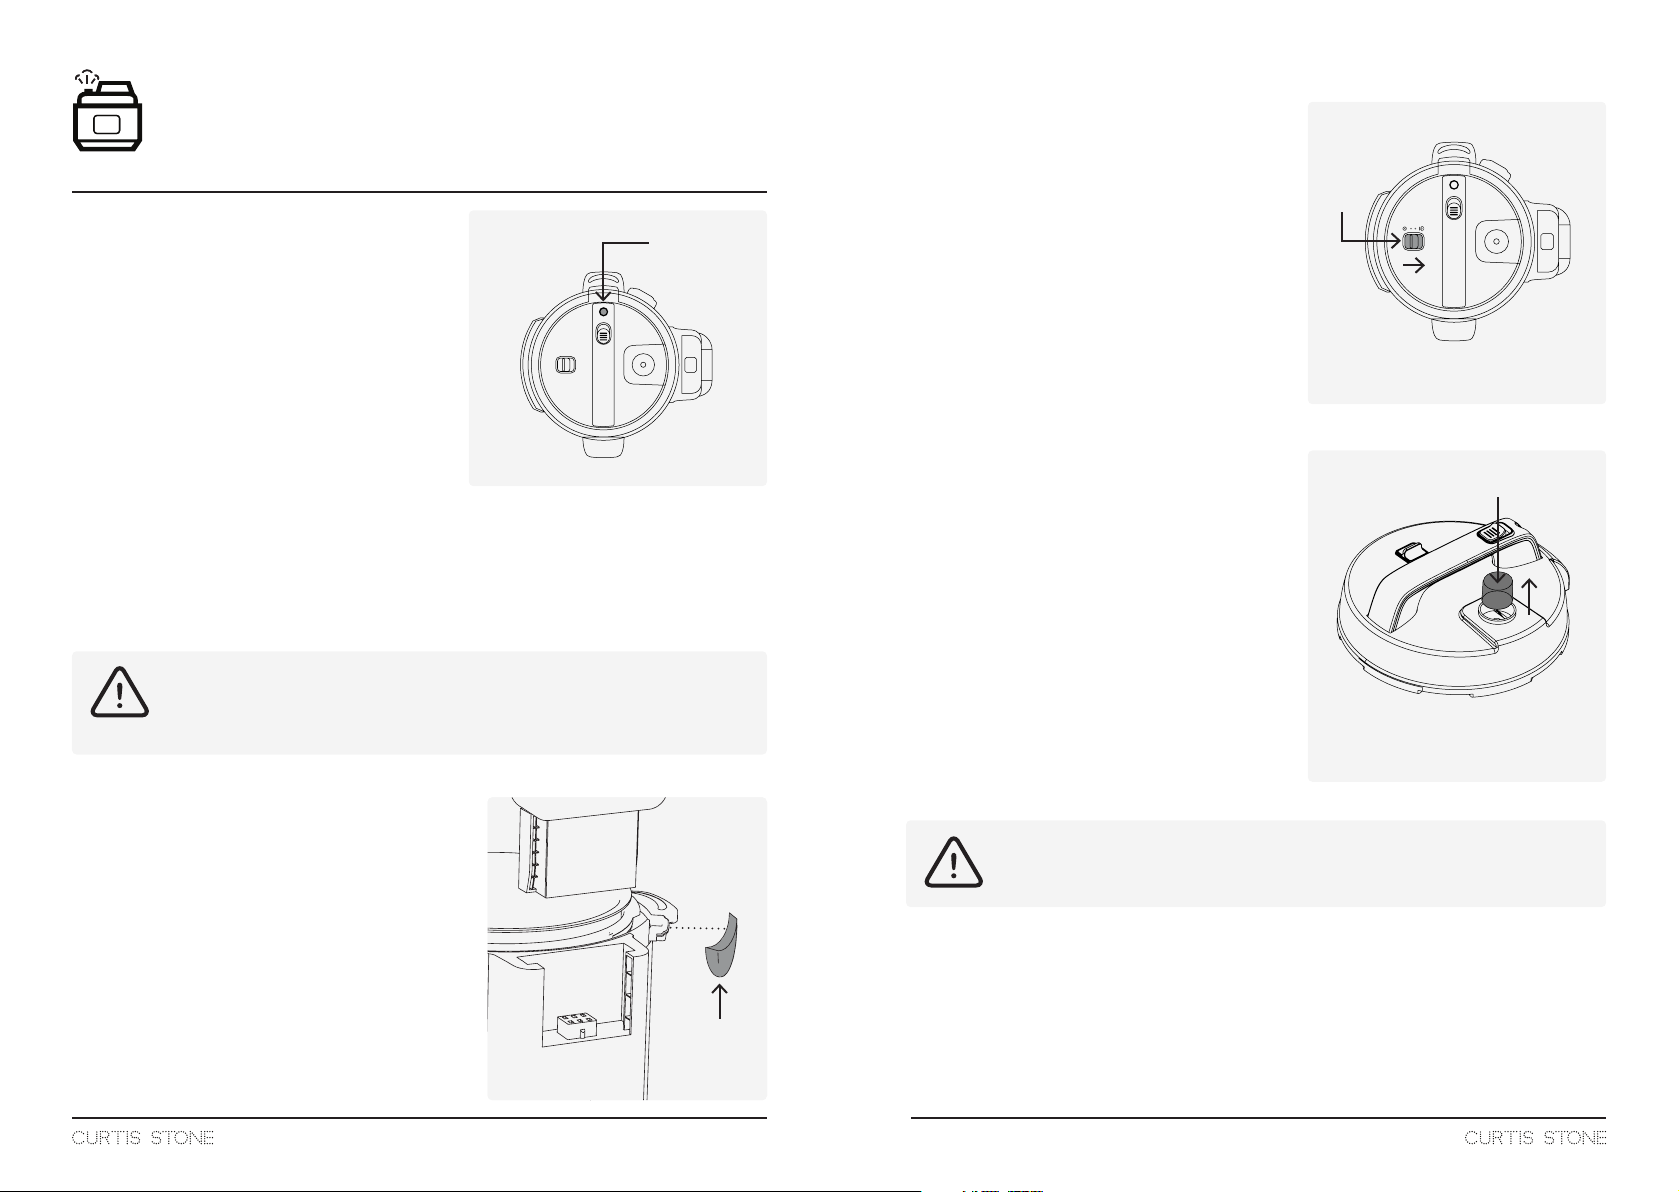
6. DO NOT open the lid when the float valve is raised.
7. DO NOT touch near the surface of the Steam Release Valve and the area
above it to avoid scalding steam.
8. DO NOT immerse the product in water or other liquids, or rinse under the
tap.
9. Please check if the voltage marked by the product matches the local
power supply voltage, before connecting the product to the power supply.
10. DO NOT use this product if the plug, power cord, or the product is
damaged.
11. This product is not intended for people (including children) who are
physically impaired,have sensory or mental disabilities, or lack relevant
experience and knowledge, unless someone responsible for their safety
supervises or directs their use of the product.
12. Keep the product and its cables out of the reach of children.
13. Keep the power cord away from hot surfaces.
14. The product can only be connected to a wall outlet with a grounding wire.
Make sure the plug is properly plugged into the wall outlet
15. Always place and use this product on a dry, stable, level, and level surface.
16. This product cannot be operated with an external timer or a separate
remote control system.
17. DO NOT place the product against a wall or against other products. At the
back of the product, at least 10 cm of space should be left on both sides
and above.
18. DO NOT place anything on this product.
19. DO NOT use this product for any purpose other than as described in this
user manual.
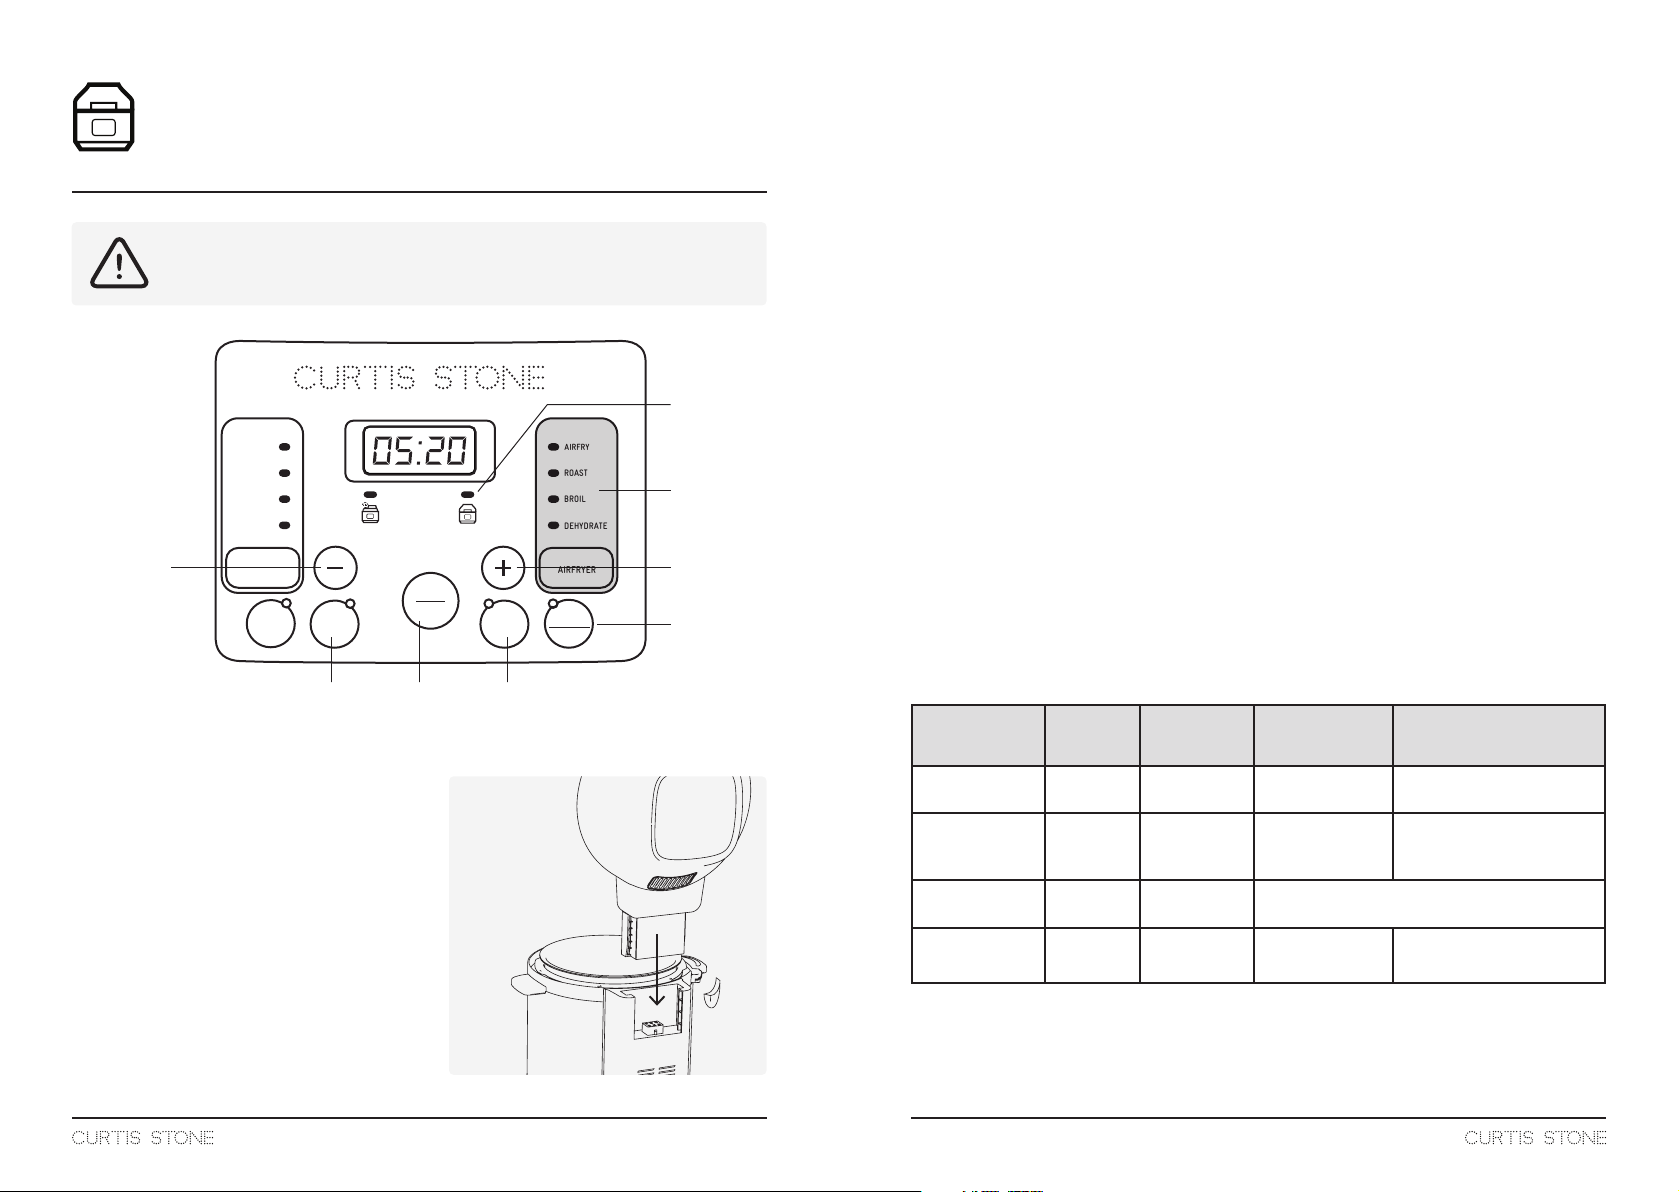
20. During working, the air outlet behind the air fryer lid will release high temperature
steam. Keep your hands and face at a safe distance from the steam and air
outlets.
21. During working ,the surface will be hot.
22. When the supplied accessories are used in the Airfryer, the accessories will also
be heated. Please be careful when operating.
23. This product is limited to households. It not be used in sta canteens in shops,
oces, farms or other work environments.
24. It must not be used by hotels, car hotels, places that provide accommodation and
breakfast, and other accommodations.
25. The outside temperature should be between 40F and 105F when operating.
26. Always unplug the product after use.
27. The product must be allowed to cool for around 30 minutes before cleaning.
28. DO NOT overfill the fry basket.
29. Make sure that the foods cooked in this product are finally golden brown, not
black or brown. The charred part should be discarded.
30. When taking out the fry basket, please bring special insulating gloves for cooking
to avoid burns.
31. Be careful when cleaning the area above the cooking chamber (hot heating
elements, metal parts edges).
32. DO NOT use this product for any purpose other than those described in the user
manual, and be sure to use original accessories.
33. DO NOT touch hot surfaces of pressure cooker. Use side handles for carrying.
34. DO NOT place the pressure cooker on or near a hot gas or electric burner, or in a
heated oven.
35. Intended for countertop use only. DO NOT operate this appliance on an unstable
surface.
36. DO NOT use pressure cooker for anything other than intended use.
37. Never deep fry or pressure fry in the cooker with oil.
38. DO NOT let cord hang over edge of table or counter, or touch hot surfaces.
39. DO NOT use cooker in electrical systems other than 110-120V~/60Hz.
40. DO NOT operate cooker with damaged cord or plug, or after the cooker
malfunctions or has been damaged in any manner.
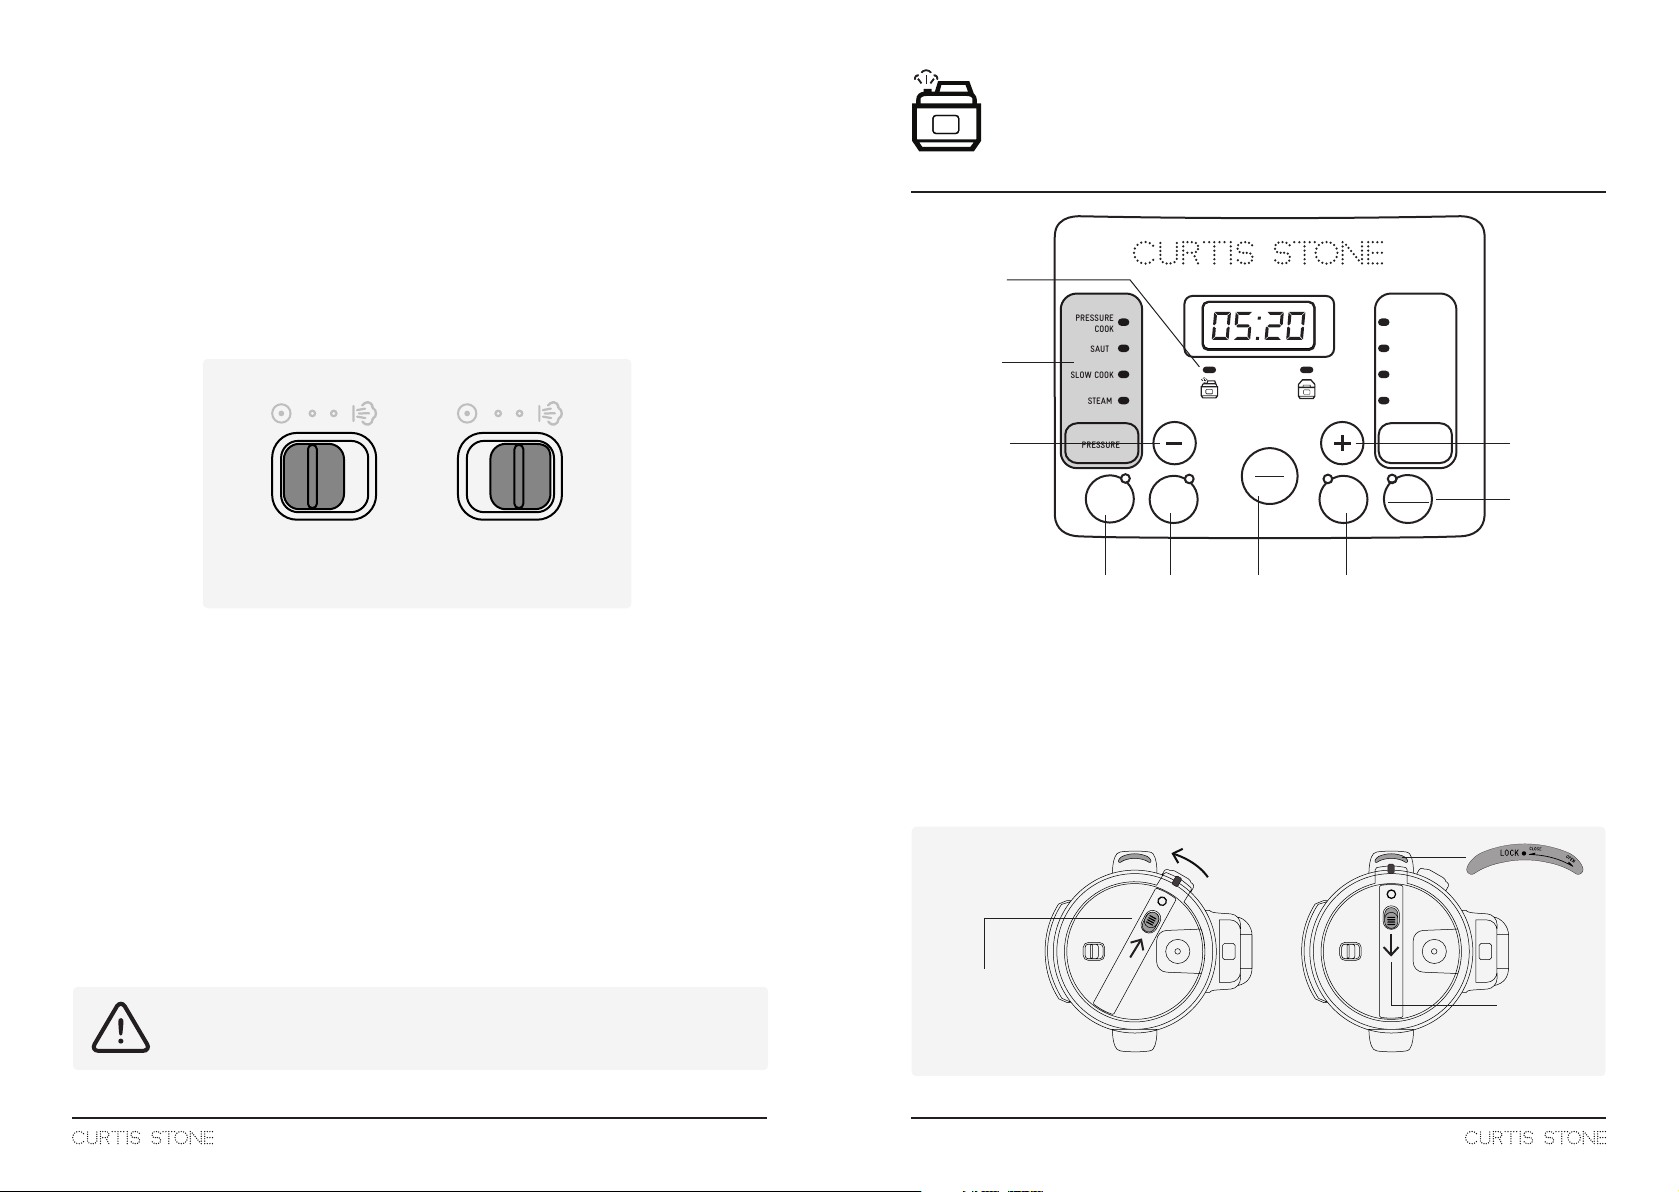
41. DO NOT open the cooker until the cooker has cooled and all internal pressure
has been released. If the float valve is still up or the lid is dicult to turn, it is an
indication that the cooker is still pressurized - DO NOT force it open.
42. For all pressure cooking programs, the total amount of pre-cooked food and
liquid in the inner pot should not pass the 4/5 line. When cooking food that
expands during cooking such as rice, beans or vegetables, the inner pot should
not pass the FULL CUP line. Over filling may risk clogging the steam release
and developing excess pressure. This may also cause leakage, personal injuries,
or damage to the cooker. These fill level warnings do not apply to non-pressure
cooking programs.
Like any electrical appliance, the Airfryer Pressure Cooker must be handled with care at
all times. To ensure your own safety, the following precautions should be followed.

4 5
43. Make sure the Pressure Cooker Lid is in the Sealed position for all the pressure
cooking programs.
44. This appliance should not be used by or near children or by individuals with
disabilities or limited knowledge in using pressure cookers.
45. DO NOT immerse the cooker base in water. To protect against electrical shock, do
not immerse the cord, power plug, or cooker in any liquid.
46. Always attach plug to the cooker first, then plug cord into the wall outlet. To
disconnect, turn controls OFF, then remove plug from the wall outlet. Unplug
from power outlet when not in use and before cleaning. Allow the cooker to cool
before putting on or taking o parts, and before cleaning.
47. For Household use only. Not intended for outdoor use.
48. Extreme caution must be used when moving a pressure cooker containing hot
liquids.
49. This appliance cooks under pressure. Improper use may result in scalding injuries.
Make certain the lid is properly closed before operating. Caution: To reduce the
risk of electric shock, cook only in removable containers (inner pot).
50. Use of accessories and parts that are not recommended or supplied by the
manufacturer may cause the cooker to malfunction or serious hazardous
situations including personal injury. Cook only in the aluminum INNER POT. Other
brands may not have the correct curvature to match the heating element.
51. Be aware that certain foods, such as applesauce, cranberries, pearl barley,
oatmeal and other cereals, split peas, noodles, macaroni, rhubarb, and spaghetti
can foam, froth, sputter, and clog the steam release. These foods should not be
cooked under pressure cooking settings unless as directed in cooker recipes.
52. Always check the Steam Release Valve and Float Valve for clogging before use.
53. If this appliance begins to malfunction during use, immediately unplug the cord.
54. DO NOT use or attempt to repair a malfunctioning appliance!
55. CAUTION HOT SURFACES. This appliance generates heat and escaping steam
during use. Proper precautions must be taken to prevent the risk of personal
injury, fires, and damage to property.
56. DO NOT pressure relief during heating.
57. DO NOT use the Pressure Cooker without INNER POT.
SAVE THESE INSTRUCTIONS
FOR HOUSEHOLD USE ONLY
PARTS & ACCESSORIES
1. AIR FRYER LID
2. ELEMENT COVER
3. INNER POT
4. CONTROL PANEL
5. COOKER BASE HANDLES
6. BASE
7. AIR FRYER LID HANDLE
8. AIR INTAKE
9. AIR VENT
10. LID CONNECTOR
11. LID CONNECTOR SOCKET
12. BACK VENTS
13. POWER SOCKET
412
13
3
2
1
7
8
9
10
11
5
6

6 7
12
5 76
9 10
11 12
84
3
PRESSURE
COOK
SAUT
STEAM
SLOW COOK
ROAST
PRESSURE
KEEP WARM
CANCEL
TEMPTIME
START
STOP
DELAY
TIME
BROIL
DEHYDRATE
CONTROL PANELPARTS & ACCESSORIES
14
16
17
15
18
19
22
20 21
14. STEAM RELEASE VALVE
15. PRESSURE COOKER LID HANDLE
16. LOCKING SWITCH
17. STEAM RELEASE SWITCH
18. AIRFRY BASKET
19. STEAMER RACK
20. SPOON
21. MEASURING CUP
(CAPACITY 5.4oz/160ml)
22. POWER CORD
1. TIME DISPLAY
2. PRESSURE COOK CONTROLS
3. AIR FRYER CONTROLS
4. START/STOP BUTTON
5. DELAY TIME BUTTON
6. TIME ADJUST BUTTON
7. TEMP ADJUST BUTTON
8. KEEP WARM/CANCEL BUTTON
9. ADJUST TIME/TEMP DOWN
10. ADJUST TIME/TEMP UP
11. PRESSURE COOK INDICATOR
12. AIR FRYER INDICATOR
AIRFRY
É
AIRFRYER

8 9
1. Insert the Airfryer lid into the LID
CONNECTOR SOCKET on the back side
of the base (see Figure 1).
NOTE: Make sure the Aifryer lid is fully
inserted then grasp the front handle and
fully close the lid to the BASE.
2. Put the STEAMER RACK inside the
INNER POT, then open the AIRFRYER LID
and place the INNER POT into the BASE.
3. Place your food in the AIRFRYER BASKET, do not exceed the top edge of the Air frying
basket. Then place the AIRFRYER BASKET into the INNER POT and rest on top of the
STEAMER RACK. Position carefully so that the AIRFRYER BASKET has an even gap
around the outer edge and the inside of the INNER POT to ensure good airflow for best
cooking results. Finally close the Air fryer lid.
NOTE: Ensure the AIRFRYER LID is closed otherwise you will not be able to select
Airfyer mode on the front control panel.
4. Insert the power cord into the socket on the back side of the BASE, then insert the end
of the plug into a power socket. When the power in connected , the product will emit a
beep and enter the standby state. The display shows “— — — —”.
NOTE: (The Airfryer indicator lights up, indicating that it switches to the air fryer mode,
at which point the electric pressure cooker function is not available).
5. Select a cooking mode. Press the Airfryer button to cycle through the four cooking
modes, AIRFRY, ROAST, BROIL and DEHYDRATE. A light will illuminate next to the
cooking mode to show you which mode you are on.
6. Adjust your settings. Press "TIME" to adjust the cooking time, then press "+" and "-"
keys to adjust the time. Press "TEMP" to adjust the cooking temperature then press
"+" and "-" keys to adjust the temperature. For the adjustable TIME and TEMP range
for each mode, please refer to (Table 1). Note: you can still adjust “TIME” and “TEMP”
settings after pressing “START”.
7. To start, press the ”START” button, the Airfryer will beep and start cooking your food.
When the timer reaches Zero you will hear a beep, and the Airfryer will stop working.
Gently lift the lid upwards OR remove the lid. Using heat protected Gloves remove the
AIRFRY BASKET from the INNER POT. Be careful not to touch the underside of the
Airfryer lid as it will be very hot.
AIRFRYER MODE
FUNCTION DEFAULT
TIME
ADJUST
TIME
DEFAULT
TEMPERATURE (˚F)
ADJUST
TEMPERATURE (˚F)
AIRFRY 20min 390 300 to 400
250 to 400
Temperature is fixed at 400°F
120 to 195
375
160
1min — 1hr
1min — 1hr
15min
1 — 30min15min
6hrs 1 — 12hrs
ROAST
BROIL
DEHYDRATE
NOTE: AIRFRYER mode does note use KEEP WARM function and DELAY
TIME function. When selecting the AIRFRYER mode, the temperature is
displayed. After starting the cooking time will be displayed.
FIGURE 1
TABLE 1
1. INSERT
AIRFRYER LID
AIR FRYER
MODE
FUNCTIONS
AIRFRYER
MODE
INDICATOR
CANCEL
ADJUST
TIME/TEMP
ADJUST
TIME/TEMP
START/STOPADJUST
TIME
ADJUST
TEMP
PRESSURE
COOK
SAUT
STEAM
SLOW COOK
ROAST
PRESSURE
KEEP WARM
CANCEL
TEMPTIME
START
STOP
DELAY
TIME
BROIL
DEHYDRATE
HOW TO USE AIRFRYER MODE
AIRFRYER
AIRFRY
É

10 11
PRESSURE COOKER OVERVIEW
FLOAT VALVE
CONDENSATION COLLECTOR
STEAM RELEASE SWITCH
STEAM RELEASE VALVE
The float valve rises when the pressure within
the cooker increases. When the float valve
is popped up it prevents the LID LOCKING
SWITCH from moving forward, preventing the
lid to open which is how you will know the
cooker is pressurized. When the float is down,
the cooker is depressurized, allowing the LID
LOCKING SWITCH to be pushed forward then
allowing the lid to be rotated clockwise and be
opened.
How to remove the FLOAT VALVE and re-install
for cleaning.
Turn the lid over. Detach the silicone cap from the
bottom side of the float valve. Remove the float
valve from the top of the lid. Do not discard the
float valve or silicone cap. To Install, place the
FLOAT VALVE into the FLOAT VALVE hole on the
top of the lid. While holding in place (recommend
to use a small screw driver) turn over the lid.
Attach the silicone cap to the bottom of the FLOAT
VALVE.
The condensation collector is located at the back of
the cooker BASE (see Figure 3) and collects overflow
moisture from the rim of the cooker.
NOTE: The condensation collector must be installed
before cooking. It must be emptied and cleaned after
each use.
The steam release valve sits loosely on the
steam release pipe. When the cooker releases
pressure, steam ejects from the top of the
steam release valve.
1. Remove the Steam Release Valve
Pull steam release valve up and o steam
release pipe (see Figure 5). Steam release
valve must be installed before use and
cleaned frequently.
2. Install the Steam Release Valve
Place the steam release valve on the steam
release pipe and press down firmly. The
steam release valve sits loosely on the
steam release pipe when installed properly
but should remain in place when the lid is
turned over.
The STEAM RELEASE SWITCH is located on
the PRESSURE COOKER LID and controls the
amount of pressure released in the cooker.
1. Sliding the STEAM RELEASE SWITCH
to the OPEN position (see Figure 4 & 6)
releases pressure in the cooker which will
allow steam to release from the top of the
STEAM RELEASE VALVE
1. Remove the Condensation Collector
Pull the condensation collector away from the
cooker BASE. Do not pull down.
2. Install the Condensation Collector
Align the condensation collector over the
aligning tabs on the back of the cooker BASE
and slide the condensation collector into place.
FIGURE 3
FIGURE 4
FIGURE 2
FIGURE 5
1. SLIDE SWITCH
TO RELEASE STEAM
1. PULL STEAM RELEASE
VALVE UP AND OFF
CONDENSATION
COLLECTOR
FLOAT VALVE
STEAM RELEASE VALVE
STEAM
RELEASE
SWITCH
NOTE: While the FLOAT VALVE is up, the contents of cooker are under
extreme pressure. Do not try to remove the lid while the float valve is still up.
Before removing the lid, all pressure must be released, and FLOAT VALVE
must be down. Never attempt to force the lid open.
WARNING: Do not cover or block to steam release valve. Steam ejected from
the STEAM RELEASE VALVE is hot. Do not place hands, face, or any exposed
skin over the STEAM RELEASE VALVE when releasing pressure.

12 13
SEALING RING
When the PRESSURE COOKER LID is closed, the sealing ring installed on the underside of
the lid creates an air-tight seal between the lid and the cooker base.
The sealing ring will stretch over time with normal use and should be replaced as soon as
stretching, deformation, or damage is noticed.
1. Remove the Sealing Ring
Grip the edge of the sealing ring and pull out from behind the circular stainless steel
channel.
2. Install the Sealing Ring
Place the sealing ring over the sealing ring rack and press it into place. Press down
firmly to ensure it is attached properly.
The sealing ring should sit snug behind circular stainless steel channel and should not
fall out when the lid is turned over.
WARNING: The sealing ring must be installed before using the cooker and
should be cleaned after each use.
1. Remove the Pressure cooker lid o the BASE. NOTE: If the Airfryer lid is sitting on the
base the Pressure cooker Mode will not be available, please remove.
2. Place your food in the INNER POT according to your recipe. Then place the INNER POT
into the BASE. Finally close the Pressure cooker lid. See Figure 7 on opening and closing
the pressure cooker lid. NOTE: after closing and locking lid in place check that it is firmly
locked. You should not be able to rotate the lid in either direction.
PRESSURE COOKER MODE
PRESSURE
COOK
MODE
FUNCTIONS
PRESSURE COOK
MODE
INDICATOR
KEEP WARM
ADJUST
TIME/TEMP
ADJUST
TIME/TEMP
START/STOPADJUST
TIME
DELAY
TIME
ADJUST
TEMP
HOW TO USE PRESSURE COOKER MODE
FIGURE 7
1. PUSH LOCKING
SWITCH FORWARD
AND ROTATE LID
ANTI-CLOCWISE
3. RELEASE
LOCKING
SWITCH TO
LOCK LID
2. ROTATE LID
PRESSURE
COOK
SAUT
STEAM
SLOW COOK
ROAST
PRESSURE
KEEP WARM
CANCEL
TEMPTIME
START
STOP
DELAY
TIME
BROIL
DEHYDRATE
AIRFRYER
AIRFRY
É
DEPRESSURIZING THE COOKER
Follow recipe instructions for depressurizing the cooker. When the cooker has completely
depressurized, the float valve sitting inside the handle recess drops allowing the Locking
switch to be pushed forward and release the lid.
QUICK RELEASE: To manully release the pressure in the cooker move the STEAM RELEASE
SWITCH to the open position (see Figure 6).
NATURAL DEPRESSURIZATION: When your program has ended, leave the STEAM RELEASE
SWITCH in the closed position. The temperature within the cooker will drop and depressurize
naturally over time. Depressurization time varies based upon the volume and type of food
and liquid.
STEAM RELEASE SWITCH
CLOSED OPEN
FIGURE 6

14 15
FUNCTION DEFAULT
TIME
ADJUST
TIME
MAX APPOINTMENT
TIME
MAX KEEP WARM
TIME
PRESSURE COOK 10min 24hrs 24hrs
24hrs 24hrs
24hrs 24hrs
24hrs 24hrs
1min - 4hrs
20min 1 - 30min
1 - 12hrs2hrs
8min 1 - 30min
SAUTÉ
SLOW COOK
STEAM
3. Insert the power cord into the socket on the back side of the BASE, then insert the end
of the plug into a power socket . When the power in connected , the product will emit a
beep and enter the standby state. The display shows “— — — —”.
Note: (The Pressure cooker mode indicator lights up, indicating that you are in Pressure
cooker mode, at which point the Airfryer mode function is not available).
4. Select a cooking mode. Press the “PRESSURE” button to cycle through the four cooking
modes, PRESSURE COOK, SUATE, SLOW COOK and STEAM. A light will illuminate next
to the cooking mode to show you which mode you are on.
5. Adjust your settings. Press "TIME" to adjust the cooking time, "+" and "-" keys to adjust
the time. Press "TEMP" to adjust the cooking temperature then press "+" and "-" keys
to adjust the for “L” low or “H” high pressure cook. For the adjustable TIME and TEMP
range and availability for each mode, please refer to (Table 2). Note: you can still adjust
“TIME” and “TEMP” settings after pressing “START”.
6. DELAY TIME
The DELAY TIME option allows you to set a delayed start time if you wish your recipe
to be ready at a later time. To use simply press the DELAY TIME button then using the
“+" and "-" buttons to adjust a delay time. You can choose from 30minutes to 24hours
in 30 minute steps . When the timer reaches zero the Pressure Cooker will start cooking.
NOTE:This option only works for PRESSURE COOK, SLOW COOK and STEAM cooking
modes.
WARNING : Delay start program is not recommended for porridge,oatmeal or other
foamy and thick liquids . Cooking progress should be monitored when cooking these
foods.
7. To start, press the “START“ button, the Pressure cooker will emit a beep and enter the
working state. NOTE: The Timer does not start until the correct pressure is reached, the
display will show bars rotating in a clockwise motion. This can take up to 20 minutes
before your set timer starts depending on the amount of food and what your cooking.
When the timer reaches zero you will hear a beep, and the Pressure cooker will stop
working. To be able to release the lid you must firstly release any pressure in your
Pressure Cooker by pushing the STEAM RELEASE SWITCH button forward until all built
up steam is released. You may now remove the lid. (ref. Table 2)
Note: in “SAUTE’” mode the lid is not used.
TABLE 2
TROUBLE SHOOTING
SOLUTIONPROBABLE CAUSE
PROBLEM
Diculty with
closing the lid.
Diculty with
opening the lid.
Steam leaks
from the rim of
the lid.
Steam leaks
from the float
valve.
Silicon gasket is not
properly installed.
Float valve in the
popped-up position.
Pressure exists
inside the cooker.
No silicon gasket
(sealing ring).
Food debris attached
to the silicon gasket.
Silicon gasket
damaged.
Lid not closed
properly.
Food debris on the
float valve silicone
seal.
Float valve silicone
ring worn-out.
Position the steam release valve to the
venting position to reduce the internal
pressure. Open the lid after the pressure
is completely released.
Install the silicon gasket.
Clean the silicon gasket.
Replace the silicon gasket.
Open then close the lid again.
Clean the float valve silicone seal.
Replace the float valve silicone ring.
Position the silicon gasket well.
Slightly press the float valve downward.
If your Airfryer Pressure Cooker is not working properly, check whether you are able to fix
the problem yourself using the table below. If the problem cannot be fixed with the steps
that are listed, contact the customer service department.

16 17
SOLUTIONPROBABLE CAUSE
PROBLEM
Steam comes
out from the
pressure valve
non-stop.
Rice is too soft.
Rice is half
cooked or too
hard.
Display remains
blank after
connecting the
power cord.
Occasional
ticking or light
cracking sound.
Displays "E01",
"E02" or "E04"
error code.
Displays "E03"
error code.
Silicon gasket is not
properly installed.
Float valve in the
popped-up position.
Too little water.
Too much water.
Lid opened too early.
Bad power connection
or no power.
Cooker's electrical
fuse has blew.
The sound of power
switching and
expanding pressure
board when changing
temperature.
Bottom of the inner
pot is wet.
Food burned on the
bottom of inner pot.
Overheating, power
board is
malfunctioning.
The cooker is
malfunctioning.
Contact customer service.
This is normal.
Wipe bottom of the inner pot dry before
cooking.
Clean the sticky or burned food o the
inner pot.
Position the silicon gasket well.
Slightly press the float valve downward.
Adjust dry rice and water ratio according
to recipe.
Adjust dry rice and water ratio according
to recipe.
Inspect the power cord to ensure a good
connection, check if the power outlet is
active.
After cooking cycle completes, leave the
lid on for 5 more minutes.
This appliance requires little maintenance. It contains no user serviceable parts. Do
not try to repair it yourself. Contact the customer service department for any unusual
issues you may experience.
1. Always unplug Airfryer Pressure Cooker before cleaning.
2. Ensure the appliance has cooled down before cleaning.
3. To clean Base, Aifryer Lid and Pressure Cooker Lid, wipe down with a damp cloth
and dry thoroughly. Never submerge in water or other liquids.
4. To clean the Steam Rack, Airfryer Basket, Spoon. Never use harsh chenical
detergents, powder or scouring pads on accessories. If placing in the dishwasher,
place on top rack.
5. To clean Inner Pot and Airfryer basket. Soak in hot water for few hours for easy
cleaning. Then wipe down with a damp cloth and allow to dry.
6. Do not use abrasive cleaners.
7. Store Airfryer Pressure Cooker in a clean dry place.
8. Contact Customer Service for any issues or malfunctions that should occur.
CARE & CLEANING

Table of contents