DuraComm PSDA-MU1 User manual

Page 1 of 47 April 20, 2022
PSDA-MU1
Annunciator with Remote Monitoring for BDA Emergency Radio System
Owners Guide
*NOTE: Specifications are subject to change without notice.
Description
The DuraComm Annunciator provides visual and audible alarms at the installed location of a BDA in an Emergency In-
Building Radio system. This annunciator is designed to monitor NFPA 72 IDC Circuits and report the status to a Fire alarm
panel via Form C relay contacts. Power input is 90 to 264 VAC with an internal 12 Volt 12-hour backup battery. A loud
audible alarm will sound when a fault or trouble alarm is triggered. The Alarm can be muted until a normal condition is
restored, or until a scheduled daily unmute occurs. Audible alarm Mute, Unmute, and Self-Test buttons are located
inside for security.
It also provides remote monitoring via Ethernet. This allows the test point voltages to be monitored in relation to their
alarm points by a bar graph for each monitored input. The internal battery backup voltage is also monitored with its own
bar graph. Password-protected remote-control functions allow the system designer to set alarm voltages, manage user
logins, schedule audible alarm unmute, and many other features. Notifications of alarms can be sent via email or SNMP
traps. The DuraComm Annunciator comes with a 3-year warranty.
•Designed to Monitor NFPA 72 IDC Circuits
•NEMA 4, UL Listed Enclosure E333443
•AC Power 90-264 VAC
•Automatic Internal Battery Backup
•Monitors up to 6 Closed Contacts and wiring
•Separate 50 Ohm Antenna Fail
•9 Form C Relays to Connect to Fire Alarm Panel,
Including System Fault and System Trouble
•9 Bright LEDs Indicate Status
•Audible Alarm with Inside Mute/Unmute
•User Scheduled Unmute
•Self-Test Button Inside
•Remotely Monitor Status and More via Ethernet
•Email and SNMP notifications
•3 Year DuraComm Warranty

Page 2 of 47
Table of Contents
Description.............................................................................................................................................................................. 1
Table of Contents.................................................................................................................................................................... 2
Section 3: PSDA-MU1Feature List........................................................................................................................................... 4
Simplified Theory of Managing an IDC Circuit ........................................................................................................................ 5
DuraComm Annunciator Internal Operation Basics ............................................................................................................... 6
DuraComm Annunciator Remote Monitoring Features ......................................................................................................... 6
Section 1 | Important Safety Instructions .............................................................................................................................. 8
Section 2 | Installation............................................................................................................................................................ 8
IMPORTANT SAFETY INSTRUCTIONS............................................................................................................................... 8
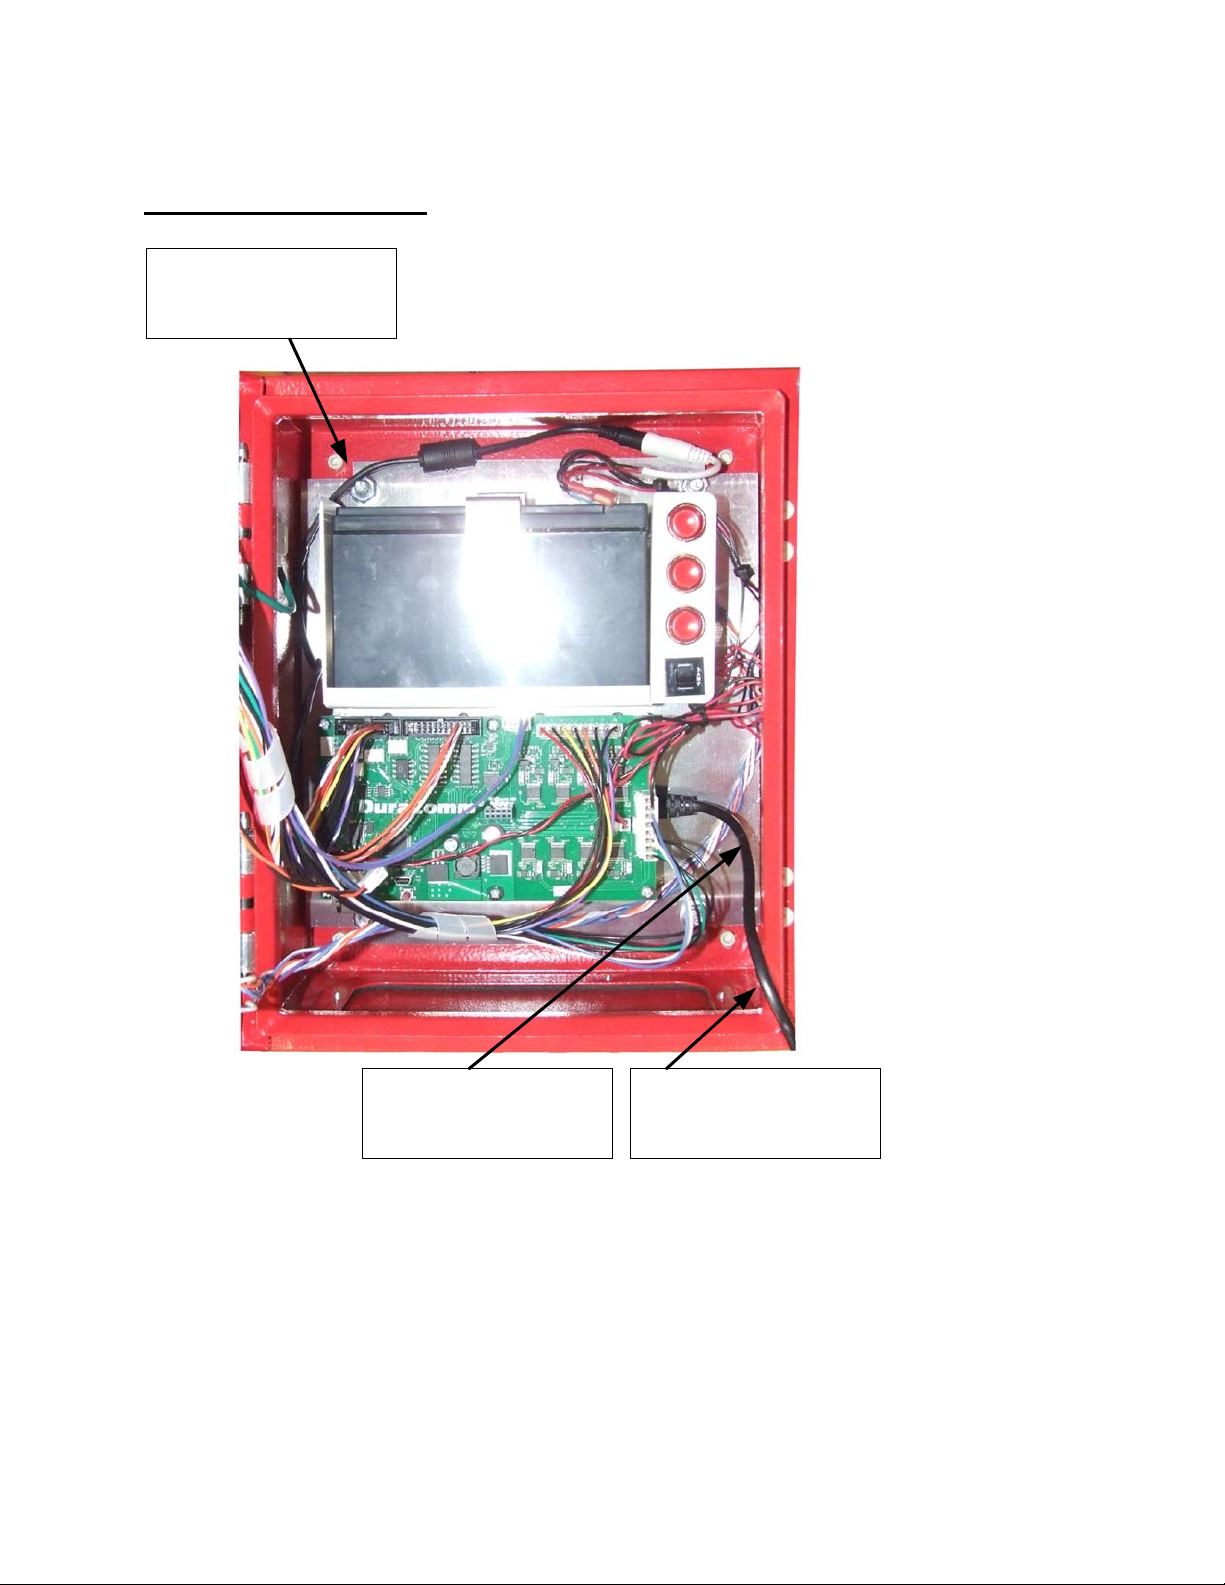
Overall Internal Layout.................................................................................................................................................... 9
Mounting the PSDA-MU1.............................................................................................................................................. 10
AC Power Connection ................................................................................................................................................... 11
RMCU Ethernet Connection.......................................................................................................................................... 11
Supervised Form C Contacts from Equipment.............................................................................................................. 12
Fire Alarm Panel Connections ....................................................................................................................................... 15
Section 3: Self Test................................................................................................................................................................ 16
Section 4: Remote Monitoring Configuration and Operation .............................................................................................. 18
SITEGUARD Description ................................................................................................................................................ 18
Prerequisites ................................................................................................................................................................. 19
Using DHCP ................................................................................................................................................................... 19
Using Static SITEGUARD IP and Network Configuration ............................................................................................... 19
Open a Web Connection to the SITEGUARD................................................................................................................. 20
User Login ..................................................................................................................................................................... 21
Network Setup Notes.................................................................................................................................................... 23
SNMP Traps Setup......................................................................................................................................................... 23
Email Setup Notes......................................................................................................................................................... 24
Device Info .................................................................................................................................................................... 26
Logging .......................................................................................................................................................................... 26
Archive graphing ........................................................................................................................................................... 26
Date and Time Settings ................................................................................................................................................. 26
Miscellaneous Settings.................................................................................................................................................. 26
Sensor Setup (continued – DAC and Scheduling) ......................................................................................................... 28
Sensor Setup Notes....................................................................................................................................................... 29
Alarm Setup Notes ........................................................................................................................................................ 34
Factory Default Alarm Settings ..................................................................................................................................... 35
User Setup – Continued ................................................................................................................................................ 37

Page 3 of 47
User Setup Notes .......................................................................................................................................................... 37
Section 5 | Remote Operation.............................................................................................................................................. 38
Status screen................................................................................................................................................................. 38
Status screen Notes ...................................................................................................................................................... 41
Battery........................................................................................................................................................................... 41
Section 6: Internal Information............................................................................................................................................. 42
Annunciator Board Internal Connector Layout............................................................................................................. 42
Annunciator Board Jumper Options (Only Change for Non-Standard Installation)...................................................... 44
Annunciator Board Test Points and LEDs...................................................................................................................... 45
Section 7 | Specifications...................................................................................................................................................... 46
Section 8 | LIMITED WARRANTY........................................................................................................................................... 47

Page 4 of 47
Section 3: PSDA-MU1 Feature List
Product
•Designed to be Compatible with NFPA 1221.
•AC-Powered Annunciator with Remote Monitoring via
Ethernet. (autorange 90 to 264VAC).
•UL Listed Enclosure E333443
•Removeable Cable/Conduit Panel at Bottom.
•Internal 12-Hour Battery Backup with automatic switchover
•6 Fully Isolated Inputs for normally open contact
monitoring. Requires 10Kohm EOL resistors. (Ignores single
fault to earth ground)
•One 50 Ohm Antenna cable monitoring channel (Earth
Ground Reference, with fault detection). Using this input
requires separate purchase of (2) 50 Ohm Bias Tees and a
50 Ohm Load. (Alternate: can monitor normally open
contacts with 51 Ohm EOL)
•Programmable Alarm Levels (default setting at factory)
•Built-In Self-Test that simulates Fault, Normal, and Trouble
conditions at Monitored Inputs.
•Combined System Fault Output, and Combined System
Trouble Output
•Form C Fire Alarm Panel outputs with separate on-board
EOL resistor connector (9).
•Audible Alarm, with internal Mute and Unmute buttons and
programmable scheduled Unmute.
•Audible Alarm Disable.
•Internet Browser Viewable Status Page
•Configurable eMail Notifications and SNMP Alarms with
User Password.
•Push-On Style connectors for all external alarm connections
for easy installation.
•WagoConnectors for AC input
DuraComm 3-Year Warranty
Firmware
•Web Ready / Web GUI
•Graphing of data for each analog input.
•Bar Graphs with Alarm settings and Alarm Status Color.
•HTTPS self-generated web page. Plug-and-Play. No
downloads or additional software required.
•Email alerts and scheduled status emails.
•User configurable alarm thresholds and delays
•SMTP/POP3 – email alerts
•2 User Levels with different permissions
•Admin Can Configure up to 8 Users with 2 Different
Permission Levels.
•Manual or NTP Time Setting
•Log and Download Time stamped Readings and Alarms,
stored on internal SD card and downloadable .CSV file
•SNMP Version 1, 2 and 3 compatible
•Configurable Labels and Buttons for Each Digital Output.
•Optional Analog Input Averaging.
•Configure Analog and Digital Alarm Delay Duration (Holdoff)
before triggering to Avoid Transient Alarms.
•Remote reboot.

Page 5 of 47
Simplified Theory of Managing an IDC Circuit
R1
10K
R2
10K EOL
GND1
A la r m
Con ta c ts
GND1
Vs
Annunciator
Monitored Circuit
Wi r in g Al arm
Initiating Device
GND1
Test Point
(C H-X, Neg)
Test Point
(C H-X, Pos)
V DC
Figure 1: Simplified Circuit for IDC Management
The EOL Resistor must be placed at the Alarm Initiating Device to detect open circuits in the wiring.
A ‘normal’ circuit divides the test point positive voltage (Vs) in half since the test current passes through
two 10K resistors in series. The test point voltage will be Vs *(R2/R1+R2) or Vs/2. This produces a GREEN
LED.
A trouble alarm switch closure will short out the EOL resistor, and the full Vs voltage will be applied to
the test point (across R1 only), so the test point voltage will be equal to Vs. This produces a RED LED.
A Single Fault (broken wire or one of the wires is shorted to GND1) will produce a test point voltage of
Zero (0) volts.
Both wires shorted to GND1 will produce a Fault since the test point voltage will be Zero. Faults are
reported with a BLUE LED.
If both wires are shorted to any other conductive material that is isolated from GND1, it will produce the
same result as a Trouble alarm since this will short the alarm circuit wires together, and the test point
voltage will be equal to Vs

Page 6 of 47
DuraComm Annunciator Internal Operation Basics
The Full Test Point Voltage for the DuraComm Annunciator is reduced by the internal current limiter for
each circuit (10ma for each channel CH1 to CH6). The voltage drop is minimal for a normal state, trouble
alarm, open circuit fault, or test point short to GND1. If the test point positive wire is shorted to GND1,
the current limiter drops all the Vs voltage across itself, and limits the current to 10ma to protect Vs.
For CH1 to CH6 the internal Vs is 12VDC, and the Test Point Positive voltage is approximately 11.5 VDC
for normal operation, and the measured test point voltage is approximately 5.7 VDC.
Vs is 5 VDC for CH7 (Antenna). CH7 uses approximately 50 Ohms for R1 and EOL, so that it can detect
faults and trouble through the 50 Ohm Coax to the antenna, using two bias tees and a 50 Ohm load. See
Figure x for circuit. The internal 5 VDC current limiter is 100ma. This channel can be used to monitor a
relay, but it still requires the 50 Ohm EOL.
The 12 VDC and 5 VDC supplies are isolated from each other and from earth ground. A single short to
earth ground doesn’t cause any faults because it will not interfere with any trouble alarms.
The Audible alarm automatically sounds at the same rate as the flashing RED or Blue LEDs (about once
per second +/-). The audible alarm is automatically cancelled when no alarms or faults are active. The
Audible alarm can be manually muted or unmuted by a button located inside the annunciator door for
security. The audible alarm cannot be “muted” unless there is an active alarm or fault.
A self-test button is also located inside the door of the annunciator. An inspector should be prepared to
note that channels 1 thru 7 should cycle BLUE flashing, to GREEN solid, to RED flashing, then back to the
current system status. When the button is pressed, the outside managed wires are temporarily
disconnected, and internal hardware simulates a short to internal common to simulate a Fault (BLUE
LEDs), , a normal EOL condition (GREEN LEDs), and an alarm (short across managed lines – RED lights).
The front panel lights will cycle thru the colors for these conditions, and the FormC relays that connect
to the Fire Alarm Panel will cycle thru the proper states. (NOTE: This will generate alarms at the Fire
Alarm Panel. – Notify the responsible monitoring parties before preforming a test.)The RED lights for
alarms and the BLUE lights for faults will flash approximately once per second when they are active. The
green lights (Normal) do not flash. The self test Once the self-test completes it will re-connect to the
managed wires and show the current status of the wires.
DuraComm Annunciator Remote Monitoring Features
Monitor test point voltages and alarm levels for managed connections with bar graph display.
Monitor internal annunciator back-up battery voltage. Set alarm level and notifications.
Set user access
View alarm, fault, and normal status for all managed connections to BDA equipment.
Configure device and network settings

Page 7 of 47
Log measurements and /or alarms to the on-board SD card by specifying number of minutes between
samples, and “Log Alarms”.
Set up email notifications.
Set up SNMP monitoring for larger systems.
The audible alarm can be muted manually. The mute can be cancelled manually, automatically at one or
more specific times of the day by setting up a schedule. The mute is also cancelled automatically when
the fault or alarm condition is corrected.
Adjust alarm settings to be closer or farther away from the normal test point value for each channel to
change sensitivity to changes in the managed lines, or adjust for long wire resistance. The alarm is set
for 7 volts for CH-1 to CH-6. This alarm value controls the alarm setpoint of the red alarm on the
annunciator board. Each channel can be controlled independently. The Antenna channel is set at about
2 Volts.
Fault alarm levels (Blue lights) are set to a common value by digital-to-analog converter output #1 on
the RMCU board, and this can also be programmed. This is set to 1 Volt at the factory. This controls the
actual fault reference voltage used by the annunciator board. This is one voltage common to channels 1
thru 6.
The antenna channel (CH7) fault reference is fixed at about 0.7 volt by a diode junction on the
annunciator board. The fault alarm threshold is also programmed to 0.7 volt for an approximate match
for the sake of remote monitoring. This remote monitoring threshold can be reprogrammed for the sake
of remote monitoring, but the behavior of the annunciator board is fixed to the diode junction voltage.
This voltage must be isolated from the remote monitoring board to maintain isolation from CH1 thru
CH-6 since the test point for this channel will most like be attached to the 50 Ohm shield, which will be
earth ground.

Page 8 of 47
Section 1 | Important Safety Instructions
These instructions are intended for use by a technician familiar with electronic products.
WARNING: There are no user serviceable parts inside. High voltage may be present. Service must be
referred to a qualified factory personnel.
NOTE:The individual user should take care to determine prior to use or installation whether this device
is suitable, adequate, and safe for the use intended. Since individual applications are subject to
numerous variations, DuraComm makes no representation or warranty as to the merchantability,
suitability, or fitness of these units for any specific application.
Section 2 | Installation
The outputs are NOT referenced to the chassis.
IMPORTANT SAFETY INSTRUCTIONS
1. SAVE THESE INSTRUCTIONS – This manual contains important safety and operating instructions for
PSDA-MU1Annunciator.
2. CAUTION – Danger of explosion if battery is incorrectly replaced. Replace only with the same type
recommended by the manufacturer. Dispose of used battery according to the manufacturer’s
instructions.
3. CAUTION – When making installation, route field wiring away from sharp projections, corners, and
internal components.
4. This equipment covered in this document are intended to be installed in accordance with the
following:
• NFPA 70 – National Electrical Code.
• NFPA 72 – National Fire Alarm and Signal Code.
• NFPA 1221 – Standard for the Installation, Maintenance, and Use of Emergency Services
Communication Systems.
• In accordance with the Local Authority Having Jurisdiction (AHJ).
• Installation instructions described in this document.
5. Ensure DC polarity when connecting battery in the unit.
6. Internal circuits can still be energized with power switches in the off position
7. Physically disconnect all external power sources and internal battery before attempting any service or
installation activities.

Page 9 of 47
Overall Internal Layout
Isolated 12V and 5V
regulated supplies
Annunciator Board Battery
Remote Monitoring
and Control Board
Mute
Cancel
Mute
Self Test
Battery Charger
(Under)
Battery
Breaker
Ethernet
Fire Alarm Panel
Connections
BDA Connections
Figure 2: Overall Layout of PSDA-MU1Annunciator

Page 10 of 47
Mounting the PSDA-MU1
Mounting Holes in Rear
Corners (4)
Battery Charger AC
Input Cord with Wago
Connectors
Frame Ground Post on
Right Side Bottom
Figure 3:Mounting Holes and AC Installation
Holes to mount the annunciator are located at the rear four corners of the box. Use appropriate
mounting screws with rubber sealing washers to prevent water entry.

Page 11 of 47
AC Power Connection
Figure 4: Field Wiring Access Panel on Bottom
See Figure 3 for AC wiring location. A removeable blank access panel is provided for wiring AC, Internet,
BDA wiring and fire alarm panel cables through separate UL Type 4X Waterproof Conduit Hubs. Two
Wago® connectors are provided on the Internal battery charger power cord for Line and Neutral
connection. A frame ground post on the inside, right side bottom is provided for earth ground
connection.
RMCU Ethernet Connection
See Figure 2 for Ethernet connection location.

Page 12 of 47
Supervised Form C Contacts from Equipment
End User Connector Layout
J106
CH1-CH3
To Fire Alarm Panel
J107
CH4-CH6
To Fire Alarm Panel
J108
CH7
System Fault
System Trou ble
To Fire Alarm Panel
J109
CH1-CH7
Monitored Lines to BDA
J700_CH1 – EOL R esi st or M ou nt
J700_CH2 – EOL R esi st or M ou nt
J700_CH3 – EOL R esi st or M ou nt
J700_CH4 – EOL R esi st or M ou nt
J700_CH5 – EOL R esi st or M ou nt
J700_CH6 – EOL R esi st or M ou nt
J700_CH7 – EOL R esi st or M ou nt
J401_F – System Fault
EOL Resi st or M ou nt
J401_T – Syste m Tr ou bl e
EOL Resi st or M ou nt
Figure 5: Alarm Connection Layout

Page 13 of 47
The left side connects to the Fire Alarm Panel (FAP). The separate EOL connector allows the FAP to
detect when there is a bad connection to the annunciator board or when the connector is accidently not
replaced. Full FORM C connections are available for 6 channels, 1 antenna channel (50 Ohms), a system
fault channel and a system trouble channel.
The connector on the right has two positions for each of the 7 monitored lines to the BDA alarm
contacts. The annunciator assumes the contacts are normally open for a non-trouble or non-alarm)
situation. 10 Kohm EOL resistors (supplied mounted on the connector) should be used at the equipment
termination end for channels 1-6, and a 50 Ohm EOL termination should be used for the antenna
channel. A 51 ohm resistor is mounted on the connector for monitoring a relay contact instead of an
antenna line, if desired. (Bias tees, as well as connector and 50 ohm load must be purchased
separately.)
Channels 1 through 6 are floating relative to earth ground due to an isolated 12VDC power supply
module, and normal operation is not affected when either the high or low side of any channel has a
short to earth ground. If both lines (Supply voltage and test point) are shorted to earth ground, the
result is a short across the wires, like an alarm contact, so it will show a Trouble alarm (red light).
Multiple ground faults across multiple channels could cause unpredictable results.
If, for some strange reason the test point supply or test point are shorted to the internal ground, it will
show a fault (blue light).
The antenna monitoring channel (channel 7) is also isolated from earth ground. The test point for the
antenna channel is connected to earth ground when connected to the antenna coax shield. A short
between the center conductor of the coax and the shield will create a trouble alarm.
The 5 V and 12 V internal power supplies are isolated from each other as well.
The SITEGUARD uses its fully Isolated analog channels to monitor the test point voltages and compare
the reading to alarm values. IF the voltage is above the upper alarm limit, it will set a corresponding
digital output which causes the annunciator board to report a trouble (red). These alarm levels are
adjustable if required, but the default setting allows for a large amount of cable loss. Setting the alarm
voltage too close to the normal test point voltage may cause false alarms due to electrical noise,
temperature variations or other variables. Setting a higher measurement average on the Sensor Setup
page, or alarm duration on the Alarm Setup page may help with the random effects, but this could have
negative effects with alarm reporting, especially for self-test.
The Fault voltage reference is set for channels 1-6 by Digital-to-Analog (DAC) output 1 on the
SITEGUARD and can be remotely programmed if needed. It is set to 1 V at the factory.

Page 14 of 47
J109
CH-1CH-2CH-3CH-4CH-5CH-6CH-7
CH1 -
CH1 +
EOL – 10 Kohm
Alarm1
CH2 -
CH2 +
EOL – 10 Kohm
Alarm2
CH3 -
CH3 +
EOL – 10 Kohm
Alarm2
CH4 -
CH4 +
EOL – 10 Kohm
Alarm2
CH5 -
CH5 +
EOL – 10 Kohm
Alarm2
CH6 -
CH6 +
EOL – 10 Kohm
Alarm2
Transmitter
CH7 -
CH7 +
Earth
10 ma
10 ma
10 ma
10 ma
10 ma
10 ma
12VDC
G1
100 ma
5VD C
G2
Current Limiters
Bias Tee
E1
50 Ohm
Term
Bias Tee
BDA Alarm Outputs
Normally Open
Figure 6: BDA Wiring Schematic

Page 15 of 47
Fire Alarm Panel Connections
J107
CH-4
CH-5CH-6
COM
NO
NC
COM
NO
NC
COM
NO
NC
R-E OL
J700_CH4
R-E OL
J700_CH5
J700_CH6
R-E OL
J106
CH-1
CH-2
CH-3
COM
NO
NC
COM
NO
NC
COM
NO
NC
R-E OL
J700_CH1
R-E OL
J700_CH2
J700_CH3
R-E OL
J108
CH-7
S-F
S-T
COM
NO
NC
COM
NO
NC
COM
NO
NC
R-E OL
J1100
R-E OL
J400_F
J400_T
R-E OL
Fire Alarm Panel
EOL Resistors
Channel 1 Name
Channel 2 Name
Channel 3 Name
Channel 4 Name
Channel 5 Name
Channel 6 Name
Channel 7 Name
System Fault
System Trouble
Figure 7: Fire Alarm Panel Connection WOrksheet

Page 16 of 47
Audible Alarm
The Audible Alarm may be permanently disabled by removing the connector wire labeled “Audible) from J110 on
the annunciator board, if it is not needed. Zip tie this to the cable harness to prevent it from contacting other
exposed pins inside the PSDA-MU1when not connected.
Power Up The PSDA-MU
To power up the PSDA-MU, connect the battery using the quick connects provided: Caution: Observe Polarity!
Apply power to the AC input by turning the AC breaker “ON”.

Page 17 of 47
Section 3: Self Test
Note: Pressing the self test button will cause fire alarm panel outputs to close during the test. Notify monitoring
personnel before performing self test.
To perform a self test, press the button marked “Self Test” (See Figure 2 for location).
The PSDA-MU1will disconnect from the managed BDA connections and begin simulation of a Fault (short to
internal test point common), a normal condition (internal EOL substitution), and an alarm (short across monitored
pair. All channels will cycle at the same time.
Assuming all channels are GREEN to begin with, LEDs will change to BLUE and flash once, back to GREEN for a few
seconds (no flash), to RED and flash once (alarm condition), then it will return to normal and connect to the
external monitored connections.
Any channels that are not in the GREEN state when starting the test may show a purple light briefly when
changing back to external connections until the RMCU synchronizes with the annunciator board.

Page 18 of 47
Section 4: Remote Monitoring Configuration and Operation
SITEGUARD Description
The new SITEGUARD DC-Powered Remote Monitoring and Control Unit (RMCU) is flexible product for remote site
monitoring and control, and Industrial Internet of Things (IIoT) applications. The SITEGUARD provides 8 voltmeters, digital
inputs, digital outputs, and analog outputs that are dedicated to annunciator operation and monitoring. All of these channels are
visible on the home page with alarm status, and all analog channels are displayed as bar graphs with alarm setting indicators,
and alarm status color. Configuration is set at the factory with only a few setup changes required to install for a PSDA-
MU1Application. NOTE: Changes to other settings should only be considered if the factory settings do not perform
correctly in your installation. Other changes may cause unpredictable or unsafe operation.
•Internet Networking Addresses
•Usernames and Passwords
•Device Name
•Date & Time (and NTP)
•Channel Names (optional – factory configured)
•Alarms (Optional – factory configured)
•Email Notifications (optional)
•SNMP Monitoring (optional)
•Audible Alarm Mute Cancel Schedule (factory set to 13:40 every day of the week) This only applies if the mute
has not been cancelled manually or by a non-alarm all normal condition.)
Admin and Control Users will be able to configure all of the input and output settings, and set the state of the digital
outputs. Admin and Control users can set device settings for logging, time, and Site Name. Admin users have exclusive control
of network configuration, including manual time setting or NTP, soft reboot of the SITEGUARD, factory reset of the entire
configuration, and user passwords.
The SITEGUARD comes with the DuraComm three-year warranty.

Page 19 of 47
CONNECTING TO THE SITEGUARD VIA THE INTERNET
Prerequisites
System administrators must decide whether the SITEGUARD will operate on the network with DHCP or a fixed IP
address. The factory-set SITEGUARD will have these static addresses: IP address: 192.168.100.220, gateway
address: 192.168.100.1, netmask: 255.255.255.0, and DNS address: 192.168.100.1.
If you configure it to use DHCP, the SITEGUARD will request an available IP address on your network. You will
need to determine what address it has been given.
If DHCP is not used, system administrators must also choose an unused IP address, and other network settings to
use in the Network Setup screen. System administrators will also need to choose an email service and address to
use for notifications, if needed. These will be used in the Email Setup Screen.
DETERMINING THE IP ADDRESS OF THE SITEGUARD
Power up the SITEGUARD then connect the SITEGUARD to the network with an Ethernet cable. A 3 foot cable is
provided.
Using DHCP
The SITEGUARD will attempt to connect to the network via DHCP when it is first connected, or when you perform
a factory reset.
You will need to get the IP address in one of two ways. You can get the IP address from the DHCP server’s client
list, or you can use a PC on the same network to scan for the new IP address by using a software tool such as
Angry IP Scanner. In Angry IP Scanner, you should add the MAC address “Fetcher” under “Tools > Fetchers”. The
DuraComm MAC addresses all start with a base address of 70-B3-D5-6B-3. Write down the IP address of the
SITEGUARD, then proceed to the section in this manual named “Open a Web Connection to the SITEGUARD”.
Using Static SITEGUARD IP and Network Configuration
If your network is not set up for DHCP, you will need to manually configure the settings to match the network it
will be used on. Before you can do that, you will need to configure a computer to talk to the SITEGUARD at the
default configuration settings shown above. We will use Windows 7 as an example. Other operating systems will
vary, but the overall concept is the same.
1. Disconnect your PC from all networks.
2. Connect it directly to the SITEGUARD with an Ethernet cable (You may need to use an Ethernet crossover cable if the
PC does not automatically detect this configuration).
3. Open the control panel on your PC and select “View Network Status and Tasks”
4. Click on “Change Adapter Settings” on the left side of the screen.
5. Right click on “Local Area Connection” and click on “Properties”
6. Click on “Internet Protocol Version 4 (TCP/IPv4)” to highlight it, then click the “Properties” button.
7. Before you make any changes, record the existing settings, so that you can change them back when you are finished
setting up the SITEGUARD.
8. Enable “Use The Following IP Address”
9. Now enter 192.168.100.221 for the IP address.
10. Enter 255.255.255.0 Subnet mask
11. Click OK to save the network configuration.

Page 20 of 47
12. Jump to the section in this owners guide named “Open a Web Connection to the SITEGUARD” to log in and enter
the final network settings for the SITEGUARD.
Open a Web Connection to the SITEGUARD
Use your favorite device and browser (Chrome, Firefox, internet Explorer, etc.), and enter the IP address of
the power supply on your network into the URL box on the browser (see the screenshot below). The
SITEGUARD should respond with the “Status” screen.
Table of contents