DURHAND C20-037 User manual

ASSEMBLY INSTRUCTION
INaga001_UK_DE_FR_ES_IT
C20-037_C20-037V01_C20-037V02
READ AND SAVE THIS INSTRUCTION FOR FUTURE USE
AUTO REWIND CABLE REEL
INSTRUCTION MANUAL
KABELTROMMEL MIT AUTOMATISCHER
AUFWICKLUNG BEDIENUNGSANLEITUNG
ENROULEUR DE CÂBLE À REMBOBINAGE AUTOMATIQUE
MANUEL D'INSTRUCTIONS
CARRETE DE CABLE DE REBOBINADO AUTOMÁTICO
MANUAL DE INSTRUCCIONES
AVVOLGITORE AUTOMATICO
MANUALE D'USO

Fasten metal mounting to the wall or ceiling with screw.
1.Drill 2x M6 holes to match the holes located in the Mounting Bracket.
2.Connect the hose reel to the Mounting Bracket with the Pivot Pin.
3.Pull the hose, It has 2-3 lock positions every one metre.
4.Please don't pull at the hose when it has finished.
5.Please hold the nozzle when the hose is retraction until it is finished.
6: Trouble Shooting:
The most common malfunction is :the hose cannot be retracted automatically
after fully extending the hose.
The reason may be that:The hose end is locked as the stop anywhere
mechanism stays in the locking point,and there's no extra hose to be pulled out
for a release. There are two ways to solve this:
(1) hold the hose at the yellow waring mark and pull with a jerking motion until
the hose retracts.
(2) Place the item with its right side down, pull on the hose until it retracts.
EN

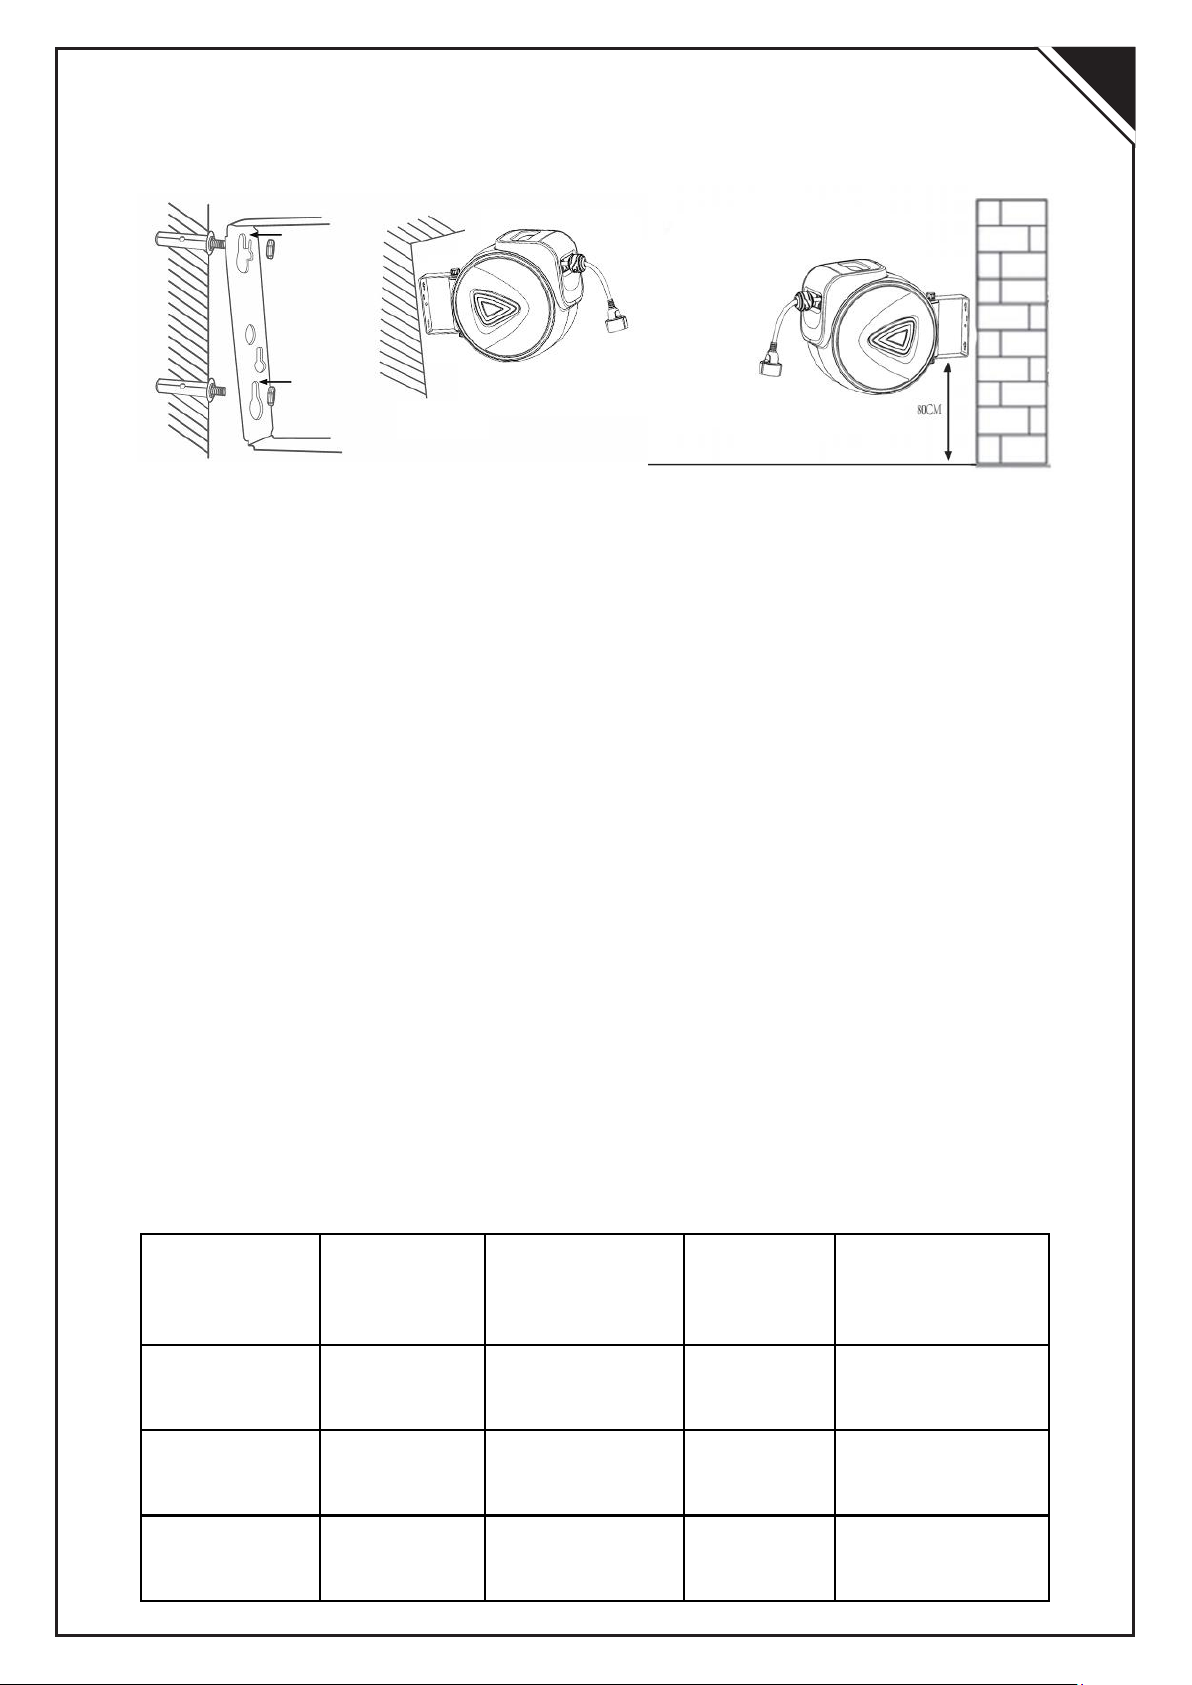
Metallbefestigung mit Schraube an der Wand oder Decke befestigen.
1. Bohren Sie 2x M6-Löcher, die der Größe der Löcher auf der
Montagehalterung entsprechen.
2. Verbinden Sie die Schlauchtrommel mit dem Drehzapfen mit der
Montagehalterung.
3. Ziehen Sie den Schlauch. Er hat 2-3 Verriegelungspositionen pro
Meter.
4. Ziehen Sie nicht am Schlauch, wenn die Schlauchhaspel fertig ist.
5. Halten Sie die Düse, wenn der Schlauch zurückgezogen wird, bis er
fertig ist.
6: Fehlerbehebung:
Das häufigste Problem tritt auf, wenn der Schlauch nach dem
vollständigen Ausfahren nicht automatisch eingezogen wird. Dies
könnte daran liegen, dass das Schlauchende verriegelt ist. Es gibt
zwei Möglichkeiten, dieses Problem zu lösen:
(1) Halten Sie den Schlauch an der gelben Warnmarkierung und
ziehen Sie mit einer ruckartigen Bewegung, bis er sich zurückzieht.
(2) Legen Sie den Körper einfach auf die rechte Seite nach unten und
ziehen Sie den Schlauch, bis er sich zurückzieht.
DE
Modell
Länge des
Schlauches
Spezifikationen
Stromansc
hluss
Material des
Außenmantels
C20-037
20M
H05VV-F
3G*1,5MM2
230V/16A
PP
C20-037V01
15M
H05VV-F
3G*1,5MM2
230V/16A
PP
C20-037V02
10M
H05VV-F
3G*1,5MM2
230V/16A
PP
KABELTROMMEL

Fixez le support métallique au mur ou au plafond avec la vis.
1. Percez les trous 2x M6 de la même taille que ceux du support de
montage.
2. Connectez l'enrouleur de tuyau au support de montage à l'aide du
pivot.
3. Tirez sur le tuyau. Il a 2 ou 3 positions de verrouillage par mètre.
4. Ne tirez pas sur le tuyau lorsque l'enrouleur est terminé.
5. Maintenez la buse lorsque le tuyau est rétracté jusqu'à ce qu'il soit
terminé.
6: Dépannage:
Le problème le plus courant est lorsque le tuyau ne se rétracte pas
automatiquement après avoir été complètement déroulé. Cela peut
être dû au fait que l'extrémité du tuyau est bloquée. Il y a deux
façons de résoudre ce problème:
(1) Tenez le tuyau au niveau de la marque de guerre jaune et tirez
d'un coup sec jusqu'à ce qu'il se rétracte.
(2) Il suffit de placer le corps sur son côté droit et de tirer sur le
tuyau jusqu'à ce qu'il se rétracte.
FR
ENROULEUR DE CÂBLE
Modèle
Longueur
de tuyau
Spécifications
Prise
Matériel de
boîtier extérieur
C20-037
20M
H05VV-F
3G*1,5MM2
230V/16A
PP
C20-037V01
15M
H05VV-F
3G*1,5MM2
230V/16A
PP
C20-037V02
10M
H05VV-F
3G*1,5MM2
230V/16A
PP

Fije el soporte de metal a la pared o al techo con un tornillo.
1. Taladre 2 orificios M6 para que coincidan con el tamaño de los orificios
del soporte.
2. Conecte el carrete de manguera al soporte con el pasador de pivote.
3. Tire de la manguera. Tiene 2-3 posiciones de bloqueo por metro.
4. No tire de la manguera cuando el carrete haya extendido
completamente.
5. Sostenga la boquilla cuando la manguera se retrae hasta que se
extiende completamente.
6: Solución de problemas:
El problema más común es cuando la manguera no se retrae de
manera automática después de estar extendida completamente.
Esto podría ser debido a que el extremo de la manguera está
bloqueado. Hay dos métodos para resolver este problema:
(1) Sostenga la manguera en la marca amarilla de advertencia y tire
con un movimiento de sacudidas hasta que la manguera se retraiga.
(2) Coloque el cuerpo con el lado derecho hacia abajo simplemente
y tire de la manguera hasta que se retraiga.
ES
CARRETE DE CABLE
Modelo
Longitud
de
manguera
Especificacione
s
Enchufe
Material de
carcasa
exterior
C20-037
20M
H05VV-F
3G*1,5MM2
230V/16A
PP
C20-037V01
15M
H05VV-F
3G*1,5MM2
230V/16A
PP
C20-037V02
10M
H05VV-F
3G*1,5MM2
230V/16A
PP

Fissare il montante in metallo alla parete o al soffitto con
l'apposita vite.
1. Praticare 2x M6 fori che corrispondano alla dimensione di quelli sulla
staffa montante.
2. Connettere l'avvolgitore alla staffa montante tramite il perno.
3. Estendere il tubo. Puo' essere bloccato in 2-3 posizioni per metro.
4. Non tirare il tubo quando la bobina è terminata
5. Prendere il tubo dall'ugello quando lo si ritrae finché non è terminata la
bobina.
6: Risoluzione problemi:
Il problema più comune si verifica quando il tubo non si ritrae
automaticamente dopo che è stato completamente esteso. Ciò
potrebbe essere dovuto al fatto che l'estremità del tubo è bloccata.
Ci sono due metodi di risoluzione:
(1) Prendere il tubo in corrispondenza del segno di avvertenza
giallo e tirare con un movimento a scatti finché non si ritrae con
successo.
(2) Posizionare semplicemente l'avvolgitore con il lato destro verso
il basso e tirare il tubo finché non si ritrae.
IT
AVVOLGITORE
Modello
Lunghez
za tubo
Specifiche
Presa
Materiale
esterno
C20-037
20M
H05VV-F
3G*1,5MM2
230V/16A
PP
C20-037V01
15M
H05VV-F
3G*1,5MM2
230V/16A
PP
C20-037V02
10M
H05VV-F
3G*1,5MM2
230V/16A
PP

This manual suits for next models
2
Table of contents
Languages:
Other DURHAND Cables And Connectors manuals
Popular Cables And Connectors manuals by other brands

Philips
Philips SWV2966W Specifications

Panasonic
Panasonic FZ-VSRG211 Series operating instructions

Extron electronics
Extron electronics 26-018-02 Specifications

Rocstor
Rocstor Y10C132-B1 Instruction guide

Boston Scientific
Boston Scientific Precision Series manual

Splitvolt
Splitvolt EGB 11-016 Quick start user guide