Durite 0-776-62 User manual

720p Forward and Rear FacingTwin Camera with GPS
Part 0-776-62
0-776-62-LEAF
www.durite.co.uk
WARNINGS
Before using this unit please read these instructions carefully. Take special care to follow the warnings
indicated on the unit itself as well as the safety suggestions listed below. Keep these instructions for
future reference.
* Please ensure you are familiar and comply with local trafc and driving regulations.
* Power Source - The Mini DVR should be connected to a 12-24 volt dc power supply only.
* Water and Moisture - Do not use the Mini DVR where it may be subject to water ingress or excessive
moisture. Do not use outside the vehicle unprotected.
* Heat - Do not install the Mini DVR near a direct heat sources.
* Ventilation - The Mini DVR should be situated to allow free circulation of air.
* Foreign Material - Care should be taken so that objects do not fall onto or into, and that liquids are not
spilled on the Mini DVR.
* Mounting Surface - The Mini DVR should be mounted to a strong secure surface.
* Replacement Parts - Use only manufacturers replacement specied parts. Unauthorised substitutions
may result in re risk, electric shock or other hazards and will void the warranty
* Service - The user should not attempt to service this units beyond that described in the operating
instructions. There are no user-serviceable parts within the unit.
*Screen Protective Film - Remove the LCD screen protective plastic cover before use.

www.durite.co.uk
PRODUCT FUNCTION DIAGRAM
0-776-62-LEAF
CONTENTS
1 x Twin Camera Dash Cam
1 x GPS Aerial
1 x Suction Mount Bracket
1 x 12/24VDC Charger
1 x User Manual

www.durite.co.uk
PRODUCT FUNCTIONALITY
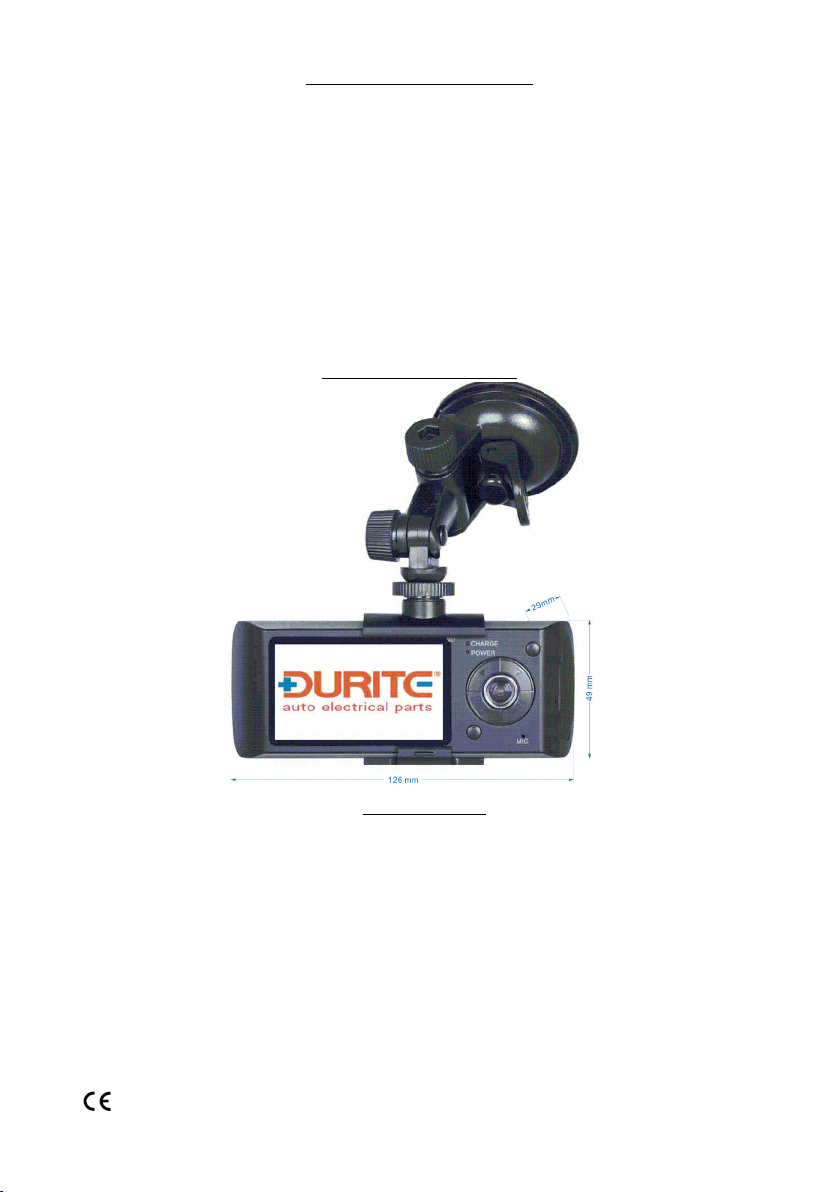
0-776-62-LEAF
OVERVIEW
DuriteTwin Camera Dash Cam with Built-in double lens can be used to record two images
at front and back at the same time.
The GPS module can record the whole driving journey. Using the software provided, you
can play the video at a computer, at the same time connect Google map through the Inter-
net for locating and tracking purposes. Driving track shows on the map and you can trace
the route of the vehicle.
There is as built-in gravity sensor G-Sensor can record the gravity sensing information.
Using the software, you can read the gravity sensing data to trace accident and abnormal
circumstance occurred in the running process.
In order to maximize the performance of the recorder, please read this instruction manual
carefully before use (design and specications are subject to change without prior notice).
Battery Charging
There are two methods for battery charging:
1 Using USB line to connect the machine with the computer for charging;
2 Using accessory vehicle-mounted power source for charging:
In the whole process of charging, charging indicator lights up in red. When the charging
is nished, indicator automatically extinguishes. The whole charging process takes about
3-4hours
Insert a memory card
Insert TF (Micro SD) memory card straightly into the slot in accordance with the indicating
direction on the machine body.
Remove card: Push theTF card inside and the card will pop up.Then you can remove.
Notice:
When using the memory card for the machine for the rst time, since the format of the
memory card is not compatible with the machine, you must use the machine or attached
tool software to format the memory card (The formatting of the memory card by computer
is not supported). Formatting will permanently delete all the data on the memory card,
including the protected image, which can not be restored.Therefore, before formatting the
memory card, please back up any important data.
If you can't use the machine to format the memory card format, please use attached soft-
ware on a computer.
Adjust the positions of the lens
The front lens of this machine can be turned 20 degrees up and down in order to better
meet the recorder xed position and get better shooting.
Turn on and turn off
Tum on: press power supply once for a 2-3 seconds until red ON indicator lights up.
Tum off: press power supply one more time for a 2-3seconds until red ON indicator extin-
guishes.
Notice:
When in a low battery state, the DVR recorder will automatically turn off.

0-776-62-LEAF
www.durite.co.uk
Change operating mode
This machine has two operating modes: Record and playback.
Press MODE button to change between them.
Setup menu
Press MENU button to enter MENU page, now the column of "Menu setting" is in blue
background.
In the menu setting page, click left and right keys to select the required setting elds; click
"OK" button to accept the settings, again press the MENU key to exit the menu.
System setting:You can make system setting in framing preview mode.
Record mode:CH1&CH2, CH1 only, CH2 only
Time setup: SetTime Zone
Format:Format card,yes/no
TV Out:NTSC,PAL
Audio Record:on,off
Beep:on,off
Language: English Default
LCD Default: On/Off
G Sensor: Low Medium High
Frequency: 50Hz 60Hz
How to Record
Start / Stop Recording:
In the Recording mode, press OK key to start recording, then press OK key again to stop
recording.
When the traveling recorder is on or insert a memory card, it will automatically start record-
ing.
Open / Close audio:
During video recording process, pressing left key can fast open / close audio in the video.
Video playback and le management
Press MODE key to enter playback mode and now the screen shows playback picture of the
last video le.
Video playback:
Press left and right buttons to select audio and video les for playback. Press OK key for
play and pause of the video le.
Computer access to the machine le
This machine does not support USB protocol. Computer access to the recorded le of this
machine can be done by a device supporting TF card (such as a card reader).
When the machine insert memory card and complete formatting for the rst time, it will
automatically generate a specialized software tool in the memory card. Computer access to
the le of the machine must be done via this tool.
Notice:
(l) For easy use and to avoid abnormal circumstance of the storage card causing software
tool damage, it is recommended to backup the tool on computer.
(2) The computer operating system must be Windows 2000 / XP / Vista / Windows 7, MAC OS
x above 10.3.6.

0-776-62-LEAF
www.durite.co.uk
Usage of the software
1. Use card reader to read video information on theTF card.
In TF card disk under “my computer”, the user can see three les: ap.bin. Default Folder. ini
and software .
2. Run software.
3. Open the player to play video documents. Click the folder to open the player.
SelectTF Card disk path, then click the “apply” to load and automatically play the docu-
ment in the card.
Clicking the Fast Forward/Rewind/Stop/Play/Pause ActiveX can control playing state: from
left to right can realize: slow turning / stop / play (pause) / fast turning.
4. Select double lens channel:
ActiveX can also select double lens channel of video playing: double lens / front lens / back
lens.
5. Video on le:
Select video le for save and click ‘save icon’ to pop up saving le path picture. After selec-
tion, click “sure” to save the selected le.
6. Photo on le:
Select image photo for save and click ‘camera icon’ to pop up saving le path picture. After
select the path, click the “save”.
7. Delete document:
Select the video le not needed and click ‘rubbish bin icon’. “Sure/ cancel” options will
appear, select “Sure” to delete the selected video le.
8. Kit:
Kit can proceed as follows: SD card formatting / upload software to the SD card / SD card
speed test / map selection and user password setting. Click ‘settings icon’ to enter the kit.
9. Google map:
Click the ‘map icon’ and the computer will connect to Google map via Internet and show
travelling path on the map.You can trace the travelling path of the vehicle.
10.Gravity sensor:
Click ‘video’ icon , watch the video on the computer, at the same time read and display the
gravity sensing data, trace accident and abnormal circumstance occurred during the driving
process.
11. Password Control - Press Menu. Input Password '1234' Using 'Left Arrow' and 'Right
Arrow' for up and down. Press 'OK' button to confirm selection. Once you are on the main
menu you can scroll down to 'password set' to change the password. Input your desired
password and select OK.
Other operations:
Click ‘repair//padlock/display’ icon to repair film / unlock protection / choose to display size.
Resetting Dash Cam
When abnormal circumstance occur due to improper operation, you can press reset button
and then restart the machine, now the machine can return to default status.

SPECIFICATION
Type......................................................Twin Dash Camera
Voltage.................................................12-24VDC
LCD Screen Size..................................2.7inch (16:9)
Lens Angle...........................................Front (140 Degrees) / Rear (120 Degrees)
Languages...........................................English Default, Chinese, German, French.
Video Format.......................................AVI
TF Card................................................8-32GB Max
Microphone.........................................Yes
Output..................................................NTSC / PAL
TV Output and DC Access..................5V 500MA
Weight..................................................0.350KG
Dimensions.........................................As above
Certicates...........................................CE
PRODUCT CHARACTERISTICS
—Ultra small volume; the front lens has a wide angle of 140 degrees and can be rotated
up and down 20 degrees; the back lens with an angle of 120 degrees high resolution; this
perfect modular design is more convenient for various angle and high resolution video
shooting.
—Built-in 1/4 inch low-noise and high-quality photographic element can capture an ultra
clear picture in a dark place.
—Built-in lithium battery with charging and meanwhile recording function.
—Built-in microphone/speaker.
—Support high-capacity Micro SD (TF) Card upto 32GB
—Automatic turning on and recording function when the vehicle start.
—Soft start delayed start function to prevent transient pulse current.
—GPS scanning and positioning.
—G Sensor
DIMENSIONAL DRAWING
0-776-62-LEAF
www.durite.co.uk
Table of contents
Other Durite Dashcam manuals
Popular Dashcam manuals by other brands

RSC
RSC duDuo e1 user manual

Fleet Complete
Fleet Complete Vision 2.0 Quick reference card

Papago
Papago GoSafe 110 quick start guide

Sencor
Sencor SCR 4400 user manual

Provision ISR
Provision ISR PR-DVR-C10 Quick installation guide

Pedigree Technologies
Pedigree Technologies CameraView JC400 installation manual