DUROMAX XP7HP User manual

This manual provides information regarding the
operation and maintenance of these products. We
have made every effort to ensure the accuracy of the
information in this manual. We reserve the right to
change this product at any time without prior notice.
5800 Ontario Mills Pkwy
Ontario, CA 91764 USA
www.duromaxpower.com
Call our Customer Care Team Toll Free 8-5pm PST Mon-Fri
844-DUROMAX
REV: XP7HP_rev05152023
XP7HP
SERVICE MANUAL


CONTENTS
1.
Engine Components ....................................................................................................... 7
Engine Components
4.
Specications................................................................................................................. 30
Adjustment and Torque Specications ...................................................................... 31
Specications
3.
Engine Diagrams........................................................................................................... 32
Wiring Diagram ............................................................................................................. 34
Engine Diagrams
2.
Maintenance Schedule................................................................................................... 8
Break-In Period ............................................................................................................... 9
High Altitude Operation ................................................................................................. 9
Changing the Carburetor Main Jet.............................................................................. 10
Checking the Oil ............................................................................................................ 14
Changing the Oil............................................................................................................ 15
Cleaning the Air Filter ................................................................................................... 16
Spark Plug Maintenance .............................................................................................. 18
Emptying the Gas Tank ................................................................................................ 20
Storing the Engine for Same Day Use ........................................................................ 22
Storing the Engine for Use Within 30 Days................................................................ 23
Storing the Engine for Longer Than 30 Days............................................................. 24
Check and Adjust Valve Clearance.............................................................................. 26
Maintenance and Care
5.
Troubleshooting............................................................................................................ 35
Troubleshooting

CONTENTS
6.
Common Engine Parts................................................................................................... 36
Common Engine Parts
7.
Maintenance Log............................................................................................................ 40
Maintenance Log

5

6
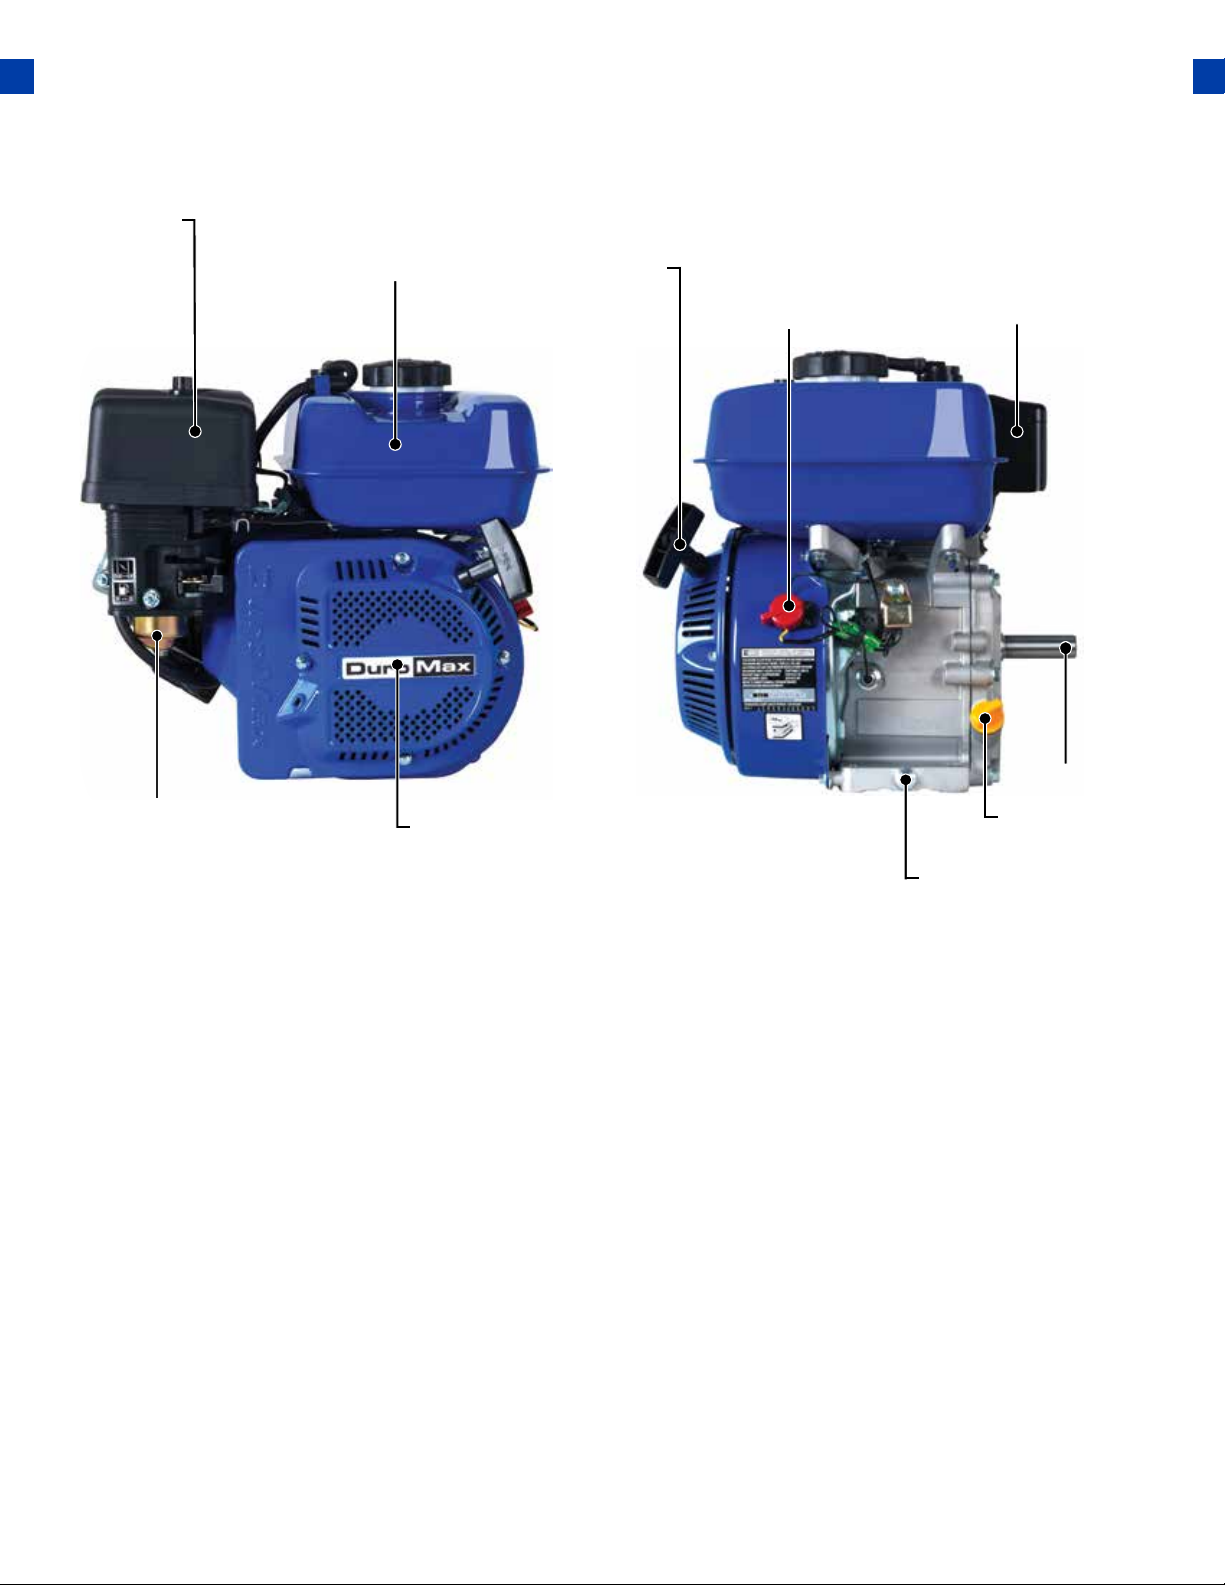
ENGINE COMPONENTS
7
1. Air Filter - A removable, cleanable, oiled, element that cleans the air going into the engine.
2. Carburetor - A component used to control the air fuel mixture of the engine.
3. Fuel Tank - All metal 1 gallon gasoline fuel tank.
4. Recoil Starter - An easy pull recoil start to start the engine without the electric start.
5. Recoil Handle - An easy grip handle used to pull the recoil starter rope.
6. Start Switch - An easy to use switch used to turn the engine on or o.
7. Muer - A noise dampening component that helps lower the engine decibel level.
8. Engine Shaft - A 3/4” diameter, 2-3/8” long, 3/16” key-way.
9. Oil Fill - An easy access location to ll the oil for the engine.
10. Oil Drain Plug - An easy to remove oil plug that is used to drain the oil.
3. Fuel Tank
7. Muer
8. Engine Shaft
9. Oil Fill
4. Recoil Starter
2. Carburetor
1. Air Filter
10. Oil Drain Plug
5. Recoil Handle
6. Start Switch

8
MAINTENANCE AND CARE
Proper routine maintenance of your generator is essential for safe, economical, and trouble-free
operation. It will also help reduce air pollution.
Maintenance Schedule
Remember that this schedule is based on the assumption that your machine will be used for its
designed purpose. Sustained high-load, high-temperature operation, or use in unusually wet or
dusty conditions, will require more frequent service.
SERVICE
EVERY USE
1ST MO. OR
8 HRS.
(BREAK IN)
EVERY 3 MO. OR
50 HRS. OF
HEAVY USE
EVERY 6 MO.
OR 100 HRS. OF
NORMAL USE
EVERY 12 MO. OR
300 HRS.
EVERY 3 YRS. OR
500 HRS.
ENGINE OIL CHECK CHANGE CHANGE CHANGE
AIR CLEANER CHECK CHECK CHANGE CHANGE
SPARK PLUG CLEAN /
ADJUST
CLEAN /
ADJUST
SPARK
ARRESTOR
CHECK CLEAN
IDLE SPEED CHECK /
ADJUST
VALVE
CLEARANCE
CHECK /
ADJUST
FUEL TUBE CHECK CHECK /
REPLACE
FUEL TANK /
FILTER
CLEAN
COMBUSTION
CHAMBER
CLEAN
8
WARNING: Improper maintenance, or failure to correct a problem before operation, can
cause a malfunction in which you can be seriously injured or killed. Always follow the
inspection, maintenance recommendations, and schedules in this instruction manual.
●Make sure the engine is o before you begin any maintenance or repairs.
●Let the engine and exhaust system cool before touching.
●To reduce the possibility of re or explosion, be careful when working around
gasoline. Use only a nonammable solvent, not gasoline, to clean parts. Keep
cigarettes, sparks, and ames away from all fuel-related parts.

9
Break-In Period
As the best practice for any new combustion motor it’s recommended to perform the break
in procedure as follows:
●Run the engine for the rst 6-8 hours on conventional oil, then change the oil. After
the break-in period synthetic oil may be used.
●During the break in period of the rst 6-8 hours keep the engine speed under 50% for
optimal results.
●Check and clean the air lter if necessary after the break-in period.
High Altitude Operation
At high altitudes, the standard carburetor air/fuel mixture will be too rich. The performance will decrease,
and fuel consumption will increase. A very rich mixture will also foul the spark plug and cause hard starting.
Operation at an altitude that diers from that at which this engine was certied, for extended periods of
time, may increase emissions. High altitude performance can be improved by specic modications to
the carburetor. If you always operate your engine at altitudes above 3,000 feet (900 meters), have a dealer
perform this carburetor modication. This engine, when operated at high altitude with the carburetor
modications for high altitude use, will meet each emission standard throughout its useful life. Even with
carburetor modication, engine horsepower will decrease by about 3.5% for each 1,000-foot (300-meter)
increase in altitude. The eect of altitude on horsepower will be greater than this if no carburetor
modication is made.
When the carburetor has been modied for high altitude operation, the air/fuel mixture will be too lean for
low altitude use. Operation at altitudes below 3,000 feet (900 meters) with a modied carburetor may cause
the engine to overheat and result in serious engine damage.
Note: Jet kits available for purchase upon request, please contact us at 844-DUROMAX to set up your
parts order.
Altitude Range Jet Kit Part Number
3,000 ft. - 6,000 ft. DJ170FD-14100-3KJS
6,000 ft. - 8,000 ft. DJ170FD-14100-6KJS

MAINTENANCE AND CARE (CONTINUED)
10
Changing the Carburetor Main Jet
Turn fuel valve OFF
Turn the fuel valve OFF.
1.
Remove carburetor bowl bolt
Remove the carburetor bowl bolt located under the solenoid
with a 10 mm socket wrench.
4.
Remove carburetor drain bolt
Remove the outward angled bolt that is located on the
bottom of the carburetor.
2.
Place funnel below drain port
Place funnel with container to catch the gasoline under the
drain port location and put drained gasoline in a gasoline
safe container.
3.
Table of contents
Other DUROMAX Engine manuals

DUROMAX
DUROMAX XP18HP User manual

DUROMAX
DUROMAX XP7HPE User manual

DUROMAX
DUROMAX XP18HPX User manual

DUROMAX
DUROMAX XP9HPE User manual

DUROMAX
DUROMAX XP7HPX User manual

DUROMAX
DUROMAX XP35HPE User manual

DUROMAX
DUROMAX XP18HPE User manual

DUROMAX
DUROMAX XP20HPE User manual

DUROMAX
DUROMAX XP23HPE User manual


