STICKS 3000 INSTRUCTIONS
8834-8845, 30 kg
650
Dansk
Skær teleskopemballagen op på midten og træk den yderste del af (1).
Fjern de to skruer (2) og træk jordankeret med koblingsboksen ud af masterøret.
Frigør stikforbindelsen og fastgør ledningen til masteenden ved hjælp af krogen (3). Pas på ledningen ikke smutter op i masten.
Nedgrav jordankeret som vist i fig. 4. Vær opmærksom på at det står i lod. Gevindhullerne (4.2) til masten vendes til højre for lysspalten, når denne vender mod
beskueren.
Træk koblingsboksen (4.1) op af jordankeret, og fyld leca-ærtesten i til manchettens (4.3) overkant.Tilpas og afisoler kablerne, max. 2 stk. 5x6 mm2, skub koblingsbok-
sen ned over kablerne og tilslut. Fjern resten af emballagen og tag toprøret af for at sætte lyskilden i (5).
Løft lampen, saml stikket, træk dækskærmen (6) ned over stikket og sænk lampen ned over jordankeret. Ledningen trækker sig selv op i masten.
Monter de to skruer (7).
Vedligeholdelse:
Tag toprøret af for at skifte lysrør.Træk komponentstangen med lysrøret et stykke op for at skifte sikring (8).
English
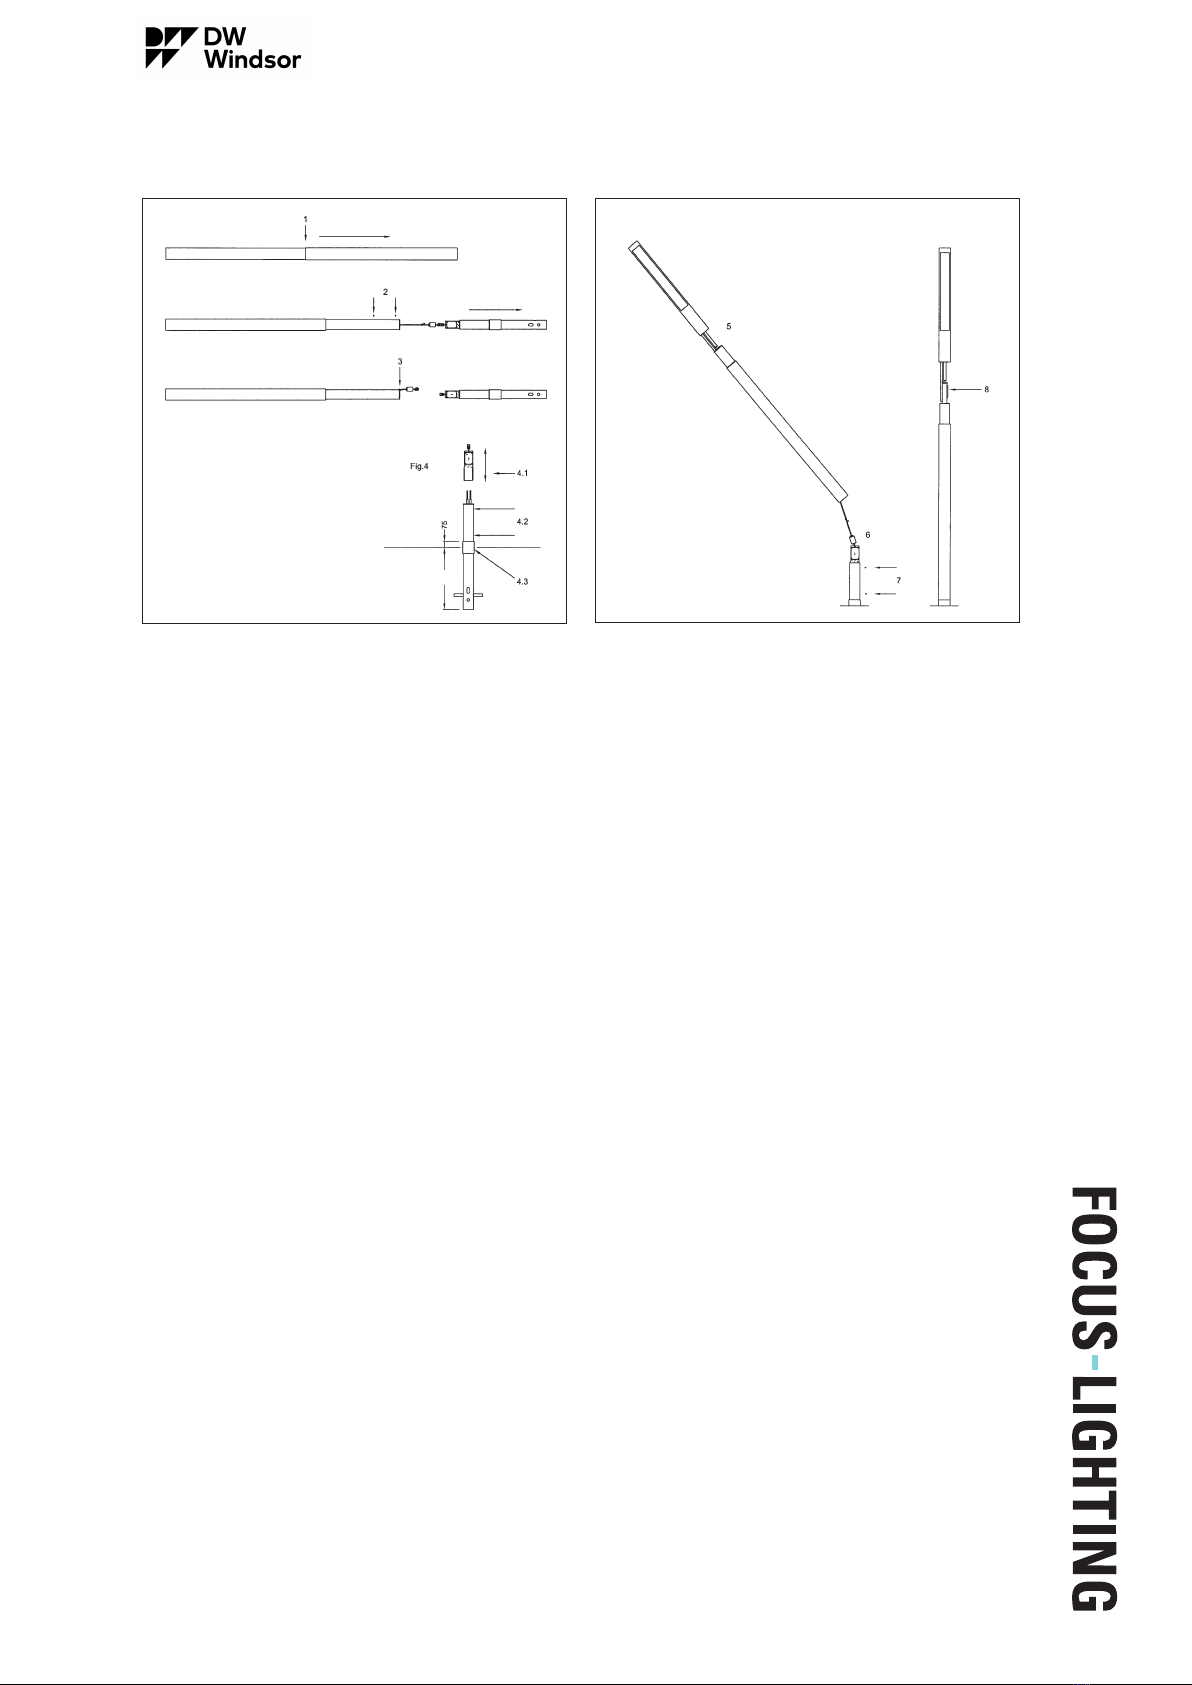
Cut the telescope open at the middle and pull off the outer part (1).
Remove the two screws (2) and pull the base tube including the connection box out of the pole tube.
Untie the connection and use the hook at the pole end to secure the lead (3). Take care that the lead does not disappear into the pole.
Embed the base as shown in fig. 4. Take care that it is plumb. The screw holes (4.2) for the pole should be to the right of the light slit pointing toward yourself.
Pull the connection box (4.1) out of the base and fill in leca granulate to the top edge of the sleeve (4.3). Adjust and de-isolate the cables, max two 5x6 mm2,
mount the box and connect the cables. Remove the last part of the telescope and lift off the top tube to insert the lamp (5).
Lift the pole, connect the plug and cover it by the cylinder (6). Lower the pole into position on the base.
Mount the two screws (7).
Maintenance:
Demount the top part to replace the lamp. Lift the rod including the lamp a little to replace the fuse (8).
Deutsch
Die Teleskopverpackung an der Mitte aufschneiden und den äußersten Teil entnehmen (1).
Die beiden Schrauben (2) entfernen und den Erdanker mit Anschlußkasten aus dem Mastrohr ziehen.
Die Steckverbindung freimachen und die Leitung am Haken (3) befestigen. Bitte, darauf achten, dass die Leitung in den Mast nicht verschwindet.
Den Erdanker wie veranschaulicht (4) eingraben und eventuell mit dem Lot messen. Die Gewindelöcher (4.2) rechts der Lichtrichtung drehen.
Den Anschlußkasten (4.1) aus dem Erdanker ziehen, und Leca-Granulat bis zum Oberrand der Manchette (4.3) hineingießen. Kabel, max. 2 Stck. 5x6 mm2,
anpassen und Isolierung entfernen. Kasten zurückschieben und Kabel anschließen. Den letzten Teil der Verpackung entfernen und das obere Rohr für die
Bestückung entnehmen (5).
Die Leuchte heben, die Steckverbindung sammeln und durch den Zylinder schützen (6). Den Mast über den Erdanker anbringen. Die Leitung zieht sich automa-
tisch auf.
Die beiden Schrauben montieren (7).
Wartung:
Für den Leuchtmittelwechsel, das obere Rohr entnehmen. Für den Sicherungswechsel, die Bausteinstange mit der Leuchtstofflampe ein bißchen aufziehen. (8)
FOCUS LIGHTING AS · Kokkedal Industripark 40 · DK-2980 Kokkedal · Tel 4914 8080 · www.focus-lighting.dk · focus@focus-
lighting.dk
Distributed in the UK by
DW WINDSOR · Pindar Road · Hoddesdon · EN11 0DX · Tel 01992 474600 · www.dwwindsor.com ·


