E-Lux Malibu User manual

Malibu and Malibu GT
Owner’s Manual
930 W. 16th St., Suite C-2
Costa Mesa, CA 92627
www.E-LuxBikes.com

2| P a g e
Thanks so much for purchasing your new E-Lux Electric Beach Cruiser
and welcome to a world of new possibilities!
With your new electric bike, you will be able ride farther, faster, and
easier than ever before on a bicycle which equates to Fun, Fun, and
more Fun! All while traveling for less than half a cent a mile - it’s not
only good for your wallet but it’s good for the planet!
If you have any questions, suggestions, concerns, or if you just want to
say “Hi!” please feel free to drop us a line at info@E-Luxbikes.com.
Happy Trails!
From Jerry and J.P., co-founders of E-Lux Electric Bikes

3 | P a g e
Table of Contents
Carton/Box Contents ................................................................................ 4
Assembly ................................................................................................... 5
Understanding the Display and Display Settings .................................... 10
Battery Care and Charging ...................................................................... 15
Removing Your Battery ........................................................................... 18
Checking Your Battery Charge ................................................................ 19
Battery Life .............................................................................................. 19
Before Your First Ride…. ......................................................................... 20
Stopping the Motor ................................................................................. 23
Brakes ...................................................................................................... 24
Gears ....................................................................................................... 25
Tires ......................................................................................................... 27
Appearance and Care .............................................................................. 28
Commonly Asked Questions ................................................................... 28
Technical Assistance ............................................................................... 29
Important! Read Before Riding! .............................................................. 30
One Year Limited Warranty (Battery Three Years) ................................. 31
Recording Your E-Lux Bike Information .................................................. 35

4| P a g e
Carton/Box Contents
Caution – Please use care when opening box with sharp objects to avoid
cutting any bicycle parts inside.
After opening please check the box for the following contents:
1. Bicycle
2. Handlebar
3. Small Box Containing Battery Charger
4. Small Box Containing Pedals, Manual, Stem Cap, Neck
Cover, Cargo Straps, and Battery Charger

5 | P a g e
Assembly
E-Lux suggests taking your electric bike to a professional bike
technician for assembly. This can be done for a nominal fee at your
local bike shop. If you are comfortable assembling it on your own then
please refer to the directions below. You can also view our assembly
video on our website at www.E-Luxbikes.com/assembly.
What You Will Need
1. Scissors
2. 15 mm wrench
3. 4/5/6 mm Allen wrench(es)
4. All-Purpose Grease
Warning – When removing packaging and zip ties do not use box cutters
or knives as you may damage paint or tires. We suggest a pair of scissors.
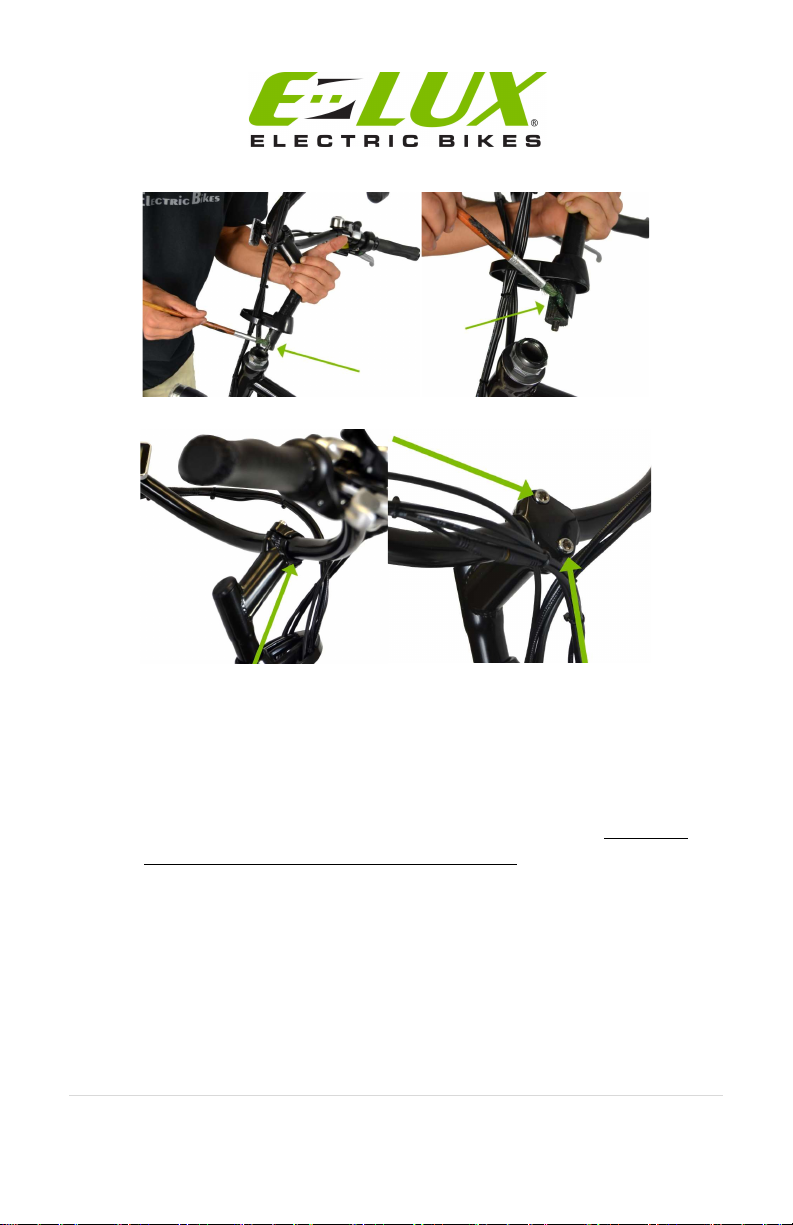
1. Carefully remove the packing from around bicycle.
2. Carefully cut the zip ties holding the handlebars to the frame.
3. Place the bike upright on wheels and kickstand.
4. Apply a small amount of grease inside of the gooseneck tube as
well as the threads and slider on the stem of gooseneck.
5. Making sure that all wires and cables are facing front and not
twisted; install handlebar into handlebar stem tightening the bolt
on the handlebar stem using an Allen wrench.
6. Tilt the handlebars up, making sure they are level and centered
before tightening the two additional bolts.
6| P a g e
7. Pull the seat clamp handle out from the seat post to release
pressure allowing you to remove the seat. Remove seat post and
apply a small bit of grease inside seat tube. Then replace seat.

7 | P a g e
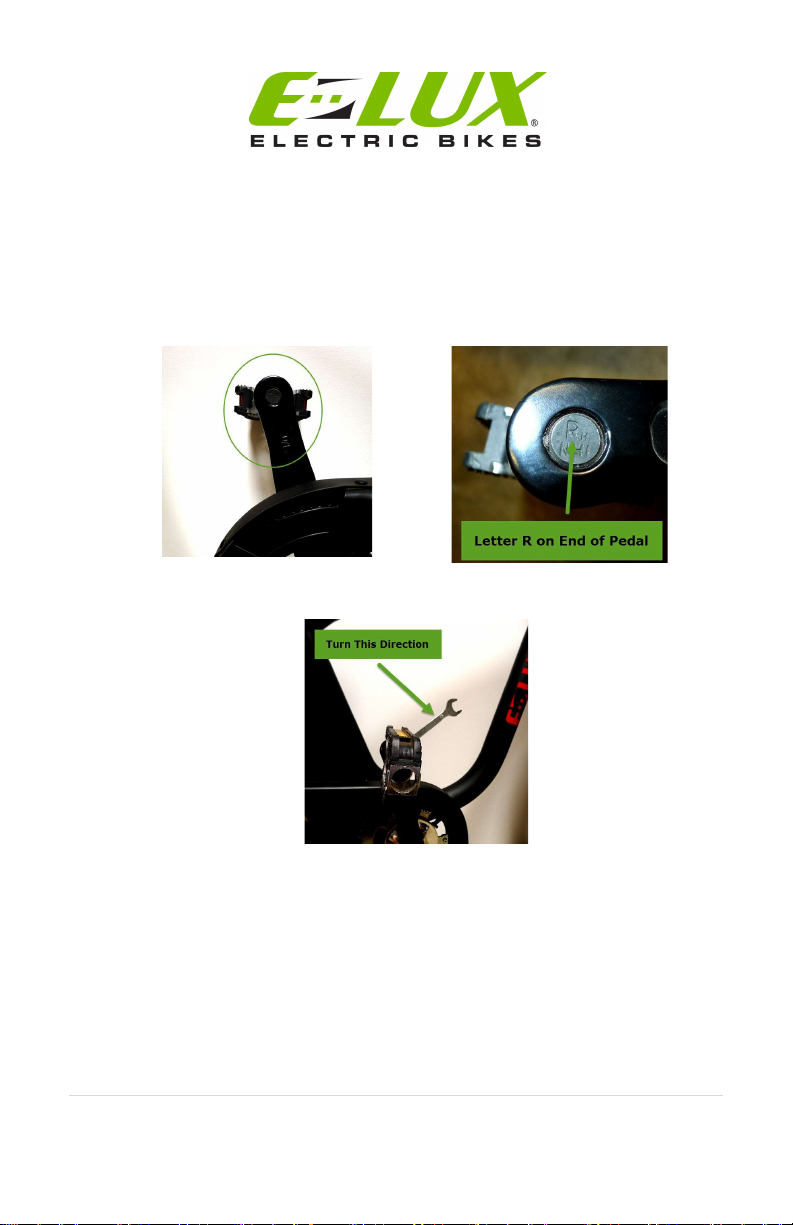
8. Caution – When installing pedals there are two separate pedals
for the left and right sides of the bike. They have different thread
patterns and it is important to be sure each is installed on the
correct side of the bike to avoid stripping the threads. The
following procedure is performed so that when the bike is pedaled
it tightens the pedals.
9. Apply a small amount of grease on pedal threads.
8| P a g e
10. Right Pedal – Facing the bike from the chain side, place pedal
with R on the end of its bolt-on chain side of bike and tighten by
turning clockwise (top of wrench turning towards the front of bike
as noted in the picture below). Tighten pedal very tight.

9 | P a g e
11. Left Pedal – Facing the bike from the kickstand side, place
remaining pedal on the kickstand side of the bike and tighten by
turning counter-clockwise (top of wrench turning towards the
front of bike as noted in the picture below.) Tighten pedal very
tight.
12. Align seat on seat post to your comfort (typically hip height).
13. Use the following recommended tire pressures:
Malibu – 30 to 55 P.S.I.
10| P a g e
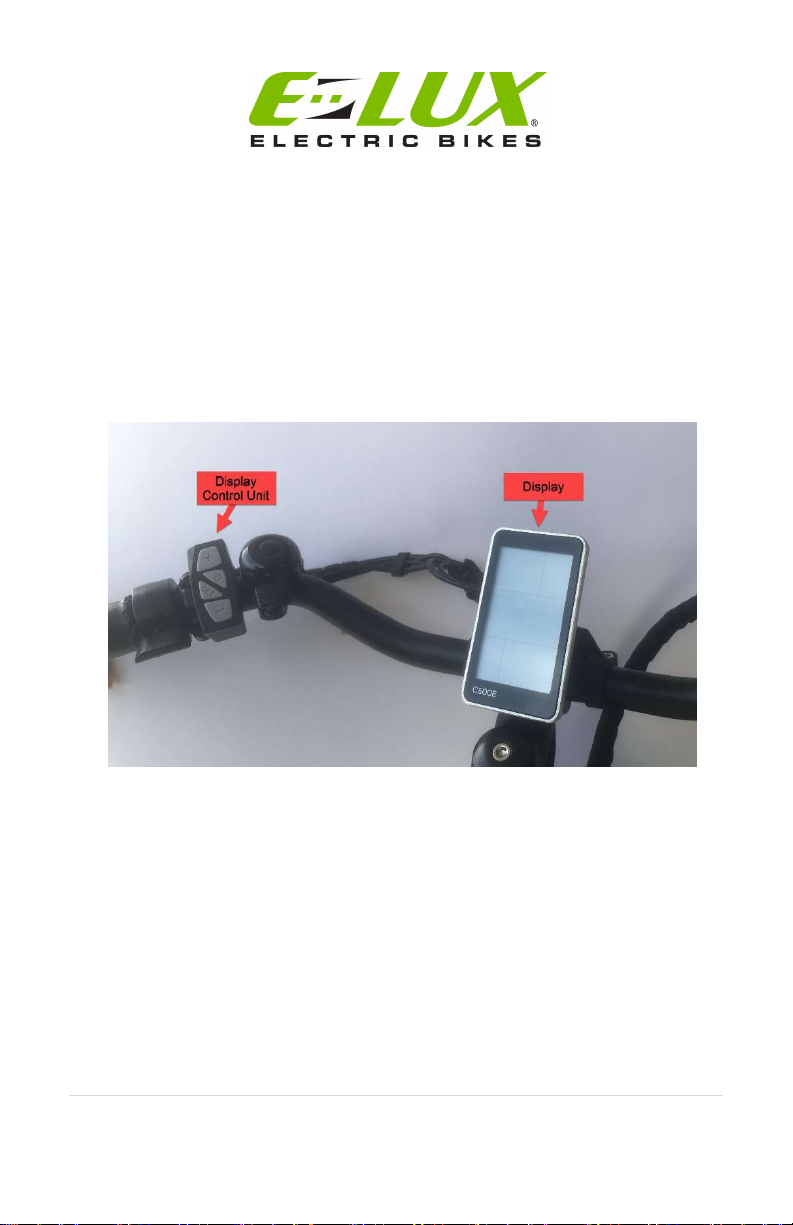
Understanding the Display and Display Settings
1. The picture below shows the Display Control Unit on the left
handlebar and the Display centered above the gooseneck.

11 | P a g e
2. Use the Display Control to turn the power on.
3. Use the plus and minus keys to increase or decrease pedal
assist, and to scroll through various options in the display
modes. This will be explained in the sections below.

12| P a g e
4. IMPORTANT! – Holding the minus key down more than 5 seconds
will put the bike into walk mode. The motor will turn on and the bike
will move forward at 6 mph until you release the minus button or
apply the brakes.
5. Uses the Set button to change modes
6. Briefly pressing the set button will alter the data displayed at the
bottom of the screen from trip to time riding and then finally to
odometer.
7. Pressing the set and plus key at the same time for 5 seconds will turn
on the USB port. The USB indicator will appear. To turn off either
press set and plus at the same time for five seconds or turn the
display off and then on again. The USB port is located underneath
the minus sign on the Display Control Unit on the left handlebar.
13 | P a g e
Gently remove the rubber insulation and then insert your USB
device.
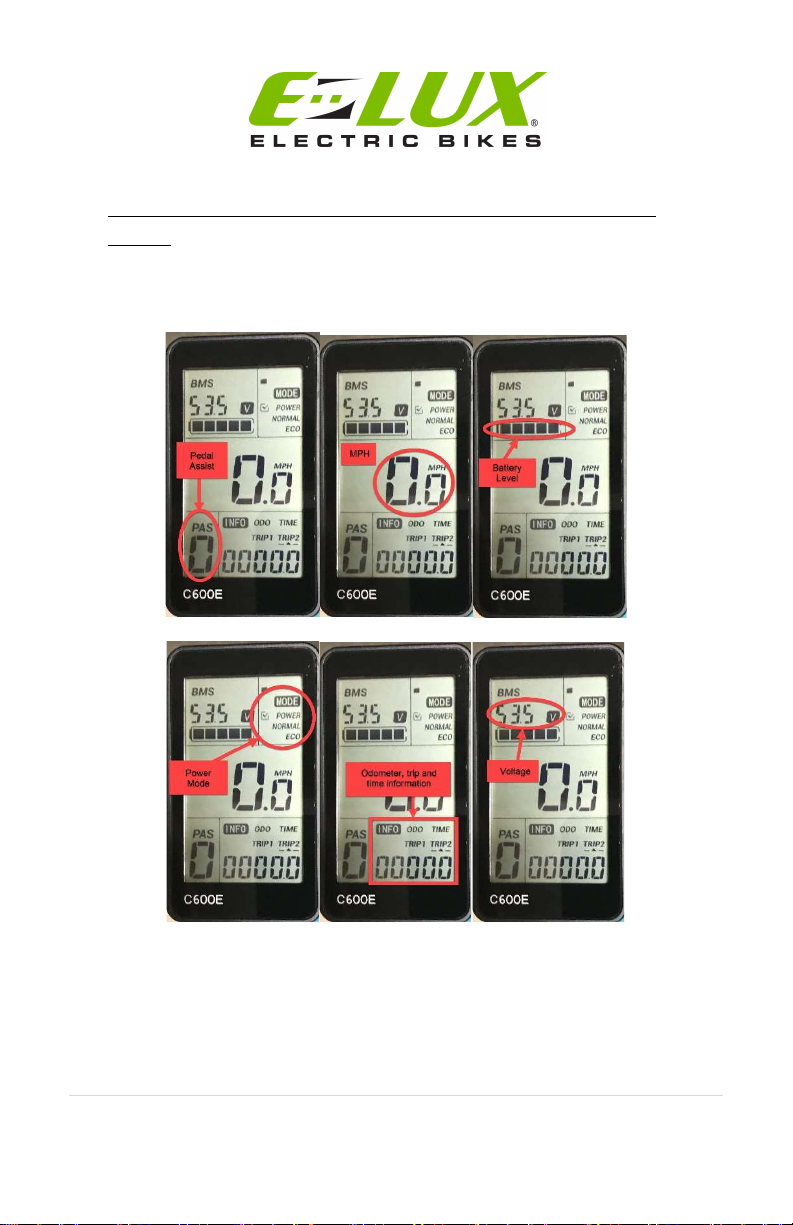
8. The following pictures describe the information on the display:
9. In operating mode, the volt indicator will display 53 to 54 volts when
the battery is fully charged. At 42 volts you will be out of power.
10. There are two indicators for power. One has black bars and indicates
power being consumed/used. It will vary with terrain/load on the
system. The other is a system power mode indicator. The indicator is

14| P a g e
a small check box next to Eco, Normal, or Power. Directions for
changing the mode are below. Use Eco mode for longer trips to save
battery. Use Power mode for higher performance and hill climbing.
Use Normal for regular riding conditions.
11. Holding the set key down for 5 seconds will place the display into
the first of 5 setting modes. Release the set key when you see the
screen change. Use the plus and minus keys to adjust the settings in
each mode. Briefly pressing the set key again will cycle to the next
setting mode.
12. Set Mode 0 – Allows you to select system power mode using plus
and minus keys. Select Eco, Normal or Power.
13. Set Mode 1 – Allows you to reset the trip 1 odometer by briefly
pressing minus key. WARNING! Holding minus key for 5 seconds
will put bike into walk mode and bike will begin moving at 6mph
unless you are holding the brake lever. Note: The trip 2 odometer is
reset every time you turn off the bike.
14. Set Mode 2 – Allows you to set the bike’s top speed.
15. Set Mode 3 – Indicates wheel size. Malibu should be set at 26 in.
16. Set Mode 4 – Allows you to change the from MPH to KPH using
plus and minus keys.
17. Hold the set button down for 5 seconds to return to operating mode.
18. In operating mode, the volt indicator will display 54 volts when the
battery is fully charged. At 42 volts you will be out of power.
15 | P a g e
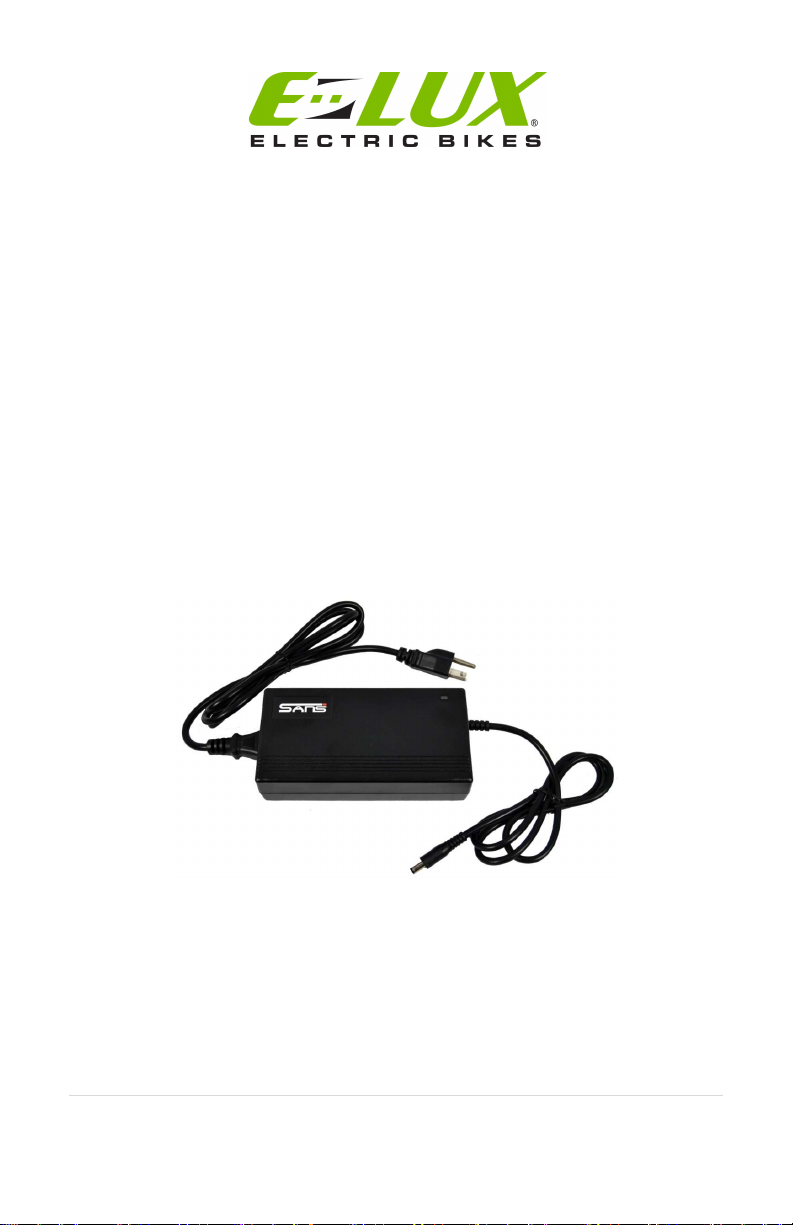
Battery Care and Charging
Your E-Lux Malibu comes with a 48 Volt 14ah or 21ah lithium battery
and charger. Please be aware of the following:
1. Only use the charger provided with your battery. Using a
different charger may result in overheating, fire, or an
explosion damaging your battery and everything around it.
2. You should recharge your battery after each use or when the
battery indicator on the battery display indicates that the
battery charge is low.
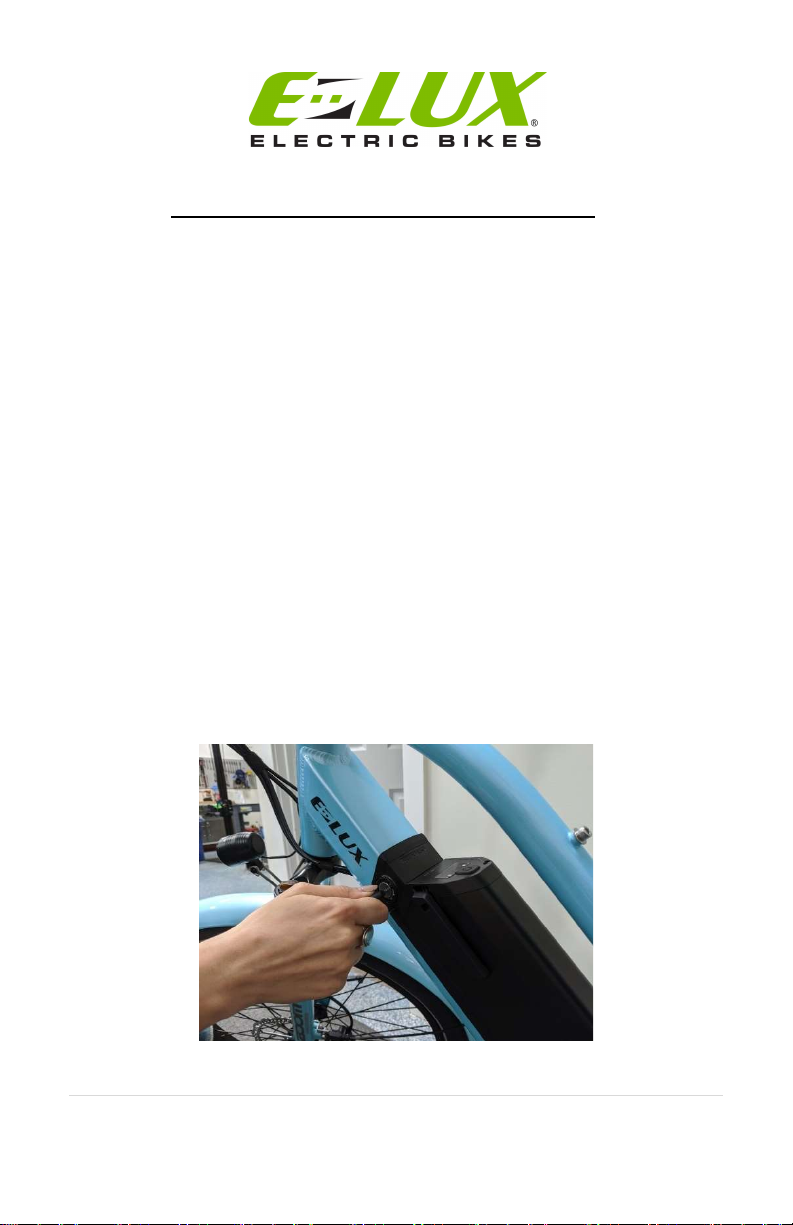
3. The battery may be charged while attached to bike or
separately. The battery may be removed by turning the key to
the unlocked position and sliding the battery out.

16| P a g e
4. To charge the battery plug the charger into the wall outlet first
and then into the port located on the side of the battery.

17 | P a g e
Close-Up View
5. Continue charging until the red light turns green indicating a
full charge or the display shows the battery is full. (Aprox. 4-6
hours.)
6. Then first remove the charger power plug from the wall
followed by the battery side plug.
7. To avoid shortening its lifespan always recharge your battery
18| P a g e
before it becomes completely discharged. Completely
discharging the battery reduces the number of recharge cycles
and reduces its capacity. It can also ruin the battery. It is ok to
charge the battery after every ride.
8. Never store the battery in a discharged state.
9. If you need to store your battery for an extended time, charge
it fully, store it in a cool dry place, and recharge every three
months.
10. Do not subject the battery to high temperatures or leave the
battery in direct sunlight for extended periods of time.
11. Do not place the battery near fire or corrosive substances.
12. Do not immerse the battery in water or other liquids.
13. Do not open or alter the battery or battery charger.
14. If you experience any unusual odors or sounds coming from
your charger or battery unplug it immediately and contact us at
714-440-1967.
Removing Your Battery
To remove your battery, insert and turn the key as shown in the picture
below and gently lift the battery out of the battery housing.
19 | P a g e
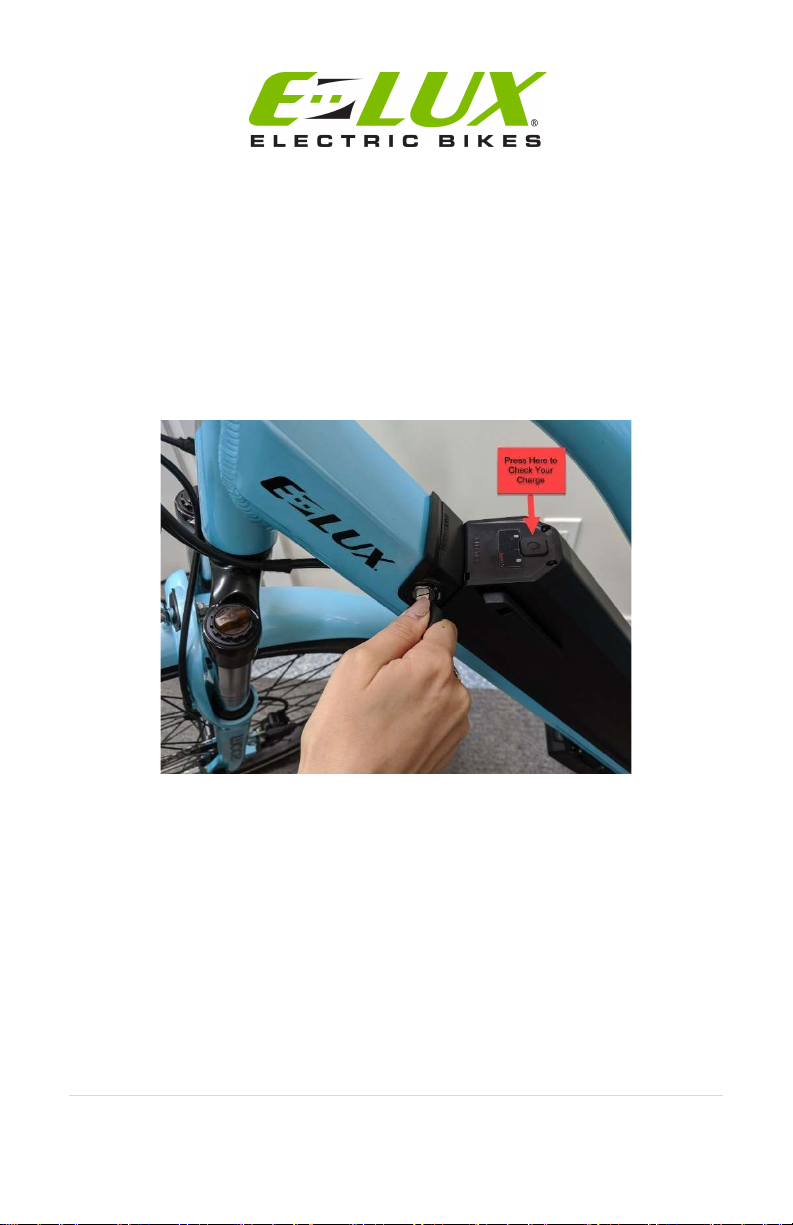
Checking Your Battery Charge
To check the charge on your battery, press the button on the top of the
battery. The battery charge display is next to this button. See the picture
below. Also, if your bike has been stored for a while, press this button to
“wake up” your battery.
Battery Life
Under normal use, your battery is designed to undergo 800 charging and
discharging cycles. After 800 charges its charge holding capacity will
decrease and eventually not hold enough charge even for shorter trips. At
this point you should contact E-Lux Bikes or your dealer to order a new
battery.

20| P a g e
Before Your First Ride….
There are a few things you will need to know before your first ride.
Follow these quick steps and you will be on the road in no time….
1. Adjust the Seat – Pull the seat clamp handle out from the seat
post to release pressure allowing you to raise or lower the seat.
After the seat is at desired level turn handle until clamp is tight
and then push clamp in towards seat post to lock.
1. Helmet – E-Lux suggests that you always wear a helmet when
operating your electric bike. Please be sure to wear a quality
helmet and follow the manufacturer’s directions for fit and use.
2. Safety Check – Please perform a routine safety check of your
entire electric bike before each ride. Look for any loose nuts or
bolts. Check that the brakes are operating properly. Be sure the
tires are at 30-55 PSI and have no cracks or other excessive wear
before riding.
This manual suits for next models
1
Table of contents


