Jorvik Jet-E1 User manual

JET-E2 FH Elite Front Hub Dual Baery Folding Electric
Tricycle
[CITE YOUR SOURCE HERE.]
Jorvik JET-E
1
Elite Low Step Through Folding Tricycle

Jorvik JET-E2 Elite Hub Drive Dual Baery Folding Tricycle
Page | 2

Jorvik JET-E2 Elite Hub Drive Dual Baery Folding Tricycle
Page | 3
User Manual
Thank you for purchasing a Jorvik Elite Tricycle “JET Range”.
We believe this is the future of transport, not only is it an eco-friendly way of transportaon of yourself or goods in the
basket but the rider will also reap the benets of a healthy body and a healthy mind. The JET range is built with style,
quality, ease of use and value for money.
The possibilies are endless but mainly it should bring a smile to your face.
HAPPY TRIKING!
Please scan the above QR code and subscribe to our YouTube channel for useful hints and ps videos.

Jorvik JET-E2 Elite Hub Drive Dual Baery Folding Tricycle
Page | 4
Warning
Electric tricycles can be dangerous to use. The user assumes all risk of personal injury, damage or failures of the tricycle
or system and any other losses or damage to themselves or others, including property arising from the result of using
the tricycle.
As with all mechanical components, the tricycle is subject to wear and tear and high stresses. Dierent materials and
components may react to wear or stress fague in dierent ways. If the design life of material has been exceeded, it
may suddenly fail possibly causing injury to the rider. Any cracks, scratches, changes of colour in the paint in high stress
areas indicates the life of that component has been reached and should be replaced.
For replacement parts, technical informaon and warranty assistance, please contact Jorvik Tricycles on
+441904405338 or E-Mail:
info@jorviktricycles.com
DDO NOT DISSASSEMBLE, MODIFY OR REPLACE ANY OF THE ELECTRICAL PART.
Your insurance policy may not provide coverage for accidents involving the use of electric tricycles. Contact your
insurance company or agent to determine if you are covered.

Jorvik JET-E2 Elite Hub Drive Dual Baery Folding Tricycle
Page | 5
Index
User manual 3
Warning 4
Index 5
How to Assemble the Tricycle 6
Maintenance and upkeep 20
About Charging 25
Removing the Baery 27
Starng the Tricycle 29
Safety 30
Troubleshoong 34
Notes 43

Jorvik JET-E2 Elite Hub Drive Dual Baery Folding Tricycle
Page | 6
How To Assemble This Tricycle
Assembly Instrucons
Your tricycle has been pre-assembled. It requires
only a few simple steps to get ready for your rst
ride. You may need a small amount of grease
during assembly.
1. Remove the outer carton aer cung the
nylon bands and taking o the lid carefully
remove your tricycle, gently resng it in place.
2. Remove all the protecve packaging.
3. Locate and set aside the hardware box that
contains:
Baery charger
Pedals
Tool kit
Jorvik JET-E2 Elite Hub Drive Dual Baery Folding Tricycle
Page | 7
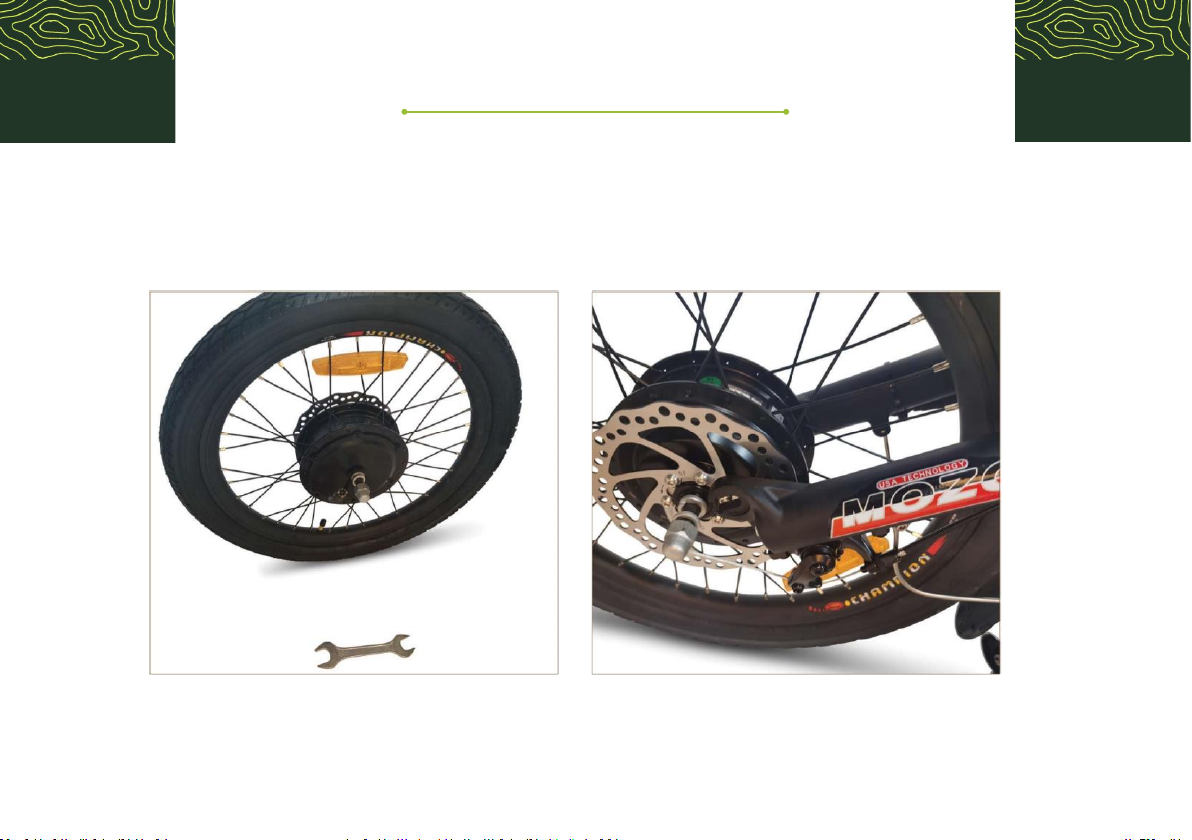
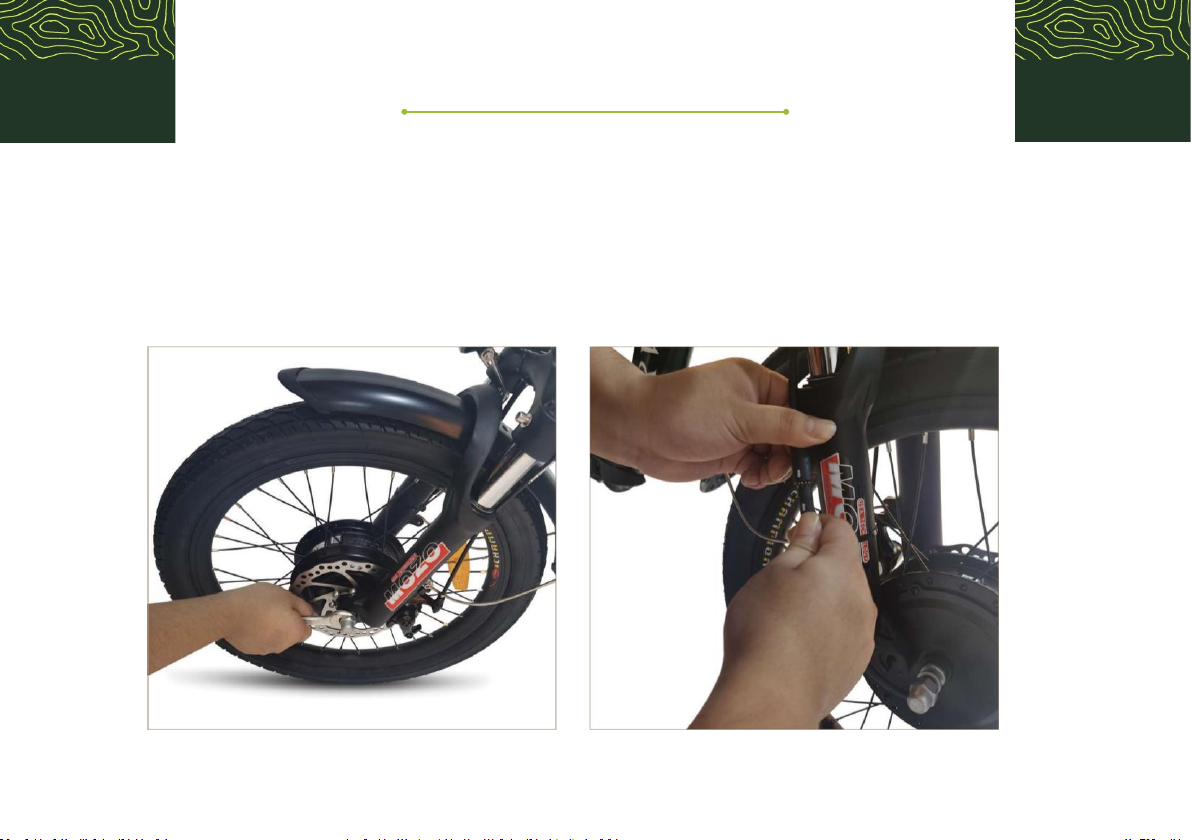
Wheel Assembly Instrucons
1. Loosen the nuts on the front wheel, posion the wheel with the torque washer towards the oor. The wheel
should be installed by lining up the brake rotor and the at sides of the wheel axle with forks dropouts. The disc
brake should be on the back and le side of the fork.
Jorvik JET-E2 Elite Hub Drive Dual Baery Folding Tricycle
Page | 8
Wheel Assembly Instrucons Connued
2. Tighten the nuts on the hub axle, ensure that the at washers are outside the fork.
3. Once the front wheel is securely ed, connect the front drive cable. Ensure both arrows are lined up and the
plugs are fully connected. Incorrect alignment may damage the system. A loose connecon can lead to an
error08 message.
4. Check that all wheels run true and adjust with the supplied spoke key if necessary.

Jorvik JET-E2 Elite Hub Drive Dual Baery Folding Tricycle
Page | 9
Fing the Pedals
Apply a small amount of grease onto the
pedal threads.
NOTE: You will see either “L” or “R” on the
end of the pedal thread. The “R” is for the
righthand pedal and needs to be turned
clockwise to ghten and the “L” or lehand
pedal Counterclockwise to ghten. Incorrect
ng can damage your crank.
Use a 15mm spanner to ghten the pedals
rmly.

Jorvik JET-E2 Elite Hub Drive Dual Baery Folding Tricycle
Page | 10
Fing the Saddle
Apply a small amount of grease into the seat tube
or boom of the seat post. Release the seat clamp
lever and insert the seat post into the tube and
slide up and down to make sure it moves freely.
Clamp the seat post by moving the lever back to
the closed posion. It should require rm pressure
(enough to leave a small imprint on the palm of
your hand to close. Check the seat height so that
when the pedals are set the furthest down your
leg has a slight bend.
If the seat moves when weight is put on it open
the clamp and adjust the nut on the opposite side
clockwise to add to the clamping force. Adjust in
¼ turns unl the seat is secure.
Do not exceed minimum inseron mark.
Other manuals for Jet-E1
1
This manual suits for next models
7
Table of contents
Other Jorvik Bicycle manuals

Jorvik
Jorvik Elite JET-E2 User manual

Jorvik
Jorvik JMT9 User manual

Jorvik
Jorvik Jet-E1 User manual

Jorvik
Jorvik JMT6 User manual

Jorvik
Jorvik JMT7 User manual

Jorvik
Jorvik JET-1 Elite User manual

Jorvik
Jorvik JMT3 User manual

Jorvik
Jorvik JMT10 User manual

Jorvik
Jorvik Odin User manual

Jorvik
Jorvik Odin User manual


