E-MORE 2M2S User manual

E-MORE 2M2S / 2M3S
E-MORE
E-MORE
E-MORE
DE | Bedienungsanleitung: Elektrisch höhenverstellbares Tischgestell E-MORE 2M2S/2M3S ( z w e i s t u fi g /dreistufi g) . . . . . . . . . . . . Seite 10
EN | Operation Manual: Electrical Height Adjustable Desk Frame E-MORE 2M2S/2M3S (2/3 segments) . . . . . . . . . . . . . . . . . . . . . . Page 12
IT | Manuale di instruzonie: Strutture per tavoli regolabili elettricamente in altezza E-MORE 2M2S/2M3S (2/3 segmenti) . . . . . .Pagina 14
FR | Guide d'assemblage et mode d'emploi: Base électrique pour bureau réglable en hauteur E-MORE 2M2S/2M3S (2/3 segments)Page 16
NL | Oorspronkelijke gebruiksaanwijzing: Elektrisch in hoogte verstelbaar tafelframe E-MORE 2M2S/2M3S (2/3-traps) . . . . . . . .Pagina 18
CZ | Návod k obsluze: Rám stolu elektricky nastavitelný na výšku E-MORE 2M2S/2M3S (dvoustupňový/třístupňový) . . . . . . . . . . Strana 20
SE | Bruksanvisning: Bordsstativ med elektrisk höjdjustering E-MORE 2M2S/2M3S (tvåstegs/trestegs). . . . . . . . . . . . . . . . . . . . . .Sidan 22
RO | Instrucţiune de utilizare: Cadru de masă cu reglare electrică în înălţime E-MORE 2M2S/2M3S (în două trepte/în trei trepte).Pagina 24
SK | Návod na používanie: Elektricky výškovo nastaviteľný stolový rám E-MORE 2M2S/2M3S (dvojstupňový/trojstupňový) . . . . . Strana 26

2
E-MORE 2M2S / 2M3S
60
29
1100-1800
473
245
560
600
90
680
610-1270
695-1145 (2M2S)
(2M3S)

3
E-MORE 2M2S / 2M3S
3
3
4
4
8
7
5
6
9
C
4x
A
4x
B
8x
G
4x
D
2x
E
16x
H
4x
F
1x
4
E-MORE 2M2S / 2M3S
1
F
C
4x
1
16
13
13
2
5 6

5
E-MORE 2M2S / 2M3S
3
4
F
A
4x
3
3
1
6
E-MORE 2M2S / 2M3S
5
6
10
10
10
44
F
B
8x
17
H
7
E-MORE 2M2S / 2M3S
7
F
1
8
E
16x
8
E-MORE 2M2S / 2M3S
9

9
E-MORE 2M2S / 2M3S
11
10
G
4x
D
2x
7
8
9

10
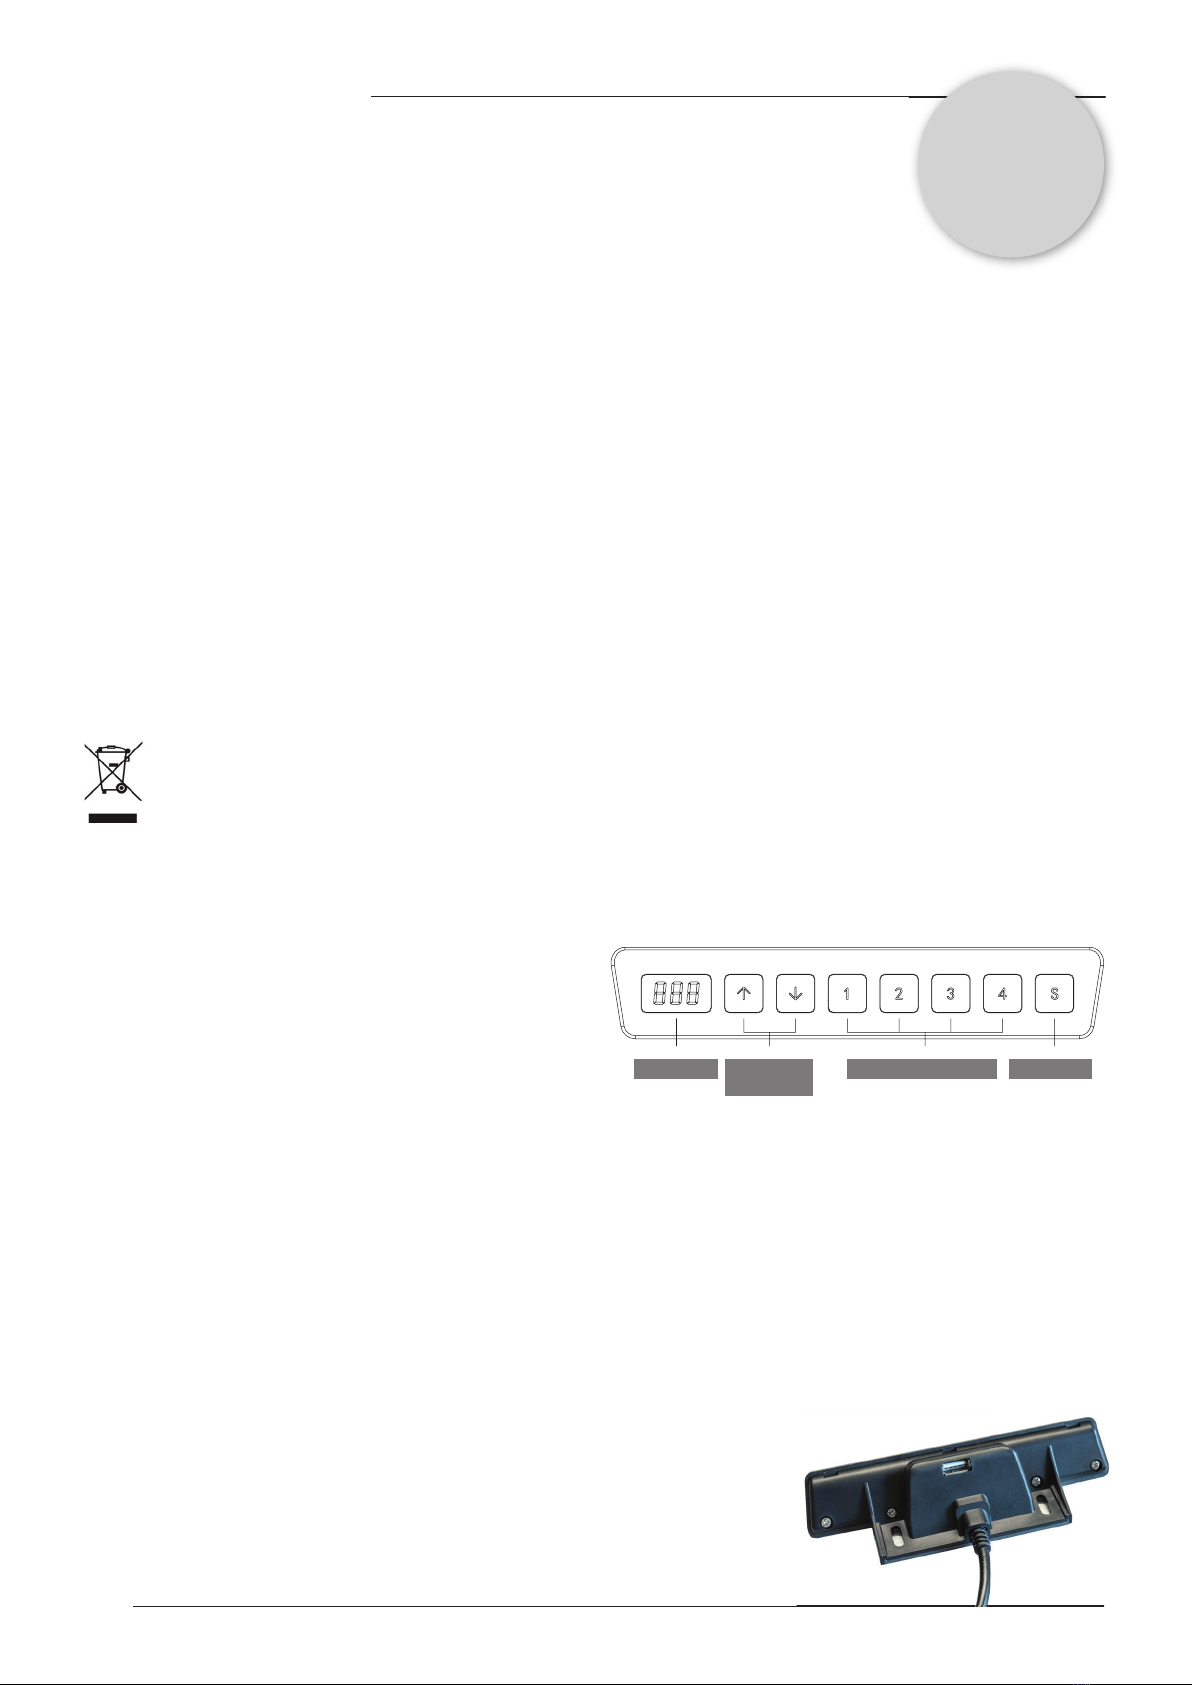
DEUTSCH
HANDSET
1. Up/ Down Tasten
Zur Veränderung der Tischhöhe drücken Sie bitte
die Up oder Down Taste. Die Taste muss gedrückt
bleiben, bis die gewünschte Position erreicht ist.
2. LED Anzeige
Die Anzeige gibt die Höhe des Tisches an. Zudem
werden hier die Auswahlcodes für die Einstellungs-
varianten und die Fehlercodes angezeigt.
3. Memory Tasten (1 / 2 / 3 / 4)
Sind die Memorytasten programmiert, fährt der Tisch durch gedrückt halten der Taste zur programmierten Höhe.
Programmieranleitung:
Bitte fahren Sie den Tisch auf die gewünschte Position. Dann drücken Sie die „S“ Taste und ein „S“ blinkt in der Anzeige. Um
die Höhe des Gestelles zu speichern, drücken Sie eine der Memory Tasten. Immer wenn Sie diese Taste drücken, fährt das
Tischgestell automatisch zur gespeicherten Tischposition.
4. „S“ Taste
Die „S“ Taste dient zum Auswählen und Speichern von Einstellungen.
5. Auffahrschutz
Sollte der Tisch während der Bewegung Druck in Gegenrichtung zur
Fahrtrichtung spüren, stoppt der Tisch und bewegt sich etwas in Gegenrichtung.
6. Reset
1. Erscheint „RST“ in der Anzeige, drücken Sie die DOWN Taste bis das Gestell die
niedrigste Position erreicht, ein Signalton ertönt und das Gestell leicht zurückfährt.
Das Reset ist fertig.
2. Um ein Reset zu erzwingen muss die DOWN Taste solange gedrückt werden, bis
das Gestell die niedrigste Position erreicht. Dann loslassen und sofort wieder für wei-
tere 5 Sekunden drücken (bis ein Signalton ertönt und der Tisch leicht zurückfährt)
KORREKTE ENTSORGUNG
Dieses Produkt darf innerhalb der Europäischen Gemeinschaft nicht mit dem normalen Hausmüll entsorgt wer-
den. Um Schäden durch unsachgemäße Entsorgung von Umwelt und Mensch fernzuhalten, ist eine sachgerechte
Entsorgung sicherzustellen. Im Entsorgungsfall wenden Sie sich bitte an den verantwortlichen Entsorger oder den
genannten Hersteller, um entsprechende Entsorgungsstellen zu nden. (WEEE-Reg.-Nr. DE: 52242201)
2. Tischgestell
Auffahrschutz
Eingebauter Überlastungsschutz
Dynamische Belastung: 120 KG max. (2M3S, 3-stu g)
100 KG max. (2M2S, 2-stu g)
Statische Belastung: 140 KG max. (2M3S, 3-stu g)
120 KG max. (2M2S, 2-stu g)
Geschwindigkeit: 40 mm/s (2M3S, 3-stu g)
32 mm/s (2M2S, 2-stu g)
5 Jahre
GARANTIE
SICHERHEIT!
Dieses Produkt kann nach entsprechender Erklärung / Training im sicheren Umgang mit dem Produkt auch von Kinder ab 8
Jahren, sowie von Personen mit leichten körperlichen oder geistigen Einschränkungen bedient werden. Bitte weisen Sie alle
Personen aus den genannten Personengruppen ausdrücklich auf mögliche Gefahren hin. Kindern ist das Spielen mit dem
Produkt zu untersagen.
1. Elektrische Komponenten:
Eingangsspannung: 100-240V, 50/60 Hz
Nutzgrad: 10% max 2 min ein 18 min aus
Automatische Ausschaltung,
energiesparend
TECHNISCHE DATEN
USB-Steckplatz
Rückseitig mit Ladefunktion
Display S-TasteMemory Tasten
Up-/Down-
Tasten

11
E-MORE 2M2S / 2M3S
Durch das Drücken der “S” Taste für 5 Sekunden gelangen Sie in den Bereich Voreinstellungen. Mit der UP und DOWN Taste
wählen Sie die verschiedenen Unterpunkte. Nachdem eine Einstellung geändert wurde, muss diese durch das Drücken der „S“
Taste gespeichert werden.
S-1 Maßeinheit -> mit “S” auswählen und dann: 0 für cm, 1 für Inches
S-2 Gyroskop Sensor -> mit “S” auswählen und dann:
0 = aus, 1 = wenig empndlich bis 8 = sehr empndlich
S-3 Auffahrschutz Einstellung aufwärts -> mit “S” auswählen und dann:
0 = aus (nicht empfohlen), 1 = wenig empndlich bis 8 = sehr empndlich
S-4 Auffahrschutz Einstellung abwärts -> mit “S” auswählen und dann:
0 = aus (nicht empfohlen), 1 = wenig empndlich bis 8 = sehr empndlich
S-5 Angezeigte Höhe Sollte die angezeigte Höhe von der tatsächlichen Höhe abweichen, kann diese
korrigiert werden.
-> mit “S” auswählen und dann mit Hilfe der UP oder DOWN Taste die tatsäch-
liche Höhe festlegen
S-6 UP / Down Tasten Einstellung -> mit “S” auswählen und dann: 0 = UP / DOWN muss gedrückt bleiben oder 1 =
ein Tastendruck startet und stoppt die Bewegung
S-7 Duty cycle -> Zum Deaktivieren des Überhitzungsschutzes – nicht empfohlen!
S-8 Plattenschräge -> mit “S” auswählen und dann:
0 = aus, 1 = 0.5°, 2 = 1.0°, 3 = 1.5°, 4 = 2.0°, 5 = 2.5°, 6 = 3.0°, 7 = 3.5°, 8 = 4.0°
Nachdem Sie eine Voreinstellung geändert und gespeichert haben, müssen Sie die S-Taste nochmals drücken,
um die neue Einstellung nal zu sichern und in das Hauptmenü zurückzukehren.
Mindesthöhe / Maximale Höhe
Soll eine Höhe beim Herunterfahren nicht unterschritten werden gehen Sie wie folgt vor: Fahren Sie den Tisch auf die ge-
wünschte Mindesthöhe. Drücken Sie die Abwärts- und Aufwärtstaste gleichzeitig für 5 Sekunden. Ein Ton bestätigt, dass die
Höhe gespeichert wurde. (Achtung: Die Mindesthöhe muss unter 92,6 cm liegen)
Soll die Mindesthöhe gelöscht werden, fahren Sie den Tisch auf die Mindesthöhe und drücken Sie die Aufwärts- und Abwärts-
taste erneut für 5 Sekunden. Ein Ton zeigt an, dass die Mindesthöhe gelöscht wurde.
Für die Programmierung der Maximalen Höhe verfahren Sie gleich. Eine Maximale Höhe kann nur für Werte größer 92,7 cm
erfolgen.
ANLEITUNG ZUR VERÄNDERUNG DER VOREINSTELLUNGEN
PROBLEMBEHANDLUNG
Fehler Code Mögliche Ursache Fehlerbehebung
E1, E6, E7 Stromzufuhr Fehler Aus- und wieder einstecken des Stromkabels
E2 Hubsäulen nicht synchron Ein Reset durchführen wie unter 1. beschrieben
E4 Handsteuerung Fehler Die Kabelverbindungen prüfen und neu verbinden
E5 Auffahrschutz Warnung Hindernis entfernen
E8 Tisch steht schräg Tisch in eine Ebene Stellung bringen
E11, E21 Motor Fehler Motorverkabelung überprüfen
E12, E22 Kontrollbox Fehler Kontrollbox muss getauscht werden
E14 - E17 | E24 - E27 Motor Defekt Motor / Hubsäule muss getauscht werden
E18, E28 Zu viel Gewicht Gewicht reduzieren
HOT Zu häug bewegt Tisch für 20 Minuten ruhen lassen

12
ENGLISH
HANDSET
1. Up / Down Keys
To adjust the height of the desk, keep pressing the "up" or "down"
key until the tabletop reaches the desired position.
2. Display Screen
Display the height value of the desk.
3. Memory Key (1 / 2 / 3 / 4)
After setting memory keys, the desk will move automatically to
the saved position.
How to set a memory key: Please select the desired position. Then press the S-key. Then
press the S-Key, the display will show a “S” and fl ashes. Whenever a programmed memory
key is pressed, the tabletop will automatically adjust to the entered/saved height.
4. Set Key
The set key saves all changed settings.
5. Anti-collision function
When the desktop encounters reverse resistance while moving, the desk will stop and
move slightly in the opposite direction.
6. Re-set Procedure
1. When the display shows “RST” press the DOWN key until the frame reaches its
lowest position, you hear a “beep” and the frame rebounds slightly. Now the re-set is
complete.
2. To force a re-set you have to move the frame to its lowest position by pushing the
DOWN key. Release the DOWN key briefl y and push it again for about 5 seconds until
you hear a “beep” and the frame rebounds slightly. The re-set is done.
To restore the factory settings (e.g., when a controller is replaced) press the UP and
DOWN button simultaneously until you hear a rst “beep” after 5 seconds and a
second “beep” after 10 seconds. Once the display shows “RST” proceed as described
under 1. Above.
Display S-Key
Memory Keys
Up-/Down-
Tasten
CORRECT DISPOSAL
This sign indicates that this product must not be disposed through regular household waste within the European
Union. To prevent possible harm to the environment or human health from uncontrolled waste disposal, recycle
it responsibly to promote the sustainable reuse of material resources. To return your used device, please use the
return and collection systems or contact the retailer where the product was purchased. There you can obtain all
information necessary to dispose of this product properly. (WEEE-Reg.-Nr. DE: 52242201)
2. Desk Frame
Anti-Collission
Built-in load limit switch
Dynamic load: 120 KG max. (2M3S, 3 segments)
100 KG max. (2M2S, 2 segments)
Static load: 140 KG max. (2M3S, 3 segments)
120 KG max. (2M2S, 2 segments)
Speed: 40 mm/s (2M3S, 3 segments)
32 mm/s (2M2S, 2 segments)
SAFETY AND WARNING!
This product can be used by children age 8 years and older, a persons with reduced physical, sensory or mental capacity as
long as they have been given proper instructions / training on how to use the product in a safe way and understand the haz-
ards involved. Children shall not play with the product.
1. Electric Components:
Input Voltage: 100-240V, 50/60 Hz
Duty cycle: 10% max 2min on 18 min off
Automatic power off,
low energy consumption
TECHNICAL SPECIFICATIONS
5-year
warranty
USB-Slot
With charging
function on the back

13
E-MORE 2M2S / 2M3S
Press the “S” key for 5 seconds to select between the different settings by using the UP or DOWN key. After you changed a
setting, you have to save the new setting by pressing the “S” key again.
S-1 Unit of measure Press “S” and then select: 0 for cm, 1 for inches
S-2 Gyroscope sensor Press “S” and then select: 0 = off, 1 = least sensitive to 8 = most sensitive
S-3 Anti-collision sensitivity moving up Press “S” and then select: 0 = off (not recommended), 1 = least sensitive to 8
= most sensitive
S-4 Anti-collision sensitivity moving down Press “S” and then select: 0 = off (not recommended), 1 = least sensitive to 8
= most sensitive
S-5 Display height Press “S” and then using the up / down keys you can change the display
height if necessary
S-6 frame operating mode Press “S” and then select: 0 = constant touch or 1 = one-touch
S-7 Duty cycle To deactivate the overheating protection – please do not change!
S-8 frame tilt sensitivity Press “S” and then select 0 = off, 1 = 0.5°, 2 = 1.0°, 3 = 1.5°, 4 = 2.0°, 5 = 2.5°, 6
= 3.0°, 7 = 3.5°, 8 = 4.0°
After adjusting all settings you have to press the “S” key again to return to the main menu.
Minimum /Maximum height
To select a minimum height do the following: Move the frame to the desired minimum height. Press the UP & Down key simul-
taneously for about 5 seconds. A beep indicates that the minimum height has been set. (IMPORTANT: You can only select a
minimum height that is below 92.6 cm)
To remove the minimum height please move the frame to the programmed minimum height, than press the Up & Down key
simultaneously until you hear a beep indicating that the minimum height was deleted.
To set/delete the maximum height please proceed the same way. The maximum height must be more than 92.7 cm.
HOW TO ADJUST SETTINGS BY USING THE HAND CONTROLSETS
TROUBLESHOOTING
Error Code Possible Cause How To Correct
E1, E6, E7 Power failure Reconnect power - switch power source
E2 Lifting columns out of synch Perform a reset as described under 1.
E4 Handset fault Unplug and plug in the cable of the handset
E5 Anti-collission warning standard function, no corrective action required
E8 Desktop not level Level the table
E11, E21 Motor fault Check the motor wire connections
E12, E22 Control box failure Control box needs to be replaced
E14 - E17 | E24 - E27 Motor failure Motor / lifting column needs to be replaced
E18, E28 Overload protection Reduce the weight
HOT Excessive use Do not use for 20 minutes. System will recover automatically.

14
ITALIANO
ISTRUZIONI COMANDO MANUALE
1. Tasti Su / Giù
Per regolare l’altezza, tenere premuto "Su" o "Giù" no
a quando il piano raggiunge l’altezza desiderata.
2. Display
Mostra l'altezza a cui è regolato il tavolo.
3. Tasti di memoria (1 / 2 / 3 / 4)
Dopo aver impostato i tasti di memoria, alla loro pressione il tavolo
si spostera’ automaticamente alla posizione salvata.
Come impostare i tasti di memoria: Selezionare la posizione desiderata; poi premere il tasto S. Sul display apparirà una “S”
lampeggiante; a questo punto premere uno dei tasti di memoria (1/2/3/4) per salvare la posizione corrispondente a quel tasto.
Premendo il tasto di memoria programmato, il piano raggiungerà automaticamente l’altezza salvata.
4. Tasto S
Il tasto S salva qualsiasi modi ca apportata alle impostazioni.
5. Funzione anticollisione
Quando il piano incontra una resistenza contraria durante il movimento, il tavolo si ferma e si sposta leggermente nella dire-
zione opposta.
6. Procedura di ripristino
1. Quando il display mostra “RST” premere il pulsante Giù no a quando la struttura
non raggiunge la posizione più bassa. A quel punto verrà emesso un “bip” e la struttu-
ra rimbalzerà leggermente. Ora la procedura è completata.
2. Per un ripristino forzato portare la struttura alla posizione più bassa premendo il
tasto Giù, poi rilasciarlo brevemente e premere di nuovo per circa 5 secondi no a
quando viene emesso un “bip” e la struttura rimbalza leggermente. Il ripristino è stato
effettuato.
Per ripristinare le impostazioni di fabbrica (es. quando viene sostituito un comando)
premere i pulsanti Su/Giù contemporaneamente no a quando dopo 5 secondi viene
emesso un primo “bip” e dopo 10 secondi un secondo “bip”. Una volta mostrato “RST”
sul display procedere come descritto al punto 1.
CORRETTO SMALTIMENTO
Ai sensi dell’art. 26 del Decreto Legislativo 14 marzo 2014, n. 49 "Attuazione della Direttiva 2012/19/UE sui ri uti di
apparecchiature elettriche ed elettroniche (RAEE)" il simbolo del cassonetto barrato riportato sull’apparecchiatura o
sulla sua confezione indica che il prodotto alla ne della propria vita utile deve essere raccolto separatamente dagli
altri ri uti per permetterne un adeguato trattamento e riciclo. (WEEE-Reg.-Nr. DE: 52242201)
SICUREZZA E AVVERTENZE
Questo prodotto può essere utilizzato da bambini d’età uguale o superiore agli 8 anni, nonchè da persone con ridotte capacità
fisiche, sensoriali o mentali purchè abbiano ricevuto istruzioni sul corretto utilizzo del prodotto e sugli eventuali rischi ad esso
connessi. I bambini non devono utilizzarlo come giocattolo nè operare alcun tipo di pulizia o azione di manutenzione senza la
supervisione di un adulto.
SPECIFICHE TECNICHE
5 ANNI DI
GARANZIA
Porta USB
con funzione di ricarica
sul retro
Display Tasto STasti di memoria
Tasti
Su/Giù
2. Struttura
Anticollisione
Protezione da sovraccarico integrata
Portata dinamica: 120 KG max. (2M3S, 3 segmenti)
100 KG max. (2M2S, 2 segmenti)
Portata statica: 140 KG max. (2M3S, 3 segmenti)
120 KG max. (2M2S, 2 segmenti)
Velocità: 40 mm/s (2M3S, 3 segmenti)
32 mm/s (2M2S, 2 segmenti)
1. Componenti elettrici
Tensione d'ingresso: 100-240V, 50/60 Hz
Ciclo di lavoro: 10% max
2 min acceso, 18 min spento
Sospensione automatica per
risparmio energetico

15
E-MORE 2M2S / 2M3S
Premere il tasto “S” per 5 secondi e successivamente scegliere tra le diverse impostazioni utilizzando i tasti
Su/Giù. Dopo aver modicato una qualsiasi impostazione è necessario salvarla premendo nuovamente il tasto “S”.
S-1 Unità di misura Premere “S” e poi selezionare: 0 per cm, 1 per pollici
S-2 Sensore giroscopio Premere “S” e poi selezionare:
0 = funzione disattivata, 1 - 8 = dal meno sensibile al più sensibile
S-3 Sensibilità anticollisione verso l'alto Premere “S” e poi selezionare: 0 = funzione disattivata (non raccomandato),
1 - 8 = dal meno al più sensibile
S-4 Anti-collision sensitivity moving down Premere “S” e poi selezionare: 0 = funzione disattivata (non raccomandato),
1 - 8 = dal meno al più sensibile
S-5 Altezza visualizzata Se l'altezza indicata differisce da quella reale, potete correggerla.
Premere "S" e poi selezionare l'altezza corretta utilizzando i tasti su/Giù
S-6 Modalità funzionamento telaio Premere “S” e poi selezionare: 0 = tocco costante, 1 = tocco singolo
S-7 Ciclo di lavoro Per disattivare la protezione contro il surriscaldamento – si prega di non modi-
care!
S-8 Sensibilità all'inclinazione Premere “S” e poi selezionare: 0 = funzione disattivata,
1 = 0.5°, 2 = 1.0°, 3 = 1.5°, 4 = 2.0°, 5 = 2.5°, 6 = 3.0°, 7 = 3.5°, 8 = 4.0°
Dopo la modica delle impostazioni premere nuovamente il tasto “S” per ritornare al menù principale.
Altezza minima / massima
Per selezionare l'altezza minima procedere come segue: Portare la struttura all'altezza minima desiderata. Premere i tasti Su/
Giù contemporaneamente per circa 5 secondi. Un "bip" indicherà che l'altezza minima è stata impostata. (IMPORTANTE: E'
possibile selezionare solo un'altezza minima inferiore a 92,6 cm). Per rimuovere l'altezza minima portare la struttura all'altez-
za minima programmata e successivamente premere contemporaneamente i tasti Su/Giù no ad udire un "bip" che indica che
l'altezza minima è stata eliminata.
Per impostare/eliminare l'altezza massima si prega di seguire la stessa procedura. L'altezza massima dev'essere superiore a
92,7 cm.
COME REGOLARE LE IMPOSTAZIONI
UTILIZZANDO IL COMANDO MANUALE
RISOLUZIONE PROBLEMI
Codice errore Possibile causa Correzione
E1, E6, E7 Guasto di alimentazione Ricollegare alla corrente cambiando la fonte
E2 Sollevamento colonne fuori
sincrono
Eseguire la procedura di ripristino come descritto al punto 1
E4 Anomalia del comando manuale Scollegare e ricollegare il cablaggio del comando manuale
E5 Avviso anticollisione Funzione standard. Nessuna azione correttiva necessaria
E8 Tavolo non in piano Portare il tavolo in piano
E11, E21 Anomalia del motore Controllare il cablaggio del motore
E12, E22 Guasto dell'unita di controllo L'unita di controllo deve essere sostituita
E14 - E17 | E24 - E27 Guasto del motore Il motore / le colonne di sollevamento devono essere sostituite
E18, E28 Protezione da sovraccarico Ridurre il carico
HOT Utilizzo eccessivo Sospendere l'utilizzo per 20 minuti. Il sistema si riprenderà
automaticamente
16
FRANÇAIS
HANDSET
1. Touches haut/bas
Pour régler la hauteur de la table s'il vous plaît appuyez sur
une des touches haut/bas. Il faut que la touche soit appuyé
jusqu'à ce que vous ayez obtenu la hauteur désirée.
2. Affichage LED
L'affichage vous indique la hauteur de la table.
En plus vous pouvez voir les codes d'erreur.
3. Touches mémoire (1/2/3/4)
Si vous avez programmé les touches mémoire, la table s'ajustera à la hauteur programmée.
Programmation: S'il vous plaît bougez la table à la hauteur désirée. Appuyez sur la touche "S" (l'écran vous affichera un "S").
Pour sauvegarder la hauteur de la table, appuyez sur une des touches mémoire. Désormais quand vous appuyez sur cette
touche, la table bouge à la hauteur enregistrée.
4. Touche "S"
Avec cette touche vous pouvez choisir et sauvegarder vos paramètres.
5. Protection contre les collisions
Si la table est poussée et en se déplaçant touche un obstacle,
la table arrête et bouge un peu dans la direction opposée.
6. Touche de réinitialisation
1. Si l'écran vous affiche les lettres "RST" appuyez sur la touche bas jusqu'à ce que
les pieds de la table descendent à la position mini. Ensuite vous devez à la position
la plus basse. Aprés vous devez entendre un "bip", la table recule légérement et la
réinitialisation est finie.
2. Pour forcer une réinitialisation, appuyez sur la touche bas jusqu'à ce que les pieds
de la table arrivent à la position mini. Immediatement après. Tout de suite après
appuyez sur la touche pendant 5 secondes de plus. (jusqu'à ce que vous entendiez un
"bip" et la table recule légèrement).
L'affichage Touche STouches mémoire
Touches
haut/bas
DISPOSER DES DÉCHETS CORRECTEMENT
Ce signe signifie qu'au sein de la communauté européenne ce produit ne peut être jeté avec les ordures ména-
gères. Pour empêcher les dégâts potentiels dans l'environnement et aux humains, une élimination responsable
est nécessaire. En cas d'élimination adressez vous aux services de collecte responsables ou au fabricant de ce
produit pour une élimination appropriée. (WEEE-Reg.-Nr. DE: 52242201)
2. Pieds de la table
Protection de collision et de surcharge Integrées
Charge dynamique : 120 KG max (2M3S, 3 segments)
100 KG max. (2M2S, 2 segments)
Charge statique : 140 KG max. (2M3S, 3 segments)
120 KG max. (2M2S, 2 segments)
Vitesse: 40 mm/s (2M3S, 3 segments)
32 mm/s (2M2S, 2 segments)
5 ans de
garantie
SÉCURITÉ!
Aprés une bonne explication/entraînement ce produit peut être utilisé par les enfants de 8 ans et plus, ainsi que les personnes
avec des capacités physiques ou mentales réduites. S'il vous plaît informez ces personnes des dangers potentiels. Il est inter-
dit pour les enfants de jouer avec ce produit. Ne laissez pas vos enfants nettoyer ou faire la maintenance de ce produit sans
votre supervision.
1. Composantes électriques
Tension d'entrée: 100-240V, 50/60 Hz
Cycle de service : 10% max. 2 min. allumé, 18 min fermé
arrêt automatique, énergisant
DONNÉES TECHNIQUES
Prise USB
Avec emplacement de
chargement à l'arrière

17
E-MORE 2M2S / 2M3S
Pour accéder aux paramètres appuyez sur la touche "S" pour 5 secondes. Appuyez sur les touches haut/bas pour choisir un
des sous-éléments et appuyez sur la touche "S" une autre fois pour sauvegarder votre sélection.
S-1 Unité de mesure -> Appuyez sur la touche "S" et choisissez: 0 = cm, 1 = pouces
S-2 S-2 Capteur gyroscope -> Appuyez sur la touche "S" et choisissez:
0 = fermé, 1 = le moins sensible à 8 = le plus sensible
S-3 Protection contre les collisions (vers le haut) -> Appuyez sur la touche "S" et choisissez:
0 = fermé (non recommandé), 1 = le moins sensible à 8 = le plus sensible
S-4 Protection contre les collisions (vers le bas) -> Appuyez sur la touche "S" et choisissez:
0 = fermé (non recommandé), 1 = le moins sensible à 8 = le plus sensible
S-5 Hauteur indiquée Si la hauteur indiquée diffère de la hauteur réel, vous pouvez la corriger.
Appuyez sur la touche "S", puis vous pouvez choisir la hauteur réel avec
les touches haut/bas.
S-6 Réglage des touches haut/bas -> Appuyez sur la touche "S" et choisissez: 0 = maintenez une des touches haut/
bas ou 1 = appuyez une fois pour commencer et arrêter le mouvement
S-7 Cycle de service -> Pour désactiver la protection contre la surchauffe (non recommandé)
S-8 Biseau de plaque -> Appuyez sur la touche "S" et choisissez:
0 = fermé, 1 = 0.5°, 2 = 1.0°, 3 = 1.5°, 4 = 2.0°, 5 = 2.5°, 6 = 3.0°, 7 = 3.5°, 8 = 4.0°
Après avoir changé et sauvegardé les paramétres, vous devez appuyer sur la touche "S"
une 2ème fois pour sauvegarder fois pour sauver vos paramétres finaux et retourner au menu principal.
Hauteur minimale/maximale
Pour ne pas descendre en dessous d'une hauteur spécifique, faitez ce qui suit: Abaissez la table à la hauteur désirée et
appuyez sur les touches haut et bas simultanément pendant 5 secondes. Un "bip" vous confirmera que la hauteur est sauvée.
(Attention: La hauteur minimale doit être en dessous de 92.6 cm)
Pour suprimer la hauteur minimale, abaissez la table à la hauteur minimale et appuyez sur les touches haut et bas simultané-
ment pour 5 secondes. Un "bip" vous signalera que la hauteur minimale est annullée. Pour programmer la hauteur maximale,
vous devez faire la même chose. (Attention: La hauteur maximale doit être plus grand que 92.7cm)
MODE D'EMPLOI POUR CHANGER LA PRÉRÉGLAGE À L'AIDE
DU COMBINÉ
MANUEL DE DÉPANNAGE
Code d'erreur Causes possibles Corrections d'erreurs
E1, E6, E7 Panne de courant Débranchez et branchez le fil
E2 Les pieds ne sont pas
synchronisés
Faitez une touche de réinitialisation comme expliqué en
point 1.
E4 Panne de combiné Verifiez le câble de connection et le reconnectez
E5 Avertissement de protection
contre les collisions Retirez l'obstacle
E8 Table est en biais Nivelez la table
E11, E21 Erreur du moteur Vérifiez la câblage
E12, E22 Erreur boîtier de commande Changez le boitier de commande
E14 - E17 | E24 - E27 Moteur défectueux Changez le moteur/levier
E18, E28 Trop de poids Réduisez le poids
HOT Trop bougé Laissez reposer la table pour 20 min

18
NEDERLANDS
HANDSET
1. omhoog/omlaag toetsen
Om de hoogte van de tafel te wijzigen, drukt u op
de omhoog of omlaag knop. De toets moet worden ingedrukt
tot dat de gewenste positie is bereikt.
2. LED-display
Het display geeft de hoogte van de tabel weer. Ook
de selectiecodes voor de instelvarianten
en de foutcodes worden weergegeven.
3. geheugentoetsen (1 / 2 / 3 / 4)
Als de geheugentoetsen zijn geprogrammeerd, gaat het tafelframe naar de geprogrammeerde hoogte door de toets ingedrukt
te houden.
Programmeerinstructies:
Verplaats het tafelframe naar de gewenste positie. Druk vervolgens op de "S"-toets en er knippert een "S" in het display.
Om de hoogte van de standaard op te slaan, drukt u op een van de geheugenknoppen. Telkens wanneer u op deze knop drukt
gaat het tafelframe automatisch naar de opgeslagen tafelpositie.
4. "S"-knop
De "S"-toets wordt gebruikt om de instellingen te selecteren en op te slaan.
5. aanrijdingsbeveiliging
Als de tafel weerstand voelt tijdens een beweging in de tegenovergestelde richting
dan stopt de tafel en beweegt deze iets in de tegenovergestelde richting.
6. reset
1. wanneer "RST" op het display verschijnt, druk dan op de DOWN-toets tot het frame
de laagste stand heeft bereikt, er klinkt een signaaltoon en de stand gaat iets terug.
De reset is voltooid.
2.Om een reset te forceren, moet de DOWN-toets worden ingedrukt totdat
het frame de laagste positie heeft bereikt. Dan loslaten en onmiddellijk de toets weer
5 seconden indrukken (tot er een signaaltoon klinkt en de tafel een beetje terug-
loopt).
Scherm S-knopGeheugenknoppen
Omhoog / om-
laag-knoppen
CORRECTE VERWIJDERING
Dit product mag binnen de Europese Gemeenschap niet met normaal huishoudelijk afval worden weggegooid.
Om schade aan het milieu en de gezondheid van de mens te voorkomen, moet je zorgen voor een goede afval-
verwijdering. Neem In geval van verwijdering contact op met het verantwoordelijke afvalverwerkingsbedrijf of de
genoemde fabrikant om een geschikte stortplaats te vinden. (WEEE-Reg. Nr. DE: 52242201)
2. tafelframe
Botsingsbescherming
Ingebouwde overbelasting beveiliging
Dynamische belasting: 120 KG max. (2M3S, 3-traps)
100 KG max (2M2S, 2-traps)
Statische belasting: 140 KG max. (2M3S, 3-traps)
120 KG max. (2M2S, 2-traps)
Snelheid: 40 mm/s (2M3S, 3-traps)
32 mm/s (2M2S, 2-traps)
5 jaar
GARANTIE
VEILIGHEID!
Dit product kan ook gebruikt worden door kinderen vanaf 8 jaar na een passende uitleg / training in de veilige omgang met het
product. Maar ook door personen met een lichte lichamelijke of geestelijke handicap. Gelieve allen te instrueren Personen van
bovengenoemde groepen uitdrukkelijk wijzen op mogelijke gevaren. Kinderen mogen niet met het product spelen.
1. elektrische componenten:
Ingangsspanning: 100-240V, 50/60 Hz
Effectieve graad: 10% max. 2 min. aan 18 min. uit
Automatische uitschakeling,
energiebesparend
TECHNISCHE SPECIFICATIES
USB-aansluiting
Met oplaadfunctie aan de
achterkant

19
E-MORE 2M2S / 2M3S
Door de "S"-toets 5 seconden in te drukken, komt u bij de voorinstellingen. Met de knop OMHOOG en OMLAAG selecteert u de
verschillende subitems. Nadat een instelling is gewijzigd, moet deze worden bevestigd door op de "S" te drukken.
S-1 Meeteenheid -> selecteer "S" en dan: 0 voor cm, 1 voor inches
S-2 Gyroscoopsensor -> selecteer "S" en dan:
0 = uit, 1 = weinig gevoelig tot 8 = zeer gevoelig
S-3 Botsingsbeveiliging naar boven instellen -> selecteer "S" en dan:
0 = uit (niet aanbevolen), 1 = lage gevoeligheid tot 8 = zeer gevoelig
S-4 Botsingsbeveiliging naar beneden -> selecteer "S" en dan:
0 = uit (niet aanbevolen), 1 = weinig gevoelig tot 8 = zeer gevoelig
S-5 Weergegeven hoogte Als de weergegeven hoogte afwijkt van de werkelijke hoogte, kan deze worden
gecorrigeerd.
-> selecteer met "S" en gebruik dan de UP of DOWN-toets om de eigenlijke
Ingestelde hoogte vast te zetten.
S-6 Toetsen OMHOOG / OMLAAG Instelling -> selecteer "S" en dan: 0 = OMHOOG / OMLAAG moet ingedrukt blijven of
1 = één druk op de knop start en stopt de beweging
S-7 Duty cycle -> Voor het uitschakelen van de oververhittingsbeveiliging - niet aanbevolen!
S-8 Plaatkant -> selecteer "S" en dan:
0 = uit, 1 = 0,5°, 2 = 1,0°, 3 = 1,5°, 4 = 2,0°, 5 = 2,5°, 6 = 3,0°, 7 = 3,5°, 8 = 4,0°.
Nadat u een voorinstelling hebt gewijzigd en opgeslagen, moet u opnieuw op de S-toets drukken,
om uiteindelijk de nieuwe instelling op te slaan en terug te keren naar het hoofdmenu.
Minimale hoogte / Maximale hoogte
Ga als volgt te werk als u niet onder een bepaalde hoogte wilt gaan als u afdaalt: Verplaats de tafel naar de gewenste mini-
male hoogte. Druk de omlaag- en omhoog knop tegelijkertijd gedurende 5 seconden in. Een toon bevestigt dat de hoogte is
bepaald (Let op: de minimale hoogte moet minder dan 92,6 cm zijn)
Om de minimale hoogte te wissen, verplaatst u de tafel naar de minimale hoogte en drukt u op de omhoog- en omlaag-toet-
sen. opnieuw voor 5 seconden. Een pieptoon geeft aan dat de minimale hoogte is geschrapt.
Ga op dezelfde manier te werk om de maximale hoogte te programmeren. Een maximale hoogte kan alleen worden gepro-
grammeerd voor waarden groter dan 92,7 cm.
INSTRUCTIES VOOR HET WIJZIGEN VAN DE VOORINSTELLINGEN
HET OPLOSSEN VAN PROBLEMEN
Foutcode Mogelijke oorzaak Problemen oplossen
E1, E6, E7 Fout in de stroomvoorziening Haal de stekker uit het stopcontact en sluit de
stroomkabel weer aan.
E2 Hefkolommen niet synchroon Voer een reset uit zoals beschreven onder 1.
E4 Fout in de handmatige besturing Controleer de kabelaansluitingen en sluit ze opnieuw aan.
E5 Waarschuwing voor
botsingsbeveiliging Verwijder obstakel
E8 Tafel is schuin Verplaats de tafel naar een vlakke positie
E11, E21 Motorfout Motorbedrading controleren
E12, E22 Fout in de besturingskast Besturingskast moet worden vervangen.
E14 - E17 | E24 - E27 Motordefect Motor / hefkolom moet worden vervangen.
E18, E28 Te veel gewicht Verminder gewicht
HOT Te vaak bewogen Laat de tafel 20 minuten rusten.

20
ČEŠTINA
OVLÁDÁNÍ
1. Tlačítka Nahoru / Dolů
Pro změnu výšky stolu stiskněte
tlačítko Nahoru / Dolů Tlačítko se musí přidržet
, tak dlouho až se dosáhne požadovaná pozice.
2. LED displej
Na displeji se zobrazuje výška stolu. Kromě toho
se zde ukazují kódy pro výběr variant
nastavení a kódy poruch.
3. Paměťová tlačítka (1 / 2 / 3 / 4)
Pokud jsou paměťová tlačítka naprogramována, stůl se přidržením tlačítka přesune do naprogramované výšky.
Návod k programování:
Prosíme, nastavte stůl do požadované pozice. Potom stiskněte tlačítko „S“ a písmeno „S“ začne blikat. Pro uložení výšky
rámu do paměti, stiskněte jedno paměťové tlačítko. Vždy po stisknutí tohoto tlačítka se rám stolu automaticky přemístí do
pozice uložené v paměti.
4. Tlačítko „S“
Tlačítko „S“ slouží k volbě a ukládání nastavení do paměti.
5. Ochrana proti nárazu
Pokud stůl během pohybu ucítí tlak v protisměru
, pak se zastaví a vrátí poněkud zpět.
6. Resetování
1. Jestliže se na displeji objeví „RST“ stiskněte a přidržte tlačítko DOLŮ tak dlouho, až
dosáhne rám nejnižší pozici, zazní signální tón a rám se vrátí poněkud zpět. Resetová-
ní je hotové.
2. Chcete-li vynutit resp. provést reset, musíte stisknout tlačítko DOLŮ na tak dlou-
ho, dokud rám nedosáhne nejnižší pozici. Potom tlačítko uvolněte a ihned zase na 5
vteřin stiskněte (až zazní signální tón a stůl se vrátí poněkud zpět).
5 Jahre
GARANTIE
SPRÁVNÉ ODSTRANĚNÍ DO ODPADU
Tento produkt nesmí být v Evropském společenství likvidován spolu s běžným domácím odpadem. Pro zabránění
škod na životním prostředí a ohrožení osob nesprávným odstraněním do odpadu se musí zajistit správná likvidace.
V případě likvidace se obraťte na odpovědnou společnost pro likvidaci odpadu nebo na jmenovaného výrobce, abys-
te našli příslušnou sběrnu. (WEEE reg. č. DE: 52242201)
2. Rám stolu
Ochrana proti nárazu
Vestavěná ochrana proti přetížení
Dynamické zatížení: 120 kg maximálně (2M3S, 3-stupňový)
100 kg maximálně (2M2S, 2-stupňový)
Statické zatížení: 140 kg maximálně (2M3S, 3-stupňový)
120 kg maximálně (2M2S, 2-stupňový)
Rychlost: 40 mm/s (2M3S, 3-stupňový)
32 mm/s (2M2S, 2-stupňový)
5 Jahre
GARANTIE
5 let
ZÁRUKA
BEZPEČNOST!
Tento výrobek mohou, po odpovídajícím vysvětlení / tréninku pro bezpečné zacházení, obsluhovat děti od 8 let i osoby s
lehkým tělesným nebo mentálním postižením. Prosíme, upozorněte výslovně všechny uživatele z uvedených skupin osob na
možná nebezpečí. Dětem se musí hraní s výrobkem zakázat.
1. Elektrické komponenty:
Vstupní napětí: 100 - 240 V, 50/60 Hz
Účinnost: 10% maximálně 2 minuty zapnuto,
18 minut vypnuto
Automatické vypínání,
energeticky úsporné
TECHNICKÁ DATA
USB slot
Na zadní straně s funkcí nabíjení
Displej Tlačítko SPaměťová tlačítka
Tlačítka Na-
horu / Dolů
This manual suits for next models
1
Table of contents
Languages:
Other E-MORE Indoor Furnishing manuals


Popular Indoor Furnishing manuals by other brands


Next
Next 148735 Assembly instructions

Abbyson
Abbyson Alix 72 In. Media Console Assembly instructions & user manual

Furniture of America
Furniture of America CM2706 Assembly instructions

Whittier Wood Furniture
Whittier Wood Furniture Addison 3836DUETb Assembly instructions

Atlantic
Atlantic 3010-4010 Assembly instruction

Trasman
Trasman 6017H Bo8 Assembly manual