manuals.online logo
Brands
  1. Home
  2. •
  3. Brands
  4. •
  5. Eagle Health Supplies
  6. •
  7. Mobility Aid
  8. •
  9. Eagle Health Supplies 77963 User manual

Eagle Health Supplies 77963 User manual

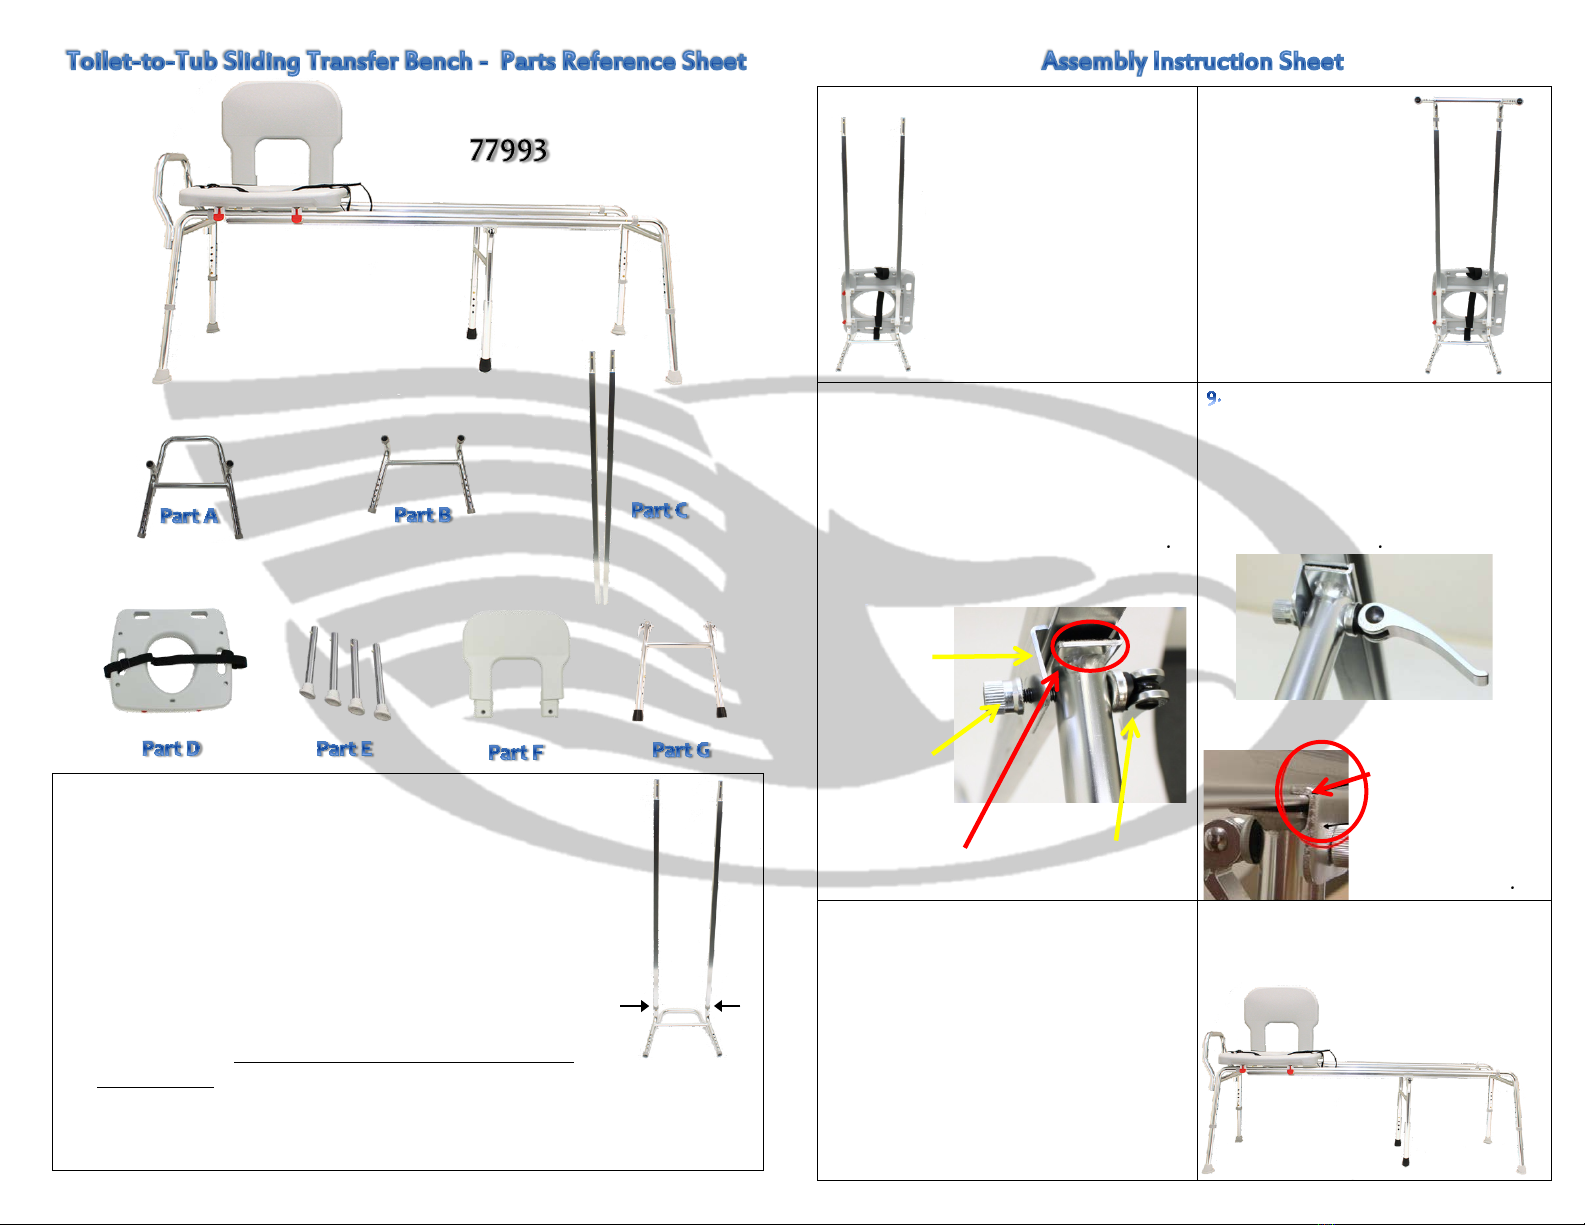
1. Take the leg frame with the handlebar (Part A), and lay it
flat on the ground.
2. Determine which direction you would like the seat to face
in your bathtub. The leg frame with the handlebar (Part
A) will be the side that goes inside the bathtub.
3. There are two sliding rails (Part C): one rail has 4 brass
push buttons (front rail), and the other rail has 2 push
buttons (rear rail).
4. If you prefer to sit facing left (if looking at the tub from
outside), take the rail with 4 push buttons (front rail), and
insert it into tube X (or insert it into tube Y if you want to
sit facing right). Make sure the two smaller push buttons
face forwards (the smaller push buttons are for the sliding rail locking
mechanisms). Make sure the larger button snaps firmly into the leg frame.
5. Insert the rear sliding rail into the other side of the leg frame (Part A), making
sure the button snaps firmly into place.
Take the seat with the attached sliding6.
rings (Part D), and align
the sliding rings with
the rails, so that the locking
side of the seat (the side
with the red tabs) is on
the same rail as the 4 brass
push buttons. Insert both
sliding rails into the sliding
rings under the seat. Push in
push buttons to slide
the seat easily onto the rails.
Take the other leg7.
frame (Part B),
and insert the
sliding rails into it.
Make sure
the brass buttons
snap firmly
into place.
Place leg-support (Part G) along8.
the under-side of rails. Ensure the black
rubber platforms at the top of the leg-
support are flush with the flat
underside of the sliding rails. If
necessary, loosen thumb-nut to widen
the top L-plate of the clamp to install.
Make sure top L-plate is positioned
above the flat part of the rail.
Position the leg-support (Part G)
at mid-point along the sliding rails
before tightening. With the clamp
lock-handle open (perpendicular
to the legs), tighten the thumb-nut.
Then flip the lock-handle down
to lock the clamp.
CAUTION: Do not over-tighten.
The top L-plate should sit flat with
the top of the flat
part of the sliding
rail. The lock-handle
will bounce back
to perpendicular
if over-tightened.
Take the 4 legs (Part E), and insert10.
them into the leg frames. Set bench
height by using same button-hole
location for each leg. Make sure the
buttons snap firmly into place. For your
safety, adjust the rubber tips on the
legs by turning them outward for
maximum floor contact. Sit the bench
up on the legs.
Insert the backrest (Part F) into the11.
two oblong holes on top of the seat
towards the rear of the seat. Push
backrest down firmly
into seat until it snaps
into place.
Y
L-plate
Thumb-nut
Lock-handle
Make Flush
X
Thank you for purchasing an Eagle Health Supplies product!
Helpful instructional assembly videos available at www.EagleHealth.com.
If any push button/pin does not completely snap into place
while assembling, or if you feel the bench is not secure,
please do not use the bench, and notify your Authorized Dealer immediately.
To register your product for the Limited One-Year Warranty, please complete and
return the included Warranty Card, or register online at www.EagleHealth.com.
Locking Mechanism
Lock the seat into place by making sure the slide ring snaps firmly onto the
brass push button at the end of the sliding rail (shown below). Release the
locking mechanism by pressing down on the red tab of the locked slide ring.
UNLOCKED LOCKED
Middle Leg-Support
Adjust the leg height so the legs are barely off the ground (about 1/8” to 1/4”).
Make sure the buttons snap firmly into place.
Rubber Tips
Be sure the rubber tips are turned outward for maximum floor contact
and stability.
Cleaning
Rinse off the bench with warm water after each use to prevent dirt, soap scum,
and mineral deposits from forming which could affect proper operation. We
recommend regularly cleaning the seat and back with a soft cloth, warm water
and mild soap, or with a soft cloth and any non-bleach cleaner.
Maintenance
Built up soap scum, mineral deposits, or watermarks may cause the brass push
buttons/pins to stick or may cause the seat to not slide smoothly along the rails.
To help, spray lubricant, such as WD-40, on the brass push buttons/pins to
loosen the buttons/pins, or along the sliding rails to maintain a smooth slide.
For Toilet-to-Tub Sliding Transfer Benches
77963 / 77983 / 77993 / 77903 / 77913
For Your Comfort. For Your Safety.
For Your Independence. For YOU.

This manual suits for next models

4

Other Eagle Health Supplies Mobility Aid manuals

Eagle Health Supplies 77111 User manual

Eagle Health Supplies

Eagle Health Supplies 77111 User manual

Eagle Health Supplies 77111 User manual

Eagle Health Supplies

Eagle Health Supplies 77111 User manual

Eagle Health Supplies 74654 User manual

Eagle Health Supplies

Eagle Health Supplies 74654 User manual

Eagle Health Supplies 55111 User manual

Eagle Health Supplies

Eagle Health Supplies 55111 User manual

Popular Mobility Aid manuals by other brands

dynarex Bari+Max 10374 quick start guide

dynarex

dynarex Bari+Max 10374 quick start guide

aidapt VM938C Usage and maintenance instructions

aidapt

aidapt VM938C Usage and maintenance instructions

NRS Healthcare L71134 User instructions

NRS Healthcare

NRS Healthcare L71134 User instructions

Gima 28610 Use and maintenance book

Gima

Gima 28610 Use and maintenance book

EZee Life CH1052 instructions

EZee Life

EZee Life CH1052 instructions

Guardian MDS86825 User instructions and warranty

Guardian

Guardian MDS86825 User instructions and warranty

aidapt VM923 Usage and maintenance instructions

aidapt

aidapt VM923 Usage and maintenance instructions

LPA Evolution S-250 instruction manual

LPA

LPA Evolution S-250 instruction manual

Life & Mobility PRESTO user manual

Life & Mobility

Life & Mobility PRESTO user manual

Handicare SystemRoMedic DisposableBelt manual

Handicare

Handicare SystemRoMedic DisposableBelt manual

Invacare Matrx MX1 manual

Invacare

Invacare Matrx MX1 manual

Medline MICROBAN MDSCA86321WPMBG User instructions and warranty

Medline

Medline MICROBAN MDSCA86321WPMBG User instructions and warranty

Nova 4200 user guide

Nova

Nova 4200 user guide

Vela 014900 Mounting instructions

Vela

Vela 014900 Mounting instructions

Enabling Devices Twitch Switch user manual

Enabling Devices

Enabling Devices Twitch Switch user manual

Timago JMC-C 3222 Instructions for use

Timago

Timago JMC-C 3222 Instructions for use

Kid-Man 02-5041B user manual

Kid-Man

Kid-Man 02-5041B user manual

NRS Healthcare H87115 User instructions

NRS Healthcare

NRS Healthcare H87115 User instructions

manuals.online logo
manuals.online logoBrands
  • About & Mission
  • Contact us
  • Privacy Policy
  • Terms and Conditions

Copyright 2025 Manuals.Online. All Rights Reserved.