manuals.online logo
Brands
  1. Home
  2. •
  3. Brands
  4. •
  5. Eagle Pro
  6. •
  7. Pet Care Product
  8. •
  9. Eagle Pro ProSix K9 Assembly instructions

Eagle Pro ProSix K9 Assembly instructions

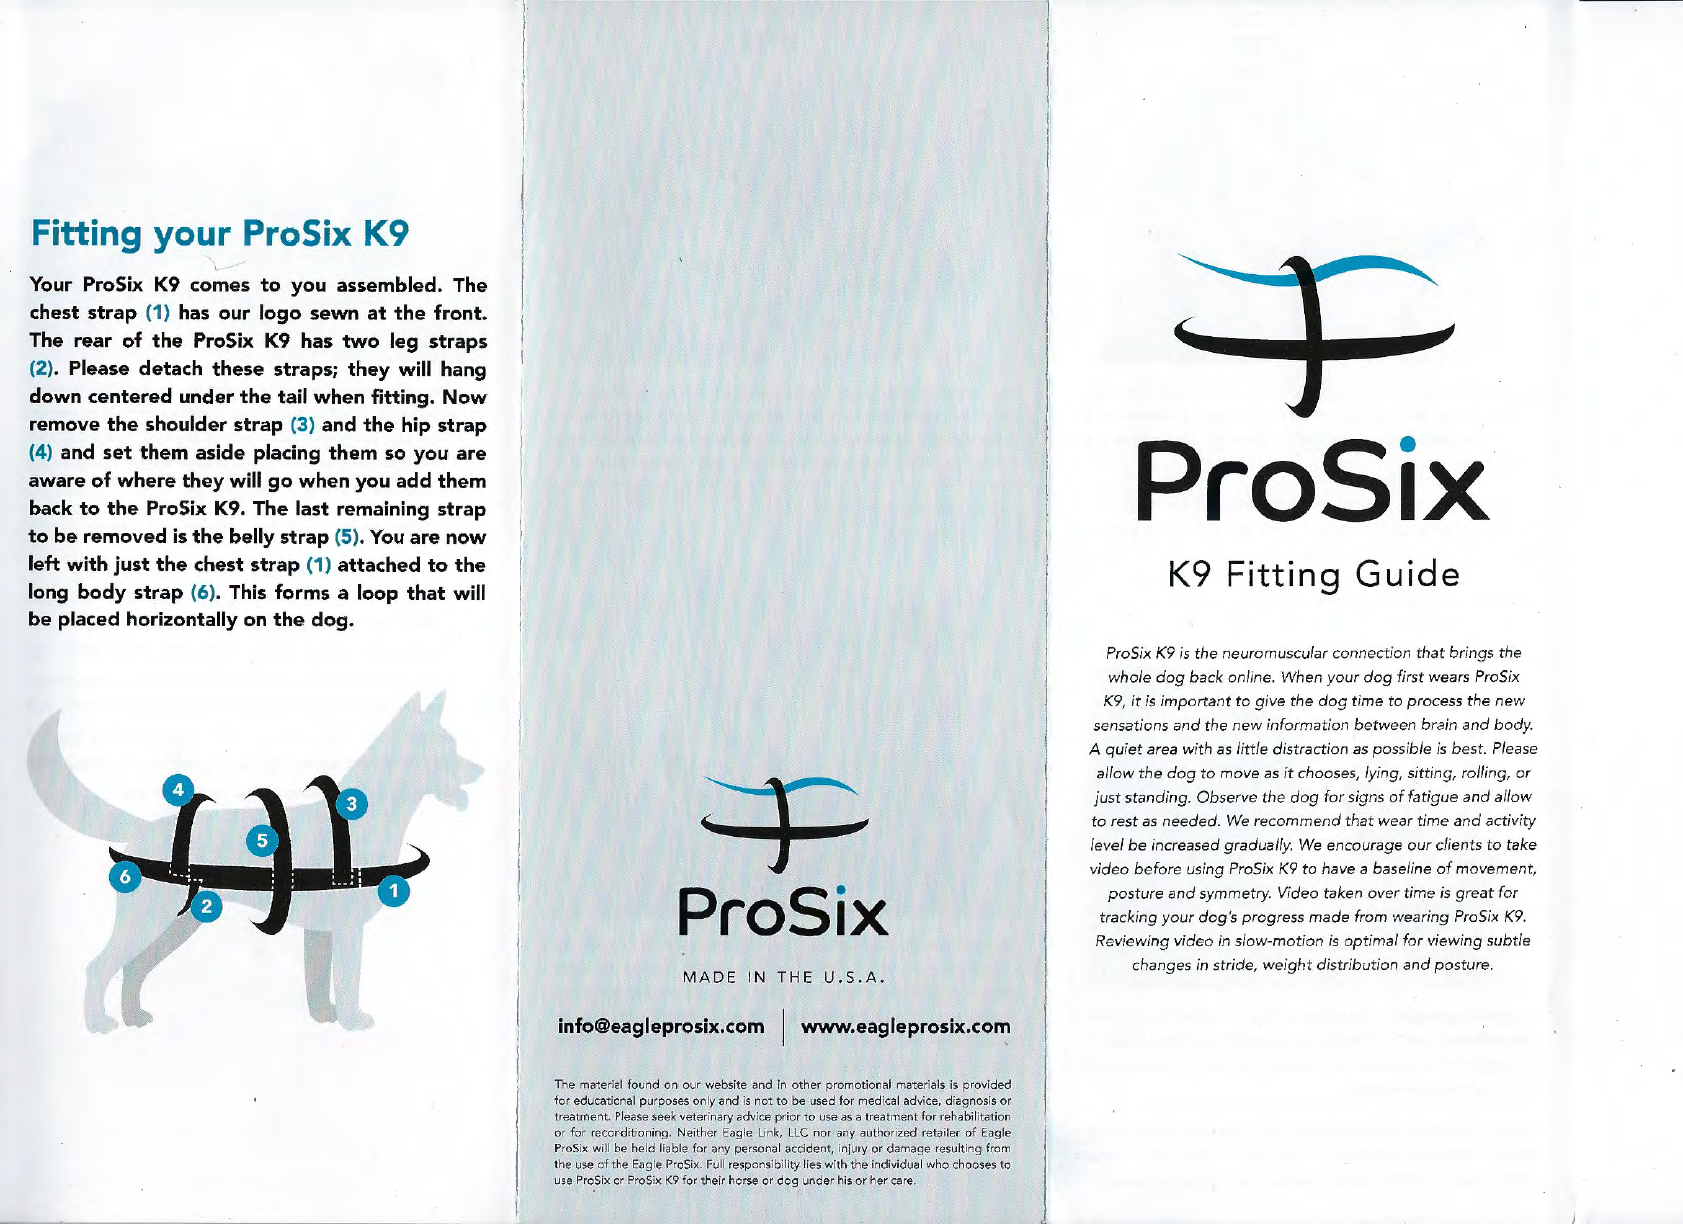
Fitting your ProSix K9
\,,
Your ProSix
K9
comes
to
you assembled. The
chest strap (1)
has
our
logo
sewn
at
the
front
.
The
rear
of
the
ProSix
K9
has
two
leg straps
(2). Please detach these straps;
they
will hang
down
centered under
the
tail
when
fitting.
Now
remove
the
shoulder strap (3) and
the
hip strap
(4) and
set
them
aside placing
them
so
you
are
aware
of
where
they
will
go
when
you
add
them
back
to
the
ProSix
K9
. The last remaining strap
to
be
removed
is
the
belly strap (5). You
are
now
left
with
just
the
chest
strap
(1) attached
to
the
long
body
strap
(6)
. This forms a loop
that
will
be placed
hor
izontally on
the
dog
.
ProSix
M
AD
E IN THE U. S
.A
.
[email protected] I
www
.eagleprosix.com
The material
found
on
our
website and in
other
promotional materi
als
is
provided
for
educational purposes only and is
not
to
be used
fo
r
med
ical
ad
vice, diagnosis
or
treatment. Please seek
vet
er
inary advice
pr
i
or
to
use
as
a treatment for rehabilit
ation
or
for reconditioning.
Ne
ither Eagle
Li
nk,
LLC
nor
any
authorized retailer
of
Eagle
ProSix
wi
ll
be
he
ld
liab
le
for
any personal accident, injury
or
damage
re
sulting from
the use
of
the Eagle ProSix. Full responsibi
lity
lies
with
the
ind
ividual
who
chooses
to
use ProS
ix
or
ProSix K9
for
the
ir horse or
dog
under his
or
her care.
ProSix
K9
Fitting
Guide
ProSix
K9
is
the neuromuscular connection that brings the
whole
dog
back online. When your
dog
first
wears ProSix
K9,
it is important
to
give
the
dog
time
to
process
the
new
sensations
and
the
new
information be
tween
bra
in
and
body
.
A
qu
iet
area
wi
th
as
little distracti
on
as
possible
is
best. Please
allow
the
dog
to
move
as
it
chooses, lying, sitting,
roll
ing, or
just standing. Observe the
dog
for signs
of
fatigue
and
allo
w
to
rest
as
needed.
We recommend that weartime
and
activity
level
be
incr
eased
gradually. We encourage
our
clients
to
take
video before using ProSix
K9
to
have a baseline
of
movement,
posture
and
symme
try. Video taken over time
is
great
for
tracking your dog's progress
made
from wearing ProSix
K9.
Reviewing vid
eo
in
slow-motion
is
optimal for viewing subtle
chan
ges
in
stride,
weight
distribution
an
d posture.
1. Begin by placing
the
long
body/chest
strap
around
the
dog.
As
seen
above, th
is
long
body/chest
strap
l
oop
should
be
in a
straight line from across
the
chest
to
across
the
hind
end
at
the
widest part.
Make sure
the
logo is
centered
at
the
front
of
the
chest. The
loop
should
be
snug,
but
not
tight.
You
should
be
able
to
slide
your hand
between
the
strap
and
the
dog.
At this time you can
adjust
the
hoop
and
loop
between
the
chest
and
long
body
straps,
one
si
de
at
a time. Make
sure
your adjustments overlap
equally on
both
sides.
~
~
-
'
~~
, ~ -
~
~
r
2. Attach
the
shoulder
strap
that
you
had
set
aside. (Usually
the
l
onger
of
the
two) The shoulder
strap
attaches
on
both
sides
of
the
dog.
Start
on
one
side
and
l
ay
over
the
base
of
the
neck
and
attach
to
the
opposite
side.
The
shou
l
der
strap
should
be
snug
enough
to
hold
the
long
body
strap
in
a straight line and
keep
the
chest
strap
in
place. Reas-
sess
position
of
strapsfollowing activity
and
adjust as
needed.
3.
The next
step
is
attaching
the
hipstrap. The hip
strap
attach-
es
on
both
sides
of
the
dog.
Start
on
one
side
and
lay
over
the
back
of
the
dog
and
attach
to
the
opposite
side. The hip
strap
has
to
be
far enough forward
that
it
doesn't
slide towards
the
tail when
the
dog
is
in
motion. The hip strap keeps
the
long
body
strap
in
a straight line.
4.
Now
add
the
~elly strap. The belly strap will fit around
the
dog
where
the
belly starts
to
get
narrower, toward
the
hind
legs. The belly
strap
should fit over
the
last
true
ribs. Begin
by
attaching
the
soft loop
of
the
belly
band
to
the
l
ong
body
hook
material
on
one
side
of
the
dog.
Now
go
over
the
dog's
back
down
the
oppos
i
te
side
and
under
the
belly.
Cont
i
nue
to
bring t
he
belly
strap
up
to
the
original
side
and
attach it
to
itself. Check
that
this
strap
is
snug
enough
to
provide
s
upport
but
nevertight.
Chec
k
that
you can easily pull away
and
ret
u
rn
into pl
ace
(gently,
do
not
snap).
-.::
"
5.
Next, find
the
hind l
eg
st
r
aps
sewn
to
the
long
body
strap,
under
the
dog
's tail.
Pull
eac
h strap underneath
the
hi
nd l
eg
on
that
side, and bring it
up
to
attac
h
to
the l
ong
body
strap,
in
front
of
the
hind leg
as
seen
in
the
picture above. Th
ese
str
aps
may
be
crossed
to
attach on
opposite
si
de
on
female
dogs.
Once this process has been completed
for
your dog and you are happy with
the
fit, you
shouldn't have
to
go through this entire process
again. Simply remove
by
detaching
the
hind leg
straps and
the
bellystrap. Slide
the
ProSix K9 up
and over the dog's head.
To
put the ProSix K9
on again, put
the
dog's head through
the
body/
shoulder strap opening, and
pull
down over
the
hind, attach leg straps and belly strap.
-4.i
'"4

Popular Pet Care Product manuals by other brands

COPELE EQUIMATIC instruction manual

COPELE

COPELE EQUIMATIC instruction manual

Innotek UltraSmart IUT-300E user manual

Innotek

Innotek UltraSmart IUT-300E user manual

ALZA PETKIT Eversweet 3 user manual

ALZA

ALZA PETKIT Eversweet 3 user manual

Petory F01 user manual

Petory

Petory F01 user manual

Kurgo G-Train Fitting and use instructions

Kurgo

Kurgo G-Train Fitting and use instructions

Trixie TX5 instructions

Trixie

Trixie TX5 instructions

PawHut D02-062 Assembly & instruction manual

PawHut

PawHut D02-062 Assembly & instruction manual

NVK TC-20 user manual

NVK

NVK TC-20 user manual

Ritchie Classic Equine EZFount installation instructions

Ritchie

Ritchie Classic Equine EZFount installation instructions

Garmin DELTA SE owner's manual

Garmin

Garmin DELTA SE owner's manual

Innotek Spray Commander Instruction guide

Innotek

Innotek Spray Commander Instruction guide

Premier MannersMinder Instruction guide

Premier

Premier MannersMinder Instruction guide

Innotek SD-2100 quick start guide

Innotek

Innotek SD-2100 quick start guide

TITO CANE-M quick start guide

TITO

TITO CANE-M quick start guide

Drinkwell FCB-AU-17 operating guide

Drinkwell

Drinkwell FCB-AU-17 operating guide

Petsafe ScatMat quick start guide

Petsafe

Petsafe ScatMat quick start guide

Roverpet KK3 Assembly instructions

Roverpet

Roverpet KK3 Assembly instructions

Dennerle CO2 Cyclo Turbo operating instructions

Dennerle

Dennerle CO2 Cyclo Turbo operating instructions

manuals.online logo
manuals.online logoBrands
  • About & Mission
  • Contact us
  • Privacy Policy
  • Terms and Conditions

Copyright 2025 Manuals.Online. All Rights Reserved.