Eagle DCS302 User manual

DCS302
DUAL CYLINDER SCALE
INSTALLATION & OPERATION
MANUAL
Eagle Microsystems, Inc. 366 Circle of Progress Pottstown, PA 19464
www.eaglemicrosystems.com phone 610-323-2250 : fax 610-323-0114

DCS302 GENERAL INFORMATION
GENERAL
The DCS302 is a dual cylinder scale designed specifically for the water and
wastewater industry. The scale base and weighing surfaces are made of Type 2
PVC plastic and are guaranteed for five years against environmental damage.
All mechanical parts, wherever possible, are made of stainless steel or protected
with a durable chemical-resistant powder finish.
The DCS302 can accommodate any cylinder that does not exceed 12” diameter
and 150 lbs. net weight.
SPECIFICATIONS
Accuracy: …….………………………………………………………… +/- 0.25% FS
Resolution: …………………………………………………………….. 0.5 lb.
Scale Readability: ……………………………………………………… 0.1 lb.
Scale capacity: ..………………………………………………………. 300 lbs.
Safe overload capacity: ……………………………………………….. 400 lbs.
FEATURES
• Simultaneously weighs two cylinders independently and displays the net weight
on separate digital indicators.
• Wall mounting bracket and safety chains are optionally available. These can
adapt to different cylinder sizes.
• All scales are factory assembled, tested and calibrated.
ASSEMBLY
The DCS302 scale base is fully assembled at the factory. Installation and
testing procedures later in this manual.
OPERATION
See Instruction Manual EI-2000 for scale setup and operation.
WARRANTY
Eagle Microsystems warrants the DCS302 scale base to be free from all defects
in material and workmanship. Any parts that fail because of defective
Workmanship or material within five (5) years of date of shipment will be
replaced. The warranty does not include miss use, negligence or modifications.
Eagle Microsystems shall not be liable for transportation or installation charges,
or any other expenses incurred by the customer.

INSTRUCTIONS
DCS302 DUAL CYLINDER LOAD CELL SCALE
1. Before placing scale in operation remove the six (6) plastic stops and the
aluminum shipping plate located on the underside of the scale.
2. Determine service location of scale and position base 2 1/2-inches or
more from the wall.
3. Anchor scale base securely to smooth, level floor using 3/8-inch anchor
bolts (not supplied) through the four (4) 1/2-inch diameter holes in the corners of
the scale base. It is recommended that the floor be level to within 0.5 degree for
optimal performance.
4. Mount NEMA 4X EI-2000 Dual Channel Digital Display Instrument to a
suitable and convenient wall surface. Remove instrument cover and mount
instrument to the wall with #10 screws or suitably sized masonry or hollow wall
anchors, as applicable. The instrument case has four (4) through holes, as
shown in the Operating Manual, located on 5 3/8-inch centers horizontally and 5
5/8-inch centers vertically.
5. Route the cable provided, and factory terminated at the scale, to the
display instrument. Make wiring connections as shown on pages 13 and 14 of
the "EI-2000 Dual Channel Weight & Level Display/Transmitter Operating
Manual" for the "DCS302 Dual Cylinder Scale".
6. Follow instructions in the Operating Manual for startup and calibration of
the EI-2000. The scale base is factory calibrated using known weights and is
ready for use when received.

SCALE INSTALLATION
16"
30"
DCS302 FOOT PRINT
2 1/2"
15FT. 6 CONDUCTOR
CABLE
WALL MINIMUM WALL
CLEARANCE
C
L
1 5/8"
RECOMMENDED
ELEVATION 40"
5 5/8"
CHLORINE
30"
1/2" CLR. HOLE
4 PLCS.
31 1/2"
16" 18"
30"
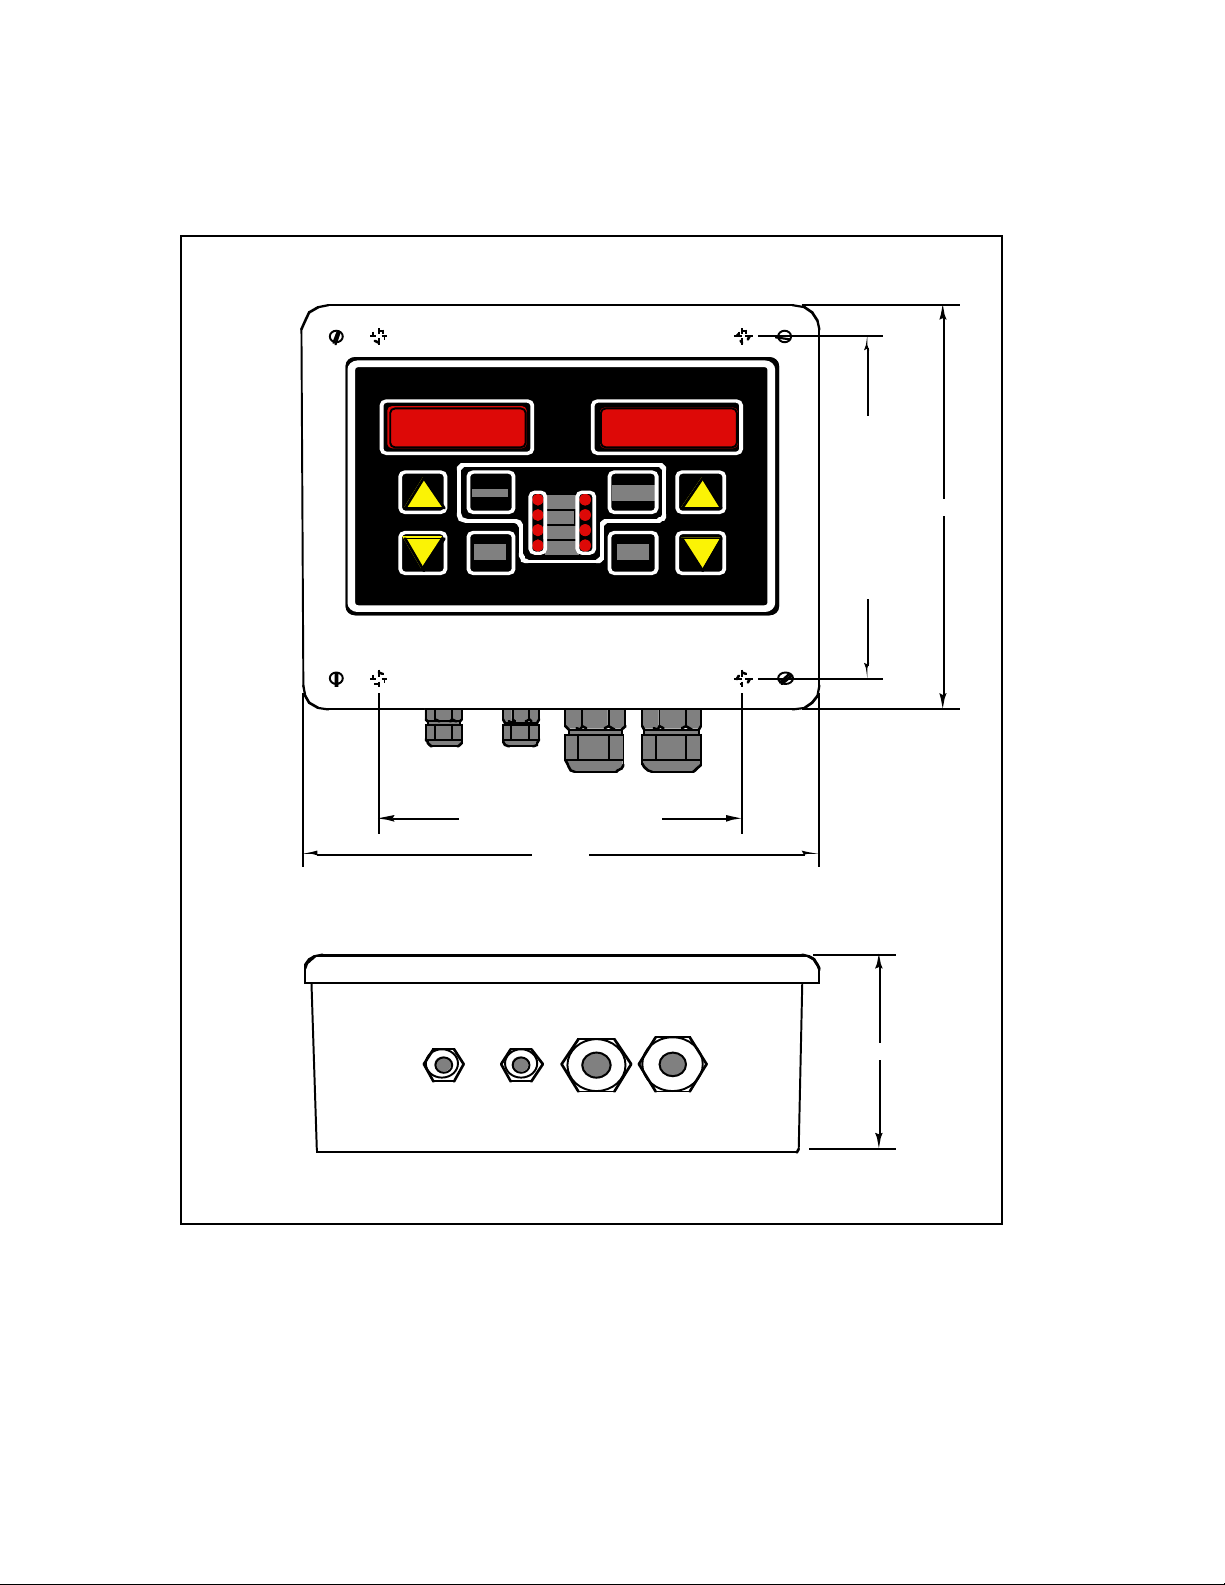
EI2000 INDICATOR
Wall Mounting Dimensions
Enclosure conforms to: NEMA 4X
7 5/8"
5 3/8"
ctr. to ctr. mounting holes
5 5/8"
ctr. to ctr. mounting holes
6 5/8"
3 3/16"
EI-2000

PC BOARD CONNECTIONS
SELECT
EI-2000
ZERO ZERO
SELECT
GROSS
TARE
REMAIN
LO LEV
CHLORINE
J6
C20
C21
R12
R11
T1
1
2
3
4
CH1 CH2
J4
CH1
LEFT SCALE CH2
RIGHT SCALE
J5
+E +S –S –E SH
+E +S –S –E SH ABCRTIN
RS485 RS232
+L –L +R –R
J3
4-20mA OUT
L+R+
J2
CH1 CH2
RELAYS
GNH
J1 POWER
U6
U5
EI-2000 REV 0042 300476
+
1234
5678
RED
GREEN
WHITE
BLACK
YELLOW
Load Cell Connector
Mating Half P5
(Use for single scale)
LEFT
LEFT
RIGHT
RIGHT
Alarm Contacts
P2
NEUTRAL
HOT
GROUND
AC Power
P1
RED
GREEN
WHITE
BLACK
YELLOW
Load Cell Connector
Mating Half P4
ABCRTIN
RS485 RS232 Com.
Mating Half P6
Analog 4 - 20 mA
Output P3
RIGHT POS.
LEFT POS.
LEFT NEG.
RIGHT NEG.
CONNECTOR PLUGS
EI2000 TRANSMITTER
15' CABLE
AC CONNECTOR FUNCTION
J1
POWERIN
120 VAC, 50-60Hz
J4
LEFT SCALE INPUT
J5
RIGHT SCALE INPUT
J3
4-20 mA ANALOG
OUTPUT
J2
ALARM RELAY OPTION
J6
SERIAL PORT OPTION
PIN
G
N
H
+E
+S
–S
–E
SH
+E
+S
-S
–E
SH
L+
L–
R+
R–
L
R
A
B
G
R
T
DESCRIPTION
GROUND
NEUTRAL
HOT
+EXCITATION
+ SIGNAL
– SIGNAL
–EXCITATION
SHIELD
+EXCITATION
+ SIGNAL
– SIGNAL
–EXCITATION
SHIELD
LEFT+
LEFT–
RIGHT +
RIGHT –
LEFT ALARM RLY
RT ALARM RLY
RS485 "A"
RS485 "B"
GROUND
RS232 RCV
RS232 XMT
COLOR
RED
WHITE
GREEN
BLACK
YEL
RED
WHITE
GREEN
BLACK
YEL

TEST PROCEDURES
DCS302 DUAL CYLINDER LOAD CELL SCALE
1. After assembly a known weight of 250 lbs. is alternately placed on each
platform and removed two times in order to flex the components of the scale
base.
2. Upon loading the scale for the third time, the display of the EI-2000
indicator allowed to stabilize. The display value is noted and, in Mode 3 -
Automatic Operation, the display is adjusted to read the known weight using the
Up/Down arrow keys. Once the Gross Weight display is set to the known 250 lbs.
the SEL PB is pressed and the display will change to Weight Remaining and
show 150 lbs. The weights are removed. Readout should return to zero.
3. The known weight is reapplied once more. The scale should now read
Gross Weight of 250 lbs +/- 3 counts. (A count is the smallest displayed
increment, i.e., if counting by 0.5 lb. increments a count represents 0.5 lb.). The
weight is removed and the display should read zero. If so test is concluded and
scale is ready for packing and shipment.
4. If readout weight is outside tolerance, platforms are adjusted and test is
repeated.

DCS302
DUAL CYLINDER SCALE BASE
SPIDER DRAWING
12
15
14
13
48 49
(Not Shown)
10
1
4
5
2
3
6
7
8
9

SPIDER DRAWING
DMS/DCS
SPIDER ASSEMBLY
BASE DISK
36
37 13 41
38
37 39
41
41
42
37
40
38
45
46
44
43
44

DRAWING KEY
ITEM DESCRIPTION P/N
1 Locknut 612541
2Adjusting bolt, ss 400177
3 Pin, spring (split), ss, type 420 640136
4Chain, sash, ss, 1/0 100356
5 Chain clip 400182
6 Enclosure, FG 5x5x3 630604
7 Bracket, cell, PVC-1 400244
8 Load cell, 40#, 14”, 350 ohm 500317
9 Term. block, 6 ckt, screw term. 532061
10 Lid, enclosure, FG Part of Item 6 above
11 Not used ---------
12 Screw, 10B x 5/8 Self tap, ss 611060
13 Pivot screw 400229
14 Disc 400178
15 Deck 400178
16-35 Not used ----------
36 Disc washer 400154
37 Perimeter flexure 400143
38 Perimeter clamp 400144
39 Center clamp 400145
40 Center flexure 400142
41 Short lever 400160
42 Long lever 400141
43 Screw, 6A-3/8, self tap hex 610684
44 Screw, 10-24 x 3/8 Hex head 611061
45 Screw, 10B-5/8 Self tap Phillips 611060
46 Screw, 10A-3/8 Self tap hex 611028
47 Bolt, 10-32 x 3 1/4 611013
Table of contents
Other Eagle Scale manuals


