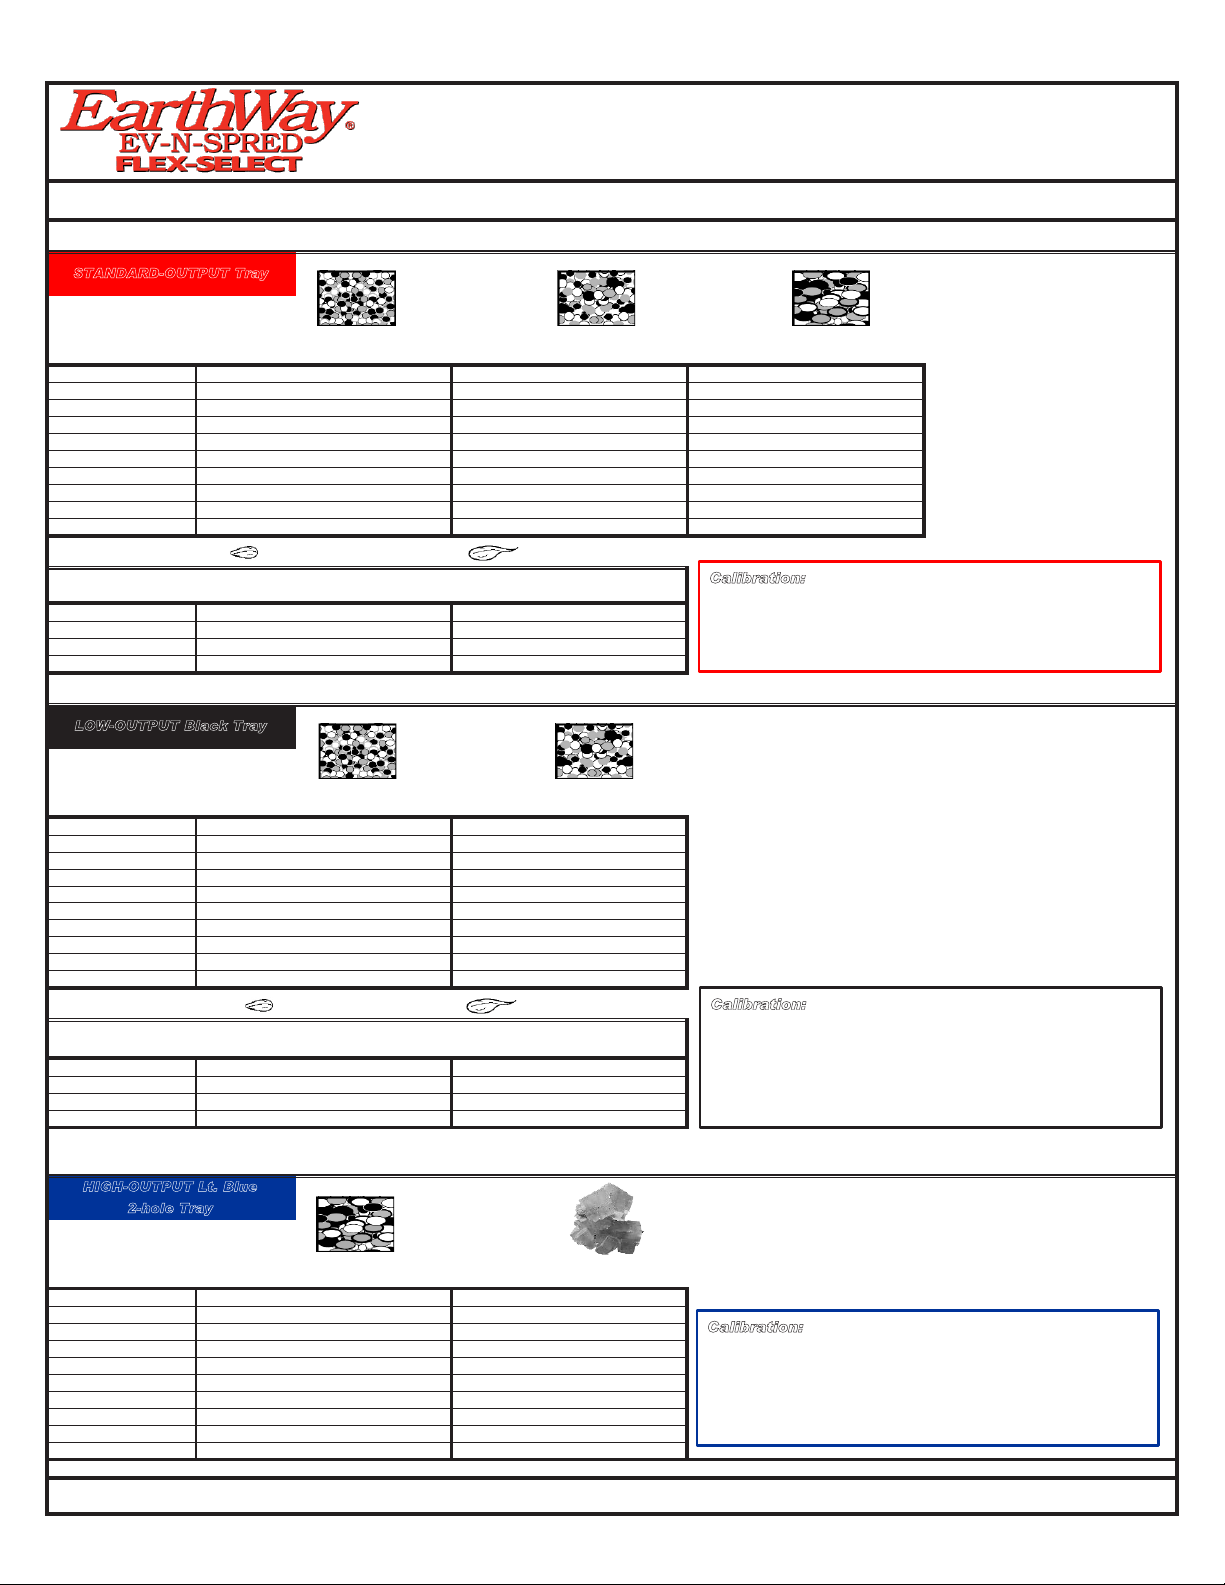
GRANULAR MATERIAL
PARTICLE SIZES: Fine/Small
(SAND) (HALF BB) (BB) Ice Melt
LBS. PER 1,000 SPREAD SPREAD SPREAD SPREAD SPREAD SPREAD
SQUARE FEET SETTING WIDTH FT METERS SETTING WIDTH FT METERS SETTING WIDTH FT METERS
1 LB. 718' 5.5m 924' 7.3m 14 36' 11m
2 LBS. 10 18' 5.5m 13 24' 7.3m 18 36' 11m
3 LBS. 13 18' 5.5m 16 24' 7.3m 23 36' 11m
4 LBS. 14 18' 5.5m 20 24' 7.3m 27 36' 11m
5 LBS. 16 18' 5.5m 22 24' 7.3m 30 36' 11m
6 LBS. 18 18' 5.5m 25 24' 7.3m 23 = 2 pass 36' 11m
7 LBS. 20 18' 5.5m 27 24' 7.3m 25 = 2 pass 36' 11m
8 LBS. 22 18' 5.5m 28 24' 7.3m 27 = 2 pass 36' 11m
9 LBS. 24 18' 5.5m 30 24' 7.3m 28 = 2 pass 36' 11m
10 LBS. 26 18' 5.5m 22 = 2 pass 24' 7.3m 30 = 2 pass 36' 11m
GRASS SEED
LBS. PER 1,000 FINE SPREAD SPREAD COARSE SPREAD SPREAD
SQUARE FEET SETTING WIDTH FT METERS SETTING WIDTH FT METERS
2 LBS. 14 8' 2.4m 22 14' 4.3m
3 LBS. 16 8' 2.4m 25 14' 4.3m
4 LBS> 18 8' 2.4m 28 14' 4.3m
5 LBS> 20 8' 2.4m 30 14' 4.3m
GRANULAR MATERIAL
PARTICLE SIZES: Fine/Small Medium
(SAND) (HALF BB)
LBS. PER 1,000 SPREAD SPREAD SPREAD SPREAD
SQUARE FEET SETTING WIDTH FT METERS SETTING WIDTH FT METERS
1 LB. 816' 4.9m 10 20' 6.1m
2 LBS. 10 16' 4.9m 13 20' 6.1m
3 LBS. 12 16' 4.9m 18 20' 6.1m
4 LBS. 13 16' 4.9m 20 20' 6.1m
5 LBS. 16 16' 4.9m 22 20' 6.1m
6 LBS. 18 16' 4.9m 25 20' 6.1m
7 LBS. 20 16' 4.9m 27 20' 6.1m
8 LBS. 21 16' 4.9m 29 20' 6.1m
9 LBS. 23 16' 4.9m 30 20' 6.1m
10 LBS. 24 16' 4.9m 22 = 2 pass 20' 6.1m
GRASS SEED
LBS. PER 1,000 FINE SPREAD SPREAD COARSE SPREAD SPREAD
SQUARE FEET. SETTING WIDTH FT METERS SETTING WIDTH FT METERS
2 LBS. 15 9' 2.7m 21 15' 4.6m
3 LBS. 18 9' 2.7m 24 15' 4.6m
4 LBS. 21 9' 2.7m 27 15' 4.6m
5 LBS. 24 9' 2.7m 30 15' 4.6m
GRANULAR MATERIAL
PARTICLE SIZES: Large EXTRA LARGE
(BB) ROCK SALT
LBS. PER 1,000 SPREAD SPREAD SPREAD SPREAD
SQUARE FEET. SETTING WIDTH FT METERS SETTING WIDTH FT METERS
1 LB. 728' 8.5m 826' 7.9m
2 LBS. 10 28' 8.5m 11 26' 7.9m
3 LBS. 12 28' 8.5m 13 26' 7.9m
4 LBS. 14 28' 8.5m 14 26' 7.9m
5 LBS. 15 28' 8.5m 15 26' 7.9m
6 LBS. 17 28' 8.5m 16 26' 7.9m
7 LBS. 20 28' 8.5m 17 26' 7.9m
8 LBS. 21 28' 8.5m 18 26' 7.9m
9 LBS. 23 28' 8.5m 19 26' 7.9m
10 LBS. 24 28' 8.5m 21 26' 7.9m
FLEX-SELECT
®
BROADCAST SPREADER SETTING MATRIX
STANDARD-OUTPUT Red Tray
LOW-OUTPUT Black Tray
HIGH-OUTPUT Lt. Blue
2-hole Tray
©2014 Earthway Products, Inc. All rights reserved. EarthWay® EV-N-SPRED®, Flex-Select®, and SPRAY-PRO® are registered trademarks of Earthway Products, Inc.
Use of trademarks or images are prohibited unless approved by Earthway Products, Inc. 1009 Maple Street Bristol, Indiana 46507
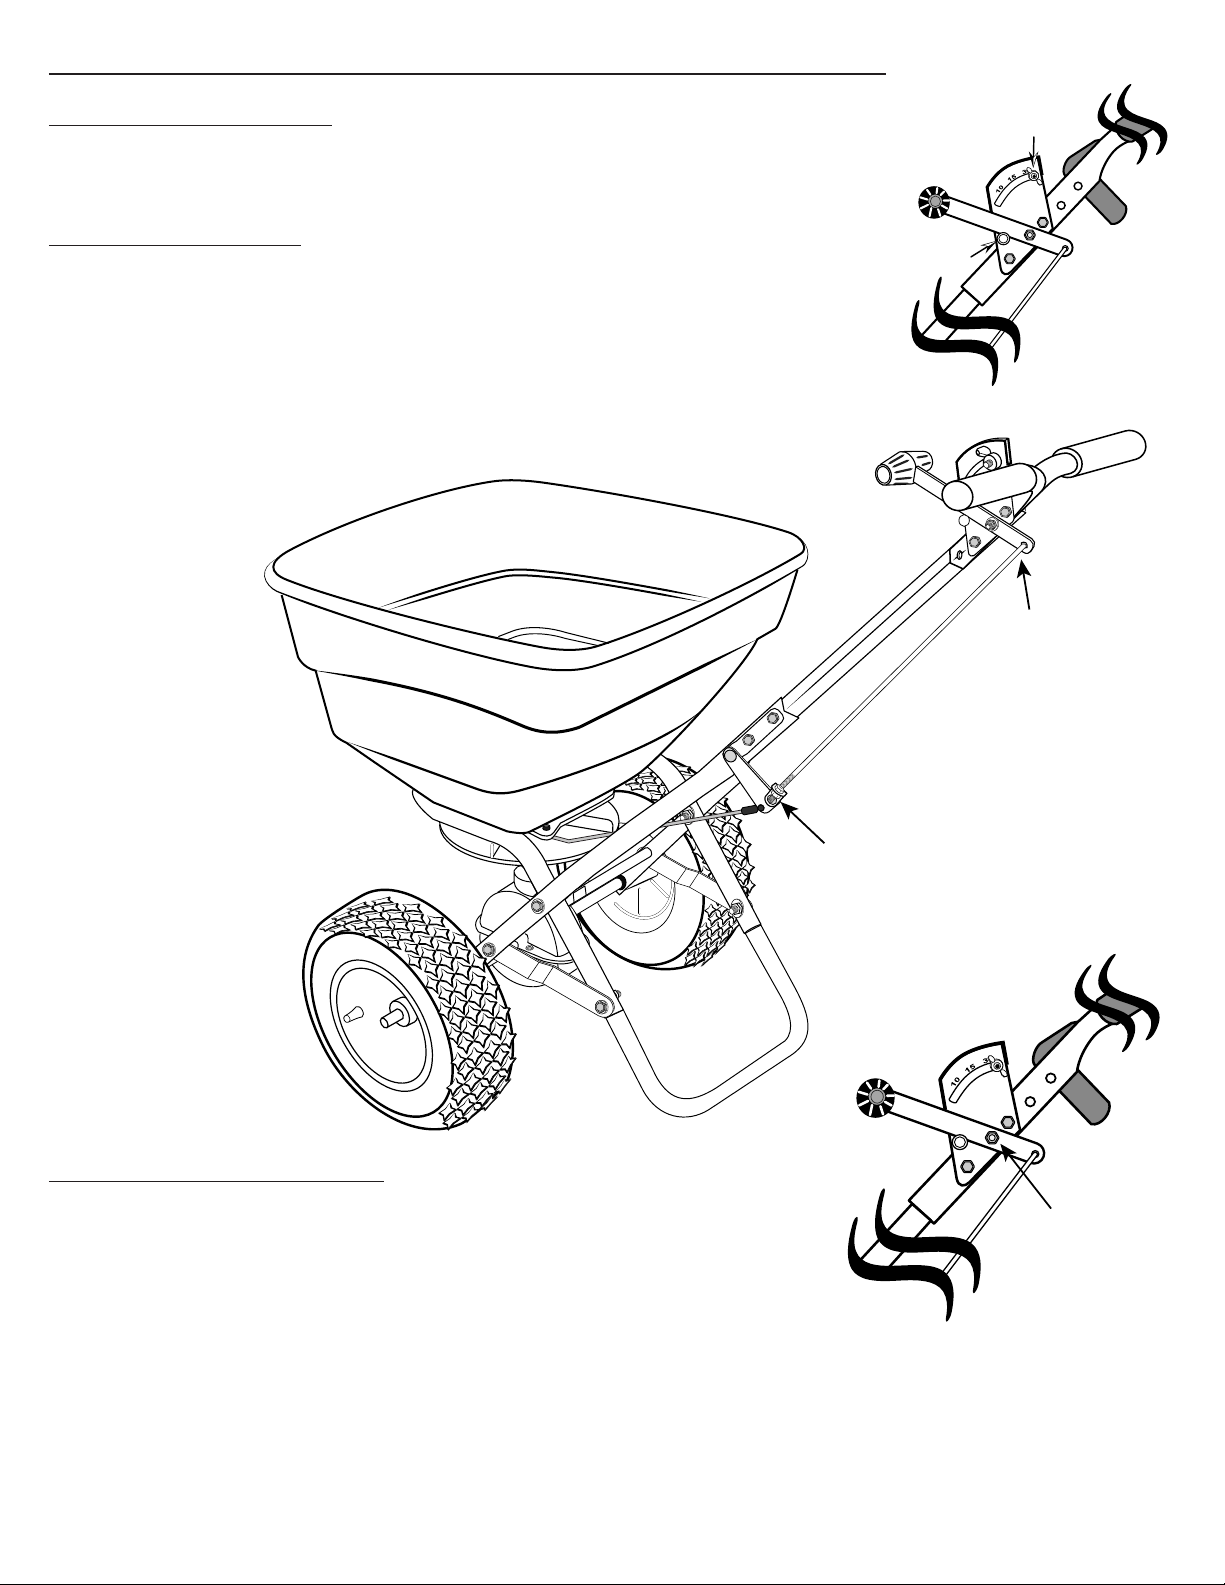
Calibration: Start by ensuring that your spreader calibration is
correct. Make sure the drop holes in the Standard-Output
Tray are fully open when the Rate Control handle is on #30. If
not, please adjust control rod at the pivot to allow for a full open
hopper holes with the handle at position at #30.
Calibration: Start by ensuring that your spreader calibration is
correct. Make sure the drop holes in the LOW-OUTPUT TRAY
are fully closed when the Rate Control Handle is resting on the
stop #0. If not, please adjust control rod at the pivot to ensure the
shut-off is fully closed with the handle at position at #0. Move
the spreader slightly to confirm the calibration because of the
cam.
Calibration: Start by ensuring that your spreader calibration is
correct. Make sure the drop holes in the HIGH-OUTPUT TRAY
are fully closed when the Rate Control Handle is resting on the
stop #0. If not, please adjust control rod at the pivot to ensure the
shut-off is fully closed with the handle at position at #0. Move
the spreader slightly to confirm the calibration because of the
cam.