Easy@Home MS-201 User manual

ID: #07177
m
y
h
a
n
s
e
c
o
n
t
r
o
l
.
c
o
m
C
E
R
T
I
F
I
E
D
User-friendly
Manual
LAUNDRY
MINI SEWING MACHINE
MINIMÁQUINA DE COSER
User Manual
Manual
del usuario
English .....06
Español .... 27

Table of contents
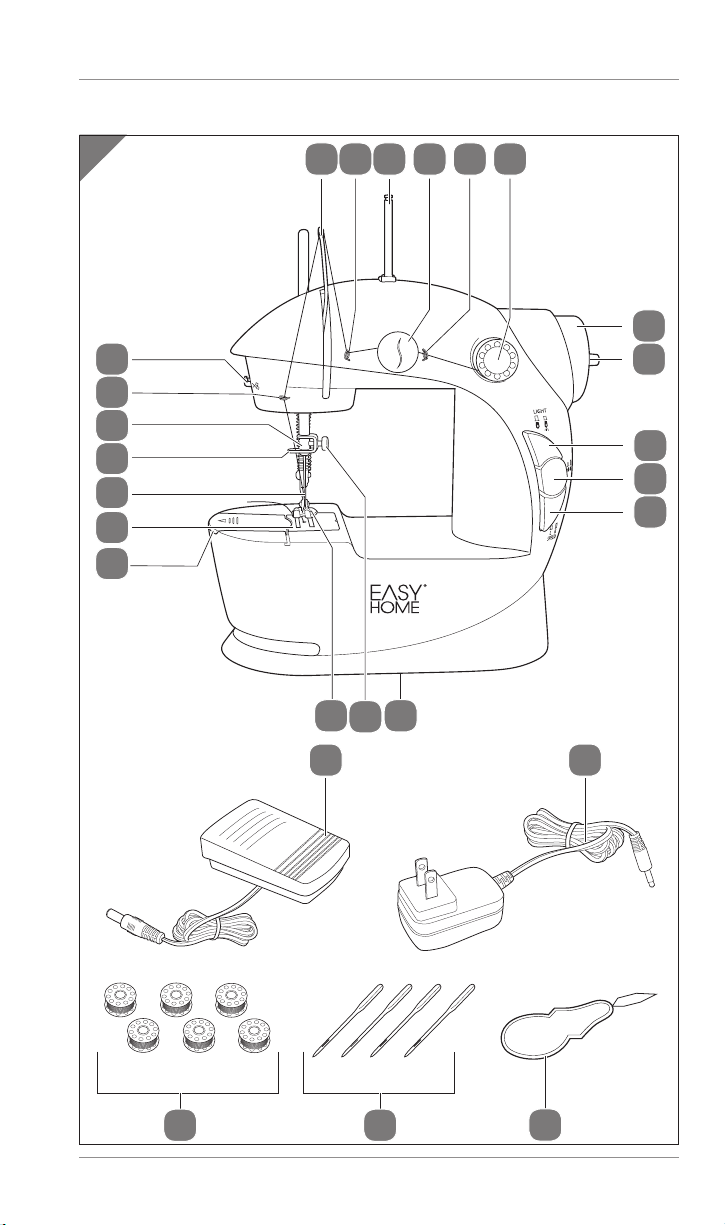
Scope of delivery....................................................................3
Components .................................................................................6
General information............................................................... 7
Reading and storing the user manual ..................................... 7
Proper use..................................................................................... 7
Explanation of symbols .............................................................. 7
Safety...................................................................................... 7
Explanation of notes ................................................................... 7
Safety instructions.......................................................................8
Battery notes............................................................................... 11
Check the sewing machine and scope of delivery ............. 15
Start-up................................................................................. 15
Inserting batteries......................................................................15
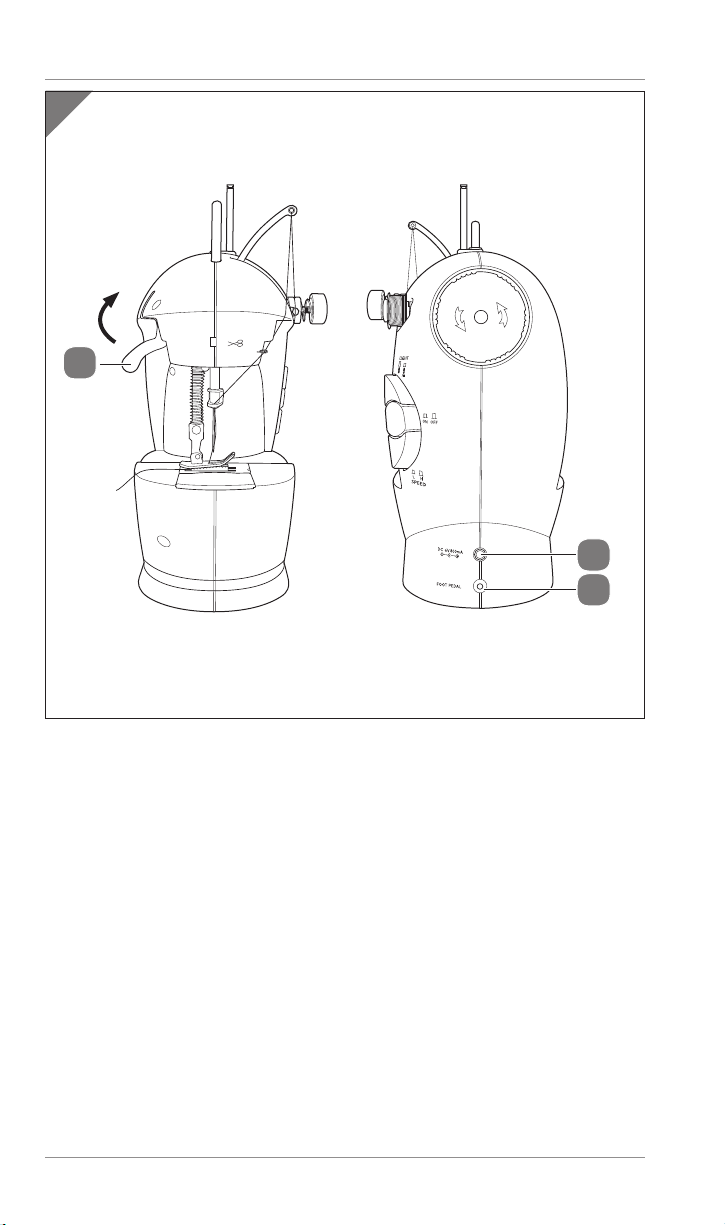
Connecting the DC connector/power plug.............................16
Connecting the foot pedal ........................................................16
Threading the upper thread.....................................................16
Using the needle threader........................................................17
Threading the lower thread..................................................... 18
Adjusting the thread tension................................................... 18
Operation.............................................................................. 19
Sewing.........................................................................................20
Changing the sewing direction...............................................20
Finishing the sewing process ..................................................20
Winding a bobbin .......................................................................21
Changing the needle .................................................................21
Cleaning................................................................................ 22
Storage ................................................................................. 23
Troubleshooting...................................................................24
Technical data ...................................................................... 26
Disposal.................................................................................26
Disposing of the packaging .....................................................26
Disposing of the sewing machine...........................................26

Scope of delivery/Contenido del paquete
3
Dok./Rev.-Nr. 198127_20200317_US_a
A
8
7
9
10
11
1
2322
20
21
19
18
17
16
15
12
24
32 4 5 6
13
14
25 17
Scope of delivery/Contenido del paquete

Scope of delivery/Contenido del paquete
4
B
27
28
26

Scope of delivery/Contenido del paquete
5
C
E
D8
4

6
Scope of delivery
The package contents include four type LR6 (AA)
1.5 V batteries.
Components
1Thread take-up
2Thread guide 2
3Spool pin
4Tension regulator for the upper
thread
5Thread guide 1
6Bobbin holder
7Handwheel
8Bobbin winder
9Light switch
10 On/Off switch
11 Speed setting switch
(L = low/H = high)
12 Battery compartment
13 Needle clamp screw
14 Presser foot
15 Bobbin case
16 Throat plate
17 Needle, 4×
18 Thread guide eyelet
19 Needle holder
20 Thread guide 3
21 Thread cutter
22 Foot pedal
23 DC connector/power plug
24 Needle threader
25 Bobbins, 6×
26 Presser foot lever
27 DC connector terminal for the
power supply
28 DC connector terminal for the
foot pedal

General information
7
General information
Reading and storing the user manual
This user manual accompanies this mini sewing machine (referred
to below only as the “sewing machine”). It contains important
information about start-up and handling the sewing machine.
Before using the sewing machine, please read through the user
manual carefully. This particularly applies to the safety instructions. Failure to
observe this user manual may result in severe injury or damage to the sewing
machine.
Store the user manual for future use. If you pass the sewing machine on to third
parties, please be absolutely sure to include this user manual.
Proper use
The sewing machine is designed only for sewing fabrics together. It is only
intended for private use and is not suitable for commercial purposes.
Only use the sewing machine as described in this user manual. Any other use
is deemed improper and may result in damage to property or even personal
injury. The sewing machine is not a children's toy.
The manufacturer or vendor accepts no liability for damage caused by
improper or incorrect use.
Explanation of symbols
The following symbols are used in this user manual, on the sewing machine or
on the packaging.
This symbol provides you with useful additional information
about starting up or operating the sewing machine.
Safety
Explanation of notes
The following symbols and signal words are used in this user manual.
WARNING!
This symbol/signal word designates a
hazard with moderate degree of risk which
may lead to death or severe injury if not
avoided.

Safety
8
CAUTION!
This signal symbol/word designates a
hazard with low risk that, if not avoided,
may result in minor or moderate injury.
NOTICE! This signal word warns against potential
damages to property.
Safety instructions
IMPORTANT SAFEGUARDS
WARNING: When using electrical appliances especially
when children are present, basic safety precautions should
always be followed to reduce the risk of fire, electric shock,
and/or injury to persons, including the following:
Read all instructions before using this sewing machine.
DANGER!
To reduce the risk of electric shock!
− An appliance should never be left unattended when
plugged in. Always unplug the sewing machine from the
electric outlet immediately after using and before cleaning.
WARNING!
To reduce the risk of burns, fire, electric shock, or injury
to persons!
− Do not allow to be used as a toy. Close attention is necessary
when the sewing machine is used by or near children.
− Use the sewing machine only for its intended use as described
in this manual. Use only attachments recommended by the
manufacturer as contained in this manual.The appliance is
only to be used with the power supply unit (adaptor) provided
with the appliance.
− Never operate the sewing machine if it has a damaged
cord or plug, if it is not working properly, if it has been
dropped or damaged, or dropped into water. Return
the sewing machine to the nearest authorized dealer

Safety
9
or service center for examination, repair, electrical or
mechanical adjustment.
− Never operate the sewing machine with any air openings
blocked. Keep ventilation openings of the sewing
machine and foot controller free from the accumulation of
lint, dust, and loose cloth.
− Never drop or insert any object into any opening.
− Do not use outdoors.
− Do not operate where aerosol (spray) products are being
used or where oxygen is being administered.
− To disconnect, switch off the sewing machine, then
remove plug from outlet.
− Do not unplug by pulling on cord. To unplug, grasp the
plug, not the cord.
− Keep fingers away from all moving parts. Special care is
required around the sewing machine needle.
− Always use the proper needle plate. The wrong plate can
cause the needle to break.
− Do not use bent needles.
− Do not pull or push fabric while stitching. It may deflect
the needle causing it to break.
− Switch the sewing machine off (OFF) when making any
adjustments in the needle area, such as threading needle,
changing needle, threading bobbin, or changing presser
foot, etc.
− Always unplug sewing machine from the electrical outlet
when removing covers, lubricating, or when making
any other user servicing adjustments mentioned in the
instruction manual.
− “SERVICING OF DOUBLE-INSULATED PRODUCTS”
In a double-insulated product, two systems of insulation
are provided instead of grounding. No grounding means
is provided on a double-insulated product, nor should a
means for grounding be added to the product. Servicing
of a double-insulated product requires extreme care

Safety
10
and knowledge of the system, and should be done only
by qualified service personnel. Replacement parts for a
double-insulated product must be identical to those parts
in the product. A double-insulated product is marked with
the words ’DOUBLE INSULATION’ or ’DOUBLE INSULATED.’
WARNING!
Risk of electric shock!
A faulty electrical installation, excessive line voltage, or incor-
rect operation may result in an electric shock.
− Only connect the sewing machine to an easily accessible
power outlet so that you can quickly disconnect it from the
power supply in the event of a fault.
− Only connect the sewing machine if the supply voltage of
the power outlet corresponds to the specification on the
rating plate.
− Do not open the housing; instead, have a qualified
professional carry out the repairs. Contact a qualified
workshop for this. Liability and warranty claims are
waived in the event of repairs performed by the user,
improper connection of the device or incorrect operation.
− Do not operate the sewing machine with an external timer
or separate telecontrol system.
− Do not immerse the sewing machine or the power cord,
foot pedal or power plug in water or any other liquids.
− Never touch the power plug with wet hands.
− Never use the power cord as a carrying handle.
− Keep the sewing machine, power plug and power cord
away from open flames and hot surfaces.
− Lay the power cord out in such a way that it does not pose
a tripping hazard.
− Do not kink the power cord and do not lay it over sharp edges.
− Never store the sewing machine in such a way that there
is a risk of it falling into a tub or sink.

Safety
11
− Never retrieve an electrical device by hand if it has fallen
into water. In this case, immediately pull the power plug
out of the power outlet.
− Always switch the sewing machine off and pull the power
plug out of the power outlet and remove the batteries
from the battery compartment when you are not using
the sewing machine, cleaning it or if it is faulty.
WARNING!
Danger for children and persons with impaired physical,
sensory or mental capacities (e.g. partially disabled
persons, older persons with reduced physical and mental
capacities) or lack of experience and knowledge (e.g.
older children).
− This sewing machine may be used by children ages eight
and up as well as by persons with impaired physical, sensory
or mental capacities or those lacking experience and
knowledge if they are supervised or have been instructed in
how to safely use the sewing machine and understand the
risks associated with operating it. Children must not play with
the sewing machine. Cleaning and user maintenance must
not be performed by unsupervised children.
− Keep children under eight years of age away from the
sewing machine and the connector cord.
− Do not leave the sewing machine unattended while in use.
− Do not let children play with the packaging. Children may
get caught in it when playing and suffocate.
Battery notes
WARNING!
Danger of explosion or leakage!
Batteries that have been inserted improperly may leak and
cause a fire or explosion.

Safety
12
− Only replace the batteries with the same or an equivalent
battery type.
− Always change the entire set of batteries. Never mix old
and new batteries or batteries with different charges.
− When inserting batteries, ensure that the polarity is correct
(positive [+] and negative[–]).
− Never expose batteries to excessive heat, for example,
direct sunlight or fire. Do not throw batteries in an open fire.
− Never disassemble the batteries, do not short circuit them
and do not recharge batteries that are not rechargeable.
− Remove empty batteries from the sewing machine.
− Rechargeable batteries are to be removed from the
appliance before being charged.
WARNING!
Health hazard!
If children swallow batteries, the batteries could leak and re-
sult in poisoning and death. Touching damaged batteries may
result in injury.
− Store both new and used batteries so that they are out of
the reach of children.
− If you suspect that a battery has been swallowed or
otherwise incorporated, promptly consult a physician.
− Take hold of leaky batteries using gloves only and dispose
of them properly.
CAUTION!
Risk of injury!
Improper handling of the sewing machine may result in injury.
− Do not sew clothing directly on your body or another
person's body. Remove clothing before sewing.
− Do not leave the sewing machine unattended while in use!

Safety
13
NOTICE!
Risk of damage!
Improper handling of the sewing machine may result in
damage to the sewing machine.
− Place the sewing machine on an easily accessible, level,
dry, heat-resistant and sufficiently stable work surface. Do
not place the sewing machine on the edge or corner of
the work surface.
− Never place the sewing machine on or near hot surfaces
(stovetops, etc.).
− Ensure that the power cord does not come into contact
with hot parts.
− Never expose the sewing machine to high temperatures
(heater, etc.) or to the effects of the weather (rain, etc.).
− Never fill the sewing machine with liquid.
− Never attempt to clean the sewing machine by submerging
it in water and do not use a steam cleaner to clean it.
Otherwise, the sewing machine could be damaged.
− Do not place any heavy objects on the sewing machine.
− Do not drop the sewing machine or subject it to heavy knocks.
− Never put the sewing machine in the dishwasher. It would
be destroyed as a result.
− Stop using the sewing machine if the plastic parts of the
sewing machine exhibit cracks or breaks or are deformed.
Replace damaged parts only with corresponding original
spare parts.
− Always use the same thread sizes for the upper and lower
thread.
− Only use the bobbins supplied.
− Do not leave the sewing machine unattended while in use.
− Do not insert any objects into sewing machine openings.

Safety
14
This device complies with Part 15 of the FCC Rules. Operation
is subject tothe followingtwoconditions: (1) thisdevice may
not cause harmful interference, and (2) this device must
accept any interference received, including interference
that may cause undesired operation.
− CAUTION! Changes or modifications not expressly
approved by the party responsible for compliance could
void the user’s authority to operate the equipment.
− NOTICE! This equipment has been tested and found to
comply with the limits for a Class B digital device, pursuant
to Part 15 of the FCC Rules. These limits are designed
to provide reasonable protection against harmful
interference in a residential installation. This equipment
generates, uses and can radiate radio frequency energy
and, if not installed and used in accordance with the
instructions, may cause harmful interference to radio
communications. However, there is no guarantee that
interference will not occur in a particular installation. If this
equipment does cause harmful interference to radio or
television reception, which can be determined by turning
the equipment off and on, the user is encouraged to try to
correct the interference by one or more of the following
measures:
− Reorient or relocate the receiving antenna.
− Increase the separation between the equipment and
receiver.
− Connect the equipment into an outlet on a circuit
different from that to which the receiver is connected.
− Consult the dealer or an experienced radio/TV
technician for help.

Check the sewing machine and scope of delivery
15
US responsible party:
WACHSMUTH & KROGMANN, INC
1015 HAWTHORN DRIVE | ITASCA IL 60143
+1 888-367-7373
HOUSEHOLD USE ONLY
SAVE THESE INSTRUCTIONS
Check the sewing machine and scope of
delivery
NOTICE!
Risk of damage!
If you are not cautious when opening the packaging with a
sharp knife or other pointed objects, you may quickly damage
the sewing machine.
− Be very careful when opening it.
1. Remove the sewing machine from the packaging.
2. Check to make sure that all parts are included (see Fig.A).
3. Check whether the sewing machine or individual parts have been
damaged. If this is the case, do not use the sewing machine. Contact the
manufacturer via the service address indicated on the warranty card.
Start-up
The sewing machine can be operated with batteries as well as
plugged into electricity (power supply).
Inserting batteries
1. Open the battery compartment 12 on the bottom of the sewing machine.
2. Insert four AA 1.5 V batteries. Make sure the polarity is correct (+/–).
3. Reattach the battery compartment cover to the battery compartment and
close it. Make sure you hear it click into place.
4. Remove the batteries after use.

Start-up
16
Connecting the DC connector/power plug
1. Connect the DC connector 23 to the DC connector terminal for the power
supply 27 on the sewing machine and then
2. put the power plug into an easily accessible outlet.
3. To disconnect the sewing machine from electricity (power supply), first
remove the plug from the power outlet and then the other end (DC
connector) from the DC connector terminal on the sewing machine.
Connecting the foot pedal
CAUTION!
Risk of injury!
Improper handling of the sewing machine may result in injury.
− Check that the on/off switch is not pushed in when
connecting and using the foot pedal!
− Make sure that nothing is on top of the foot pedal when
the sewing machine is not in use!
You can control the sewing machine when the sewing starts and stops by using
either the on/off switch 10 or the foot pedal 22 .
− Insert the foot pedal’s DC connector into the foot pedal’s DC connector
terminal 28 on the sewing machine and place the foot controller on the
floor.
The sewing machine will start sewing when you press the foot pedal with your
foot. The sewing machine will stop sewing when you lift your foot off the foot
pedal.
Threading the upper thread
• When selecting thread, please make sure that the thread
is suitable for sewing machines. An unsuitable thread can
quickly tear when sewing.
• If the sewing machine is delivered pre-threaded, make sure
to take a good look at the thread guide before changing the
thread.
The sewing machine has two upper thread holders: the bobbin holder 6
which you can use to attach bobbins 25 and the spool pin 3which you can
use to attach any spools of thread.

Start-up
17
For a three-thread seam (two upper threads and one lower
thread), use both holders at the same time. The spool pin’s
thread will be threaded together with the bobbin holder’s
thread.
1. Place the sewing machine on a table or other level, dry surface.
2. Depending on the holder you’d like to use, please follow the instructions
provided hereinafter:
− Use of the bobbin holder: Pull out the bobbin holder and remove the
spring. Insert one of the supplied bobbins and then put the spring back on
the bobbin holder. Firmly press the bobbin holder (including the spring)
back into the opening.
− Use of the spool pin: Extend the spool pin all the way out and place a spool
of thread on it.
3. Turn the handwheel 7clockwise until the needle 17 and the thread
take-up 1are both at the top.
4. Insert the end of the thread through thread guide 1 5(from right to left).
5. Pull the thread from above down through the two discs of the tension
regulator for the upper thread 4and guide it through thread guide 2 2
(see Fig. E).
6. Pull the thread through the thread guide in the thread take-up (from right
to left), then through thread guide 3 20 (from top to bottom), and then
finally through the thread guide eyelet 18 (from top to bottom) above the
needle.
7. Insert the end of the thread through the eye of the needle (left to right). You
can also use the needle threader 24 if necessary (see chapter “Using the
needle threader”).
8. Lift the presser foot lever 26 until it clicks into place. Then place the thread
in the gap of the presser foot 14 .
9. Pull approx. 4" (10 cm) of thread through the gap and place it behind the
sewing machine so that the end of the thread points away from you
(see Fig. B).
Using the needle threader
1. Guide the wire loop of the needle threader 24 through the eye of the
needle from right to left.
2. Insert the thread through the wire loop.
3. Pull the wire loop and thread through the eye of the needle.
4. Remove the thread from the wire loop.

Start-up
18
Threading the lower thread
• Only use the supplied bobbins!
• The upper thread must already be threaded when threading
the bobbin thread.
1. Slide the case cover of the bobbin 15 to the left to remove it.
2. Take the supplied bobbin 25 and wrap approx. 4" (10 cm) of thread around it.
3. Place the bobbin in the bobbin case so that it rotates clockwise when
pulling on the thread.
4. Insert the thread into the slot in the bobbin case.
5. Lift the presser foot lever 26 .
6. Hold onto the upper thread and turn the handwheel 7counterclockwise.
The needle 17 will plunge into the bobbin case and then use a loop to
remove the lower thread from the bobbin case when the needle is pulled
out.
7. When this loop has been created, slightly pull on the upper thread and
remove the end of the lower thread with a needle or scissors.
The bobbin thread should now be pulled through the small hole in the
throat plate.
8. Put together both thread ends and pull them out approx. 6" (15 cm). Then
guide them back under the presser foot.
9. Slide the bobbin case cover back onto the bobbin case.
Adjusting the thread tension
If the thread breaks while sewing, it means the thread tension is too high.
If small loops form while sewing, it means the thread tension is too low. The
thread tension must be adjusted in both cases. The upper thread and lower
thread tension must be proportional to each other.
The tension must also be different for different fabrics. The required tension
depends on the fabric’s strength and thickness as well as on how many layers
of fabric are to be sewn.
We recommend that you test the stitching on a piece of fabric every time before
sewing.
− Turn the tension regulator for the upper thread 4counterclockwise to
reduce the tension.
A higher tension is required for the upper thread in the case of light fabrics. If
the stitches are too loose, it means the upper thread tension is set too low.
− Turn the tension regulator for the upper thread clockwise to increase the
tension.
The bobbin thread tension cannot be adjusted.

Operation
19
Operation
CAUTION!
Risk of injury!
Improper handling of the sewing machine may result in injury.
− Keep fingers away from moving parts. Exercise caution in
the area surrounding the sewing needle.
− Always turn off the sewing machine and unplug it if you
are not using the sewing machine and leaving it.
NOTICE!
Risk of damage!
Improper handling of the sewing machine may result in
damage to the machine or lead to messy sewing results.
− Make sure that the upper and lower thread are correctly
threaded! If thread is not properly guided through the
thread guide, thread may tear, stitches may be missed,
or the fabric may curl up along the stitching. The sewing
machine may be damaged under certain circumstances.
− Practice sewing on a piece of fabric before you actually
begin sewing. Check the thread tension.
− Make sure that the fabric and threads have been properly
threaded through the sewing machine before turning
it on/off or using the foot pedal. The sewing machine
will immediately begin to sew after turning the sewing
machine on/off or using the foot pedal.
− Do not pull on or push the fabric when sewing to avoid
breaking the needle or damaging the sewing machine.
− When sewing in reverse (manually operated), the sewing
machine does not sew fabric. Using the reverse mode for a
prolonged period damages the sewing machine and can
damage it in the long term.

Operation
20
Sewing
1. In poor lighting conditions, you can turn on the built-in light by pressing the
light switch 9.
2. Lift the needle by turning the handwheel 7(clockwise) away from you
and lift the presser foot lever 26 (see Fig. B).
3. Place the fabric you would like to work with between the presser foot 14
and the throat plate 16 so that the needle is positioned approx. 0.4" (1 cm)
inside the edge of the fabric. In reverse mode, the fabric is moved away
from you. That’s why the fabric should be placed in front of the sewing
machine.
4. Lower the presser foot lever to lower the presser foot.
5. Turn the handwheel in your direction (counterclockwise) until the needle
pierces the fabric. Firmly hold the fabric in place.
6. Press the speed setting switch 11 to select the desired sewing speed:
− Slower sewing (L = low speed) is suitable for sewing tougher jobs which
require great precision and the machine to be frequently stopped.
− Faster sewing (H = high speed) is suitable for long stitches with no thread
breaks.
7. Sewing with the foot pedal 22 : Firmly hold the fabric in place and press the
foot pedal with your foot to begin sewing. Lift your foot from the foot pedal
to stop sewing.
8. Sewing without the foot pedal: Firmly hold the fabric in place and then
press the on/off switch 10 to start and stop the sewing machine.
Changing the sewing direction
1. Stop the sewing machine where you want to change the sewing direction
and leave the needle in the fabric.
2. Raise the presser foot 14 by lifting the presser foot lever 26 and turning
the fabric in the new direction using the needle as the pivot point.
3. Lower the presser foot and continue sewing in the new direction.
Finishing the sewing process
1. Stop the sewing machine.
2. Turn the handwheel 7to bring the needle 17 to its highest position.
3. Raise the presser foot 14 by lifting the presser foot lever 26 . Then
carefully pull the fabric to the left to remove it from the machine.
4. Use a thread cutter 21 to cut both threads approx. 6" (15 cm) away from the
fabric so that enough thread is left to secure the stitch.
5. To prepare the sewing machine for its next use, pull out about 6" (15 cm) of
thread toward the back.
Other manuals for MS-201
1
Table of contents
Languages:
Other Easy@Home Sewing Machine manuals