Easy@Home MS-201 User manual

MINI SEWING MACHINE
MINIMÁQUINA DE COSER
English……3
Español…..18
User Manual
Manual
del usuario

Contents
Parts list ..........................................................................3
Contents.....................................................................3
General information.......................................................4
Safety instructions .....................................................5
User instructions.............................................................6
Before first use ..........................................................7
Operating the machine .............................................7
With the foot pedal..............................................7
Without the foot pedal ........................................8
Winding the bobbin ...................................................9
Threading the sewing machine ...............................11
Using side bobbin...............................................11
Using thread spindle ..........................................12
Bottom bobbin placement ......................................13
Adjusting tension.....................................................14
Changing the needle................................................14
Helpful hints.............................................................15
Cleaning and maintenance...........................................15
Other useful information .............................................16
Technical specifications...........................................16
Storing......................................................................16
FCC ...........................................................................17

Parts list
3
1
Main parts
1. Pre-threaded Sewing Machine
2. Foot Pedal
3. Power Adapter
4. Sewing Accessories (in separate bag)
a. 4 Bobbins
b. 3 Needles
c. 1 Needle Threader
Contents of packaging
Pre-threaded Sewing Machine with 2 bobbins and 1 needle
Power Adapter
Foot Pedal
4 Extra Bobbins
3 Extra Needles
1 Needle Threader
4 AA Batteries
Instruction Manual
2
3
4
(a)
(c)
(b)

General information
4
General information
When using the Mini Sewing Machine, basic safety precautions should be observed.
PLEASE READ AND SAVE ALL INSTRUCTIONS BEFORE USING THE MINI SEWING MACHINE.
1. Close supervision is necessary when any appliance is used near children. The Mini
Sewing Machine is not intended for use by children.
2. For indoor household use only.
3. To protect against electric shock, do not immerse cord, plugs, or Mini Sewing Machine
in water or any other liquid.
4. Do not operate the Mini Sewing Machine with a damaged cord or plug, or if the Mini
Sewing Machine malfunctions, or has been damaged in any manner. Contact the
warranty center and follow their instructions regarding a replacement or
reimbursement.
5. Never use accessories which are not recommended by the manufacturer. They could
constitute a danger to the user and risk damage to the Mini Sewing Machine.
6. There is no reverse button with this machine. See User Instructions on how to turn
the fabric for a stitch in reverse.
7. Never move the Mini Sewing Machine by pulling the cord. DO NOT let the electrical
cord hang over the edge of a table or counter or touch hot surfaces.
8. Place the Mini Sewing Machine on a flat, level, stable surface when using.
9. Do not place the Mini Sewing Machine on or near a heat source.
10. Do not use the Mini Sewing Machine with a damaged outlet.
11. Make sure hands are dry when plugging in and unplugging the Mini Sewing Machine.
12. Do not operate the sewing machine with wet hands, without shoes or while standing
in water or wet surface.
13. If appliance gets wet, unplug it immediately.
14. Do not use this Mini Sewing Machine for other than intended use.
15. This Mini Sewing Machine is not intended for use by persons (including children) with
reduced physical, sensory, or mental capabilities, or lack of experience and
knowledge, unless they have been given supervision or instruction concerning the use
of the Mini Sewing Machine by a person responsible for their safety.
16. Not intended to be used for industrial purposes.
17. Always unplug or remove power supply before and after use.
18. Always unplug or remove power supply when changing needles or threading the
machine.
19. This sewing machine is not a toy and not meant to be used by or near children.
20. Do not change needles or thread machine while unit is on.
21. Keep fingers away from the needle when turning on the power.
22. Do not sew clothing while it is on your body.
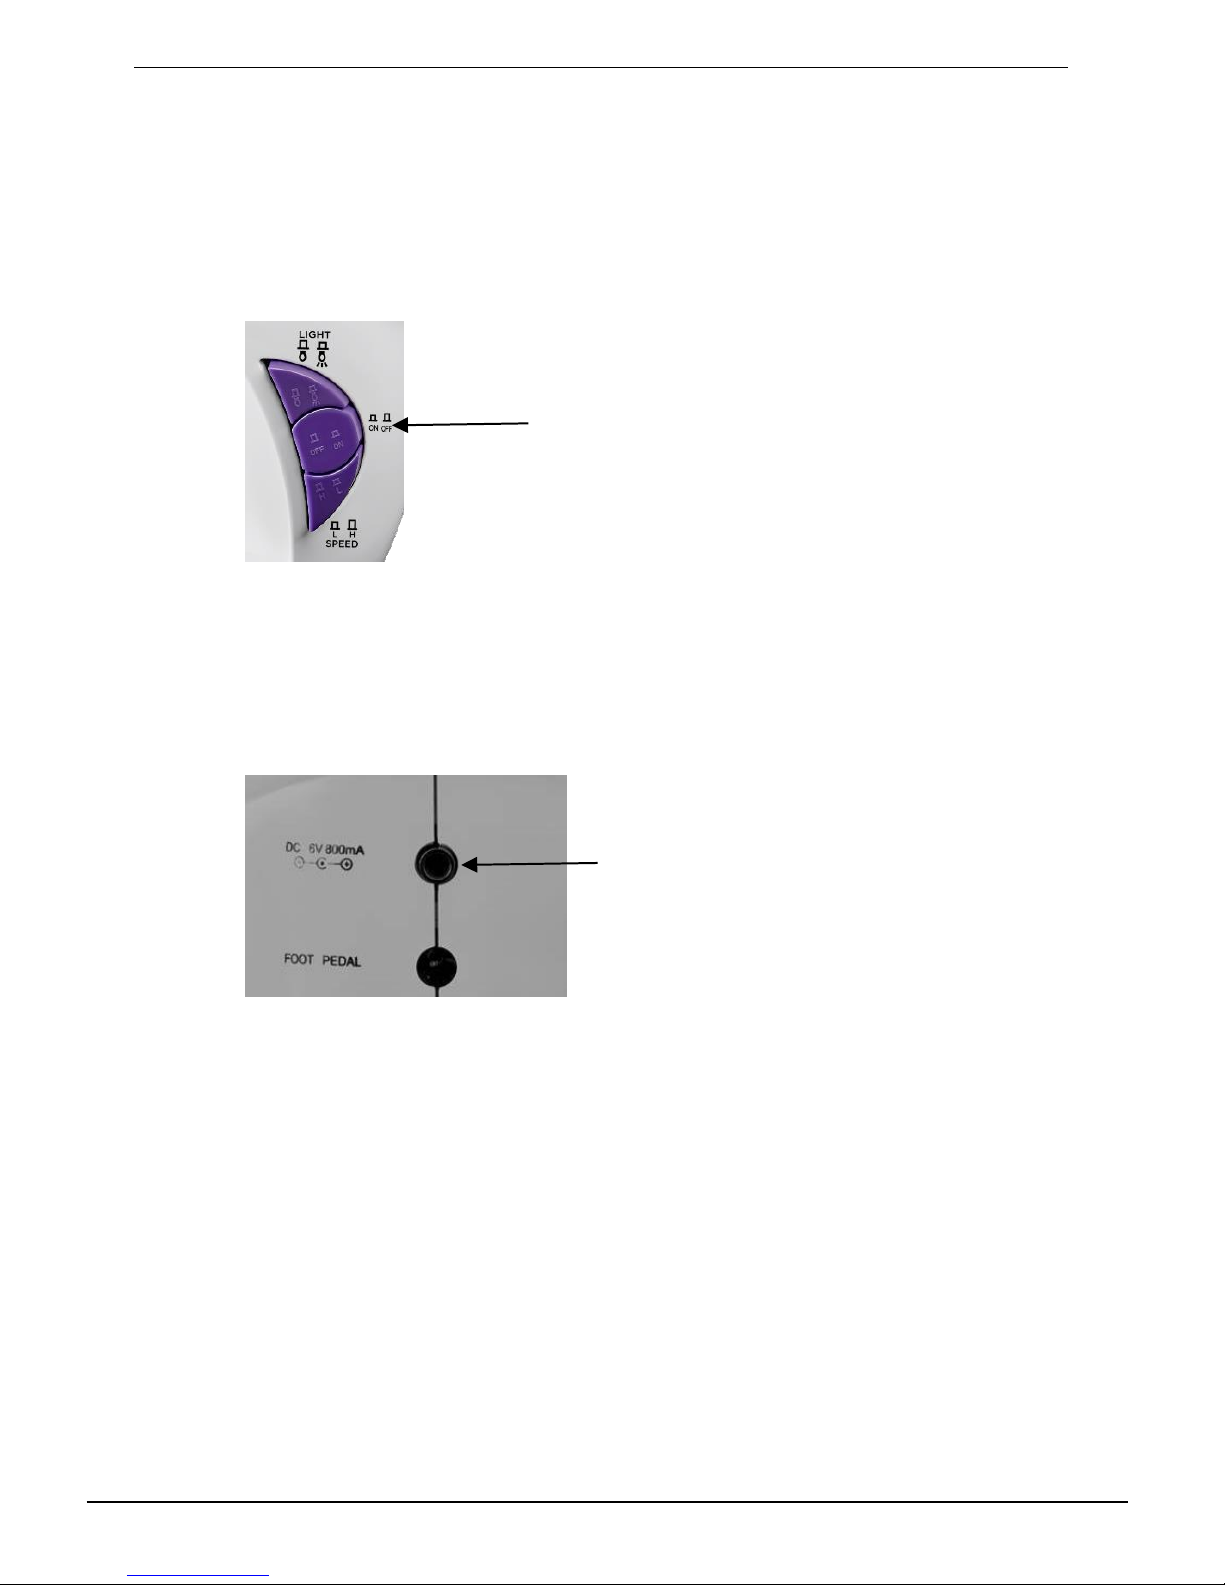
23. Use only Dc 6v 800mA. Any other adapter may cause injury or damage to the
machine.
SAVE ALL INSTRUCTIONS!

User instructions
5
Safety instructions
WARNING: Read and understand all instructions. Failure to follow all instructions
listed below may result in electric shock, fire or serious personal injury. The
warnings, cautions, and instruction discussed in this instruction manual cannot
cover all possible conditions and situations that may occur. It must be understood
by the operator that common sense and caution are a factor which cannot be
built into this product, but must be supplied by the operator.
CAUTION: A short power supply cord is provided to reduce the risk of personal
injury resulting from becoming entangled in or tripping over a longer cord.
Extension cords are available from local hardware stores and may be used if care
is exercised in their use. If an extension cord is required, special care and caution
is necessary. Also the cord must be arranged so that it will not drape over the
countertop or tabletop where it can be pulled on by children or tripped over
accidentally.
Electric power
If electric circuit is overloaded with other appliances, your machine may not
operate properly. The appliances should be operated on a separate electrical
circuit from other operating appliances.
Safety warning
Although your Mini Sewing Machine is easy to operate, for your safety, the
warnings below must be followed:
1. Do not place the Mini Sewing Machine near a heat source.
2. Never leave the Mini Sewing Machine unattended while connected to the
electrical outlet.
3. Use the Mini Sewing Machine on a stable work surface away from water.
4. Do not unplug from the wall socket by pulling on the supply cord.
5. The Mini Sewing Machine must be unplugged:
A. After each use.
B. If it appears to be faulty.
C. Before cleaning or maintenance.
THIS PRODUCT IS INTENDED FOR HOUSEHOLD USE ONLY.
SAVE THESE INSTRUCTIONS!

User instructions
6
User instructions
Foot Pedal
Jack (Z)
Power
Adapter
Jack (Y)
Thread Guide 1 (K1)
Thread
Cutter (U)
Hand Wheel (W)
Hand Wheel
Pin (X)
Takeup
Lever (I)
Thread
Spindle (J)
Power Button (P)
Speed Button (Q)
Needle Clamp
Screw (R)
Presser Foot Deck (S)
Light Button (O)
Bobbin
Spindle (N)
Bobbin Holder (M)
Tension Adjusting
Screw (L)
Thread Guide 2 (H)
Needle (E)
Presser Foot (D)
Bobbin Compartment
Cover (C)
Bobbin
Compartment (B)
Thread Gap (A)
Thread Guide 3 (F)
Needle Clamp (G)
Presser Foot
Lever (V)
Battery Compartment (T)
Thread Guide 1 (K2)

User instructions
7
Before first use:
1. Read ALL instructions carefully.
2. Place Mini Sewing Machine on a flat, stable surface.
3. Make sure sewing machine is in the ‘OFF’ position before attaching any
accessories. The ON/OFF button will be flush with the other buttons. It will
not be pushed in.
4. The Mini Sewing Machine can be used with AA batteries or with the power
adapter.
a. If using the AA batteries, insert 4 AA batteries into the Battery
Compartment (T) located on the bottom of the machine.
b. If using the power adapter, insert the plug of the power adapter into the
Power Adapter Jack (Y).
5. The Mini Sewing Machine can also be used with or without the foot pedal. See
below for foot pedal instructions.

User instructions
8
Operating the sewing machine
With the foot pedal:
1. Make sure the machine is in the ‘OFF’ position.
Please Note: When using the foot pedal, the Power Button (P) should always
be in the ‘OFF’ position.
2. Plug the foot pedal plug into the Foot Pedal Jack (Z) located on the side of
machine.
3. Place the foot pedal on the ground.
4. Raise the Presser Foot (D) by lifting up the Presser Foot Lever (V) on the back
of the machine. The presser foot will raise slightly.
5. Position fabric to be sewn under the presser foot with presser foot in raised
position.
6. Lower the Presser Foot (D) by releasing the Presser Foot Lever (V) downwards.
7. Rotate the Hand Wheel (W) in a clockwise direction at least once, until the
needle is inserted into the fabric.
8. Select speed by pressing Speed Button (Q) on the front of the machine. When
the button is pushed in, that is Low speed. When the button is extended out,
that is High speed. Use low speed for intricate work which requires a lot of
stopping, starting and turning fabric. Use high speed for long uninterrupted
seams.
NOTE: The High speed is fast. It is suggested to start on Low speed until you
are comfortable to move on to High speed.
9. Press gently on the foot pedal to run the machine.
10. Gently guide the fabric to keep the seam straight by pressing lightly down
with your fingertips on both sides as it feeds through the Presser Foot (D).
11. There is no reverse button with this machine. If you need to turn the fabric
while stitching, turn off machine when needle is still in the fabric, raise the
foot pedal, and rotate the fabric in desired direction. Lower foot pedal and
continue stitch.
12. When the seam is finished, turn machine ‘OFF’.
13. Raise the needle out of the fabric by turning the Hand Wheel (W) slightly in a
clockwise direction.
14. Raise Presser Foot (D) by lifting the Presser Foot Lever (V).
15. Pull fabric towards you leaving about 5 inches of thread between the fabric
and the machine.
16. Cut thread loose to from machine by using the Thread Cutter (U).
17. Begin the next seam in the same manner as above.

User instructions
9
Without the foot pedal:
1. Make sure the sewing machine is in the ‘OFF’ position.
2. Lift the needle above the presser foot by turning the Hand Wheel (W) slightly
in a clockwise direction (away from you).
3. Raise the Presser Foot (D) by lifting up the Presser Foot Lever (V) on the back
of the machine. The presser foot will raise slightly.
4. Position fabric to be sewn under the presser foot with presser foot in raised
position.
5. Lower the Presser Foot (D) by releasing the Presser Foot Lever (V) downwards.
6. Rotate the Hand Wheel (W) in a clockwise direction at least once, until the
needle is inserted into the fabric.
7. Select speed by pressing Speed Button (Q) on the front of the machine. When
the button is pushed in, that is Low speed. When the button is extended out,
that is High speed. Use low speed for intricate work which requires a lot of
stopping, starting and turning fabric. Use high speed for long uninterrupted
seams.
NOTE: The High speed is fast. It is suggested to start on Low speed until you
are comfortable to move on to High speed.
8. Press the Power Button (P) to the ‘ON’ position.
9. Gently guide the fabric to keep the seam straight by pressing lightly down
with your fingertips on both sides as it feeds through the Presser Foot (D).
10. If need to turn fabric during stitch, turn off machine when needle is still in the
fabric, raise the foot pedal, and rotate the fabric in desired direction. Lower
foot pedal and continue stitch.
11. When the seam is finished, turn machine ‘OFF’.
12. Raise the needle out of the fabric by turning the Hand Wheel (W) slightly in a
clockwise direction.
13. Raise Presser Foot (D) by lifting the Presser Foot Lever (V).
14. Pull fabric towards you leaving about 5 inches of thread between the fabric
and the machine.
15. Cut thread loose to from machine by using the Thread Cutter (U).
16. Begin the next seam in the same manner as above.

User instructions
10
Winding the bobbin
Please Note: For safety precautions, always remove the bobbin from the Bobbin
Compartment (B).
1. Raise Thread Spindle (J) by grasping the notch on the top of the spindle and
pulling upward until thread spindle is fully extended.
2. Place thread on Thread Spindle (J).
3. Make sure the pin is extended out. If not, unlock the Hand Wheel Pin (X) by
pushing it in while simultaneously turning the Hand Wheel (W) clockwise
(away from you). Once the pin is released, turn the pin slightly clockwise to
lock it into place.
4. Pull thread from spool and place thread through the inside of one of the holes
in the bobbin to help keep it in place. Holding the end of the thread, wind
thread onto bobbin a few times, in the clockwise direction (away from you).
The wheel turns counterclockwise, so the bobbin needs to be threaded in the
opposite direction.
5. Push bobbin onto Hand Wheel Pin (X) to keep in place.
6. Slowly turn the machine on by pressing the Power Button (P) or using the Foot
Pedal.
7. Hold the thread lightly above the bobbin, guiding it gently through your
fingers.
8. When the bobbin is full, turn off the machine.

User instructions
11
Threading the sewing machine
NOTE:
The machine comes pre-threaded from the factory. Look at this threading
carefully before removing it to replace the thread or bobbin with different thread.
Then follow the instructions to re-thread.
Using side bobbin:
Note: When threading machine, use above numbered image for reference.
1. Pull Bobbin Spindle (1A) and spring out from main unit. It pulls straight out,
but is tough to remove so use caution.
2. Place threaded bobbin on spindle. Place spring on Bobbin Spindle (1A) behind
threaded bobbin.
3. Insert Bobbin Spindle (1A) with bobbin attached into bobbin holder. Make
sure bobbin spindle with bobbin are tightly secured to main unit.
4. Pull thread from the bobbin on Bobbin Spindle (1A) and put it through the 1st
Thread Guide (2) pulling thread from right to left.
1A
7
6
5
1B
4
3
2
8

User instructions
12
5. Bring thread over and across the Tension Adjusting Screw (3), positioning
thread between the 2 washers behind the tension adjusting screw. This is
what provides the lock stitch tension to the thread.
6. Pull thread from the Tension Adjusting Screw (3) guide through the 2nd Thread
Guide (4) pulling thread from right to left.
7. Pull thread through the Take Up Lever (5) inserting thread from right to left.
8. Pull thread downward through 3rd Thread Guide (6) and insert thread from the
top down.
9. Pull thread downward through 4th Thread Guide (7).
10. Insert thread through eye of the Needle (8) from left to right, using the needle
threader if necessary. If needed, adjust the needle to reach the eye by turning
the hand wheel slightly clockwise (in the direction away from you).
Note: To use the needle threader, push the wire together and place needle
threader through the eye of the needle from right to left. Insert the thread
through the eye of the needle threader. Holding onto the needle threader
near the wire, pull the needle threader out of the needle, guiding the thread
through the eye of the needle.
11. Raise the Presser Foot by lifting up on the Presser Foot Lever located at the
back of the machine.
12. Pull about 5 inches of thread through the needle. Pull thread between the
presser foot and lay on the deck under the presser foot, running it in the
direction away from you.
Using thread spindle:
Note: When threading machine, use above numbered image for reference.
1. Raise Thread Spindle by grasping the notch on the top of the spindle and
pulling upward until thread spindle is fully extended.
2. Place thread spool on the Thread Spindle (1B).
3. Pull thread from the spool on the Thread Spindle (1B) and put it through the
1st Thread Guide (2) pulling thread from right to left.

User instructions
13
4. Bring thread over and across the Tension Adjusting Screw (3), positioning
thread between the 2 washers behind the tension adjusting screw. This is
what provides the lock stitch tension to the thread.
5. Pull thread from the Tension Adjusting Screw (3) guide through the 2nd Thread
Guide (4) pulling thread from right to left.
6. Pull thread through the Take Up Lever (5) inserting thread from right to left.
7. Pull thread downward through 3rd Thread Guide (6) and insert thread from the
top down.
8. Pull thread downward through 4th Thread Guide (7).
9. Insert thread through eye of the Needle (8) from left to right, using the needle
threader if necessary. If needed, adjust the needle to reach the eye by turning
the hand wheel slightly clockwise (in the direction away from you).
Note: To use the needle threader, push the wire together and place needle
threader through the eye of the needle from right to left. Insert the thread
through the eye of the needle threader. Holding onto the needle threader
near the wire, pull the needle threader out of the needle, guiding the thread
through the eye of the needle.
10. Raise the Presser Foot by lifting up on the Presser Foot Lever located at the
back of the machine.
11. Pull about 5 inches of thread through the needle. Pull thread between the
presser foot and lay on the deck under the presser foot, running it in the
direction away from you.
Bottom bobbin placement
1. Remove Bobbin Compartment Cover (C) by sliding it straight out to the left.
2. Place the bobbin with thread of your choice in the Bobbin Compartment (B)
leaving about 5 inches of thread extended out from the bobbin holder and
place in the Thread Gap (A).
3. Note: The machine must be threaded before attempting to bring the thread
up from the bottom bobbin compartment.
4. Turn Hand Wheel (W) counterclockwise (towards you) until the needle has
descended completely and come up again to its highest raised point. Stop

User instructions
14
when needle starts to go down again. Needle will go down, picking up the
bobbin thread.
Note: The bobbin thread will not get pulled through if the hand wheel is
turned clockwise (away from you).
5. Pull the spool thread gently towards you, seeing it has caught the bottom
bobbin thread.
6. Raise the Presser Foot (D) using the Presser Foot Lever (V).
7. Pull the thread through, laying it on the Presser Foot Deck (S) under the
Presser Foot (D), running it in the direction away from you.
8. Slide the Bobbin Compartment Cover (C) back into place.
Note: It is essential that threading both the top and bottom be done properly.
Check carefully, and do one practice stich before beginning to sew. Improper
threading will damage the lockstitch.
Adjusting tension
1. You should not need to adjust tension as the factory has already adjusted it
for maximum performance. However, if you find that stitches are too loose or
too tight, you can adjust the stich.
2. Loosen stich by turning the Tension Adjusting Screw (L) counter clockwise (to
the left).
3. Tighten the stich by turning the Tension Adjusting Screw (L) clockwise. Sewing
heavier fabric may require loosening the stich. Very light fabric may require
tightening the stich. Bobbin tension cannot be adjusted.
Changing the needle
1. Turn the Hand Wheel (W) to raise the needle to its highest position.
2. Loosen the Needle Clamp Screw (R) by turning it counter clockwise (towards
you). You may need to use a short slotted screwdriver or small pliers.
3. Remove the Needle (E), pulling down, away from the Needle Clamp (G).
4. Place the new needle with the flat side facing in against the Needle Clamp (G).
5. Push it gently as far up as it will go, and against the Needle Clamp (G).
6. Tighten the Needle Clamp Screw (R) while holding the needle in place.
7. Note: Needles come in various sizes designated by numbers. They designate
the left of the needle. The smaller the number, the thinner the needle. Use
smaller needles for more delicate fabrics and larger needles for heavier
fabrics.
8. Note: The needles currently provided with this sewing machine are 3.8cm.
*Additional bobbins, needles and needle threaders can be purchased at a local craft
store. Please be sure any additional bobbins you may purchase are the exact same
style.

Helpful hints / cleaning and maintenance
15
Helpful hints
1. To replace batteries, remove the Battery Compartment Cover (T) and insert
new batteries. Pay close attention to the polarity and make sure the batteries
are inserted properly as the machine will not function and it could cause
damage to the machine. Place the Battery Compartment Cover back on the
battery compartment.
2. To turn the light on or off, press the Light Button (O).
3. Always check the threading of the lockstitch before beginning to sew a seam.
Improper threading or placement of bobbin can result in damage to the
machine.
4. Do not pull on fabric as you sew. Gently guide fabric only. Pulling fabric can
break the needle and result in damage to the machine.
5. Keep extra batteries nearby while working on projects so they are not
interrupted when batteries need to be replaced.
6. Safety Instruction regarding changing batteries:
a. Open the battery compartment lid.
b. Remove old AA batteries from compartment.
c. Insert 3 new AA batteries, ensuring that + and –match for
polarity.
d. Do NOT mix old and new batteries.
e. Do not mix alkaline, standard (carbon-zinc), or rechargeable (ni-
cad, nimh, etc.) batteries
f. Close the battery compartment lid.
Cleaning and maintenance
CAUTION:
Always be sure that the Mini Sewing Machine is unplugged before cleaning or
attempting to store the item. NEVER IMMERSE the sewing machine in water or
any other liquid.
1. If necessary, wipe the base with a damp cloth, sponge or paper towel.
2. A can of compressed air may be used to clean out the Bobbin Compartment
(B).

Other useful information
16
Other useful information
Technical specifications
Model Number MS-201
Rating Voltage Output 12V
Nominal Power 4.8W
Storing
Store the Mini Sewing Machine in a dry location.
Do not place any heavy items on top of the Mini Sewing Machine during
storage as this may result in possible damage.
Service center
If you have any questions in regards to the operation of this Mini Sewing Machine
please contact the service center at:
Tel: 1-888-367-7373
Business Hours: Mon-Fri 10:00am –5:00pm EST
Environmental protection
If the Mini Sewing Machine should no longer work at all, please make sure that it
is disposed of in an environmentally friendly way.

FCC
17
FCC PART 15
This device complies with Part 15 of the FCC Rules. Operation is subject to the
following two conditions: (1) this device may cause harmful interference, and (2)
this device must accept any interference received, including interferences that may
cause undesired operation.
Warning: Changes or modifications to this unit not expressly approved by the party
responsible for compliance could void the user’s authority to operate the
equipment.
NOTE: This equipment has been tested and found to comply with the limits for a
Class B digital device, pursuant to Part 15 of the FCC Rules. These limits are
designed to provide reasonable protection against harmful interference in a
residential installation. This equipment generates, uses and can radiate radio
frequency energy and, if not installed and used in accordance with the instructions,
may cause harmful interference to radio communications.
However, there is no guarantee that interference will not occur in a particular
installation. If this equipment does cause harmful interference to radio or
television reception, which can be determined by turning the equipment off and
on, the user is encouraged to try to correct the interference by one or more of the
following measures:
Reorient or relocate the receiving antenna.
Increase the separation between the equipment and receiver.
Connect the equipment into an outlet on a circuit different from that to
which the receiver is connected.
Consult the dealer or an experience radio/TV technician for help.

Lista de componentes
19
Contenido
Lista de componentes ..............................................19
Contenido ............................................................19
Información general .................................................20
Instrucciones de seguridad..................................22
Modo de empleo ......................................................23
Antes del primer uso ...........................................23
Uso de la máquina ..............................................24
Con el pedal....................................................25
Sin el pedal .....................................................25
Enrollado de la bobina.........................................26
Enhebrado de la máquina de coser.....................25
Uso de la bobina lateral .................................28
Uso del portahilo............................................30
Colocación de la bobina inferior..........................31
Ajuste de la tensión .............................................31
Cambio de la aguja ..............................................32
Consejos útiles .....................................................33
Limpieza y mantenimiento.......................................33
Información adicional de utilidad............................34
Especificaciones técnicas.....................................34
Almacenamiento..................................................34
FCC .......................................................................35

Lista de componentes
19
1
Componentes principales
1. Máquina de coser enhebrada
2. Pedal
3. Adaptador de alimentación
4. Accesorios de cosido (en una bolsa aparte)
a. 4 bobinas
b. 3 agujas
c. 1 enhebrador
Contenido del embalaje
Máquina de coser enhebrada con 2 bobinas y 1 aguja
Adaptador de alimentación
Pedal
4 bobinas extra
3 agujas extra
1 enhebrador
4 pilas AA
Manual de instrucciones
2
3
4
(a)
(c)
(b)

Información general
20
Información general
Al utilizar la minimáquina de coser, es necesario seguir unas precauciones de
seguridad básicas. POR FAVOR, LEA Y GUARDE TODAS LAS INSTRUCCIONES
ANTES DE UTILIZAR LA MINIMÁQUINA DE COSER.
1. Es necesaria una atenta supervisión cuando el aparato se usa cerca de los
niños. La minimáquina de coser no está diseñada para ser usada por los niños.
2. Para uso doméstico en interiores solamente.
3. Para protegerse contra descargas eléctricas, no sumerja el cable, el enchufe o
la minimáquina de coser en agua ni en ningún otro líquido.
4. No utilice la minimáquina de coser con un cable o enchufe dañado, si ha
sufrido una avería o si se ha dañado de cualquier manera. Póngase en
contacto con el centro de garantía y siga sus instrucciones para reemplazarla o
recibir un reembolso.
5. Nunca utilice accesorios que el fabricante no haya recomendado. Podrían ser
peligrosos para el usuario y causar daños a la minimáquina de coser.
6. Esta máquina no tiene un botón de retroceso. Consulte el modo de empleo
para conocer cómo girar la tela para coser en sentido contrario.
7. No mueva nunca la minimáquina de coser jalando del cable. NO permita que
el cable eléctrico cuelgue sobre el borde de una mesa o mostrador, ni que
toque superficies calientes.
8. Coloque la minimáquina de coser en una superficie plana, nivelada y estable al
utilizarla.
9. No coloque la minimáquina de coser sobre o cerca de una fuente de calor.
10. No utilice la minimáquina de coser con un enchufe dañado.
11. Asegúrese de que sus manos estén secas al enchufar y desenchufar la
minimáquina de coser.
12. No utilice la máquina de coser con las manos mojadas, sin zapatos o si está
parado sobre un charco de agua o una superficie húmeda.
13. Si el aparato se moja, desenchúfelo inmediatamente.
14. No utilice la minimáquina de coser para un uso que no sea el previsto.
15. La minimáquina de coser no está diseñada para ser utilizada por personas
(incluidos niños) con capacidades físicas, sensoriales o mentales reducidas, o
sin experiencia o conocimiento, a menos que sean supervisados o reciban
instrucciones acerca de su uso por parte de una persona responsable de su
seguridad.
16. Este aparato no está diseñado para ser usado con fines industriales.
Table of contents
Languages:
Other Easy@Home Sewing Machine manuals