Eaton Viking 5D12V User manual

OW}IER
GUIDE
0PtRAT|oN
. tAtilT[]tA]l(t
. pARTs
lttT
EATON'S
IKI
5 H.P.
DE
1UXE
OUIBOARD %fl
I
I
Ii"l ba-
-'W
, fl.,"
q
by
& Monufocluring
Co.,of Conodo,
Ltd.
PfIERSOROUGH . CANADA
fri0r0R
NODEl
5D
12v
SPECIFICATIONS
HORSEPOVYER
. 5.0
AT 4OOO
R.P.M. - O.B.C. CERTIFIED
NUMBER OF CYLINDERS. 2
BORE AND STROKE . l-15/16', BORE X I
-rl2i STROKE
PISTON OISPLACEMENT . 8.84
CUBIC INCHES
TYPE OF POWER
HEAD . 2 CYCLE, 2 PORT, ALTERNATE FIRTNG
GEAR RATIO |5:26
PROPELLER . 2 BLADE, 8r DTAMETER
X 7_1/4" ptTCH
COOLING . RUBBER BLADE COMBINATION DISPL.ACEMENT
AND CENTRIFUGAL WATER PUMP
IGNITION . BUILT IN FLYWHEEL MAGNETO
CARBURETOR FLOAT FEED, HIGH AND LOW SPEED
ADJUSTMENT, AUTOMOTIVE TYPE CHOKE
SPEED CONTROL SYNCHRONIZED SpARK AND THROTTLE.
, TWIST GRIP CONTROL
FUEL TANK CAPAC]TY 0.7 GALLoNS
RUNNING TIME (FULL THROTTLE) APPROX. I HOUR
STARTER AUTOMATIC REWIND
GEARSHIFT CONTROL . FORWARD-NEUTRAL-REVERSE
WEIGHT. . 52 POUNDS
RECOMMENDED TRANSOM HEIGHT 15"
Monufoctured
erpresslyfor
$OT,
EATON C9,",N'O
- Ou6oorJ,l'florine
402402

STARTERHANDLE
STEERlNG
HANOLE
THROTTLE COT.ITROL
\.
RTER
HOUSING
LOW SPEED KNOB
CHOKE KNOB
HIGHSPEED KNOB
CLAMP SCREW
STERNBRACKET
WATER PUMP HOUSING
------+
FUE
CAP
/
STA
I
\
\
L TANK
EXHAUST TUBE
COVER
WATER OUTLET
ANTI-CAVITATION
PI-ATE
EXHAUST OUTLET
WATERINLET
PROPELLER
TIGURE
I
MORE MUST BE
MAY BE OBTAIN.
olL-.Frr_L
pt I
rr:
GEAR CASE ----*
SKEG ----+
3TAR.OARO (RICHT), PORT (LEFT) ARE oESIcxATEo wXtLT r^cIxc low
NOTE
ALL BOATS PO\^/ERED BY MOTORS OF 10 HORSEPOWER OR
REGISTERED. APPLICATION FORMS FOR BOAT REGISTRATION
ED FROM YOUR NEAREST COLLECTOR OF CUSTOMS OFF'ICE.
'tr..----- PROPE
LI"ERCAP
Y
fl,-
OIL DFA!N PLUG

FOREWORD
You are to be congratulated on your selection of this outboard motor which will
give you years of satisfactory service. The fine materials and high standards
of workmanship used in the manufacture of this motor assure you of durability and
Iasting performance.
Read through this manual carefully before operating the motor. You will find
complete operating instructions and recommendations for the care and protection
of your motor. Extend the same care to this motor,vou would give to a new
automobile or other personal prcrperty of even less value anct
it wlll be a constant
source of satisfaction to you. Care in handling will prevent scratches and
niclis which will mar the appearance.
operating instructions are concise and easy to follow. even for the beginner'.
if you have never operated an outboard motor, it wili be helpful to practice
step by step procedure a few times before putting the motor in actual opera-
Outboarding is great sport. Always remember. lrowever, that you have lriends
on the water. Extend to them the'courtesy of thoughtful. safe operation t)f your
motor and boat and you will increase your own enjoyment.
ANACHING
MOTOR
TOBOAT
The
But
the
tion
Figure 2
ANGLE
ADJUSTING LEVER
too
cur oFF
.''
MAXIMUM ..-.\
TRANSOM
THICKNESS
| 34
I
I
VERTICAL
TRANSOM
HEIGHT
FROM
BOAT
BOTTOM
This motor is designeci
ltrr use on a st:rndard15-inch
transorr., If transom is higher, it shr:uid be cut
down to 15 inches so propeller will be at leasl 2
inches below i-rottom
of boat. Best perfornrance wili
be obtained by having the drivestreft vertical io boat
travel and the propeller placed below br.rtlomof the
boat (see Figure 2,7
. Performance can often be im-
proved by cutting off the keel at a 10' an:1leas illus-
trated. This wiII prevent it.rrmatiou of spray and
provide free running perlormlnc'e"
Place motor on sterr.l of k'oat with stern bracket
clamps inside the stern. <'e'nterr'd
on the transom or
stern board. Tighten bracket r:Iamp
slrews securel!
by hand.
CAUTION
When nrotor is runniltg, occasionali_v
check
bracket clamp screws tcl be sure thev are
tight. We will nrtt be resporrsibie frtr an1'
mot()r d:rnurged ()r lost overbpard due to
Iooseclamp screws.
The use of a safety chailr or rope !rtlli(.ltc(l
tr; nrt;tor
stern brat'ket safety chairi link (ilem 1, Fig.uri, 5.r
and boat rvill euard agairlst Ioss of nroltrr over'irottrd.
Holes ar-epro'"'idecl
in thurnit screw irandlesthr<,ui:;-,
whit:h a padloi
k ntal be applied to lock thr,rnulrrr-on
the boat.
* 12."
ANGLE

n
to
of
OPTRAIIONOF
ANGLE
ADJUSTMENT
simple means is provided for adjusting the motor
a vertical position to make allowance for angle
the transom.
To accomplish this adjustntent, tilt the motor slightly
(gear shift lever must bein FORWARDor NEUTRAL) ,
then lift up on angle adjustment lever (see item 5,
Figure 5) and move it ahead or back in the slots in
the stern bracket so that motor is in a vertical posi-
tion when lower unit rests against thelever. Onsome
boats it may be necessary to correct angle adjust-
ment to maintain motor in a vertical position when
changing load from one to more passengers. Always
try to arrange load so boat runs on an even keel.
Transom (stern) angles may vary somewhat; how-
ever, range of adjustment is sufficient to accommo-
date angles found in most boats.
GEARSHIFI
The motor is equipped with gear shift control to
provide operation of the motor in Forward, Neutral,
or Reverse by means of a gearshift Iever (Figure 4)
located on side of motor below the tank, Move the
lever as far as possible toward front of tank for
"Forward" motion of boat -- toward rear of tank as
far as possible for "Reverse" motion of boat. The
intermediate position is "Neutral" or out of gear.
When motor is not running the internal gear shift mech-
anism may be in such a position that gear shift lever
cannot be moved from "Neutral" into "Forward" or
"Reverse" --- DO NOT FORCE. This may be reme-
died by pulling on the startercordwiththrottlecontrol
at STOP to turn gears slightlyuntilthegearshiftlever
will move to desired position. Extreme care should
be taken to prevent bending or striking the lever.
2
YOURTVIOTOR
REVERSE
Always retard motor speed to within "shifting range"
as indicated on throttle control plate before shifting.
A special reverse lock (item 4, Figure 5) built into
the swivel bracket locks the motor against tilting
when in reverse. Use extra care when running in
reverse to avoid striking any obstruction and dam-
aging lower unit parts. The tilting feature functions
only in FORWARD or NEUTRAL gear shift position.
LUBRICATION
AND
FUELINSTRUCTIONS
Proper lubrication is an important factor in the per-
formance and life of your outboard motor. The
following instructions are therefore very important
and should be followed carefully.
The oil and fuel mixture referred to in the following
instructions should always be thoroughly mixed in a
separate container before pouring into motor fuel
tanK: NEVER POUR SEPARATELY INTO FUEL
TANK. Also, all fuel should be poured through a
fine mesh strainer to remove dirt and water which
may be present: Use only metal containers.
TYPE OF GASOLINE. Use a good grade of regular
gasoline.
TYPE OF OIL. Use a high grade outboard oil . or,
if that is not availabie, regular SAE 30 motor oil .
Avoid use of low-priced, third grade (ML) oils.
MIXTURE. Mix 1r'2 pint of oil with each gallon of
gasoline.
PROCEDURE. Pour into the container approximately
one-half the amount of gasoline required. Add all
the oil required at the ratio of 1t2 pint of oil to each
gallon of gasoline. Shake the two together until they
are thoroughly mixed. Add the balance of gasoline.
Shake container briskly to insure mixing.
LUBRIC.ATION OF GEAR CASE. The gear case has
been filled at the factory with the correct lubricant.
Check for Iubricant a-fter first 5 hours of operation;
then every 50 hours. For method of lubrication, see
page 5.
EQUI
PMENT
NECESSARY
WHEN
OUTBOARDING
Although the following articles may not aI-
ways be needed,
it is advisableto have
them
aboard
when
motoring.
1. An extra can of fuel, properly mixed.
2. Funnelwithstrainer.
3. Tools.
4. Startingcord.
5. Ropeor chain
to tie motor to boat,
6. Extra spark plug.
?. Oars, andaII other alulpment requlred
for safety alloat.
TOO MUCH ANGLE
BOAT SQUATS
NOT ENOUGH ANGLE
BOAT PLOWS
MAXIMUM PERFORMANCE
Figure
3

BREAK-IN
PERIOD
Reasonable care in the operation of the motor during
t}te first seyeral hours of use will improve ir* i,€r.-
formance andinsure longer li-fe. Follow the fuel and
lubrication instructions carefully. After operatlng
motor at part throttle for aboutonehr)ur, it is per-
missible to run at full throitie for a few secondsfol-
lowed by a few minutes of part throttle operation.
Repeat frequently, gradually increasing the time of
full throttle until another two l.ours of operation are
completed. No extra oil is required lor the break-in
period.
STARTI
NGINSTRUCTIONS
lSee Figure 4.)
1. Open air vent screw in fuel tank filler cap.
2. Open fuel tank shut-off valve.
3. Sethigh andlow speedknobs^withpolnters strpighr
up. In temperatures below 40u F., turn high speed
knab l/4 turn to the left.
4. Move gear shift lever to NEUTRAL. NEVER
START MOTOR IN GEAR
5. Turn throttle control to START positton, as in-
dicated on the throttle control plate located on the
steering handle.
6. PulI out choke control knob out all the way.
7. PulI starter handle slowly untll starter engages,
then pull forcibly. Repeatunt!.I
motor starts. Allow
starter cord to rewind before releasing handle. It
is not necessary to pull cord rrutmore than two feet.
0perolion
of
your
tlotor
L AJter motor starts, push choke control knob in
slowly.
9. Reduce motor speed
before shifting in FOR1VARD
or REVERSE. Throttle control must be within
"shifting range." Move gear shift lever quickly
into desired position. DO NOT ease into position.
10. WHEN IN FORWARD ONLY, advance throttle
control to FAST position. Run motor a few minutes
to warm up. Increase speed to full power and ad-
just high speed knob, turning to left or right, until
motor r,rrrs smOothly.
11. Reduce speedandadjust low speedknob by turn-
ing to left or right, until motor idles smoothly.
12. Turningthrottle control to FAST increases speed
and to SLOW decreases speed.
13. To stop motor, turn throttle control to STOP
position.
WARM
MOTOR
It is not necessary to prime motor when startlng if
motor has been lvarmed up. Motor can usually be
started wlth carburetor knob ln running position and
pulltng starter handlewith throttle control at START
posltlon. :LOOD
ING
Floodittg may occur by over-choklng or choking a
warm motor. If this occurs, turn carburetor knob
to extreme rtght (off posttlon) and pull starter handle
several tlmes. tffhenmotor starts, allow to run untll
it stops. Then follow lnstructions for startlng cold
or warm motor, whlchever applies.
vENr
scREw. W4Ft
LLER CAP STARTER HANDLE
i,
,, i$.'sr- HTGHSPEED
GEAR SHIFT
, .i. ,
'*.
Figure
4THROTTLE CONTROL

0perolion
ol
your
tlotor
CARBURETOR
ADJUSTMENT
The carburetor is designed to operate efficiently at
all speeds. Adjustments for [igh and slow speedare
required. Adjustments can be made to your carj
buretor as received from the factory simply by turn-
ing the krrebs to the left or right. Turning the knobs
to the left (counterclockwise) enriches the mlxture
(increasing ratlo of fuel to alr); turning to the right
(clockwise) leans the mi:dure (decreaslng ratio of
fuel to air) . A rich mixture may cause the motor
to run "rough," whlle a lean mixture is indicated
by 'rcoughlng or spltting" ln the carburetor.
srrfficient for average con-
unusual conditions (such as
with heavy loads, very slow trolling, unusual at-
mospherlc conditlons, or after repairs) adjustment
may be requlred. First loosen, but do not remove,
screws in the center of botlr knobs. Pull knobs out
past stops at rear of knobs so that they wtII turn
freely. Then tighten screws. Turn both knobs to
the rlght untll needleseats gently. DO NOT FORCE,
as needlemay be damaged. Then back off bothtnobs
about 1-1/2 turns.
IIIGH SPEED ADJUSTMENT: Start motor as pre-
viously tnstructed and run at FAST until it haswarm-
ed up. Then operate motor at full power. Turn knob
to left or right to obtain best high speed setting.
Loosen center screw. DO NOT DISTURB POSIIION
OF NEEDLE. Adjust knob to point stralght up.
Push knob back on shaft to original positlon. Leave
enough clearance so knob will turn wlthout blndlng
on motor cover. Ttghten center screw to secure
knob.
SLOWSPEEDADIUSTMENT: Thlsadjustment should
be performed after htgh speed adjustment. Operate
motor at slow speed. Turn slow speed knob to left
or rlght until top performance ls obtained. Then
reset the knob as described under High Speed Ad-
justment.
c0-PtLoT
The co-pilot permits the motor to maintain a set
course without holding steering handle. It can be
adjusted by tightening or loosening the screw, lo-
cated in the center of the pivot bearing (ttem 2,
Figure 5) to the deslred tension.
TILTINGOFMOTOR
The tilting feature ls designed to permit self tilting
when strlking any submerged object while running in
forward position. Care, however, shouldbe taken in
obstructed waters, not to operate motor at too high a
speed. Thts ttlting feature is also useful in boat
launchlng, beachlng or rowlng ln shallow waters.
To ttlt the motor, grasp the carrylng handleandrear
of gas tank and pull the motor toward you. The
motor can be tilted only when gear shift lever is in
FORWARD or NEUTRAL positton. Never try to tilt
motor by beartng down on steering handle.
TILTINGFRICTION
Proper ttlttng frlction ls set at factory, but through
contlnued use, frictlon may have to be adJusted.
To adjust, loosen or draw up on tilting bolt nut
(ltem 6, Ftgure 5) as requtred, uslng a wrench.
Tension of tllt need not be too great, but just suffl-
cient to maintain the motor ln any posttion of tilt.
:flk These adjustments
-1"" ditions. However, are
for
Figure6
Figure
5
I
2
J
4
o
SAFETY LINK
CO_PILOT SCREW
CLAMP SCREW
REVERSELOCK LEVER
ANGLEADJUSTMENTLEVER
TILTING BOLT NUT

EMERGENCYSTARTING
In case of starter failure, you can still use your
motor.
Remove two rear starter housing screws and two
Iong front screws attaching starter housingandfuel
tank to bracket. Lift off entire starter housing
assembly. Replace front screws to secure tank.
To start motor, wind a 3/16 inch rope (with a knot
0perotionof
your
lUlotor
in one endplaced in the notch on the flywheel pulley)
clockwise on the pulley on top rim of flywheel (Fig-
ure 6).
Whenreassembling
the starter housingassembiy, set
in position and start the mounting screws. Holding
starter in position, pull handle slowly until starter
engages. Tighten screws and again check engage-
ment.
CARTOTYOURTIOTOR
GEARLUBRICAT]ON
Where a complete change of lubricant is required,
remove both the fill and drain plugs (Figure 8) wlth
motor in upright position. Drain out all of the oil,
water, or residue, replace the drain plug, then
fill
the gear case through the flll plug with a pump type
oil can. Replace plug.
We recommend a good grade SAE 90 automotlve
(hypoid) gear lubricant. In case of emergency it is
permlsstble to use a good grade SAE 30 englne oil,
but only until such tlme as proper lubricant can be
obtained.
The gear case should be checked for presence of
water. at frequent intervals. When checking, the
motor must have been idle for some time to allow
oll andwater to separate. To check, remove the oil
fiII plug and loosen the otl drain plug partly to allow
enough of the lubricant to drain out to determine
whether or not water is present. If uo water ls
present the drain plug may be retightened without
excessive Ioss of lubrlcant. Be sure to refill the
gear case to the fill plug level. If water is present,
drain gear case andrefill. After running motor for
several hours, again checkfor water. If presence of
water persists, have seals in gear case checked,
GREASE FITTINGS
)Figure 7
GREASING
There are two Zerk type grease fittings on the motor
which should
be greased
occasionally. Thesefittings
are located on the swivel bracket and below gear
shift lever, on the starboard side. A goodgrade of
waterproofgreaseis recommendedfor thesefittings.
Use an automotive type. See Figure ?.

Coreol
your
lUlotor
PROPTLIiR
Motors are equippedwith a propeller which gives the
best aLl around performance on'the average boat.
Adding a high speed propeller to a motor iuili nct
increase the speed of the boat unless the boat itself
is light and designed to develop higher speed" Wt:
cannot be responsible for wear or damage
to a motor'
used for raclng or equipped
with a racirrg propeller.
PROPELLERDRIVEPIN
Should
the propeller strike an underwater nbstniction
forcibly, the propeller drive pin may shear. This
should rarely, iI ever, occur, becauseof the shock
absorber. TURN OFF MOTOR
IMMEDIATELY. Re-
H move rubber cap. Remove broken pin by driving
" .:'parts out wlth a punch. Examine propeller, A blow
forceful enoughto shear the drive pin may aiso have
damagedthe propell.er
seriously. Propellershouldbe
replaced if badly damaged. Drive a new pin in place,
securing propeller to the shaft. Replace rubber cap.
SHOCKABSORBER
The shock absorber assembly (item 38, page 18)
consists of a comparatively strong spring inserted
tightly into a retainer and pilot. The retainer is
locked to upper driveshaft and pllot pinnedto lower
drtveshaft. Action of the sllp clutch assemblv is
such that when the propeller strikes an underwater
obstructlon the spring ls caused to coll slightly
in either the retainer or pllot, or in both, releasing
lts grtp, thereby absorbing shock of suddenimpact.
REMOVINGSIDE
MOTORCOVERS
You may desire to remove the side motor covers
to inspect spark plugs or other parts of the power-
head, To remove port cover, simply remove two
mountingscrews andchokeknob. Forthestarboard
cover, yorr
needremove just the two side mounting
screws. Pull out hinged gear shift lever until it
can be turned to point down. Then liJt off cover.
SPARKPLUG
The correct spark pluggap
is .030inch. Plugsare
set properly at the factory and are right when the
motor is received. We recommend ChampionJ6J
or Auto Lite A3X spark plugs, or equivalentfor re-
placement. Keep the spark plug cables free from
oil and do not permit them to become frayed or
broken. Clean the spark plugs periodicall.y and re-
set to tlre proper gap setting. Be sure gaskets are
intact. For access to spark plugs, remove port
motor cover.
COOLING
SYSTEM
Water for cooling purposes is provided by action of
the single stage rubber impeller centrifugal pump
located between the upper and lower housing of the
lower unlt. Thls functlons as a displacement pump
at slow motor speeds and as a centrlfugal pump
durlng operation in the higher speedrange. Theqe
are two water inlets in the gear case. During
FORWARD operatlon of the motor, water enters the
slot, equipped
with a screen, located
directly below

exhaustoutlet, and is forced through the cooling sys-
tem, Iater to be discharged at the outlet in the ex-
haust tube provided for this purpose. Water enters
the cooling system through the holes in the watgr
by-pass cover abovethe anti-cavitation plate when
operating in REVERSE. (See
Figure 1 for locations
of cooling system parts.)
NOTE
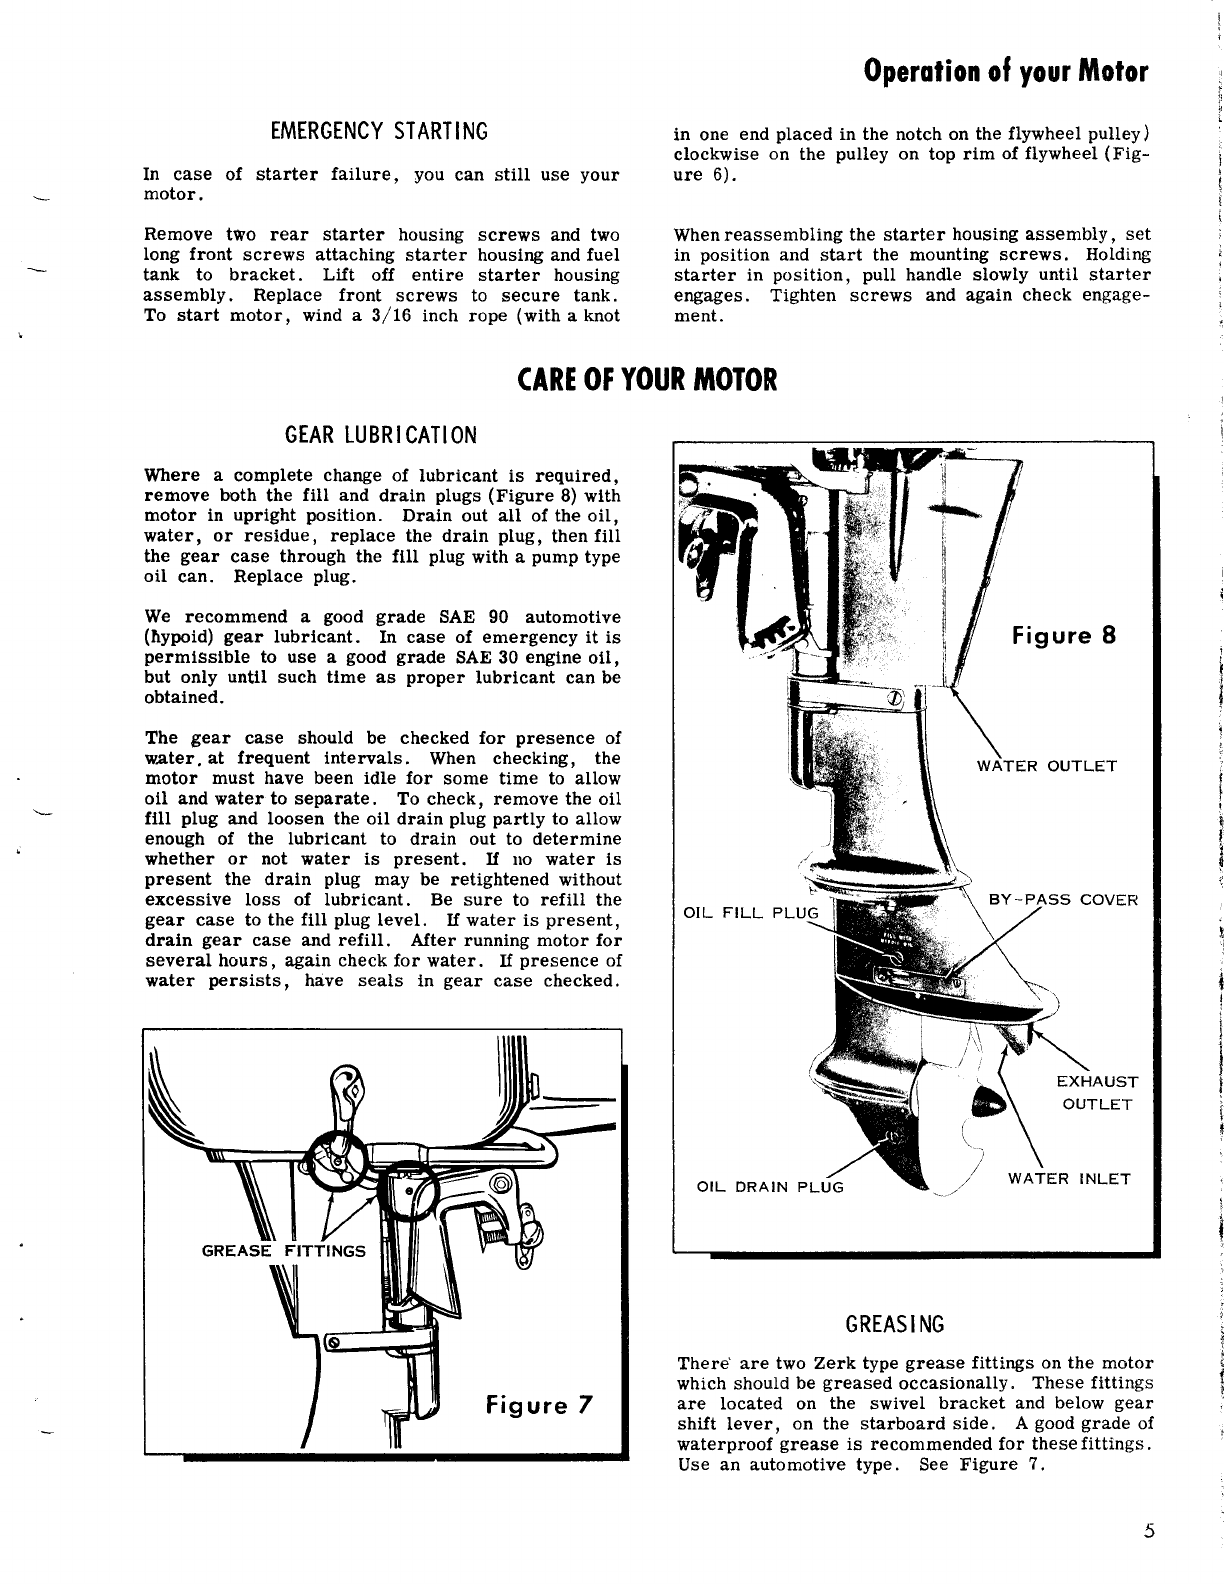
If, while operating motor at fuII speed, it
should show signs of slowing
down, immedi-
ately check water discharge at'water outlet
(Figure B) located at rear of the motor di-
rectly below cylinder. In case no water is
being discharged, immediately shut off the
motor and check water inlet (Figure 8) for
obstruction. If no obstruction is found, it
may indicate worn pump parts.
REMOVINGMOTORFROM
BOAT
At end of run, with motor running in NEUTRAL,
.close
fuel shut-off valveand
permit motor torununtil
it stops, draining carburetor. Closeair ventscrew
in filler cap. The motor can then be carried with-
out fuel leakage. For safety, always drain fuel
tank before transporting motor. Also drain water
thoroughly as in "Care of Motor in CoIdWeather.
"
When removing motor from boat, lift motor in a
straight upward position and hold thls position for
a brlef period until aII water is drained from the
underwater exhausttube and water cooling system"
Do not stand motor on top or carry with the top down
before draining water, as this may allow water to
enter the power headlrom underwaterexhausttube.
CARI
OFMOTOR
INCOLDWEATHER
The motor will not freeze while in use, but when it
is idle, water in the cylinders or pump might freeze
and damage the motor. Drain by setting the motor in
an upright position and pulling starter cord several
times with speed control grip in STOP position. If
the motor is to be stored during cold weather, be
sure that no water is left in the motor or it may
freeze. (See "Preparation for Storage.
")
SALT
WATER
INSTRUCTIONS
A little time spent in caring for vour motorwhenused
in salt water will aid in not only keeping it in good
running order but help in retaining its finish and ap-
pearance. TiIt the motor out of the water when it is
not in use. At the end oI the day or when not using
the motor for a period of time it is advisable to re-
move lt from the boat anci
to fiush it by running it in
a tank of fresh water. Wipe the motor dry and go
over all parts with an oily cloth. This should be
done as soon as possible after removing the motor
from the boat.
PREPARATIONFOR
STORAGE
No outboard motor should be placed in storage with-
out considerine the necessarv precautions. If motor
Coreol
yourlulotol
is operated in salt water, flush by runningin a tank
of fresh water. Drain and refill gear casewith the
proper lubricant. See
page 5.
Prior to storing the motor, run it for about
one-half
(1/2) rninute in choke
position. Shutoff motor with-
out pushing choke
backto normal position. Purpose
of this operation is to flood the inner parts of the
powerhead with oil (oil in fuel mixture) while in
storage.
Drain all water from the coolingsystem. See
"Care
of Motor in Cold Weather."
Drain all fuel irom fuel tank, gas,.line
andcarbure-
tor.
Under no circumstances should the motor be stored
in an inverted position. It should
be hung
on a rack
simllar to the manner in which it is mounted
onthe
boat. Store in a dry place. Wrap the motor in a
piece of canvas, old blanket, or heavy paper.
PUNING
MOTORINUSEAFTERSTORAGE
PulI off spark plug leads and remove spark plugs.
If rubber spark plug hoods have been removed from
ignition leads, be sure to ground leads to some part
of motor to prevent possibility of spark" (THIS IS
IMPORTANT. ) Spin motor by pulling on starter cord
to remove excess oil from cylinders. Clean spark
plugs, check gap and replace, Install new plugs if
they are cracked, broken, or badly burned. Tighten
all screws and nuts. Check adjustments such as tilt-
ing friction, co-pilot, and carburetor knob.
RUNNINGMOTORINTEST
TANK
1. Do not run motor out of water.
2. Do not "break-in" motor in tank.
3. Remove water by-pass cover (small metal strip
on lower port side of upper pump housing, Figure B).
4. When running in tank be sure gear housing and
propeller are submerged.
5. Do not race motor in tank.
6. Use test propeller when testing motor in tank.
?. Cavitation (air pocket around propeller) may occur
when operating motor in tank with regular propeller.
Motor will then not perform properly or it may race
and be damaged as a result.
MOTORSTHATHAVEBEEN
SUBMIRGED
Precaution shouid be taken to prevent a motor going
overboard (see page 1). However, if a motor has
been submerged, it should be recovered as quickly
as possible.
Since the motor is temporariiy out of working otdet,
do not attempt to operate it until the following pro-
cedure has been used to restore it to service,

Coreol
yourtlotor
1. Drain fuel tank by removing fuel tank filler cap
and turntng motor upslde down.
2. Remove
plugat verybottomofcarburetor (item
52,
Page 12) thereby draining watir and fuel from car-
buretor. Pour enoughfresh fuel into gas tank to re-
move any Wlter from fuel line, by permitting fuel to
run out of carburetor drain p.l.ug
hole (fuel tank shut-
off valve should be open). Whenall traces of water
are removed, replace plug.
3. Remove and dry spark plugs. If rubber spark
plug hoods have been removed, be sure to ground
wlres somewhere on motor. . Lay motor down on
gear shift handle side and crank motor. Turn motor
so that spark plug holes are down and again crank
motor untll no further water is expelled.
4. Check spark by insertlng screw or other small
metal object tnto rubber spark plug hood to make
contact wlth terminal spring in hood and holding
screw about 1/4 lnch lrom cylinder and cranking
motor rapidly. Check spark from both leadwires.
If rubber hoods are not on leadwlres, be sure to
ground one lead while checking the other.
5. Replace all parts removed, fill tank wlth newfuel
mlxture, and start motor. It may be necessary to
clean water from points of spark plugs several times
as there ls a posslbility of small drops of water re-
maintng ln the cylinder, which may short the plugs.
The abovelnstructions are primarily for motors that
have been submerged in fresh water. For motors
submergedin salt water a few additlonal precautlons,
Itsted below, Ery be necessary.
1. Remove carburetor and fuel tank, andwashwlth
fresh water. Dry thoroughly.
2. Remove flywheel, and wash magneto with fresh
water.
3. It is advisabl.eto wash external working parts,
such as the starter 'mechanism, with fresh water
and lubricate. Internal worklng parts are lubricated
by the fuel mixture.
If motor will not operate after the aboveinstructions
have been followed, disassemble and wipe all parts
dry, Coatwlth oil to prevent rust andfollow instruc-
tions under "How to Obtain Service. " (See back
cover.
)
MAGNETO
It may be necessary occasionally to lnspect the
magneto. If so, it is necessary to remove the gas
tank andflywheel. However, if cleaning or adjusting
of points is required, remove the starter hous-
ing, (seepage
5, "EmergencyStarting") andthethree
screws releasing the starter ratchet and flywheel
cover. Access to the points for cleanlng or adjusting
is possible through the opening on the top of the
flywheel. I.IOWTOREMOVE
FLYWHEEL
Disconnectfuel line andremovefuel tank. Use
fly-
wheel puller iJ available. If not, hold flywheel rigid
and unscrew the flywheel nut about two full turns.
Have someone lift up on the flywheel andthen place
a plece of bar solder or a block of Leadover the fly-
wheel nut and tap a sharp blow with a hammer. If
flywheel does not come off, loosen nut a trlfle more
and repeat procedure.
When flywheel comes off, use care not to lose key by
whtch flywheel is held inengagementwithshaft. When
1 BREAKER ARM
2 BREAKER POINTS
3 BREAKER ADJUSTING SCREW
4 CONDENSER
5 BREAKER BASE SCREW
6 COIL AND LAMINATION
ASSEMBLY
7 BREAKER CAM
8 FELT OILER
9 CRANKSHAFT
Figure
lO

Core
ofyour
fllolor
CHECKING BREAKER POINT GAP ADJUSTINGBREAKER POINT GAP
Figurell
agaln replactng flywheel, be sure key is in plate and
f.its snugly, then draw up nut as tight as possible.
IMPORTANT: Tapers onflywheelandcrankshaftmust
be perfectly clean and dry before reassembling.
MAGNETO
LUBRICATION
The magnetois equipped
with a felt oiler to lubricate
the cam and reduce wear on the cam block of the
breaker (Figure 10). A few drops of light oil should
be put on the felt once or twice a year.
CLEANAND
ADJUSTBREAKER
POINTS
AJter removing starter ratchet and flywheel cover,
revolve flywheel until opening is directly over
breaker (there are two breakers on this magneto).
Carefully spread points with small screwdri.ver.
Insert pointdresser. (Sandpaper,
fine coil file, nail
file, etc. NEVER USE EMERY CLOTH.) Release
points, work dresser up anddownto smooth. Follow
same procedure with piece of thick smooth paper to
remove traces of foreign particles which might be
left on points.
AJter cleaning, reset point gap to .020 inch maxi-
mum opening as follows: When hole in flywheel is
directly over the breaker, maxlmum opening of the
breaker is obtained. C.heck with .020 inch feeler
gage. If opening
is under or over .020 inch loosen
breaker base screw (item 5, Figure 10) slightly.
Turn adjusting screw (item 3, Figure 10)to right or
left until required setting is obtained. Tighten
breeker plate screw and re-check with gage. See
figure 11.
I LOW SPEED KNOB
2 LOW SPEED NEEDI.E
3 PACKINGNUT
4 CAM FOLLOWER LEVER
5 THROTTLE CAM FOLLOWER
6 CARBURETOR BODY
7 THROTTTE SHAFT
8 FLOAT BOWL
9 HIGH SPEED NEEDLE
IO HIGH SPEED KNO,B
II CHOKE SHAFT
12 CHOKE KNOts
FigureI2

Core
ofyourlUlotor
CARBURETOR
AIRSILENCER
The air silencer does
notfunction
as a filter, there-
fore it is never necessary to remove it for cleaning
purposes under normal use- Its only functionis for
quiet motor operation.
CARBURETOR
ADJUSTING
NEEDLES
Should the adjusting needles become so Ioose that
the knobs will not remain in a set position, they
can usually be tightened by drawing down on the
packingnuts (item 3, Figure 12).
NOTE
Turn carburetor knobs counterclockwise1/2
turn before tightening packing nuts to prevent
damage to needle seats.
If tightening of the packing nut will not help, it may
be necessarytoreplace thepacking. To replace pack-
ing remove the air silencer, needles, packing
nuts,
washers, and ALL of the old packing. Install new
packing and reassemble.
eherj, e/4c,nf
This chart will provide an outline for systematic tracing of operating difficulttes.
The causes listed are those which the average omer can locate wtth little dttfi-
culty. Once you have located the cause, the remedy ls usually self-evident.
If faulty motor op€ration cannot be traced to any oI the causes listed, we re-
c0mmond that you see your dealer:
Always make sure that you have been using the correct gasoline-oll mlxture,
and are followihg operatint instructions accurately.
Spark plugs are one of the most common sources ol trouble. It may geve con-
sidcrable time if spark plugs, then the other ignitlon parts, are checked llrst.
MOTOR WILL NOT START
FUEL TROUBLE
Tank empty.
Shut-ofl valve closed.
Fillcr cap vent closed.
Wrter in carburetor, tank or strainer.
Carburetor nozzle or passages clogged.
Sirf,iner screen between shut-off valve and
tank clogged.
Fuel Iine clogged.
Improper luel and oil mixture.
NO SPARK 'TO PLUG
Lead to spark plug disconnected or grounded.
Brcaker points not s€t at .020 inch gap.
Breaker points corroded-
Loose or broken wire in magneto.
NO COMPRESSION
Loaking gasket or stuck reed valve.
SPANK PLUG TROUBLE
Fou
I
r.d.
Porcclain cracked.
Cenler electrode (poIe) loose.
Poinls not set at .030 inch gap.
MOTOR KNOCKS
Flywhecl hub loose.
Flywheel nut loose.
lncorrect spark pluS pre-rgniting.
MOTOR IS STIFF AND CRANKS HARD
pump lnler.
not setting deep enough in water.
BUT PROPELLER DOES NOT TURN
reo.
MOTOR WILL NOT IDLE
Carburetor not adjusted properly.
Improper gasoline and oll mlxture.
Throttle stuck open.
Dirty or defective spark plug.
Clogged carburetor.
Improperly set breaker points.
MOTOR MISSES
WIRING
Loose or broken ignition wire.
Broken or oil-soaled insulation on wtre.
MAGNETO
weal or broken brealer point spring.
Corroded or dirty breaker points.
Brealer points not set at .020 inch.
CARBURETOR
Nozzle or feed hole dirty.
Water or foreign matter in strainer.
Carbur€tor passages clogged.
MOTOR LOSES POWER
INCORRECT FUEL MIXTURE
Too rich - motor slows dom and lour cycles (flres
every other compression atroke).
too lean - motor slows dom and may back flre.
MO'TOR VIBRATES
Faulty lgnition or carburetion.
Loose pivot bearing.
Bent or broken propeller blade or motor loose on
boat.
MOTOR RUNS BUT BOAT MAKES LITTLE OR
PROGRESS
Badly bent propeller blades.
Weeds or rope wound around propeller.
Rope or other obstruction dragging in mter.
l0

=:::J::-:::J::: AUXII.IARYEQ
UIPfiIT
NI
ACCESSORIES
AVAItABtE FOR
YOURMOTOR
rne UllilllG AuxiliaryFuelsystem,
now available for your 5 horse-
power outboard motor, will giveyou
extra hours of outboarding without
refueling. The system includes the
tank, pump, hoses and allnecessary
fittings. AII required drilling and
cutting has been incorporated in the
motor and the fuel system can be
attached easily in a few minutes
time,
A special kit can be purchased from yourdealer
to modify your 5 horsepower outboard motor
for remote control . With this kit, it is pos-
sible to attach or detach the new Ull(|llG n"-
mote Control System in a few minutes time.
The control box can be placed on either side
of the boat. One lever controls the gearshift,
the other the throttle. Cables are rlade in a
variety of lengths to suit any steering position.
ll
i$.r..-R
FOR FURTHER
INFORMATION.ASK THE DEALER FROM WHOMYOUOBTAINEDTHE MOTOR

CARBURTTOR Repoir
Ports
list
t'-l* @-11
/?
r
13r
TI

Repoir
Portslisl CARBURTTOR
Ref
No. Part
No. Descrlption Ref
No. Part
No. Description
1
2
3
4
D
13
14
15
16
L1
18
19
20
6
t
I
I
10
11
L2
2l
22
23
24
25
26
27
28
29
30
31
552203
552204
55151?
591279
591482
303479
203355
133451
552622
552623
85-64
7L-t487
301858
552608
552614
552609
43-259
200931
203652
302L24
55261
5
591569
19-136
30343?
591
570
85-101
591
545
303492
203166
71-1052
71-1038
552605
Screw- ChokeKnob.
Knob - ChokeControl
Screw - Carburetor Control
Knob .
SlowSpeedControl Knob and
StopPin Assembly
High Speed
Control Knob and
StopPin Assembly
Nut- SlowSpeed
NeedleValve
Washer - Carb. SlowSpeed
Valve Nut
Screw- Manifold to Crankcase .
Gasket - Manifold to Leaf Plate
Gasket - Leaf Plate to
Crankcase
Nut- Leaf to Leaf Plate Screw .
Washer - Lock, Leaf to LeaJ
Plate Screw
Screw - Leaf Attaching
Stop- LeaI
Leaf .
Plate - Leaf .
Screw - Sllencer to Manifold
Screw - Silencer to Carburetor ,
PIug - Button, Air Silencer
Screw- Cover Plate to
Silencer Body
Plate - Air Silencer Cover . . .
Loading Tube andAir Silencer
Body Assembly.
Nut - Carburetor to Manifold .
Gasket - Carburetor to
ManiJold
Inta.keManifold andStudAssy.
. Stud- Carburetor to Manlfold
Carburetor Assembly Complete
. Nipple - GasLine
. Spring- Cam Follower
. Clip - Cam Follower
. Screw- Cam Follower
. Follower - Throttle Cam .
32
33
34
35
36
37
38
39
40
41
42
43
44
4.5
46
47
48
49
50
51
52
53
54
55
56
ca
58
59
60
61
62
63
64
65
203163
41-
110
203164
302430
30297?
21-163
302997
303448
43
-l 23
3001?9
303476
43-
123
?1-1589
302994
300096
3?5919
3?5918
301996
30344?
302984
303041
552606
303?60
303444
375921
?1-
1038
3029?8
303049
303048
302996
303?60
375922
3?6531
304326
Lever - Cam Follower
Pin - Cam Follower Link. . .
Link - Lever to Follower. .
Screw - Spring to Carburetor
Body .
Spring - ChokeContiol Rod
Cotter Pin - ChokeControl Rod
Rod - ChokeControl
Needle Valve - SlowSpeed . .
Packing - SlowSpeed
Valve
Nut - High SpeedNeedlpValve
Needle Valve - High Speed
Packing - High SpeedValve
Screw - Float Chamber to
Carburetor Body
Gasket - Float Chamber to
Carburetor Body.
Hlnge Pin - Float Arm .
Float and Float Arm Assembly
Float Valve andSeatAssembly
Washer - Float Valve Seat
Nozzle - High Speed
Gasket - Float Chamber to
Carburetor Body Boss
Screw- Float Chamber
Drain
Float Chamber
Screw - ChokeValve
ChokeValve
ChokeShaftand Lever Assy. .
Screw- Throtile andCam
Follower Lever
Lever - Cam {ollower to
Throttle Shaft
Cotter Pin - Throttle Shajt .
Washer - Throttle Shalt
Spring - Throttle Shaft .
Screw- Throttle Valve .
Throtile Shaft& Lever Assy
Carburetor Body - Plug and
Throttle Valve Assembly .
. Throttle Valve
l3

POWER
HEAD RepoirPorts
list
V
T1
t0
'-=-gl
gL\
$' %--
'/\
14
Y,A
t/
l,/
v
l3
,\
,p
-4d..
=-i-%4,
"w
.r' 'o=-(5
ef-rt
\ro
35\
h;
l(
40&
36
\
@
,{
m
37
40
t a,z
ttl'
ffit/
*44
€f "l
tt*^'rl
.,Dn-
'.=;* n
-.7':
i'c;
\:q/

Repoir
Portslist POWTRHTAD
Ref
No. Part
No. Descriptlon Ref
,
No. Part
No. Descrlptton
1
2
3
4
c
6,
7
8
I
10
11
LZ
13
13
t4
15
16
L7
18
19
20
2l
300646
132L23
43-1
56
303109
55261
1
13
2346
300154
300455
300454
25-74
303407
a03439
200322
376290
25-74
552624
552625
4L-223
303278
3032?7
302431
41-
1?8
Screw- Cyl. Cover to FueI Tank
Screw- Brg. Clampand
Exh. Cover.
Screw - Bearlng Clamp
Clamp - Bearlng
Lever - Armature Plate Control
Screw - Anchor and Exhaust
Cover to Cylinder
Washer - Anchor and Exhaust
Cover Screw
Anchor - Iglitlon LFads
Grommet - Ignition Leads
Screw - Exh. Cover to Cyltnder
Cover - Exhaust
Gasket - Exhaust Cover
Spark Plug (ChampionJOJ) . . .
SparkPlug (Auto-Lite A3X). . .
Screw - Cover to Cyllnder .
Cover - Cylinder
Gasket - Cylinder Cover
Screw - SupportPlate
Support- Armature Plate
Ring - Arm. Plate Retaining
Screw - Cylinder to
Crankcase, Upper
Screw- Cylinder to Crankcase,
Lower
22
23
24
25
26
27
28
29
30
31
32
33
34
35
36
3?
38
39
40
41
42
43
993003
51-4?
300402
303125
3034?3
552613
303423
19-191
203248
203235
5915?9
27-17
303649
1
20395
120110
303333
41-
333
376067
591542
4L-44
41-
17
5526
81
Waeher - Cyllnder to
Crankcase Screw
Screw - Cyllnder to Crankcase .
Pin - Taper, Cyllnder to
Crankcase
Screw- Fuel PumpOutlet Plug.
Clamp - Oil Return Hose . . . .
Hose - Otl Return
Nipple- Oil Hose
to Cyllnder, .
Screw- LeaJValve to Crankcase
Plate - LeaJValve
Valve - Leaf, CrankcaseDraln.
Cylinder & Crankcabe Assembly
. Serew - Cylinder to Crank-
'case, Center
Slinger - Oil . .
Key - Crankshaft
Ring - Lock, Piston Pin
Pin - Wrist
Ring- Piston
Piston & Dowel Pin Assembly .
Connecting
Rodand LockPlate
Assembly
. Screw - ConnectingRod
. Lockplate - ConnectingRod
Crankshaft
t5

\\/,
RepoirPortslist
ftIANITOI.D
&BRACKTI
w;iras
4
'\pffi6,-
I'i '{
n\,
'(F=;;
pil,r};
v(@
72
rot( \
\\6
@'" 80
'?,/o
l6

Ref.
No. Part
No. Description Ref.
No. Part
No. Description
*
*
1
2
3
4
5
o
7
8
9
10
11
t2
13
L4
15
16
t7
l8
19
20
2t
22
23
24
25
26
27
28
29
30
31
32
33
34
35
36
3?
38
39
40
4l
42
43
44
45
46
47
48
49
50
51
52
53
54
55
DO
302?10
3q1656
303282
552209
203260
133452
3030?8
303093
300346
303252
302?17
3021L2
3?6416
316042
303096
3030?9
71
-135
376415
303142
303107
303800
303140
5L-47
30346?
303589
303588
303587
303585
303586
303714
303?15
15
-268
304254
303??
5
303864
303191
303236
552497
552499
552498
59r4?9
591583
85
-64
303701
303?02
303397
303392
303394
303369
303461
303458
30346
5
303393
302677
3033?2
303362
Screw - SteeringHandleGrip
Spring - Grip to Friction Block
Block - Grip Friction.
Grip - Steering IIandIe
Plate - Throttle Control
Screw - Steering HandleIlalves
Screw - SteeringHandleHalves
Handle - Steering, Inner llalf.
Pin - Groove, Gear and Shaft
Assembly
Washer - Steering Handleto
Spring
Bushing - Steering Handle
Washer - Steering Handle
Throttle Control Gear and
Shaft
Assembly, Long
Handle - Steering, Outer HaIf
Cover - Steering Handle Gears
Washer - Steering Bracket to
Handle
Screw - Pinion
Gear andShaftAssembly, Short
Pinion - Throttle Control.
Washer - Pinion Gear
Gear - Throttle Control
Bushing- Throtile Control.
Screw - Exh. Tubeto Cylinder.
Gasket - Exh. Tube to Cylinder
Screw
- Exh.Tube
Cover,Upper
Screw
- Exh.
TubeCover,
Center
Screw
- Exh.Tube Cover,
Lower
Cover - Exhaust Tube
Gasket - Exhaust Tube Cover. .
Screw - Shift Lever Shaft
Assembly
Washer - Shift Lever to Shaft
Pin - Cotter,Shift
Rod
Lever - Shaftto Shift Rod
Washer - Shift Lever andShaft
Assembly,Inner.
Washer - Shift Lever andShaft.
"O" Ring - Shift Lever
Spring - Washer
Pin - Straight,ShiftHandle.
Washer - Shiit HandlePivot Pin
Spring - Shift Handle
ShiftHandle
andPin Assembly.
Shift Shaftand Arm Assembly
Nut - Shift Rod to Connector .
Washer - Lock, Shift Rod Nut
Connector
- ShiftRodto Lever.
Screw - Friction Band
Band- Friction
Screw- SpringRetainer
Retainer - UpperMount
Spring.
Spring- Lower Mount
Spring - UpperMount
Spring - ReverseLock Rod
to
Reverse
Rod
Screw.- Steering
Bracket to
Retainer,Upper
Screw- SteeringBracket to
Retainer, Lower.
Retainer - Steering
Bracket
Sleeve
- Friction Band.
57
58
59
6?
75
?6
60
61
62
63
64
65
66
68
69
70
7l
12
73
74
n4
tl
?8
79
80
81
82
83
84
85
92
93
94
95
96
86
8?
88
89
90
91
vt
98
99
100
101
304131
3033?
1
303359
303696
3033?0
30369?
303363
1326?9
551113
303464
303049
304130
304129
rt -L82
25-196
302051
303349
303396
2026t7
160084
301983
202021
3?6395
3?6082
375744
302420
41
-48
3?6081
303398
303500
3?6269
303353
303350
55056
5
303364
85
-64
303?06
303?05
303408
303368
303409
303348
7-26L
3?6459
3760?9
Bracket - Swi'.'el
Absorber - Shock,Lower
Swivel Bracket
Washer - Thrust, Steering
Bracket to Swivel Bracket
Pin - Swivel Bracket, to Upper
Liner
Liner - Upper
Spacer- Co-pilot Plate to Upper
Liner.
Plate - Co-pilot
Screw - Co-pilot Plate
Spring - Co-pilot Plate Screw
Spring - Reverse Lock Rodto
Swlvel Bracket
Pin - Cotter, ReverseLock
Shaft .
Rod - ReverseLock
Lever - ReverseLocking
Nut - Tilting BoIt
Washer - Tilting Bolt .
Spring - Tilting Bolt
Bolt - Tilting
Screw - SternBracket, Port to
Starboard
Shim - Stern Bracket to Swivel
Bracket
BaIl - SternBracket to Swivel
Bracket
Washer - Conical
Spring - Tilting Lever
Tilting Lever Assembly.
SternBracket Assembly,
Starboard
. ClampScrew,Plate and
RetainerAssembly
. Retainer - SwivelPlate.
. Plate - Clamp Screw Swivel
SternBracketAssy.,Port (AIso
Includes
Items 81,82and83) .
Screw - Steeriirg
Bracket to
Pilot Shaft
Shaft
- SteeringBracket Pilot
SteeringBracket and
Bushing
Assembly
Plate - SteeringBracket
Support - Drive Shaft Casingto
SteeringBracket
Pin - Cotter, ReverseLock Link
to Lever
Grommet - Reverse Lock Arm
to ReverseLock Link
Nut - Lock, Reverse Lock Pin
Coupling
Coupling
- ReverseLock Link
Link - ReverseLock, Lower .
Link - ReverseLock, Upper
Screw - Shoulder,
Reverse
LockArm
Arm - Reverse
Lock
Nut - Water Tube .
Gland
- WaterTube.
Water TubeAssembly.
Driveshaft Casing,Exhaust
Tubeand
Core.PIugAssembly
RepoirPortslist fiIANITO1D&BRACI(TT
5Dl3v Order 375689
Ref.No. l8
376691
Ref. No. i3
*Not": For Model 17

RepoirPorlslist
e_t
e%_-2
Q-1
@-;
42
\
BE-
W
im,)H
5
6
fl/^'
fi--"
j---.'
ffi-"
O-
@__48
GEAR
CASE
t\\
*t
_$;
---tl ffib-33
4/t
---=-e
N
F,'
35
34
(8-,.
l8
Table of contents
Other Eaton Outboard Motor manuals