Eaton TRIPP LITE BHDBT3-TR User manual

1
Introduction 2
Important Safety Instructions 3
Package Contents 4
Product Features 4
Product Overview 5
Pre-Installation Checklist 8
Mounting the Unit 9
Hardware Installation 10
Operation 13
Specications 14
Warranty 16
Owner's Manual
Español 17
Français 33
Deutsch 49
Italiano 65
Models:
BHDBT3-TR
BHDBT3-TRX2
HDBaseT 3.0 Transmitter/Receiver
HDMI 4K 60 Hz (4:4:4), RS-232 & IR Control
Purchased product
may differ from image.

2
Introduction
The BHDBT3-TR / BHDBT-TRX2 is a video transceiver that integrates the functions of a
transmitter and a receiver into one unit. This combination allows users to easily configure the
unit to be a transmitter or receiver depending on their AV solution, and to enjoy more flexible
deployment and effective use with video matrix switches, video splitters, etc.
Designed with HDBaseT 3.0 technology, the BHDBT3-TR / BHDBT-TRX2 not only extends True
4K uncompressed signals up to 328 ft. (100 m) over a single Cat6a cable (HDBaseT3-certified)
with zero latency, but also transmits IR, RS-232, Ethernet, independent audio, and USB signals
with the latest HDBaseT standards. For stable HDMI signal transmission, the BHDBT3-TR /
BHDBT-TRX2 ensures high-quality visuals and reliable extension by supporting HDCP 2.2, 3D,
Deep Color and HDR. In addition, the BHDBT3-TR / BHDBT-TRX2 is equipped with HDMI audio
embedded / de-embedded functions, enabling users to flexibly adapt suitable audio / video
combinations based on different environments. To ensure nonstop operations, the fanless fin
heat sink design prevents overheating and thus elevates its reliability.
The BHDBT3-TR / BHDBT-TRX2 increases the potential of AV applications while also
streamlining complex installations. This makes the BHDBT3-TR / BHDBT-TRX2 an ideal solution
for conference halls, auditoriums, lecture halls, museums, exhibition rooms, and anywhere
else that requires high-quality transmission and an easy-to-use application.

3
Important Safety Instructions
• This product is for indoor use only.
• Read all of these instructions. Save them for future reference.
• Follow all warnings and instructions marked on the device.
• Do not place the device on any unstable surface (cart, stand, table, etc.). If the device falls,
serious damage will result.
• Do not use the device near water.
• Do not place the device near, or over, radiators or heat registers.
• The device cabinet is provided with slots and openings to allow for adequate ventilation. To
ensure reliable operation, and to protect against overheating, these openings must never
be blocked or covered.
• The device should never be placed on a soft surface (bed, sofa, rug, etc.), as this will block its
ventilation openings. Likewise, the device should not be placed in a built-in enclosure unless
adequate ventilation has been provided.
• Never spill liquid of any kind on the device.
• Unplug the device from the wall outlet before cleaning. Do not use liquid or aerosol
cleaners. Use a damp cloth for cleaning.
• The device should be operated from the type of power source indicated on the marking
label. If you are not sure of the type of power available, consult your dealer or local power
company.
• To prevent damage to your installation, it is important that all devices are properly
grounded.
• Do not allow anything to rest on the power cord or cables. Route the power cord and cables
so that they cannot be stepped on or tripped over.
• Position system cables and power cables carefully; make sure nothing rests on any cables.
• Never push objects of any kind into or through cabinet slots. They may touch dangerous
voltage points or cause parts to short out, resulting in a risk of fire or electrical shock.
• Do not attempt to service the device yourself. Refer all servicing to qualified service
personnel.
• If the following conditions occur, unplug the device from the wall outlet and bring it to
qualified service personnel for repair.
o The power cord or plug has become damaged or frayed.
o Liquid has been spilled into the device.
o The device has been exposed to rain or water.
o The device has been dropped, or the cabinet has been damaged.
o The device exhibits a distinct change in performance, indicating a need for service.
o The device does not operate normally when the operating instructions are followed.
• Only adjust those controls that are covered in the operating instructions. Improper
adjustment of other controls may result in damage that will require extensive work by a
qualified technician to repair.

4
Package Contents
Product Features
• BHDBT3-TR or BHDBT3-TRX2 HDBaseT 3.0 Transceiver
• RS-232 terminal block
• Wall-mount bracket (2 pcs.)
• Foot pad set (4 pcs.)
• USB-B to USB-A cable
• Power adapter
• C13 to NEMA 5-15P power cord
• C13 to BS1363 power cord
• C13 to Schuko power cord
• IR emitter
• IR receiver
• Owner’s Manual and Quick Start Guide
• Extends uncompressed True 4K HDMI signals up to 100 m over a single Cat6a cable
(HDBaseT3-certified Cat6a cable) with zero latency.
• Flexible for deployment — can be configured as a transmitter or receiver, depending on the
AV solution.
• Compliant with HDBaseT 3.0 standards — transmits high-quality video, full-range IR,
bi-directional RS-232, Gigabit Ethernet, independent stereo audio and USB 2.0 signals
channel bypass.
• HDMI (3D, Deep Color, 4K/60Hz); HDCP 2.2 compliant.
• Superior video quality — up to 4096 x 2160 @ 60 Hz (4:4:4); HDR supported.
• Supports HDMI audio embedding / de-embedding functions.
• Supports HDMI local output.
• Compliant with the USB 2.0 standard for a wide range of USB peripherals.
• LED indication of HDBaseT and HDMI signal status for easier recognition.
• Fanless fin heatsink enclosure elevates durability and reliability by preventing overheating,
fan malfunctions and excessive noise.
• Supports refresh rates up to 240 Hz for the connected display.
• Firmware upgradable.
• Built-in 8KV / 15KV ESD protection.
• Plug-and-play.
• Rack-mountable.

5
Product Overview
Front View
1HDBaseT long
reach mode switch
(reserved)
Sets to enable the long reach mode. This switch is currently
reserved for future expansion.
2HDMI audio switch Sets to enable the embed and de-embed functions. See Tx and
Rx Switch.
3RS-232 port Connects to an RS-232 serial controller, such as a PC or a
control system.
4HDBaseT port
Connects to an HDBaseT3-certied Cat6a cable with zero
latency to transmit HDMI and control signals to the connected
receiver if the unit is set to a transmitter.
5Cable lock screw Universal HDMI cable lock that provides the easiest way to
secure an HDMI cable to most HDMI devices.
6Audio-in Connects to an audio source device, such as a PC.
7USB-B port Connects to source device, such as a PC.
8Firmware upgrade
switch (reserved)
This switch is reserved for Technical Support. To perform a
rmware upgrade, rst contact your dealer.
9Tx / Rx switch Sets to dene the unit as a transmitter or a receiver.
JHDMI-in Connects to an HDMI video source device using an HDMI cable.
1
1
8
8
9
9
J
J
2
2
3
3
4
4
5
5
6
6
7
7

6
Product Overview
Rear View
1USB-A port Connects to a peripheral device, such as a keyboard or mouse.
2Cable lock screw Universal HDMI cable lock that provides the easiest way to
secure an HDMI cable to most HDMI devices.
3Audio out Connects to an audio output device, such as a set of speakers.
4Ethernet port Connects to a network switch to provide Internet access for the
connected source device using an RJ-45 cable.
5IR port Connects to an IR emitter or IR receiver for remotely control
using an IR remote control.
6Power jack Connects to a power adapter for power supply.
7HDMI-out Connects to an HDMI display device using an HDMI cable.
Top View
1Grounding
terminal Grounds the unit to a suitable grounded object.
Transmitter LEDs
2Power
Yellow Green: The unit is receiving power.
O: The unit is powered o.
3Link
Solid Orange: The transmission between the transmitter and receiver is
stable.
Blinks Orange: The transmission between the transmitter and receiver is
unstable.
O: There is no transmission between the transmitter and receiver.
4HDMI-in
Solid Orange: The video display is normal with the HDCP key.
Blinks Orange: The video display is normal without the HDCP key.
O: There is no video signal.
1
1
2
2
3
3
4
4
5
5
6
6
7
7

7
Product Overview
Receiver LEDs
5HDMI-out
Solid Orange: The video display is normal with the HDCP key.
Blinks Orange: The video display is normal without the HDCP key.
O: There is no video signal.
6Link
Solid Orange: The transmission between the transmitter and receiver is
stable.
Blinks Orange: The transmission between the transmitter and receiver is
unstable.
O: There is no transmission between the transmitter and receiver.
7Power Solid Green: The unit is receiving power.
O: The unit is powered o.
1
1
2
2
3
3
4
4
5
5
6
6
7
7

8
Pre-Installation Checklist
Display
• Up to two HDMI displays capable of the highest required resolution.
Source Device
• A source device with an HDMI port.
Cables
• 2 HDMI cables
• To connect the transmitter and receiver units, using HDBaseT3-certified Cat6a cable is
recommended to ensure video quality.
• For better video quality, using HDBaseT3-certified Cat6a cable with zero latency is highly
recommended.
Considerations
• The maximum transmission distance varies at different parts of the transmission:
Connection Interface Resolution Distance
Computer to Transmitter HDMI True 4K 16 ft. (5 m)
Transmitter to a Receiver
(R) or a compatible Eaton
Tripp Lite series HDBaseT
Receiver
HDBaseT3-certied Cat6a
cable with zero latency
True 4K 328 ft. (100 m)
Receiver to a Display HDMI True 4K 16 ft. (5 m)

9
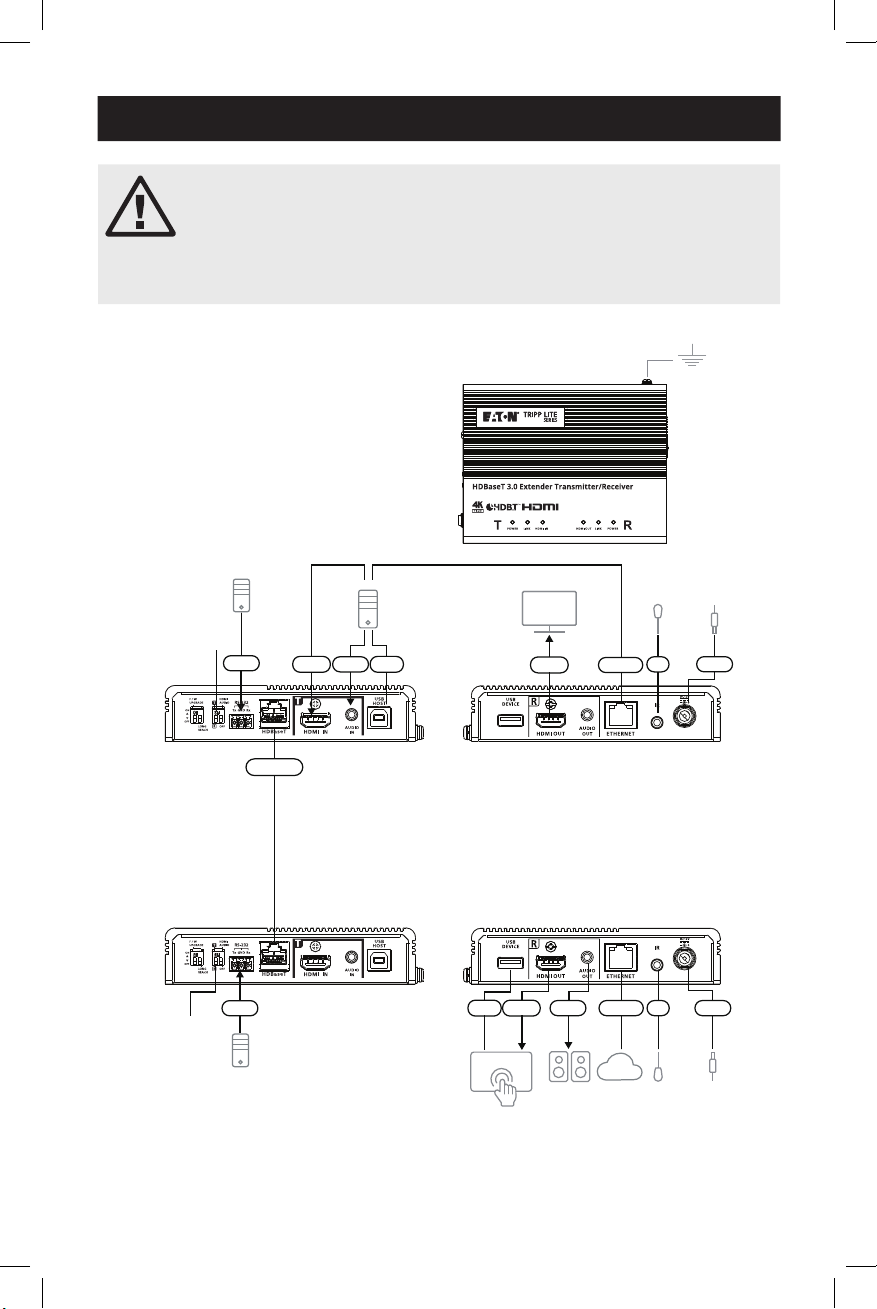
Mounting the Unit
Wall Mounting
Using the built-in mounting brackets, secure or hang the unit to the wall.
Please review the Important Safety Instructions section before
proceeding with mounting and installation.
Do not power on the unit until all the necessary hardware is connected.
10
Hardware Installation
The BHDBT3-TRX2 is a kit version of the BDHBT3-TR model. The two units
are otherwise identical. Each transceiver has the ability to transmit or
receive an HDBaseT audio/video signal.
The units can easily change from a transmitter to a receiver (or vice
versa) by switching the HDMI input to output on the source end, and
output to input on the display end.
Note: The installation shown here is based on
two units.
Transmitter
Receiver
Front
View
Speakers
VK Control System
Monitor
PC
IR Emitter /
Receiver
IR Emitter /
Receiver
Power
Adapter
Power
Adapter
Network
RS-232
RS-232
HDMI
HDBaseT
HDMI
HDMI Power
Power
Ethernet
Ethernet
Audio
Audio
USB
USB
IR
IR
Front
View
Rear
View
Rear
View
1
1
2
2
2
2
7
7
M
M
M
M
3
3
4
4
5
5
6
6
N
N
N
N
J
J
J
J
L
L
8
8
K
K
9
9
9
9

11
Hardware Installation
1Ground the unit by connecting one end of a grounding wire to the grounding terminal and
the other end to a suitable grounded object.
Note: Do not skip this step. Proper grounding helps to prevent damage to the unit from power surges or
static electricity.
2Important: Before connecting the unit, set the Tx / Rx switch to define the unit. The unit
will be a transmitter if the Tx / Rx switch is set to Tx, or will be a receiver if the Tx / Rx
switch is set to Rx.
3Connect an HDMI-enabled PC to the transmitter using an HDMI cable. You can connect
other HDMI-enabled source devices here (e.g., Blu-ray player).
4(Optional) Connect an audio source device to the transmitter. To embed this audio input
to the HDMI output, set the HDMI audio switch (on Tx) to ON.
5Connect the USB Type-B port of the transmitter to a USB host (e.g., PC).
6Connect an HDMI-enabled display device to the transmitter using an HDMI cable.
7Connect the HDBaseT ports of the transmitter and receiver with a HDBaseT3-certified
Cat6a cable (or above).
8(Optional) Connect your speakers or audio amplifier to the receiver. To de-embed this
HDMI audio from the HDMI output, set the HDMI audio switch (on Rx) to ON.
9(Optional) To remotely control a device connected to the receiver (e.g., TV), connect the IR
emitter to the IR port of the receiver, and the IR receiver to the IR port of the transmitter.
Note: The unit supports bi-directional IR transmission.
J(Optional) To provide network connectivity for your PC, connect the receiver to a network
switch, then connect the Ethernet port of the transmitter to your PC.
Note: The unit supports bi-directional bypass transmission.
K(Optional) Connect the USB-A port to a USB-enabled touchscreen.
LConnect an HDMI-enabled touchscreen to the receiver using an HDMI cable.
M(Optional) To remotely control a PC through serial controller, connect the RS-232 port of
the transmitter to a serial controller, then connect the RS-232 port of the receiver to a PC.
Note: The unit supports bi-directional bypass transmission.
NConnect the power cord and the power adapter, then plug the power adapter cables into
the power jack on the units.
OPower on all connected devices.
12
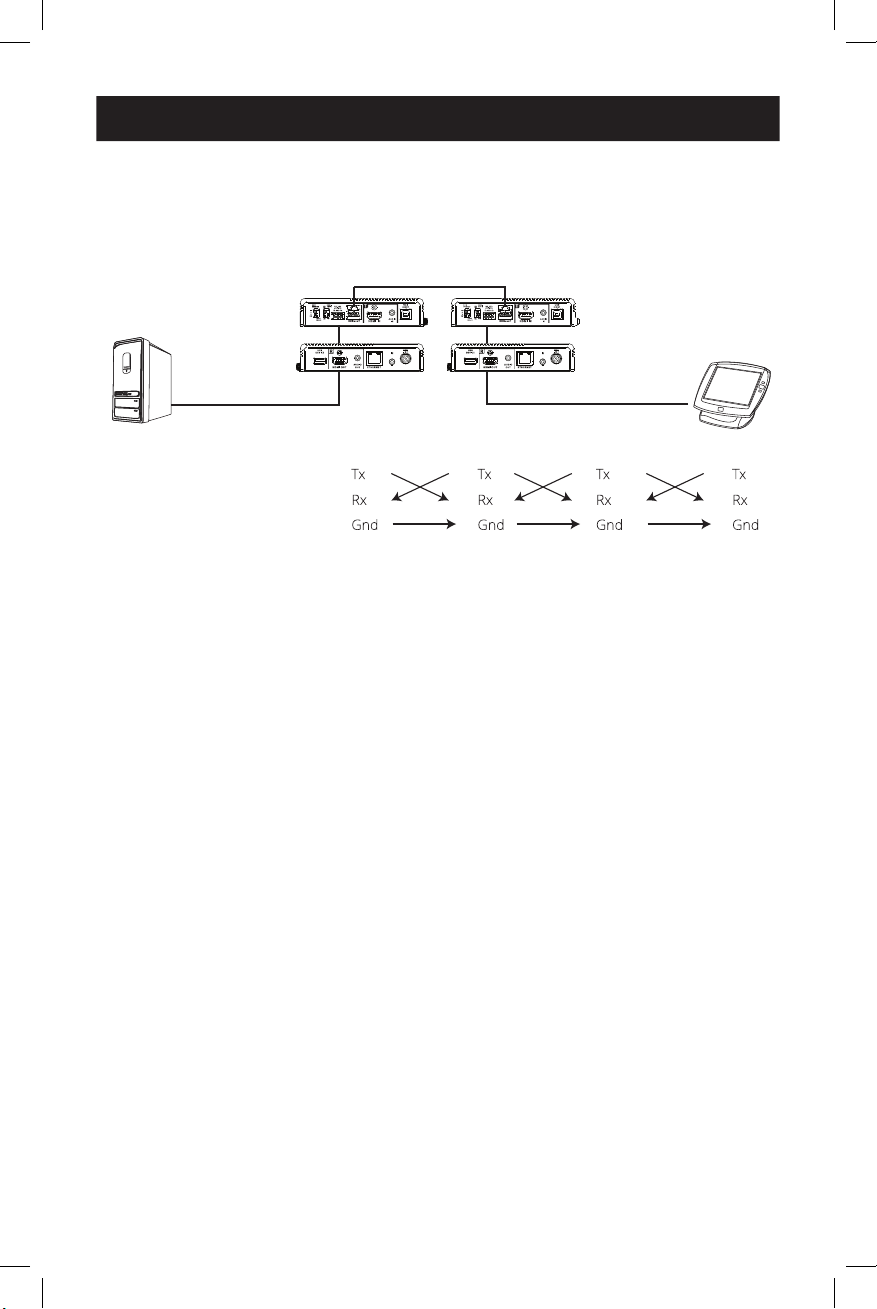
Hardware Installation
RS-232 Channel Transmission
You can connect an RS-232 serial device to the RS-232 port on the units for RS-232 bypass
channel, such as a touchscreen or a barcode scanner. The RS-232 signal transmission flow can
be illustrated as follows:
Receiver Transmitter
Cat5e/6/6a/7 Cable
PIN
CONFIGURATION
(Captive screw
connectors)
The general concept here is that an RS-232 signal can be transmitted (Tx) to the receiving (Rx)
end of a unit. The received signal can then be transmitted (Tx) to the receiving (Rx) end of
another unit. The RS-232 signals can be transmitted back the other way.
13
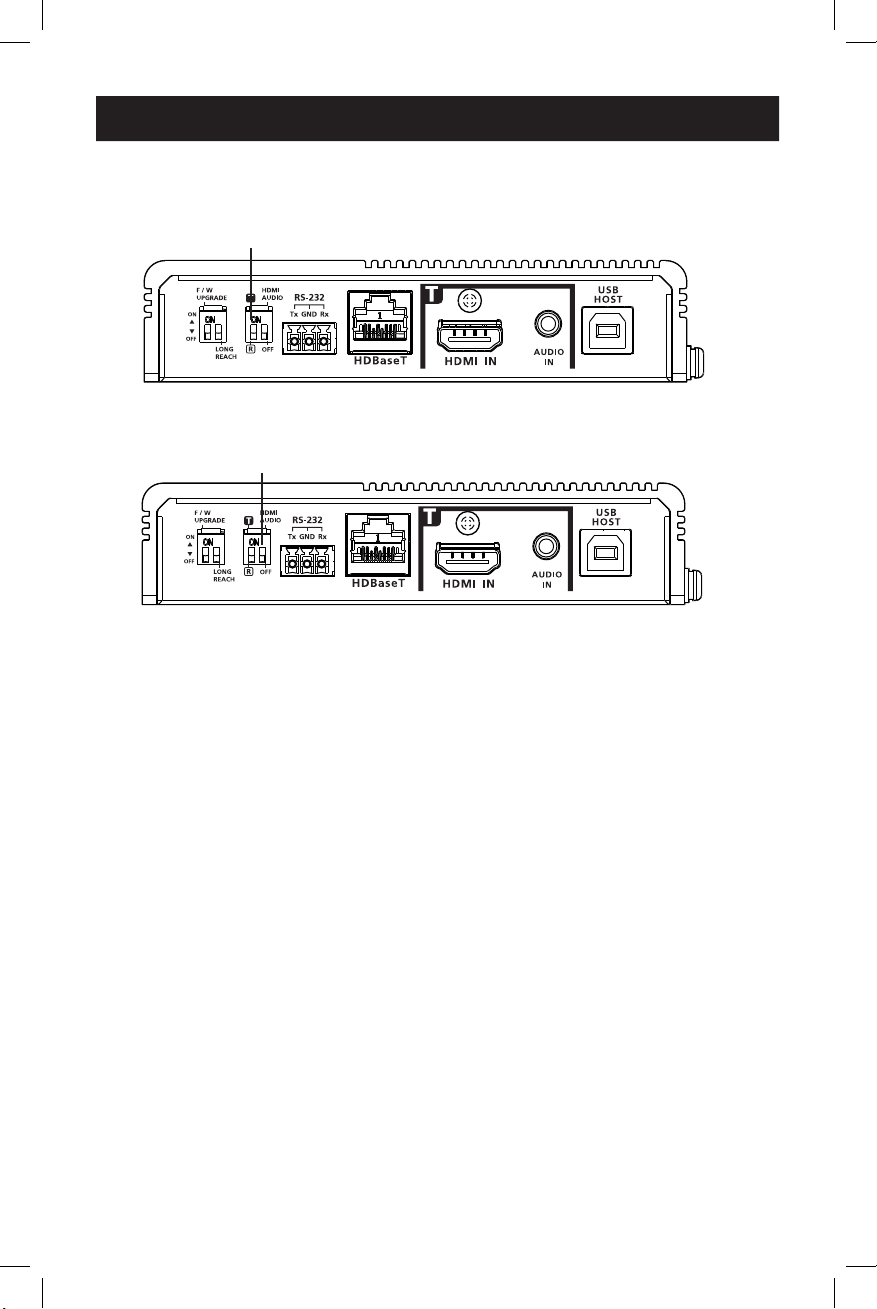
Operation
Tx and Rx Switch
Use the Tx / Rx switch to set the unit as a transmitter or receiver, as needed.
HDMI Audio Switch
Audio Embedding
1. Set the HDMI audio switch on the transmitter to On.
2. Set the HDMI audio switch on the receiver to Off.
Audio De-embedding
1. Set the HDMI audio switch on the transmitter to Off.
2. Set the HDMI audio switch on the receiver to On.
Bypassing Audio Signals
1. Set the HDMI audio switch on the transmitter to Off.
2. Set the HDMI audio switch on the receiver to Off.
Note: By default, the HDMI audio switch on the unit is set to Off.
Tx / Rx Switch
HDMI Audio Switch
14
Specifications
Video Input
Interfaces 1 x HDMI Type-A Female (Black)
Impedance 100 Ώ
Max. Distance 16 ft. (5 m)
Video Output
Interfaces 1 x HDMI Type-A Female (Black)
Impedance 100 Ώ
Max. Distance 16 ft. (5 m)
Video
Max. Data Rate 18 Gbps (6 Gbps per Lane)
Max. Pixel Clock 600 MHz
Compliance HDMI (3D, Deep Color, 4K / 60Hz); 4K HDR HDCP
2.3 Compatible
Consumer Electronics Control (CEC)
Note: The CEC signals are only bypassed from the transmit-
ter unit to the receiver unit and do not support local output.
Max. Resolutions 4096 x 2160 @ 60 Hz (4:4:4)
3840 x 2160 @ 60 Hz (4:4:4)
Max. Resolutions / Distances Up to 4K x 2K @ 60 Hz (4:4:4) @ 328 ft. (100 m)
with HDBaseT3-certied Cat6a cable
Audio
Input 1 x HDMI Type-A Female (Black)
1 x 3.5 mm Mini Stereo Female (Green)
Output 1 x HDMI Type-A Female (Black)
1 x 3.5 mm Mini Stereo Female (Green)
Connectors
Unit to Unit 1 x RJ-45 Female
Power 1 x DC Jack with locking (Black)
Control
RS-232 Channel Connector: 1 x Terminal Block, 3 Pole
Baud Rate: 19200
Data Bits: 8
Stop Bits: 1
No parity and ow control
IR Channel 1 x Mini Stereo Jack Female (Black, Bi-directional)
30K ~ 56 KHz full-range transmission
Ethernet Channel 1 x GbE RJ-45 Female
USB Channel 1 x USB 2.0 Type-B Female (White, Host)
1 x USB 2.0 Type-A Female (White, Device)
Transmission data bandwidth: Up to 3000Mbps
Power Consumption DC12V: 6.45W: 40 BTU

15
Specifications
Switches
Selection 1 x Slide Switch – Tx (Transmitter) / Rx (Receiver)
Mode Selection 1 x Slide Switch – HDMI Audio Embedding or
De-embedding ON/OFF selection
Firmware Upgrade 1 x Slide Switch - ON/OFF
Long Reach Mode 1 x Slide Switch - ON/OFF (Reserved)
LEDs
Power 1 x Tx (Yellow Green, Transmitter)
1 x Rx (Yellow Green, Receiver)
Note: The Tx or Rx LED lights to indicate which role the unit
is set to.
Link 1 x Tx (Orange, Transmitter)
1 x Rx (Orange, Receiver
Video Output 1 x Rx HDMI Out (Orange, Receiver)
Video Input 1 x Tx HDMI In (Orange, Transmitter)
Environmental
Operating Temperature 32 to 104°F (0 to 40°C)
Storage Temperature -4 to 140°F (-20 to 60°C)
Humidity 0 x 80% RH, Non-Condensing
Physical
Housing Metal
Weight 1.41 lb. (0.64 kg)
Dimensions [L x W x H]
Without Bracket
With Bracket
6.54 x 5.27 x 1.13 in. (166 x 134 x 29 mm)
6.75 x 5.94 x 1.18 in. (172 x 151 x 30 mm)
Input Resolutions 6460 x 480 @ 60/67/72/75 Hz
720 x 400 @ 70 Hz
800 x 600 @ 56/60/72/75 Hz
1024 x 768 @ 60/70/75 Hz
1280 x 800 @ 60 Hz
1280 x 1024 @ 60/75 Hz
1400 x 1050 @ 60 Hz
1400 x 900 @ 60 Hz
1600 x 1200 @ 60 Hz
1680 x 1050 @ 60 Hz
1920 x 1080/1200 @ 60 Hz
1920 x 1200 @ 60 Hz (Reduced Blanking)
1080p 60 Hz
480p 60 Hz (4:3)/(16:9)
720p 60 Hz
1080i 60 Hz
640 x 480 60 Hz (4:3)
576p 50 Hz (4:3)/(16:9)
720p 50 Hz
1080i/1080p 50 Hz
1080p 24/25/30 Hz
3840 x 2160p 24/25/30/50/60 Hz
4096 x 2160p 24/25/30/50/60 Hz
3840 x 2160p 50/60 Hz 4:2:0
4096 x 2160p 50/60 Hz 4:2:0
7680 x 4320 30 Hz 4:2:0

16
Warranty
Eaton
1000 Eaton Boulevard
Cleveland, OH 44122
United States
Eaton.com
© 2023 Eaton
All Rights Reserved
Publication No. 23-05-320 / 93-47D3_RevA
August 2023
Eaton is a registered trademark.
All trademarks are property
of their respective owners.
1-Year Limited Warranty
We warrant our products to be free from defects in materials and workmanship for a period of one (1) year
from the date of initial purchase. Our obligation under this warranty is limited to repairing or replacing (at its
sole option) any such defective products. Visit Tripplite.Eaton.com/support/product-returns before sending
any equipment back for repair. This warranty does not apply to equipment which has been damaged by
accident, negligence or misapplication or has been altered or modied in any way.
EXCEPT AS PROVIDED HEREIN, WE MAKE NO WARRANTIES, EXPRESS OR IMPLIED, INCLUDING WARRANTIES
OF MERCHANTABILITY AND FITNESS FOR A PARTICULAR PURPOSE. Some states do not permit limitation or
exclusion of implied warranties; therefore, the aforesaid limitation(s) or exclusion(s) may not apply to the
purchaser.
FCC Notice, Class A
This device complies with part 15 of the FCC Rules. Operation is subject to the following two conditions: (1)
This device may not cause harmful interference, and (2) this device must accept any interference received,
including interference that may cause undesired operation.
Note: This equipment has been tested and found to comply with the limits for a Class A digital device,
pursuant to part 15 of the FCC Rules. These limits are designed to provide reasonable protection against
harmful interference when the equipment is operated in a commercial environment. This equipment
generates, uses, and can radiate radio frequency energy and, if not installed and used in accordance with the
instruction manual, may cause harmful interference to radio communications. Operation of this equipment
in a residential area is likely to cause harmful interference in which case the user will be required to correct
the interference at his own expense. The user must use shielded cables and connectors with this equipment.
Any changes or modications to this equipment not expressly approved by Eaton could void the user's
authority to operate this equipment.
WEEE Compliance Information for Customers and Recyclers (European Union)
Under the Waste Electrical and Electronic Equipment (WEEE) Directive and implementing regulations,
when customers buy new electrical and electronic equipment from Eaton they are entitled to:
• Send old equipment for recycling on a one-for-one, like-for-like basis (this varies depending on the
country)
• Send the new equipment back for recycling when this ultimately becomes waste
Eaton has a policy of continuous improvement. Specications are subject to change without notice. Photos
and illustrations may dier slightly from actual products.

17
Introducción 18
Instrucciones de Seguridad Importantes 19
Contenido del Empaque 20
Características del Producto 20
Descripción General del Producto 21
Lista de Comprobación Previa a la Instalación 24
Instalación de la Unidad 25
Instalación del Hardware 26
Operación 29
Especicaciones 30
Garantía 32
Manual del Propietario
English 1
Françaís 33
Deutsch 49
Italiano 65
Modelos:
BHDBT3-TR
BHDBT3-TRX2
Transmisor Receptor HDBaseT 3.0
HDMI 4K @ 60Hz (4:4:4), RS-232 y Control
Remoto IR
El producto comprado
puede ser diferente al de la imagen.

18
Introducción
El BHDBT3-TR / BHDBT-TRX2 es un transceptor de vídeo que integra las funciones de un
transmisor y un receptor en una sola unidad. Esta combinación permite a los usuarios
configurar fácilmente la unidad para que sea un transmisor o un receptor en función de su
solución de audio y video, y disfrutar de un despliegue más flexible y un uso más eficaz con
switches de matriz de vídeo, divisores de vídeo, etc.
Diseñado con tecnología HDBaseT 3.0, el BHDBT3-TR y el BHDBT-TRX2 no sólo extienden las
señales True 4K sin comprimir hasta 100 m [328 pies] sobre un único cable Cat6a (certificado
HDBaseT3) con cero latencia, sino que también transmite señales IR, RS-232, Ethernet, audio
independiente y USB con los últimos estándares HDBaseT. Para una transmisión estable de
señal HDMI, el BHDBT3-TR/BHDBT-TRX2 garantiza imágenes de alta calidad y una extensión
fiable al admitir HDCP 2.2, 3D, Color Verdadero y HDR. Además, el BHDBT3-TR y el BHDBT-
TRX2 están equipados con funciones de audio HDMI incrustadas y desincrustadas, lo que
permite a los usuarios adaptar de forma flexible las combinaciones de audio y vídeo
adecuadas en función de los diferentes entornos. Para garantizar un funcionamiento
ininterrumpido, el diseño del disipador térmico de aletas sin ventilador evita el
sobrecalentamiento y eleva así su confiabilidad.
El BHDBT3-TR y el BHDBT-TRX2 aumentan el potencial de las aplicaciones de audio y video al
mismo tiempo que agilizan las instalaciones complejas. Esto convierte al BHDBT3-TR/BHDBT-
TRX2 en una solución ideal para salas de conferencias, auditorios, salones de clase, museos,
sala s de exposiciones y cualquier otro lugar que requiera una transmisión de alta calidad y
una aplicación fácil de usar.

19
Instrucciones de Seguridad Importantes
• Este producto es únicamente para uso en interiores.
• Lea todas estas instrucciones. Guárdelas para referencia futura.
• Siga todas las advertencias e instrucciones indicadas en el dispositivo.
• No coloque el dispositivo sobre superficies inestables (carro, soporte, mesa, etc.). Si se cae
el dispositivo, resultarán daños severos.
• No utilice el dispositivo cerca del agua.
• No coloque el equipo cerca o sobre radiadores o rejillas de calefacción.
• El gabinete del dispositivo está provisto de ranuras y aberturas para permitir una ventilación
adecuada. Para garantizar un funcionamiento confiable y para proteger contra el
sobrecalentamiento, estas aberturas nunca deben ser bloqueadas o cubiertas.
• El dispositivo nunca debe colocarse sobre una superficie blanda (cama, sofá, alfombra, etc.),
ya que esto bloqueará sus aberturas de ventilación. Del mismo modo, el dispositivo no
debe colocarse en un recinto incorporado a menos que se le haya proporcionado una
ventilación adecuada.
• Nunca derrame líquido de ninguna clase en el dispositivo.
• Desenchufe el dispositivo del tomacorrientes en la pared antes de limpiarlo. No use
limpiadores líquidos o en aerosol. Utilice un paño húmedo para limpiarlo.
• El dispositivo debe funcionar con el tipo de fuente de energía indicada en la etiqueta de
marcado. Si no está seguro del tipo de energía disponible, consulte a su distribuidor o a la
compañía eléctrica local.
• Para evitar daños en su instalación, es importante que todos los dispositivos estén
correctamente conectado a tierra.
• No permita que algún objeto descanse sobre el cable de alimentación o el cableado.
Conduzca el cable de alimentación y el cableado de modo que no se puedan pisar o
tropezar con ellos.
• Coloque los cables del sistema y los cables de alimentación con cuidado; asegúrese de que
no haya nada sobre ningún cable.
• Nunca introduzca ningún tipo de objeto por las ranuras del gabinete. Podrían tocar puntos
con voltajes peligrosos o provocar un cortocircuito entre las partes, con el consiguiente
riesgo de incendio o descarga eléctrica.
• No intente reparar el dispositivo usted mismo. Solicite todo servicio al personal de servicio
calificado.
• Si se dan las siguientes condiciones, desenchufe el dispositivo del tomacorriente en la
pared y llévelo a un servicio técnico cualificado para su reparación.
o El cable de alimentación o clavija se ha dañado o deshilachado.
o Se ha derramado líquido en el dispositivo.
o El dispositivo ha estado expuesto a la lluvia o al agua.
o El dispositivo se ha caído o el gabinete se ha dañado.
o El dispositivo muestra un cambio evidente en el rendimiento, lo que indica la necesidad
de servicio.
o El dispositivo no funciona normalmente cuando se siguen las instrucciones de
funcionamiento.
• Ajuste sólo los controles que figuran en el manual de instrucciones. Un ajuste incorrecto de
otros controles puede provocar daños que requerirán un trabajo extenso por un técnico
calificado para repararlos.

20
Contenido del Empaque
Características del Producto
• Transceptor HDBaseT 3.0 BHDBT3-TR o BHDBT3-TRX2
• Bloque de Terminales RS-232
• Soporte de pared (2 piezas)
• Juego de almohadillas para las patas (4 piezas)
• Cable USB-B a USB-A
• Adaptador de corriente
• Cable de alimentación C13 a NEMA 5-15P
• Cable de alimentación C13 a BS1363
• Cable de alimentación C13 a Schuko
• Transmisor IR
• Receptor IR
• Manual del Propietario y Guía de Inicio Rápido
• Extiende señales HDMI True 4K sin comprimir hasta 100 m a través de un único cable Cat6a
(cable Cat6a con certificación HDBaseT3) con cero latencia.
• Flexible para el despliegue — puede configurarse como transmisor o receptor, en función
de la solución de audio y video.
• Cumple con los estándares HDBaseT 3.0 — transmite vídeo de alta calidad, IR de rango
completo, RS-232 bidireccional, Gigabit Ethernet, audio estéreo independiente y derivación
de canal de señales USB 2.0.]
• HDMI (3D, Color Verdadero, 4K @ 60Hz); compatible con HDCP 2.2.
• Calidad de vídeo superior: hasta 4096 x 2160 @ 60 Hz (4:4:4); soporta HDR.
• Soporta funciones de incrustación y desincrustación de audio HDMI.
• Soporta salida local HDMI.
• Cumple con el estándar USB 2.0 para una amplia gama de periféricos USB.
• Indicación LED del estado de la señal HDBaseT y HDMI para facilitar su reconocimiento.
• El disipador térmico de aletas sin ventiladores aumenta la durabilidad y confiabilidad al
evitar el sobrecalentamiento, el mal funcionamiento del ventilador y el ruido excesivo.
• Soporta frecuencias de actualización de hasta 240 Hz para la pantalla conectada.
• Firmware actualizable.
• Protección ESD 8KV y 15KV incorporada.
• Conectar y Usar.
• Instalación en rack.
This manual suits for next models
1
Table of contents
Languages:
Other Eaton Transmitter manuals


Popular Transmitter manuals by other brands

Berker
Berker KNX-RF operating instructions

EUTECH INSTRUMENTS
EUTECH INSTRUMENTS ALPHA PH 800 PHORP CONTROLLERTRANSMITTER operating instructions

Blackrock Microsystems
Blackrock Microsystems CerePlex Exilis Instructions for use

BWI Eagle
BWI Eagle AIR-EAGLE FM2 43-1150-120VAC Product information bulletin

Marksman
Marksman M11RF-LCD user manual

Williams Sound
Williams Sound WIR TX90 specification


