Echo KICK GUARD X7503202102 Quick start guide

ReadRulesforSafeOperation
andInstallationCarefully
PreventsRotationalChain Saw KickbackswhenProperlyInstalled.
INSTALLATION AND USE
KICK
GUARD
WARNING
X7503202102 89857015133
10/03

2
WARNING
Always wear hand protection when handling saw chain. Never install or adjust guide bar, chain
or kick guard while chain saw is running. Serious injury can result.
WARNING
Follow Kick Guard Technical Data Reference for correct kick guard and guide bar combination.
An incorrect combination can cause bar and chain damage and may result in serious personal
injury.
Introduction/Safety
IMPORTANT: Thisisasupplementtothe Instruction Manual. Foradditional operating information, readyour Chain
SawInstruction Manual.
This safety alert symbol identifies important safety messages in this Instruction Manual Supplement and
on your chain saw. When you see this symbol, be alert to the possibility of personal injury and carefully
read the message that follows.
THE KICK GUARD KICKBACK PREVENTION DEVICE ON
YOUR SAW DOES THESE THINGS FOR YOU.
PREVENTSROTATIONAL KICKBACKWHENPROPERLY INSTALLED. The KickGuardcoversthe
nosearea of the barand chain where the kickback reaction is generated. Eliminatingchain contact in
thisareapreventsrotationalkickback.
LETSYOU USETHESAWIN TIGHTSITUATIONS
WHEREYOUCAN NOTAVOIDOBSTRUCTIONSWITH
ABARE-NOSED BAR. Canprevent accidental scarringof
shadetrees when pruning branches closeto trunk.
HELPSTOPREVENTACCIDENTAL DULLINGOF
CHAIN BY KEEPING NOSE CLEAR OF ABRASIVE
OBSTRUCTIONS.
HELPSYOUAVOIDACCIDENTALCONTACT OFCHAIN
(ATBARNOSE) WITHTHE GROUND,OR
OBSTRUCTIONSSUCHAS OTHERTREES,STONES
OR MASONRY WALLS. The Kick Guard can be used as
a bumper plate against the obstructions during cutting.
SPEEDSUPBRUSH CUTTINGANDCLEARING OUT
OPERATIONS.Operation in a semi-scything action is
limitedonly to maintenance ofcontrol-lability over push
andpull reaction forces.
Contents Page
Introduction/Safety ......................................................................................................................................................... 2
InstallingKick Guard ...................................................................................................................................................... 3
OperatingSawWith Kick Guard Installed....................................................................................................................... 4
OperatingSaw Without Kick Guard................................................................................................................................ 6
Technical Data ............................................................................................................................................................... 7
CopyRight© 2003 By Echo, Incorporated
All Rights Reserved.

3
Installing Kick Guard
1. Install bolt (A) in rear hole (B) of Kick Guard and
through front hole (C) in guide bar.
2. IMPORTANT:Dimple in Kick Guard (D) must
engage recess in guide bar (E).
3. Tighten nut (F) and bolt (A) until snug. Make
certain Kick Guard is flush against guide bar.
4. Tighten nut (F) 1/8 additional turn.
5. Check to make certain Kick Guard is tight on
guidebar.
1. Install bolt (A) in front hole (B) of Kick Guard
and through front hole (C) in guide bar.
2. IMPORTANT: Dimple in Kick Guard (D) must
engage recess in guide bar (E).
3. Tighten nut (F) and bolt (A) until snug. Make
certain Kick Guard is flush against guide bar.
4. Tighten nut (F) 1/8 additional turn.
5. Check to make certain Kick Guard is tight on
guide bar.
SYMMETRICAL
ToolsNeeded: Two(2) 11mm(7/16in.)Wrenches
For saws with Kick Guard P/N 28949 and
symmetrical or asymmetrical low-kick type
guide bars.
SYMMETRICAL
For saws with Kick Guard P/N 28932 and
symmetrical low-kick type guide bars.
ASYMMETRICAL

4
Operating Saw With Kick Guard Installed
CAUTION: TheKick Guard protects against
kickback but is not a general
insurance against “accidents” with
a chain saw. Therefore, wear
proper attire and protective
articles. Practice correct
positioning of the saw, correct
posture and stance, and use the
proper grip on the saw handles at
all times. These things are covered
in your Instruction Manual.
1. Because the Kick Guard is wider than the saw chain
and cannot go into or be pulled through a cut, it will
obstruct cutting unless it clears the wood completely.
Figure2 illustrates the maximum diameterof wood
which can be cut when the Kick Guard is on the saw.
Always check that there is enough clearance. If in
doubtthat there is enough clearanceremove the Kick
Guardbefore making thecut.
DANGER: Refer to Operating the Saw
Without Kick Guard installed on
page 6 and your Instruction
Manual BEFORE removing Kick
Guard.
2. There are situations where you may not wish to use
the Kick Guard. These include any time a wedge has
to be used to control the fall or hold open the cut, and
any situations where the nose of the saw must be
usedfor cutting, or theblade pulled through after
completion of the cut.
DANGER: During felling, if a tree starts to
fall causing your saw to bind,
leave the saw and save yourself.
The saw can be replaced – you
cannot!
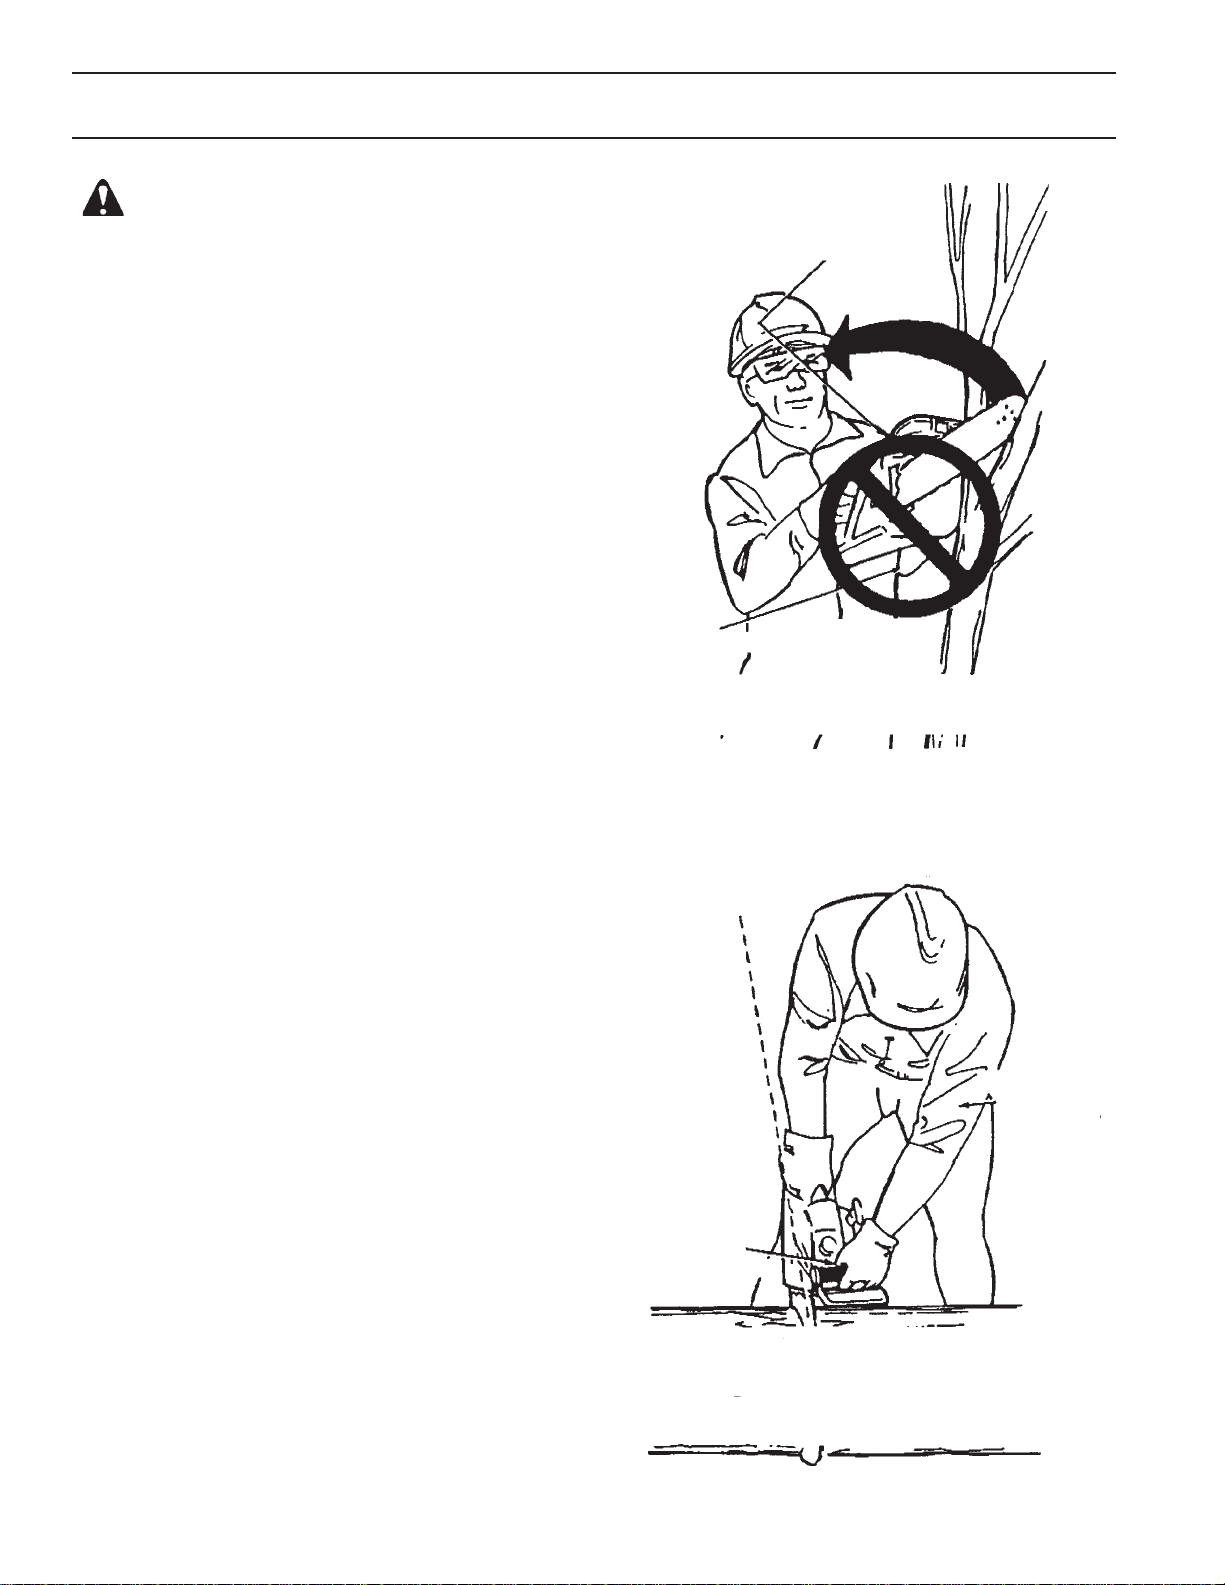
3. Refer to Figures 3, 4 and 5. Each shows a “tight
situation” cut which is hazardous to make without a
Kick Guard. These techniques of cutting in close
quarterscan be appliedtosituations encountered
when bucking or limbing as well as when felling.
HARDHAT
HEARINGPROTECTION
TRIM,
PROTECTIVE
CLOTHING
NON-SLIP
GLOVES
THUMBUNDER
HANDLEBAR
EYE
PROTECTION
ELBOWAS
STRAIGHTAS
POSSIBLE
PROTECTIVE,
NON-SLIP
FOOTWEAR
NOPANTS
CUFFSTO
SNAGIN
UNDERBRUSH
Fig. 1 - Correct Protective Articles, Grip,
andPositioning
LIMIT
IMPOSEDBY
KICK
GUARD
MAXIMUM
DIAMETER LIMITIMPOSED
BY SAW
BUMPER
Fig. 2 - Maximum Diameter of Cut with
KickGuard Installed
BLADEWITH
KICKGUARD
INSERTED
BETWEEN
TWOTREES
Fig. 3

5
Operating Saw With Kick Guard Installed
4. When cutting piled up brush, don’t stick the saw
blade into the pile unless it has a Kick Guard. (See
Fig. 6.)
CUTUP CLOSEWITHMASONRY
WALLS IF SAW HAS KICK
GUARD
Fig. 4
Fig. 5
KICKGUARDHAS
CONTACTEDAN
OBSTRUCTIONBUT
THEREISNO
KICKBACK
Fig. 6
Fig. 7
5. Reaching above chest height to cut is extremely
hazardous. Even with a Kick Guard you must maintain
good position of your feet so as to keep your balance.
Twisting and falling limbs are a hazard which you must
always watch out for. (See Fig. 7.)

6
Danger: Beware of the danger of kickback!
The Kick Guard must be removed
for any operation requiring use of
the nose section for cutting, or for
drawing the nose through a cut.
Read your Instruction Manual
before operating saw without Kick
Guard.
Checkout your technique forcutting with anunguarded
guide bar nose, because you cannot do safely without the
Kick Guard what you can do with it. The rules for cutting
without a Kick Guard are as follows:
1. Maintainproper stance and grip.(See Figure 9.)
2. Keep yourbody totheleftof theguidebar.(SeeFigure 9.)
3. Avoid letting the nose of the saw dip into the ground
or touch obstructions.
4. When necessary to bore with the saw tip, you are
most vulnerable to kickback. Begin at full throttle,
making first contact at the bottom quadrant of the
nose section, or further back on the straight portion if
there is room.
5. In the small percentage of cases where it is
absolutely necessary to bore with the upper section of
the nose, it is best to let a trained tree expert do the
job.If you areanexperienced operator, anglethesaw
blade to be sure that no part of your body is in the
sameplane of chain rotation.
6. Limit your cutting to the range within which you can
control the saw fully. Don’t reach way out so as to
lose your balance. Don’t make any cut above
shoulderheight,because you cannot control the saw
wellwhen held higher thanthis.
7. Making limbing or pruning cuts one at a time. The tree
shearingor electricrazor technique ofde-branching
(limbingfelled trees) should notbe practiced without
the Kick Guard because you can too easily hit an
obstruction which will cause kickback. Whenever
possible, stand on the opposite side of the tree from
the branches being cut, so that the tree offers a
barrierbetween you, the saw, andthebranches.
Operating Saw Without Kick Guard
OPERATOR
STANDING
DIRECTLY
BEHINDSAW
BLADE
LEFTELBOW
EXTREMELY
BENTGIVES
POOR
CONTROL
THUMBONTOP
OFHANDLEBAR
KICKBACK
PATH
Fig. 8
PLANEOF
CHAIN
ROTATION
THUMBON
UNDERSIDE
OFHANDLE
BAR
BODYENTIRELYTOONE
SIDEOF PLANEOFCHAIN
ROTATION
STRONGLEFT
ARMAND
ELBOW
POSITIONFOR
GOOD
CONTROL
Fig. 9
POOR
CONTROL
GOOD
CONTROL

7
TechnicalData
Theseguidebarand chain combinations are certified in accordance with ANSI B175.1-2000and
CSAZ62.3standards.
IMPORTANT
If your kick guard is damaged or lost, contact your Echo dealer for a replacement. For the name of
the Echo dealer nearest you, Call: 1-800-432-ECHO (3246) or on the web at www.echo-usa.com.
Refer to your Chain Saw Safety Manual for kick guard application information.
ECHO CONSUMER PRODUCT SUPPORT
If you require assistance or have questions concerning the application, operation or maintenance of this product you may call the
ECHOConsumerProductSupportDepartmentat1-800-673-1558from8:30amto4:30pm(CentralStandardTime)Mondaythrough
Friday. Before calling, please know the model and serial number of your unit to help your Consumer Product Support Representa-
tive.
LEDOM RAB HTGNEL
ELBUOD RABDRAUG NIAHCWAS KCIK DRAUG
N/POHCE )N/PMEO( OHCE .ONTRAP SKNILEPYTHCTIPEGUAG OHCE .ONTRAP
503-SC 603-SC
"21 /105473421 )5473DC4A21( 540709154
GS09
"8/3
340.
94982
"41 /102573441 )2573DC4A41( 250709125
003-SC 103-SC 043-SC 143-SC 543-SC 643-SC 0003-SC 0043-SC 0543-SC
"21 "41 "61 znetnI"21
MT
znetnI"41
MT
znetnI"61
MT
105473021 102573041 107573061 105473221 102573241 107573261
540719 250719 750719 540719 250719 750719
542575542575
GV19
050.
044-SC 0044-SC 0005-SC 015-SC 025-SC
"61 "81 "02
106633061 102733081 108733002
660333 270333 870333
662787 LS33"523.
23982076-SC 0076-SC
"61 "02 "42 "72
100683061 100783002 101883042 103983072
060727 070727 180727 390727
06071839
GL27"8/3
)P(0008-SC
"02 "42 "72 "23 "63
100783002 101883042 103983072 105083023 106183063
070727 180727 390727 5010727 6110727
071839 501 611

KIORITZ CORPORATION
ECHO,INCORPORATED
400OakwoodRoad
LakeZurich,IL60047U.S.A.
www.echo-usa.com
Table of contents
Other Echo Accessories manuals