ECM Imago User manual

Version 1.06.1 du 29/07/2016 Réf : CD MA User Manual Imago EN 1.06.docx Page 1 sur 20
User Manual
Version 1.06.1
Imago reference: 90-1945
User Manual reference: 70-2607

Version 1.06.1 du 29/07/2016 Réf : CD MA User Manual Imago EN 1.06.docx Page 2 sur 20
SUMMARY
1. INTRODUCTION ............................................................................................................................................ 3
2. IMAGO STRAPS INSTALLATION INSTRUCTIONS ............................................................................................ 3
3. SAFETY INSTRUCTIONS ................................................................................................................................. 4
3.1 PROBE INFORMATION ......................................................................................................................................... 4
3.1.1 Probe types and corresponding applications............................................................................................. 4
3.1.2 Handling of probes..................................................................................................................................... 4
3.1.3 Ultrasound coupling gel............................................................................................................................. 4
4. GETTING STARTED ........................................................................................................................................ 5
4.1 CONNECTION AND DISCONNECTION OF PROBES ........................................................................................................ 5
4.2 STARTING OF THE DEVICE..................................................................................................................................... 5
5. PRESENTATION OF THE DEVICE .................................................................................................................... 6
5.1 KEYBOARD DESCRIPTION...................................................................................................................................... 6
5.1.1 « Simplified » Interface .............................................................................................................................. 6
5.1.2 “Normal” Interface .................................................................................................................................... 7
5.2 KEYBOARD FUNCTION ......................................................................................................................................... 8
5.2.1 « Simplified Interface ................................................................................................................................. 8
5.1.3 Way to move from one Interface to the other. ........................................................................................ 15
6. CONNECTION OF PERIPHERALS .................................................................................................................. 17
7. CLEANING AND DISINFECTION INSTRUCTIONS ........................................................................................... 18
7.1 CLEANING AND DISINFECTION OF THE DEVICE......................................................................................................... 18
7.2 CLEANING AND DISINFECTION OF PROBES.............................................................................................................. 18
8. ENVIRONMENTAL CONDITIONS OF USE...................................................................................................... 19

Version 1.06.1 du 29/07/2016 Réf : CD MA User Manual Imago EN 1.06.docx Page 3 sur 20
1. Introduction
This manual includes all necessary information for installing and using the Imago ultrasound equipment (ECM ref. 90-1945)
The Imago is an ultrasound device for diagnostic imaging.
Entirely digital, using FPGA technology, Imago provides imaging in B, B+B and M mode
Imago is designed for the following applications: Veterinary (cow, horse, sheep, sow, lama, dog, cat)
2. IMAGO straps installation instructions
The Imago scanner is delivered with 1 charger, 1 gel flask and 2 straps.
-1 neck strap that will go around & behind the neck.
-1 body strap (elastic) that will go around the body.
Please here are the following steps to follow :
1. Open the 3 plastic connecting parts of the peripherals on the right part of the scanner (not the USB one), insert the
extremity of the strap underneath the Imago right notch and then close it to the longer part.
2. Close again the 3 plastic connecting parts.
3. Repeat the same operation on the left part inserting the extremity on the left notch.
4. You may then click together one part of the body strap(elastic).
5. Then, put the left or right hand inside the neck strap and place the Imago in front of you
6. Finally, you can click together the other part of the body strap.
NB : check that the straps have been installed as per the above photo.

Version 1.06.1 du 29/07/2016 Réf : CD MA User Manual Imago EN 1.06.docx Page 4 sur 20
3. Safety instructions
3.1 Probe information
3.1.1 Probe types and corresponding applications
The probes provided with the Imago device are the following :
- LB760P Linear Rectal probe, 7,5 MHz (this rectal probe is used for gynaecology and reproduction
diagnosis).
- LB760 S Linear Rectal probe, 7,5 MHz (this rectal probe is used for gynaecology and reproduction
diagnosis).
- CB360S Convex probe, 3.5 MHz (this external probe is used for the following applications : general,
abdominal, obstetrics).
- LB740R Linear probe, 7.5 MHz (this external probe is used for the following applications: general,
orthopedics, small parts).
- SB355M Mechanical probe, 5 MHz (this external probe is used for the following applications :
general, abdominal, small parts).
- DB355M Mechanical probe 5 MHz (this rectal probe is used for gynaecology and also abdominal,
small parts).
3.1.2 Handling of probes
Warning :
The probe is fragile and requires proper handling, care and cleaning. Transducer care includes daily inspections, cleaning and
disinfections between each animal.
Please refer to chapter 7.2 about how to perform proper care to the probe.
Warning :
Do not bend or twist the transducer cable. If the transducer housing becomes cracked or broken or if there are cuts or
openings in the cable, the electrical safety features of the transducer might be compromised.
Warning :
Do not immerse the transducer connector in any liquid. Immersing it can destroy its electrical safety features.
3.1.3 Ultrasound coupling gel
Some ultrasound coupling gels and lotions can damage the probes.
Agents containing the following chemicals are known to damage transducers:
▪Acetone
▪Methanol
▪Denatured ethyl alcohol
▪Mineral oil
▪Iodine
▪Any lotion or gel that contains perfume.
Warning :
Check the gel contents with your gel supplier.
Version 1.06.1 du 29/07/2016 Réf : CD MA User Manual Imago EN 1.06.docx Page 5 sur 20
4. Getting started
4.1 Connection and disconnection of probes
To connect a probe, put the probe connector in the slot provided for this purpose on the back (left side) with the connector
pointing upwards. Turn the locker situated in the middle of the connector with a slight pressure in order to engage the locking
mechanism. When the locking mechanism is engaged, push and make a quarter turn clockwards so that the probe is
connected.
After desconnecting a probe, always place the probe in a safe place in order to avoid any damage of the probe due to a shock
or falling down.
The probes can be changed during the examinaton without restarting the device, just freeze the image before.
To disconnect a probe, make a quarter turn counter-clockwards in order to unlock the connector. Take the connector out of
the device and store the probe in an appropriate place protected from shocks.
Warning :
Before disconnecting the active probe, make sure to freeze the image.
When starting the device, always make sure to have a probe connected.
The label of the connected probe label is displayed on the screen (top right of the image).
4.2 Starting of the device
Warning :
Only the power cord supplied by ECM must be used to power the device.
To start the equipment, turn on the power switch situated on the right side panel of the device.
Then wait until the system starts and displays the user interface on the screen.
The Imago equipment starts in B mode with the probe connected on the probe connector. If no probe is connected to the
probe connector, the system will display a label “No probe”. In this case, connect a probe to the connector and press “Freeze”,
or restart the equipment.
To stop the equipment, press again the power switch situated on the right side panel of the device. A shutdown procedure
will be performed until the complete stop of the equipment.

Version 1.06.1 du 29/07/2016 Réf : CD MA User Manual Imago EN 1.06.docx Page 6 sur 20
5. Presentation of the device
5.1 Keyboard description
The touch screen is situated in the left part of the scanner. This new version allows to change it to the right part (SETTINGS –
SYSTEM, activate or not Right-Handed).
Warning: do not use any metal parts (even pens) or motions that could scratch or damage the touch screen.
5.1.1 « Simplified » Interface
When we start the device, only homepage is posted from now on (that of the left below) to facilitate the use of the device.
In Freeze mode of the ultrasound image, the right page displays and the functions below are available.
To return to the homepage, just press Freeze again
Version 1.06.1 du 29/07/2016 Réf : CD MA User Manual Imago EN 1.06.docx Page 7 sur 20
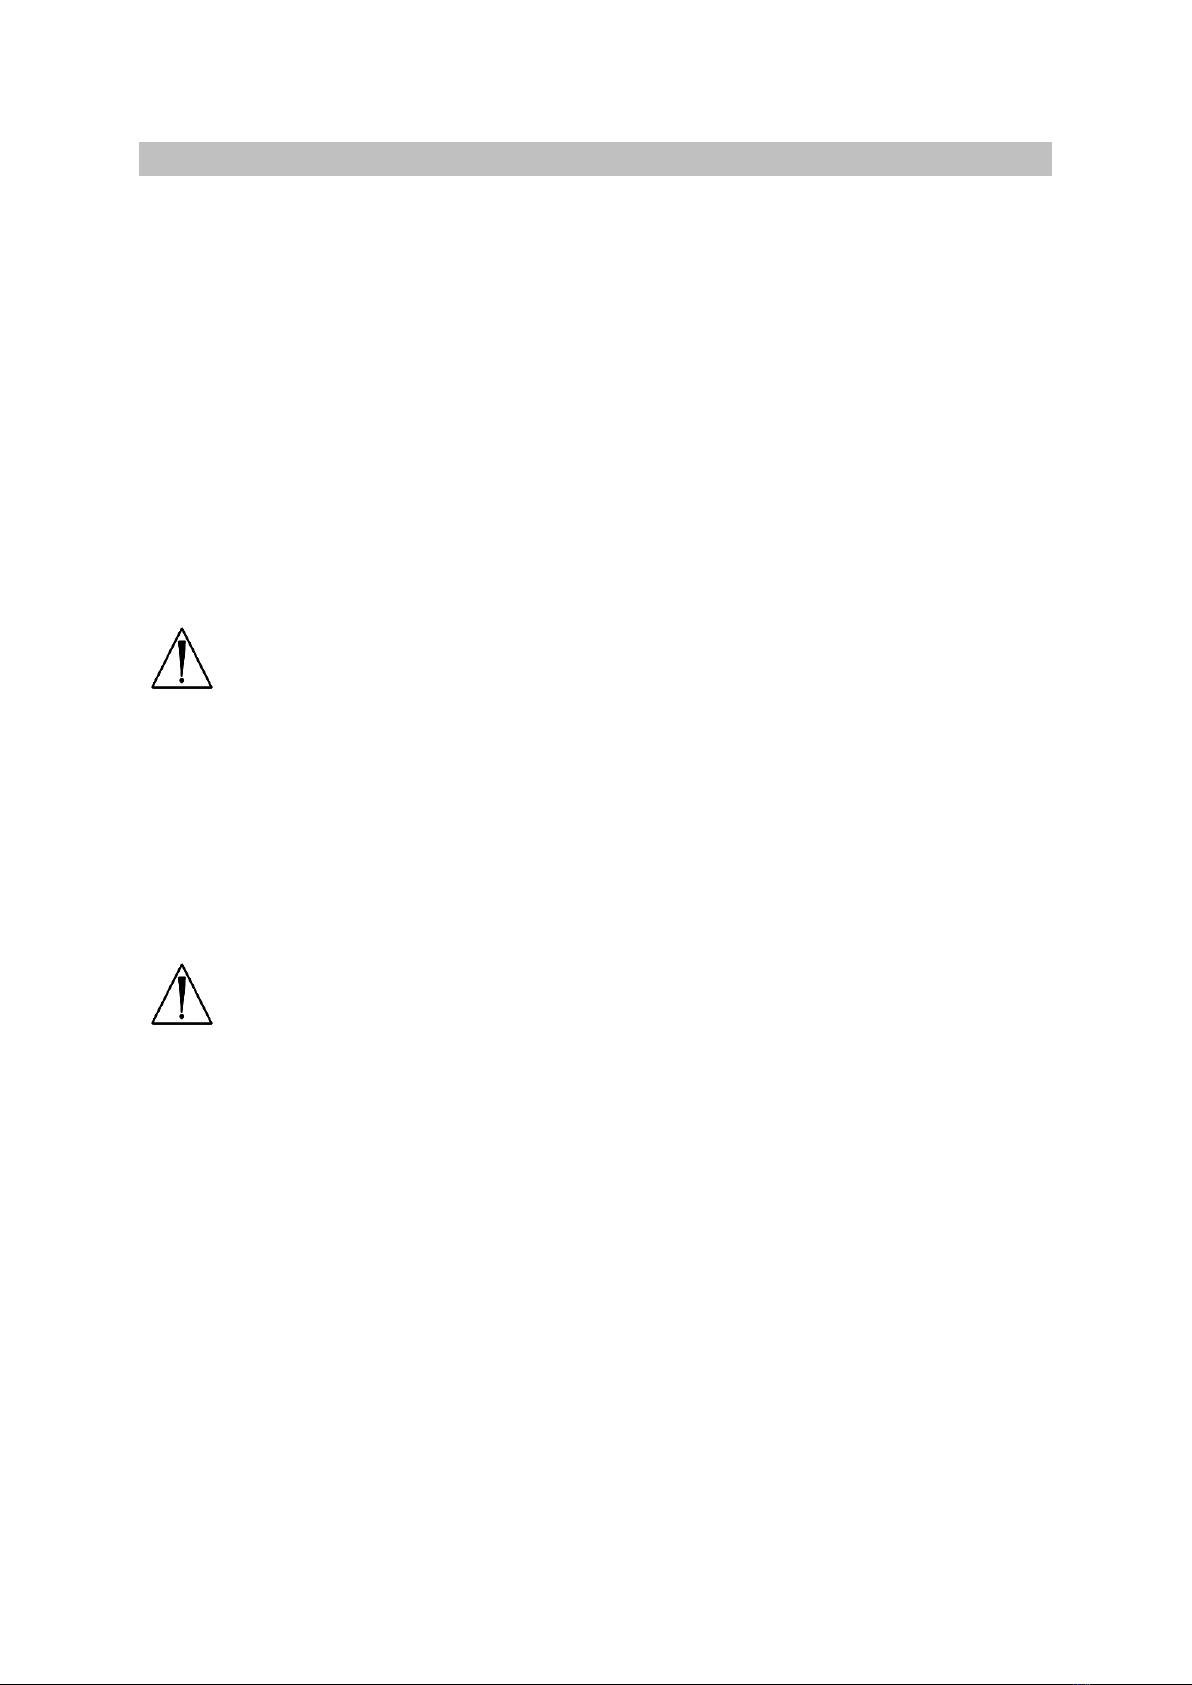
5.1.2 “Normal” Interface
After turning the unit on, 3 pages are available; you always start on page 2 (below, center) as default setting.
When image is frozen, 2 pages available :
Simply slip your finger right to left (or left to right), in order to reach the good page (in live or frozen mode).
The current pages
are indicated there
The current pages
are indicated there

Version 1.06.1 du 29/07/2016 Réf : CD MA User Manual Imago EN 1.06.docx Page 8 sur 20
5.2 Keyboard function
5.2.1 « Simplified Interface
Gain : press + to increase the gain and –to decrease it.
Depth : press + to increase and –to lower the depth.
Freeze : allows to freeze the image and the other menu appears (see below).
P1, P2, P3 : allows to access easily to pre-registered Presets (either factory or
user’s ones).
Settings : access to user’s set up.
Review : to vizualise images and clips saved.
Distance : to make measurements on frozen image.
Brightness : to be increased or lowered.
Freeze : allows to come back to B image.
Cineloop : allows to review the last registered images of the ultrasound session.
Store I : allows to register an image.
Store C : allows to register the last few seconds on the scanned session
(clip/video).
Version 1.06.1 du 29/07/2016 Réf : CD MA User Manual Imago EN 1.06.docx Page 9 sur 20
5.1.2 “Normal” Interface
Page 1 :
Application : This function allows you to choose your application, the following
choices are available: (cow –horse –sheep –sow –lama –dog –cat).
Press Load to confirm your choice.
Preset : This function allows you to access the factory presets of the machine
(the factory presets are highlighted in yellow colour ; you can’t delete them)
or save/load your own presets for your different applications.
Protocol : When you press the protocol key, you have access to all the
measurements and tables available corresponding to the chosen
application. Each animal has its own specific tables.
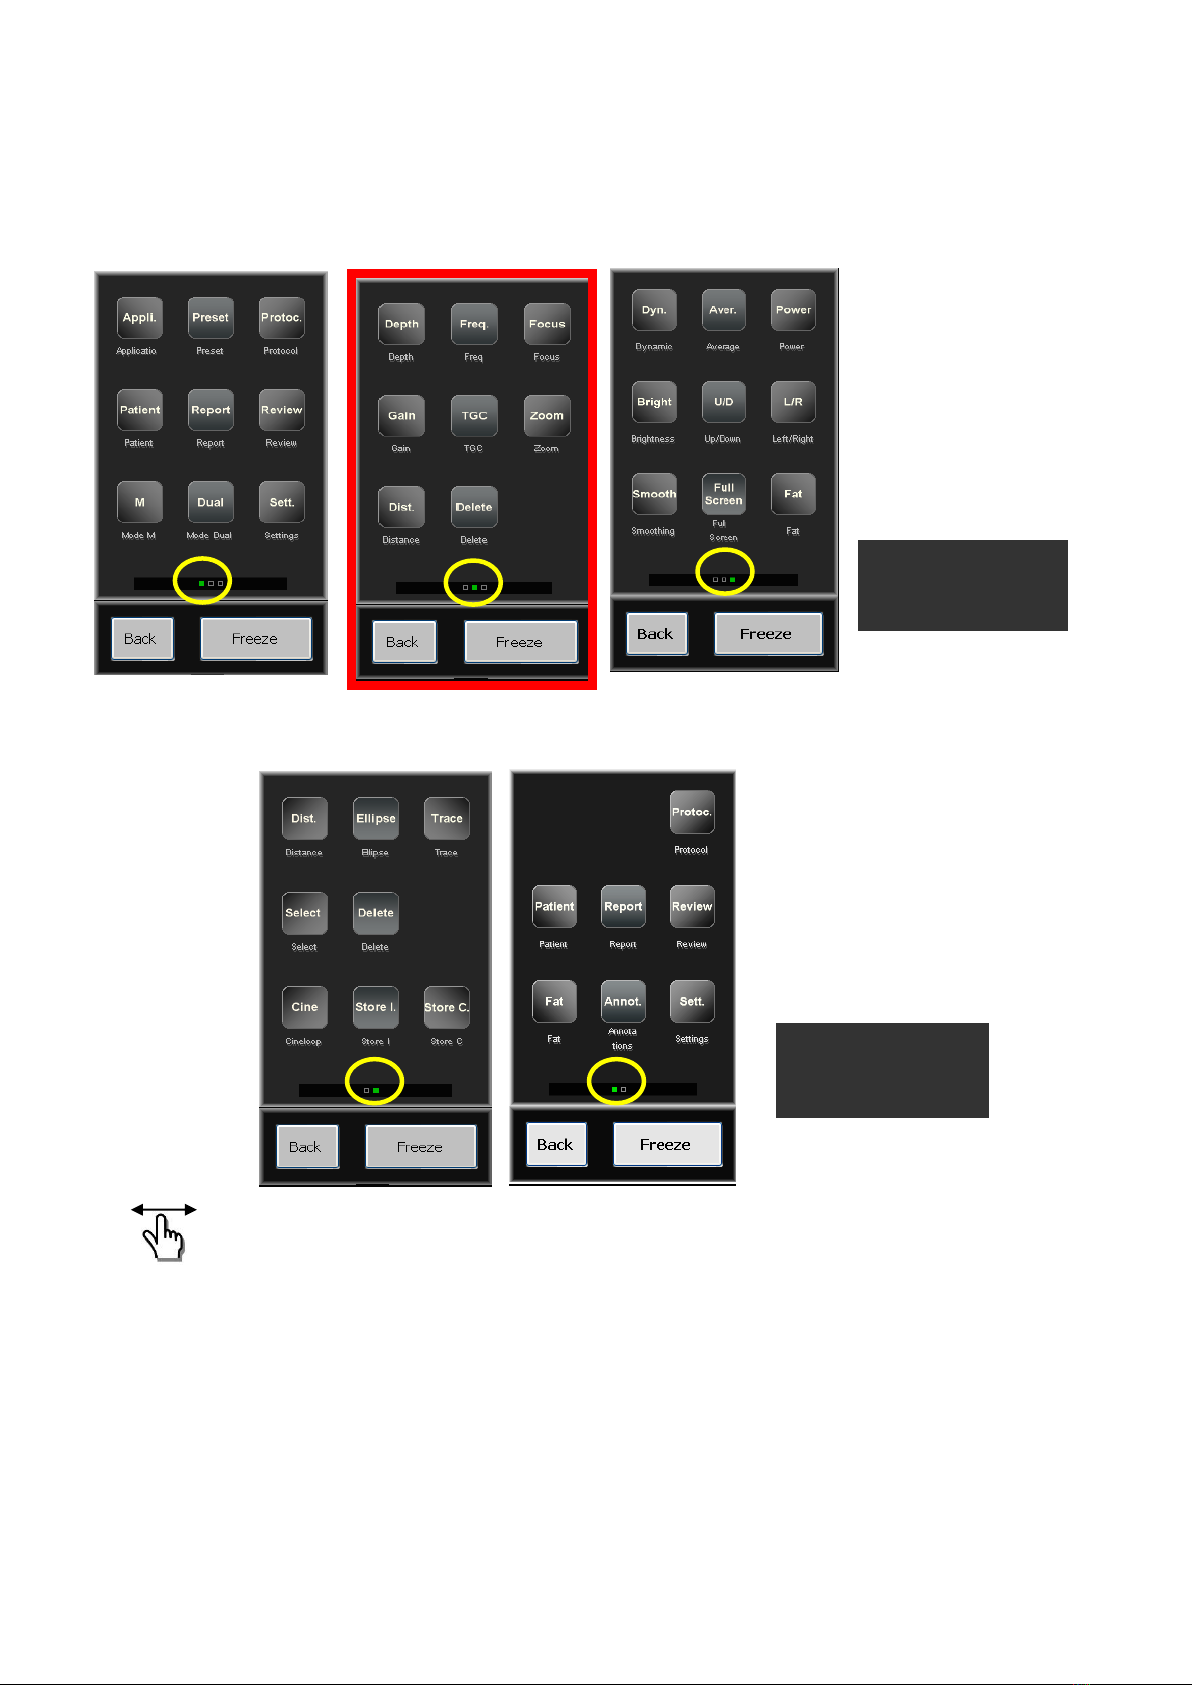
Patient : The patient key allows you to record patient data, save animal date, and scroll the patient list; this menu will allow
you to start an exam on a patient.
Warning : do not forget to click on End of exam after finishing. If not, the patient file will be erased when turning off.
Report : the report key allows the user to view the report while an exam is in progress. If the user is in free scanning mode
(no exam in progress) the report key remains inactive. Can be exported thought USB, in Review.
Review : This key allows you to access the images and the video clips that the user has previously recorded. The review mode
will access the USB drive directly if connected. If no USB is connected the review mode will access the internal memory of the
device.
Compulsory fields :
Last Name, ID,
Animal Name (pink
colour)

Version 1.06.1 du 29/07/2016 Réf : CD MA User Manual Imago EN 1.06.docx Page 10 sur 20
When connecting the USB, just wait for “USB” indication, in the bottom of the screen, to access to USB images and
clips.
M : This key allows you to start the M mode. Position the red line with the track pad and press select to start the measurement
Dual : Allows you to split the screen, press select to switch from one side to the other, press Freeze to freeze the image and
make measurements for example.
For Exit, if Image is frozen, just click on Freeze and Exit. If Image is in live, just press Exit.
Settings : This key allows you to enter the user settings.
- Record the Hospital Name.
- Record the User Name.
- Select the Language (english, french, spanish, Chinese)
M Mode : Select the Scroll Speed and the number of scrolls to Refresh.
Tools :
- AUTOSELECT : AutoSelect Frequency and Focus. If activated, the Focus will move automatically according to depth.
- DISTANCE : If In Sequence is activated, a new distance will be automatically activated after the first one.
- FOLLICLES : if On is activated, this function will automatically measure the follicle’s diameter. Different options are available : (On
Live/On Freeze, Ellipse/Diameter, one scan/two scan)
- FAT + MUSCLE : when that function is active you can directly (when image is frozen) proceed to the backfat measurement. Go
down with the touch screen part to the point, then press Toggle and proceed immediately to the muscle measurement going down
the cursor always with the touch part.
NB : a Fat + Muscle Preset allows you to set up directly the scanner.
Grid : activate the Grid Mode on screen.
Image Formats : Choose the format for picture saving (bmp, jpg, imag, dcm).
Dicom Local Store : Digital Imaging and Communications in Medicine (DICOM).
User

Version 1.06.1 du 29/07/2016 Réf : CD MA User Manual Imago EN 1.06.docx Page 11 sur 20
You can record the 10 frequently used annotations for inserting comments in frozen images.
If Restore the last annotation is activated, the last annotation will be automatically proposed.
Datas about your version of IMAGO (Date & time format, Firmware, Factory). Also the user can select: Auto Freeze, Force
store clip with USB, Keypad, Right-Handed / Left-Handed.
•System : change the date or time format
•About : software version and manufacture date
•Factory : activate or deactivate the factory mode (only for ECM)
•Auto Freeze : in standard mode, Never is always activated
•USB : if you meet problems storing threw the USB pen drive, activate this function
•Keypad : Azerty / Qwerty
•Right-Handed / Left-Handed : reverse the screen according to your working hand
•Full screen : activating full screen mode. The only visible indications are date & time, battery level, probe name, preset
application and name, and frequency. Press Exit to return to the conventional mode.
Annotations
System
System

Version 1.06.1 du 29/07/2016 Réf : CD MA User Manual Imago EN 1.06.docx Page 12 sur 20
- Energy save mode (screen deactivation after 20s without touching the screen, for
using the video goggles, only available when using large screen mode).
Reset the configuration system of IMAGO with factory settings.
Access to the User Protocol menu to create user-defined protocols.
The contextual menu includes:
•Create : add a new line in the User Protocols list. Start by selecting the application in the list to the left in which the user
protocol should be created. The user can select which measurements from the Protocol Items list will be included in the user
protocol by clicking on the corresponding box. Protocol name can be modified by typing the new name in the text field located
in the lower left part of the menu. Press Save when selection is finished.
•Delete : delete the selected User Protocol from the User Protocols list.
•Save : save the created User Protocol.
•Tables : display the current protocol table in data or graphical mode (Data/Graph control). Next and
Previous controls are used to review equivalent table with different authors (if any).
•Exit : exit the User Protocol menu and return to the Settings menu.
To activate a user protocol, select the Application, click on Patient, select Exam and choose the protocol for the
examination.
Reset
System
User Protocol
System
FULL SCREEN

Version 1.06.1 du 29/07/2016 Réf : CD MA User Manual Imago EN 1.06.docx Page 13 sur 20
Page 2 :
Depth : Choose the depth of exploration you want to use. Press Depth and access the
vertical cursor that gives you several choices of depths according to the probe that you
are currently using.
Frequency : According to the connected probe, you have the choice between 3
frequencies; you can choose the required frequency on the vertical cursor.
Focus : you can choose a Focus by pressing the Focus key and access the vertical cursor
that will give you a choice of focus positions.
Gain : Given the large amount of possibilities the gain control is represented by a tune
button that you can turn by pressing onto the white dot (it will turn green when your
finger is on it). Turn the button clockwise to increase the gain and turn the button ante
clockwise to reduce the gain.
TGC : Modify the gain by zone. When pressing the TGC button, 4 horizontal cursors will
appear, they correspond to different zones of the screen, you can choose the amount
of gain by zone, by pulling the cursor towards the right direction for more gain and in
the left direction for less gain.
Zoom : It is possible to Zoom a part of the screen, press the Zoom key then choose your magnification window, x1.5, x2, x3;
then position the window on the part of the screen you want to zoom with the touchpad and press select to magnify the
picture. Press the Bkey to go back to full size picture.
Distance : It is possible to make measurements between two points on the screen without having to freeze the picture. Press
Distance and position the cursor with the touchpad. Press Valid to start the measurement and move the second cursor. Press
toggle to switch sides on your measurement. Press Valid to close the measurement. The distance displays in the bottom left
corner of the screen.
You can put up to 7 measurements on the same image (4 distances, 2 Ellipses, 1 trace).
Delete : Delete any measurement on the screen (select the one(s) you want to delete using the key Select).
Page 3 :
Dynamic range : This function allows you to create a harder or smoother picture. Press the
Dynamic key and chose your dynamic range on the vertical cursor. The lower the dynamic is the
harder is the picture and the higher the dynamic is the smoother is the picture.
Average : This function allows you to adjust the persistence of the image among SLOW –SLOW
MEDIUM –MEDIUM FAST & FAST.
Power : You can modify the emission power of the probe. Press the Power key and choose your
emission power in % on the vertical cursor.
Brightness : You can choose the brightness of the screen by pressing the Brightness key. Choose
your brightness level with the vertical cursor.
U/D : The UP/Down function allows you to reverse the image on the screen.
L/R : The Left/right function allows you to change the side of the picture.
Smoothing : 3 levels are available ; level 3 is the highest ; level 2 is active as a standard feature.
Fat : Automatic measurement of back fat (for pigs with sector or linear probes ; cattle or small
ruminants with linear probe). Available in frozen mode also.
Version 1.06.1 du 29/07/2016 Réf : CD MA User Manual Imago EN 1.06.docx Page 14 sur 20
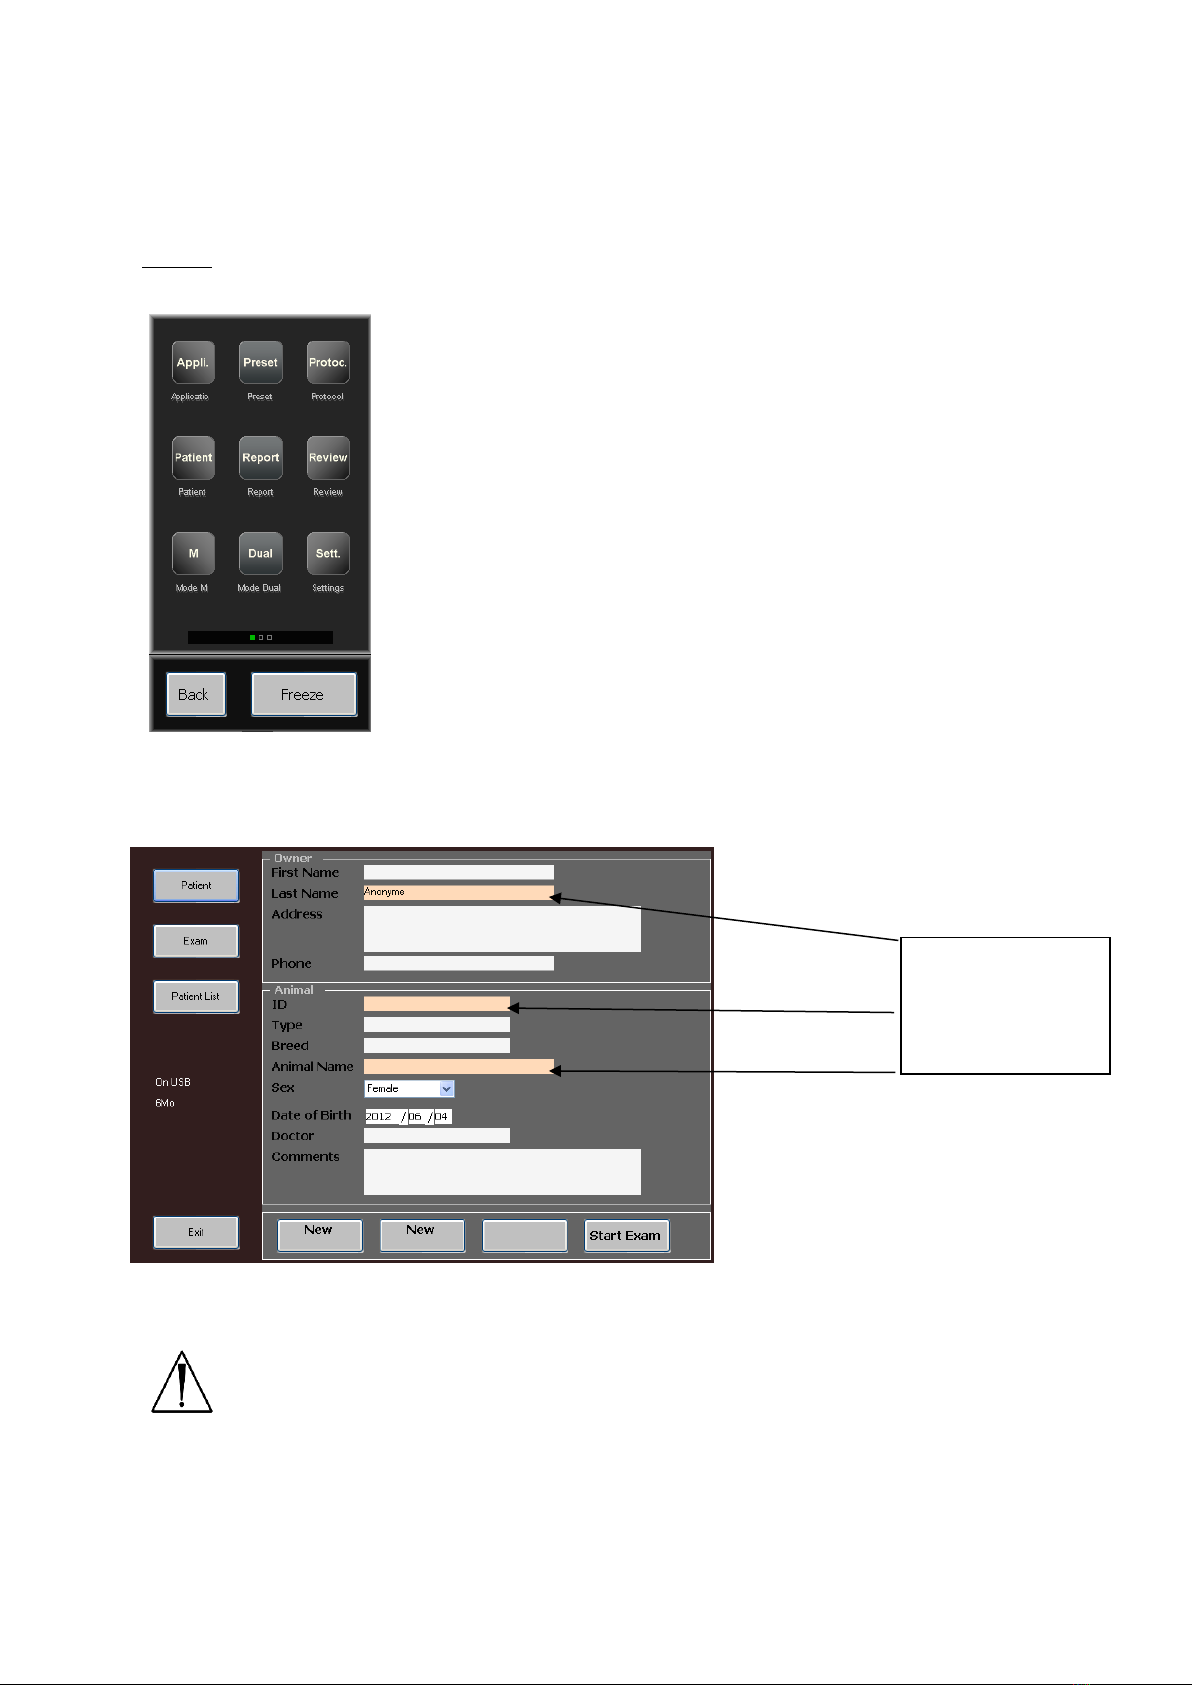
FREEZE page 1 :
Protocol : This allows you to access to the different measurement tables and
gestation tables, this is accordingly used with the specie that you have previously
selected in the application mode.
Patient : This function allows you to access to the patient menu (see page 1).
Report : Allows the user to review the report while doing an exam.
Review : View the pictures and the video clips that you have previously recorded.
FAT : Automatic measurement of back fat (for pigs with sector or linear probes ;
cattle or small ruminants with linear probe). Available in live mode also. First,
choose the animal application, before doing FAT measure, for correct
measurement.
Annotations : Allows you to write annotations on a frozen picture or choose an
annotation that you have previously recorded in the settings menu.
Settings : Preset the machine to your own convenience, and have access to the
user protocols.
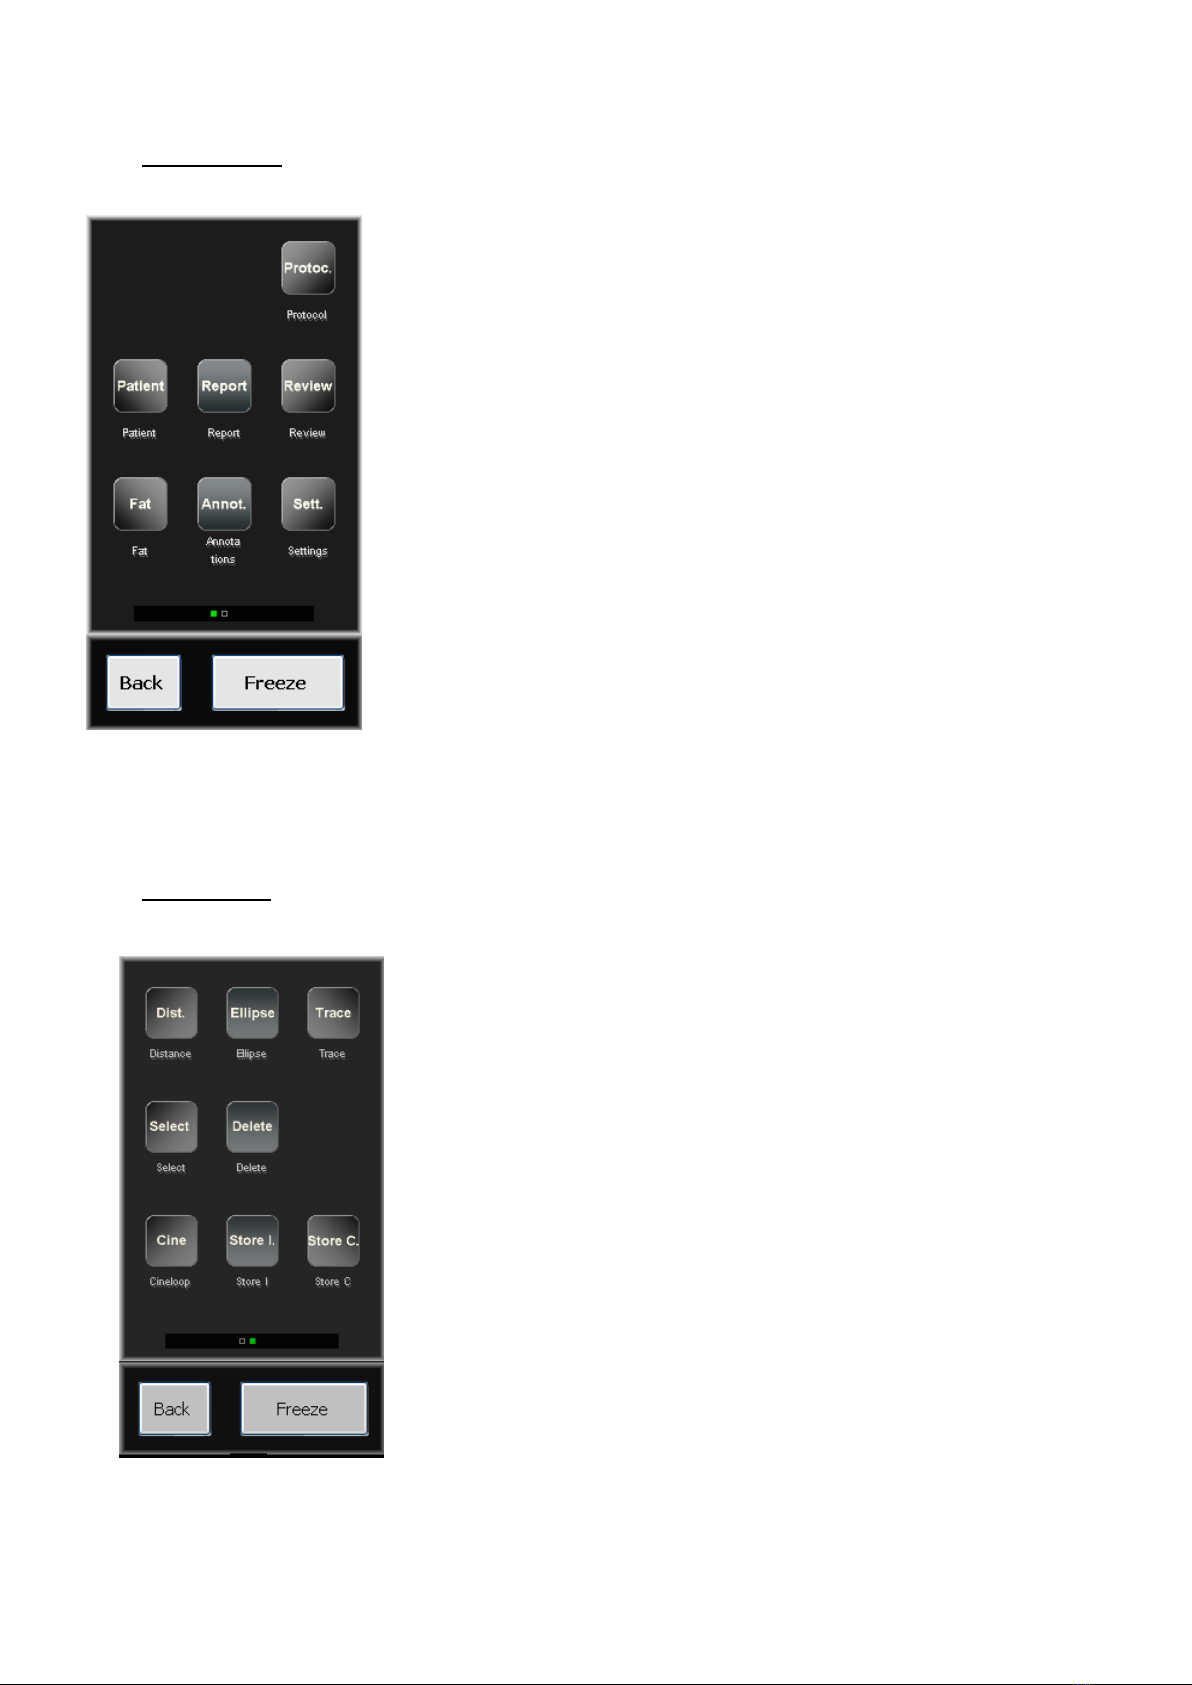
FREEZE Page 2
Distance : This allows to make a measurement on a frozen picture.
Ellipse : This allows to draw an ellipse on a frozen picture.
Trace : This allows to draw a trace on a frozen picture.
Select : This allows to switch between the different measurements on your frozen
image.
Delete : This allows to delete measurements, ellipses or traces on the screen.
Cineloop : This allows to access to the cineloop menu as explained below.
Store I : This key is used to store the image that appears on the screen.
Store C : This allows to store the clip or the cineloop that has just been made
CINELOOP : Replay the last seconds of scanning that have just been done (124 pictures with linear and convex probes ; 62
pictures with sectorial probe).
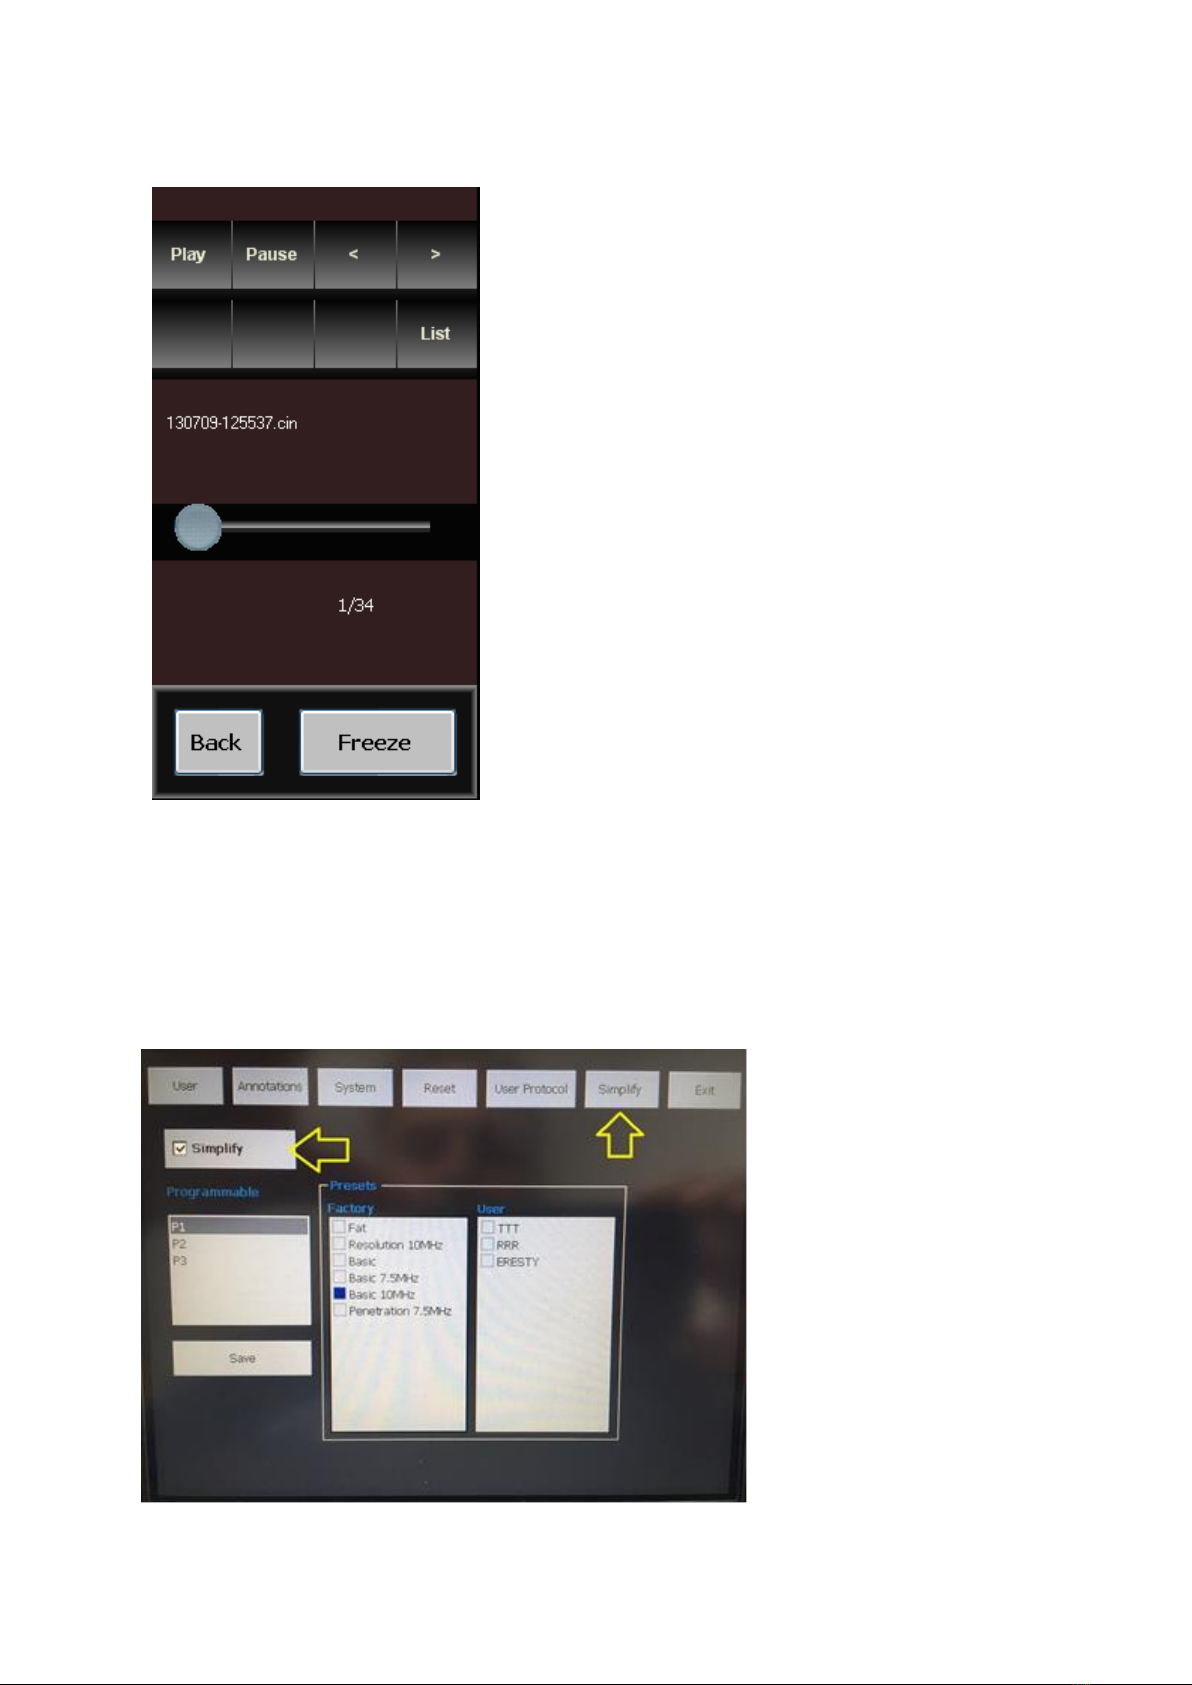
Version 1.06.1 du 29/07/2016 Réf : CD MA User Manual Imago EN 1.06.docx Page 15 sur 20
Play : this function allows you to play the last seconds of scanning that
have just been done.
Pause :This allows to stop the video sequence.
> : this key allows the user to play the cineloop image by image forward.
< : this key allows the user to play the cineloop image by image remind.
List : allows to return to the videos list (Review mode)
Back : this button will take you back to the main menu of the freeze mode.
Freeze :allows to get back to the B mode menu (it unfreezes the picture).
5.1.3 Way to move from one Interface to the other.
Go to SETTINGS function

Version 1.06.1 du 29/07/2016 Réf : CD MA User Manual Imago EN 1.06.docx Page 16 sur 20
Allows to pass in SIMPLIFIED mode, where only the essential functions will be posted.
Tick the box " SIMPLIFY " then you can schedule 3 PRESETS (regulations of the device according to use: to select
for every Preset (P1, P2, P3) Preset Factory or your own regulations that you have beforehand registered.*
Once marked Presets, to click SAVE then to throw the simplified mode by ticking on "SIMPLIFY".
*Attention: the recording of User Presets ( personalized regulations) can be made only in normal mode.
Having ticked "SIMPLIFY", you have access to the simplified mode. A single menu is so proposed in live mode.
If you untick the compartment " SIMPLIFY " you go to the "normal" said menu.
Cf 5.1.2 and 5.2.2 menu.
Version 1.06.1 du 29/07/2016 Réf : CD MA User Manual Imago EN 1.06.docx Page 17 sur 20
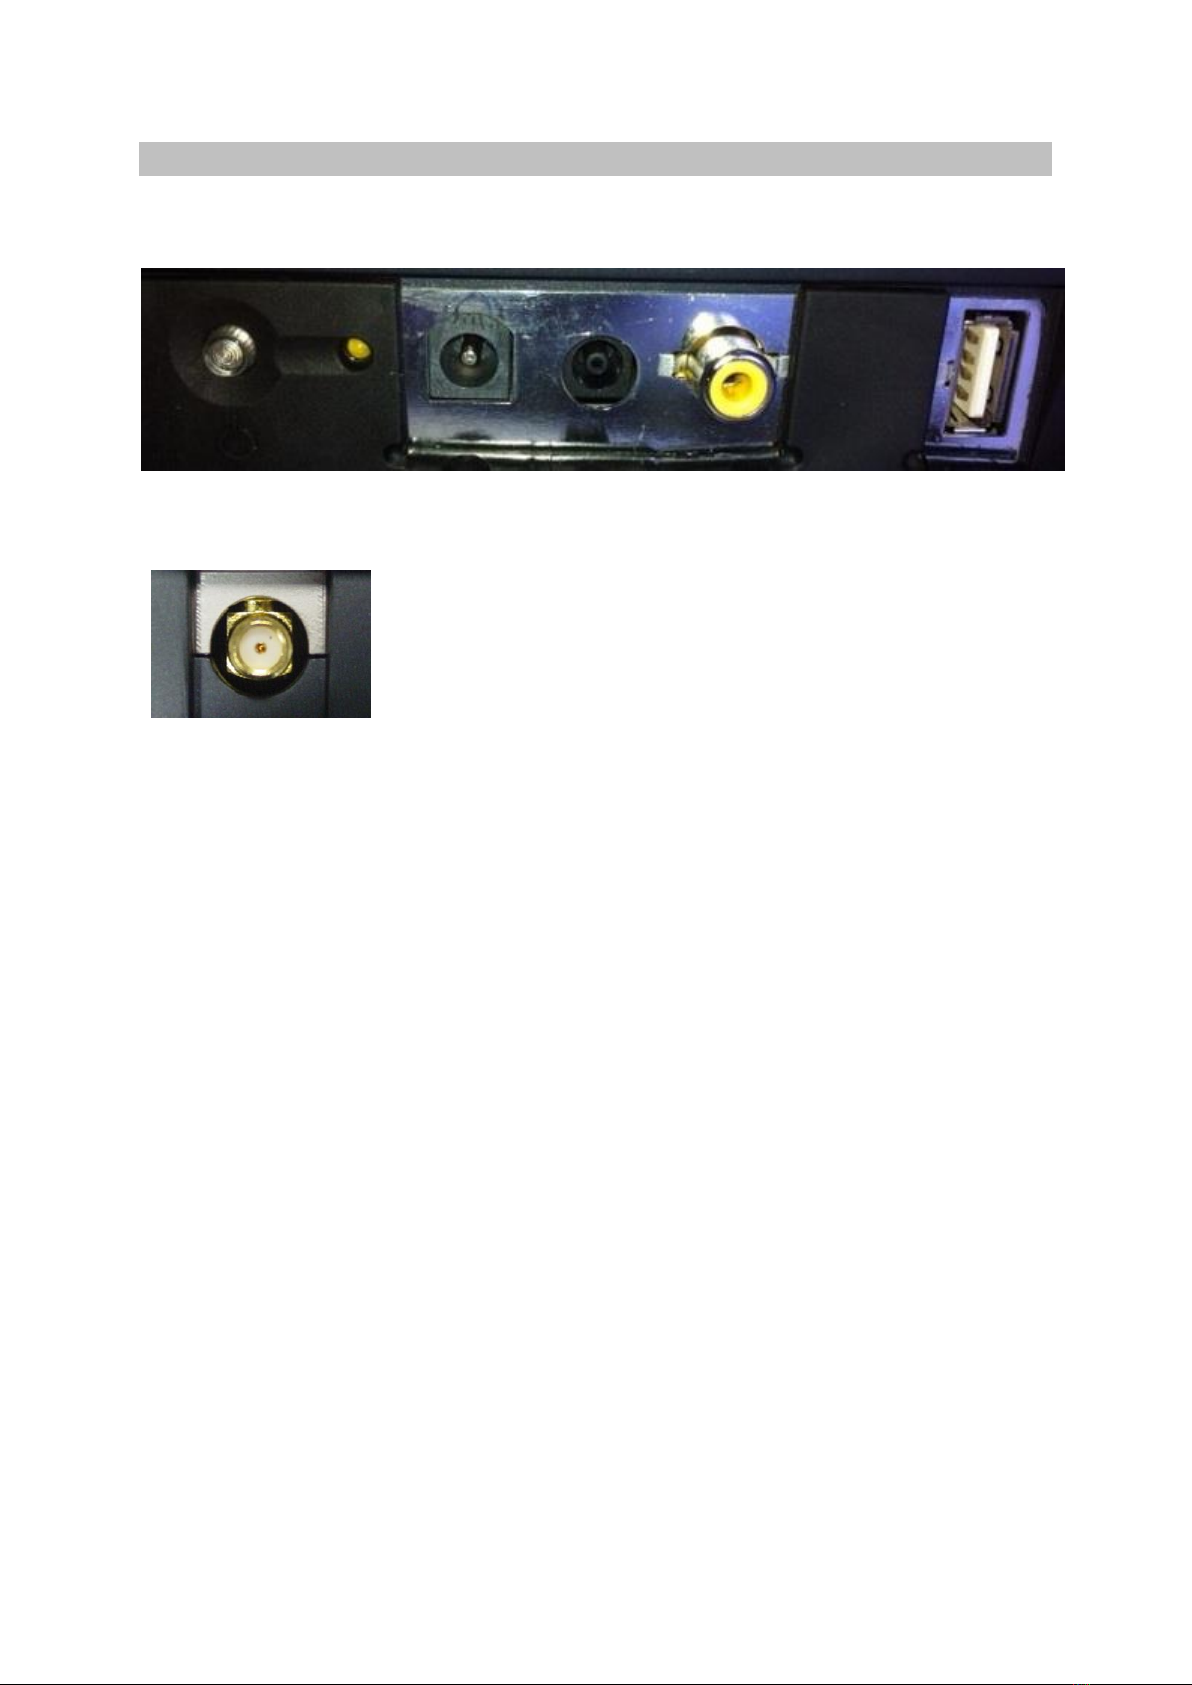
6. Connection of peripherals
The Imago equipment can be connected to several peripherals like :
TURN ON/OFF CHARGE LED BATTERY POWER SUPPLY COMPOSITE VIDEO USB PORT
CHARGE FOR GOGGLES
BLUETOOTH PORT
Version 1.06.1 du 29/07/2016 Réf : CD MA User Manual Imago EN 1.06.docx Page 18 sur 20
7. Cleaning and disinfection instructions
7.1 Cleaning and disinfection of the device
The following disinfection solutions have been tested and their compatibility with the components of the device
has been proved:
-Cidex
-Cidex plus
-Cidex OPA
It is strongly recommended to use one of these solutions in order to avoid any deterioration during the cleaning
and disinfection procedure.
WARNING : Do not pour liquid on the scanner !
And make sure, before closing the case, that neither the scanner non the probe are wet.
WARNING : The use of any other disinfecting solution than the ones indicated above is dangerous as it
may damage the components of the device. Check the list of specified agents carefully.
In order to ensure proper cleaning and disinfection, please follow the following procedure:
WARNING : Do not use alcohol, or other strong chemicals agents that may damage the casings of the
equipment. Do not poor or spray liquids directly on the equipment.
7.2 Cleaning and disinfection of probes
Low level disinfection procedure :
The following disinfection solutions have been tested and their compatibility with the components of the probes has
been proved:
-Alkazyme
-Klenzyme
-Cidezyme
-Nu-Cidex
-Anioxyde
-Gigasept-FF
-Steranios
-Cidex OPA
It is strongly recommended to use one of these solutions in order to avoid any deterioration during the cleaning
and disinfection procedure.
WARNING : The use of any other disinfecting solution than the ones indicated above is dangerous as it
may damage the probe components. Check the list of specified agents carefully.

Version 1.06.1 du 29/07/2016 Réf : CD MA User Manual Imago EN 1.06.docx Page 19 sur 20
8. Environmental conditions of use
The device shall be operated in a clean atmosphere, without dust and smoke.
The device is designed and tested be operated within this range of temperature:
▪-20°C to +60°C during transportation and storing
▪-10°C to +40°C during operation.
In order to guarentee the life span of the battery, this must be stored with a charge of between 15 and 50%
and a temperature < 30°C (86°F).
The device is designed to be operated with a relative humidity range from 10 to 95% including condensation.
The device is designed for the following atmospheric pressures:
▪700 hPa to 1060 hPa while in operation
▪500 hPa to 1060 hPa during transportation and storing.
Warning:
Never use the device if these environmental conditions are not respected. Stop operation of the device if one of
these conditions is no more respected.
The device can be used in any room or place respecting these environmental conditions.

Version 1.06.1 du 29/07/2016 Réf : CD MA User Manual Imago EN 1.06.docx Page 20 sur 20
Manufacturer’s address: Distributor’s address:
ECM Echo Control Medical ……..……………………
126 bd de la République ..............................
F-16000 Angoulême ……………………………
Tel : +33 5 45 92 03 57 …………….………………
Table of contents


