EFILive AutoCal V3 User manual

Cindy Myers
AutoCal V3 User Guide

AutoCal V3 User Guide
support@efilive.com - 1 - www.efilive.com
Contents
............................................................................................................4
Prerequisites....................................................................................................................4
Intended Audience.......................................................................................................4
Computer Knowledge...................................................................................................4
......................................................................................................5
Introduction......................................................................................................................5
What is AutoCal? .........................................................................................................5
Differences between FlashScan and AutoCal..............................................................5
A FlashScan Device is Required..................................................................................5
End User License Agreement ......................................................................................5
...............................................................................................................6
Specification & Requirements..........................................................................................6
AutoCal V3 Package Contents.....................................................................................6
AutoCal V3 Specification..............................................................................................6
USB Drivers .................................................................................................................6
AutoCal V3 Functionality..............................................................................................6
Standalone Mode .....................................................................................................6
Pass-thru Mode........................................................................................................6
Software Requirements................................................................................................7
Licensing......................................................................................................................7
Linking/Unlinking FlashScan to AutoCal ......................................................................9
Linking AutoCal ........................................................................................................9
Unlinking AutoCal...................................................................................................10
Taking Care of AutoCal V3 ........................................................................................10

AutoCal V3 User Guide
support@efilive.com - 2 - www.efilive.com
.........................................................................................................................12
Using AutoCal V3 ..........................................................................................................12
Connecting AutoCal V3..............................................................................................12
AutoCal V3 Display....................................................................................................13
LED Communication Indicators..............................................................................13
Active Communications Protocol............................................................................13
Power-Up Modes .......................................................................................................13
AutoCal Folder Structure............................................................................................14
Communicating with AutoCal V3................................................................................14
V8 Scan and Tune..................................................................................................15
Using AutoCal V3 as a USB Thumb Drive..............................................................16
Licensing a Controller ................................................................................................17
.............................................................................................................18
AutoCal V3 Menu Navigation.........................................................................................18
User Defined Menu Structure.....................................................................................18
Standard Menu Structure...........................................................................................19
Scan Tool Menu.........................................................................................................19
Tune Tool Menu.........................................................................................................20
Diagnostics Menu.......................................................................................................22
Options Menu.............................................................................................................23
.............................................................................................................30
Support..........................................................................................................................30
Supporting AutoCal....................................................................................................30
Error Codes................................................................................................................30
Trace Files .................................................................................................................30
AutoCal *.xalm files ................................................................................................30
V8 Scan and Tune *.htx files ..................................................................................31

AutoCal V3 User Guide
support@efilive.com - 4 - www.efilive.com
Prerequisites
Intended Audience
Customers who have purchased custom tunes from a professional tuner who has
supplied an AutoCal device and requires basic operational instructions for both
AutoCal and the V8 Scan and Tune Tool software.
Computer Knowledge
It is expected that readers have a basic understanding of:
The Windows operating system;
Starting and using Windows applications;
Navigating folders using Windows Explorer.

AutoCal V3 User Guide
support@efilive.com - 5 - www.efilive.com
Introduction
What is AutoCal?
EFILive’s AutoCal V3 provides a convenient platform for professional tuners to
distribute custom tunes to their customers. And for their customers to collect and
submit logged data back to the tuner for analysis. It allows the tuner to update and
optimize the original tune without shipping and/or removing controllers from
customers’ vehicles.
AutoCal can be configured in a variety of different ways to best suit your tuner’s
operational requirements and the needs of their customers. Your tuner may
provide additional support documentation tailored to the specific setup they use for
AutoCal
Differences between FlashScan and AutoCal
There are significant differences between FlashScan and AutoCal for end users. It
is important that both the tuner and the tuner’s customer (end user) understand
these differences.
With FlashScan, users have the ability to create, view, and modify tunes. With
AutoCal, only the tuner has that ability.
AutoCal cannot be used to create or change tune files.
Tunes from multiple sources can be flashed with FlashScan, however AutoCal is
limited to flashing tunes provided by a single tuner.
A FlashScan Device is Required
FlashScan is required to create tunes for an AutoCal device. AutoCal devices
cannot create tunes.
End User License Agreement
The EULA is displayed when the EFILive V8 Scan and Tune software is installed.
Installation cannot proceed until the user agrees to the EULA.
The EULA is displayed on the AutoCal V3 screen each time AutoCal V3 is
connected to power. For AutoCal V3 to be functional, the user must agree to the
EULA.
Where AutoCal V3 is connected to a PC and is being used in pass-thru mode, the
device will be functional even if the EULA is not confirmed on the AutoCal V3
display because the EULA was accepted during software installation.
The [F7: Licenses] -> [F2: Hardware] tab will display the EULA status of the
connected device. The EULA status is updated on the first acceptance of the
EULA on the AutoCal V3 device.

AutoCal V3 User Guide
support@efilive.com - 6 - www.efilive.com
Specification & Requirements
AutoCal V3 Package Contents
The contents of your AutoCal product may vary due to being supplied directly from
your tuner or parts supplier. At a minimum your AutoCal will be shipped with:
AutoCal V3.
OBDII cable (RJ45 to SAE-J1962)
PC cable (USB A to B)
AutoCal V3 Specification
Large, easy to read color screen.
Powerful ARM Cortex-M3, 32-bit CPU.
Built in 512MB micro SD Card stores hundreds of tune files and/or
hundreds of hours of logged data.
Supports 600 VIN licenses.
Built-in audible alarms.
Upgradable firmware.
Vehicle Input Voltage - Min 9V, Max 24V.
Supported protocols CAN J1979, CAN J1939 (heavy duty) and VPW.
Serial interface (RS-232).
Battery backed real-time clock for accurate timestamps.
Appears as a Windows USB drive in Windows Explorer.
Files transfer up to 10 times faster than FlashScan/AutoCal V2.
Built-in power supply prevents data corruption if external power supply is
interrupted.
Plug-and-Play, uses Windows’ built in USB drivers.
Rugged Molex connectors.
USB Drivers
AutoCal V3 appear as a Windows USB drive in Windows Explorer. There are no
external drivers to install.
AutoCal V3 Functionality
Standalone Mode
Reading, flashing, logging and clearing codes.
Pass-thru Mode
Read, log and flash supported controllers using the EFILive V8 software.

AutoCal V3 User Guide
support@efilive.com - 7 - www.efilive.com
Software Requirements
EFILive V8 Scan and Tune application must be installed for file management.
For AutoCal to be functional, the software and firmware used with your AutoCal
will need to be compatible the software and firmware used with your tuner’s
FlashScan device.
AutoCal users should only update software and firmware at their
tuners specific request. Updating to software and firmware versions
higher than your tuner may lead to your tuner being unable to offer
you support until they update.
Licensing
Each AutoCal device ships with one VIN license that may be used for tuning one
engine controller. Supported transmission control modules do not require a VIN
License.
Tuners can manage the number of available VIN slots they wish their AutoCal
devices to hold. AutoCals will ship with a default maximum VIN slot count set to 1.
AutoCal V3 is configurable to a capacity of 600 VIN licenses.
Updating VIN slot limits is at the sole discretion of the tuner. EFILive (and other
parties) cannot provide this service.
Although AutoCal can be used to return a vehicle to stock, doing so will not “reset”
the VIN license that was used to flash the vehicle. A future version of EFILive
software will allow VIN licenses to be copied from one FlashScan or AutoCal
device to an AutoCal V3 device where the device license numbers match on both
devices. Details will be provided at a later date.
License slot limits can only be viewed via V8 Scan and Tune software. Used and
available VIN Licenses can be viewed in both V8 Scan and Tune software and on
AutoCal V3;
V8 Scan and Tune software
1. Connect AutoCal V3 to your PC.
2. Open the V8 Scan and Tune software.

AutoCal V3 User Guide
support@efilive.com - 8 - www.efilive.com
3. Navigate to [F7: VIN Licenses] -> [F2: VINs]

AutoCal V3 User Guide
support@efilive.com - 9 - www.efilive.com
AutoCal V3
1. Connect AutoCal V3 to power.
2. Accept the EULA.
3. Navigate to [F4: Options] -> [F3: About] -> [F2: VIN Licenses].
4. Licensed controllers and available licenses are displayed.
Linking/Unlinking FlashScan to AutoCal
Linking AutoCal
For an AutoCal V3 device to be functional, your tuner must link the AutoCal to their
FlashScan device.
The linking status of an AutoCal is displayed on the AutoCal EULA screen when
the AutoCal is first powered. Where the AutoCal is linked, the 12 digit number is
the license number of the FlashScan that provided the link.
Unlinked AutoCal
Linked AutoCal
There are two ways to link an AutoCal device to FlashScan.
1. Physically Link AutoCal –where the tuner links the device prior to shipping.
2. Remotely Link AutoCal –where the tuner will send you an activation code
and instructions on how to link your AutoCal to the tuner’s FlashScan.
Your tuner will select the most convenient for their business model.
There are two methods to identify the FlashScan device which provided the link;

AutoCal V3 User Guide
support@efilive.com - 10 - www.efilive.com
V8 Scan and Tune software
1. Connect AutoCal V3 to your PC.
2. Open V8 Scan and Tune software.
3. Select [F7: Licenses].
4. The license number indicates the FlashScan that AutoCal is linked to.
5. Where the license number and serial number are identical, the AutoCal
device is not linked.
AutoCal V3
1. Connect AutoCal V3 to power.
2. Accept the EULA.
3. Navigate to [F4: Options] -> [F3: About] -> [F1: Firmware].
4. The license number indicates the FlashScan that AutoCal is linked to.
5. Where the license number and serial number are identical, the AutoCal
device is not linked.
Unlinking AutoCal
An AutoCal can be unlinked from a FlashScan device to allow that AutoCal device
to be relinked to another FlashScan device.
Unlinking an AutoCal is at the sole discretion of the tuner. End users should make
appropriate inquiries on the tuner's unlinking policy prior to purchase. EFILive
(and other parties) cannot provide this service.
There are two ways to unlink an AutoCal device from a FlashScan.
1. Physically Unlink AutoCal; where the tuner requires both FlashScan and
AutoCal to unlink the device.
2. Remotely Unlink AutoCal; where the tuner will send you an activation code
and instructions on how to unlink your AutoCal from the tuner’s FlashScan.
Once an AutoCal has been unlinked, it must be linked to another FlashScan prior
to flashing tune files.
Once AutoCal is unlinked, all tune files that were created by the original tuner with
the original FlashScan can no longer be flashed by the AutoCal device.
Tuners should implement a process to ensure the end user’s stock file is
converted from the original FlashScan to the new FlashScan. Failing to do so will
prevent end users from flashing their stock tune.
Once an AutoCal has licensed a controller, that controller will remain licensed to
that AutoCal. Unlinking and relinking an AutoCal device does not require
additional licensing provided the controller originally tuned remains the same.
Additional AutoCal VIN licenses are required to tune additional controllers.
Taking Care of AutoCal V3
Care must be taken when using, transporting or storing AutoCal V3.
Never leave devices in direct sunlight; it will damage the LCD screen and
the polycarbonate keypad.
Never expose devices to solvents or other corrosive or oxidizing agents.
Do not immerse devices in any liquid.
Do not expose devices to high temperatures or open flames.

AutoCal V3 User Guide
support@efilive.com - 11 - www.efilive.com
Remove ALL connectors before transporting or storing devices. Failure to
do so may cause internal connections to break.
Never wrap cables around devices that are still connected, even when not
in use. Doing so can put excessive stress on the internal connectors and
can cause them to break.
Do not allow uninsulated wires to contact any part of the vehicle’s chassis
or electrical system. Take particular care to never allow devices, or any
wires connected to devices, to contact the vehicle’s battery terminals or
other power source.
Never use a DC to AC power inverter to operate your laptop while
FlashScan V3 or AutoCal V3 is connected to either the vehicle or the laptop
or both.

AutoCal V3 User Guide
support@efilive.com - 12 - www.efilive.com
Using AutoCal V3
Connecting AutoCal V3

AutoCal V3 User Guide
support@efilive.com - 13 - www.efilive.com
AutoCal V3 Display
The AutoCal LCD footer displays a range of communications information to assist
users.
LED Communication Indicators
5 LEDs, from left to right display the following communications information.
Green: RS232 serial data interface is active.
Orange: Data logging is active - not yet implemented. This LED will never
illuminate until this is implemented.
Blue: SD Card write in progress - - not yet implemented. This LED will
never illuminate until this is implemented.
Orange: OBDII interface is active.
Green: USB interface is active.
Active Communications Protocol
The active communications protocol is displayed on the right hand side of the
footer. The display is broken into three distinct areas using the format XXX YY ZZ
where;
1. XXX is the current protocol in use and is one of:
CAN = Controller Area Network Protocol; used by most vehicles after 2004.
VPW = Variable Pulse Width Protocol; used by GM vehicles prior to 2005.
2. YY is the type of CAN protocol in use and is one of:
LD = Light Duty (aka SAE-J1979).
HD = Heavy duty (aka (SAE-J1939).
This 2 letter code will be omitted when the protocol is VPW.
3. ZZ is the number of controllers detected.
Power-Up Modes
Hold Fn key to boot into dead-poll. Used primarily when a firmware upgrade
has not executed correctly.

AutoCal V3 User Guide
support@efilive.com - 14 - www.efilive.com
AutoCal Folder Structure
The AutoCal folder structure is designed to accommodate different groups of files.
The menu options you select on your keypad will reference files in these specific
folder locations. The function of each folder is described below:
Folder
Purpose
EFILive
Root level folder
Config
Contains configuration files copied to AutoCal V3
to support controller read and flash functions.
Menu
Contains custom menu configuration files. Where
a custom menu is installed on AutoCal V3,
standard menu configuration files are also copied
here.
Scan
Contains files created by the Record Data
operation. Files in this folder will typically be
provided to your tuner to refine your calibrations.
Trace
Contains files created by the Save Trace File
operation. Files in this folder will typically be
provided to EFILive to assist with support
requests.
Tune
Contains calibration files which can be
programmed using the [Program Cal] and
[Program Full] tuning options. This is where
calibrations from your tuner must reside in order
to be available to program your vehicle.
Read
Contains calibration files which you have read
from your vehicle controller(s) with the [Read
Tune] option. This is where calibrations you will
send to your tuner will reside.
Custom folders can be created, refer to USB Thumb drive for instructions.
Tunes placed in custom folders will be accessible using the standard AutoCal
menu, or where tunes are correctly mapped using AutoCal Custom menu.
Communicating with AutoCal V3
Please avoid rapid connection/disconnection of AutoCal V3's USB
cable. Doing so repeatedly may cause the AutoCal V3 to fail to power
up via the USB connection. If AutoCal V3 does not power up within
10 seconds of a USB connection, you can reset AutoCal V3 by
powering up FlashScan V3 via the OBDII connection.
There are several methods available to move data to/from your AutoCal device.
The method used will depend on what data needs to be moved and how the tuner
chooses to manage content. Your tuner will provide instructions on how to
manage data.

AutoCal V3 User Guide
support@efilive.com - 15 - www.efilive.com
V8 Scan and Tune
Program Firmware
1. Connect AutoCal to your PC and open V8 Scan and Tune software.
2. Select [Check Firmware].
3. Select [Update Firmware].
4. After firmware has been updated if AutoCal V3 requires a boot block
update, AutoCal V3 will display the boot block update message on the LCD
screen. Where the user does not update the boot block after firmware is
updated, the boot block update message will be displayed each time the
device is powered.
5. Select [Update Config Files] if configuration files require updating.
6. Select [OK] to close firmware window.
Program Quick Setup
The Quick Setup is the quickest and easiest way to program all files required to
make AutoCal functional. The data that is copied into the quick setup file includes:
The device settings.
The current Options.txt file which contains the controllers and PID
selections.
All required supporting configuration files (*.obj, *.pmm, *.bix and *.dtc).
Up to 5 *.ctz and/or *.coz tune files.
This method requires your tuner to send you a *.bbx quick setup file via email.
1. Save the *.bbx file your tuner sent to the folder:
\Documents\EFILive\V8\BBX
2. Connect AutoCal to your PC and open V8 Scan and Tune software.
3. Navigate in the V8 software to [F5: BBX]->[F6: Quick Setup]
4. Select [Open Quick Setup] and navigate to the directory and select the
*.bbx file your tuner sent you.
5. Do not modify any of the settings defined by your tuner unless they request
you to.

AutoCal V3 User Guide
support@efilive.com - 16 - www.efilive.com
6. Select [Program Quick Setup] to program device settings, controller
configuration and tune files to your AutoCal.
Program Configuration Settings
This process is used to make changes to Scan and Tune controller selections and
PID configurations on AutoCal if your tuner does not send a Quick Setup file.
1. Save the Options.txt file your tuner sent to the folder
\Documents\EFILive\V8\Config
2. Connect AutoCal to your PC and open V8 Scan and Tune software.
3. Select [F5: BBX]
4. Select Open, and navigate to your required Options.txt file.
5. Do not modify any of the settings defined by your tuner unless they request
you to.
6. Select appropriate [Program] option. There are 4 options available. Your
Tuner should assist you in choosing the correct selection.
Program (Ctrl+P) Programs the attached device with the current
configuration and any supporting files that have been updated since the
device was last programmed.
Program Selections Only (Faster) programs the attached device with
only the configuration file. This option should only be used if you have only
changed PID selections. If you have changed the number and or type of
controllers for either scanning or tuning then you should use the Program
or Program All Required Data options.
Program Selections and Configuration Files (Slower) formats and then
programs the attached device with all configuration files regardless of
whether they are out of date or not.
Format CONFIG File System formats the CONFIG file system in which
the configuration and supporting files are stored. When making significant
changes to the BBX options, it is a good idea to format the CONFIG file
system to discard any old/unused files prior to programming.
Program Device Settings
This process is used to make changes to AutoCal device settings if your tuner
does not send a Quick Setup file.
1. Save the Settings.dat file your tuner sent to the folder
\Documents\EFILive\V8\Config
2. Connect AutoCal to your PC and open V8 Scan and Tune software.
3. Select [F6: Devices]
4. Select Open, and navigate to your required Settings.dat file.
5. Do not modify any of the settings defined by your tuner unless they request
you to.
6. Select [Program] to program device settings.
Using AutoCal V3 as a USB Thumb Drive
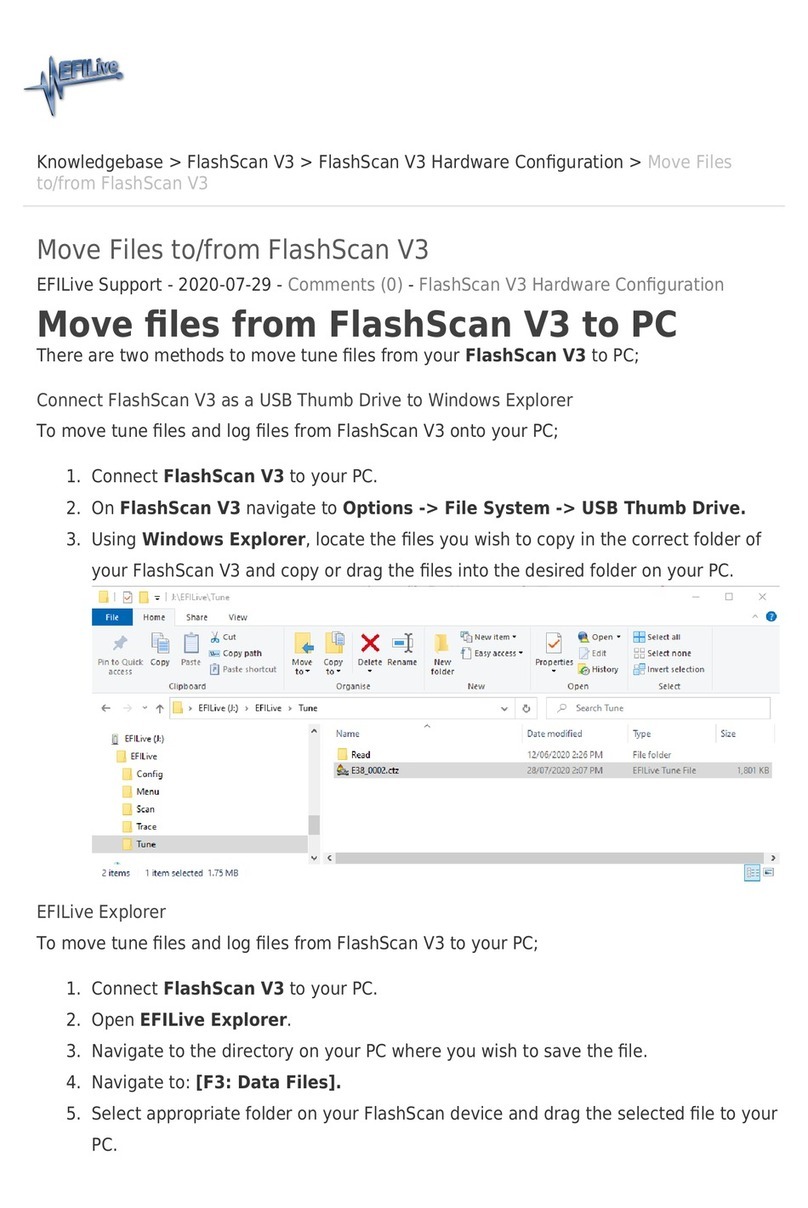
Use AutoCal V3 as a USB Thumb Drive to move/copy files to/from AutoCal V3.
Use windows explorer to manage the files and folders. To ensure data integrity,
eject the thumb drive from Windows Explorer before disconnecting the device.
1. Connect AutoCal to your PC.

AutoCal V3 User Guide
support@efilive.com - 17 - www.efilive.com
2. On AutoCal V3 navigate to Options -> F2: File System -> F3: USB Thumb
Drive.
Where the thumb drive is active, performing functions like programming device
settings and BBX will result in error $01C3, the FlashScan/AutoCal V3 device is
currently being used as a Windows USB thumb drive. De-activate the thumb drive
option on FlashScan/AutoCal V3 to use these functions.
Licensing a Controller
After navigating and selecting a tune file to flash, the first time a flash is performed
it must be allocated an available VIN license. To perform the allocation you will be
presented with two questions on the AutoCal:
Task
Description
Press the button on the AutoCal keypad to
confirm you wish to license the controller to the
AutoCal device.
Press the XButton if you do not want to license
the controller.
This is a final confirmation you wish to allocate the
license. Pressing the button on the AutoCal
keypad performs the license allocation.
Press the XButton if you do not want to license
the controller.

AutoCal V3 User Guide
support@efilive.com - 18 - www.efilive.com
AutoCal V3 Menu Navigation
AutoCal V3 supports two menu structures; the EFILive standard menu and the
user defined menu. Where a used defined menu is not installed, the EFILive
standard menu will be displayed.
User Defined Menu Structure
Tuners can customize the AutoCal V3 menu structure to suit their business
allowing the Tuner to define what options they wish their custom to see.
The User Defined menu is managed via text file that is defined in the
\Documents\EFILive\V8\User Defined Menus\ SampleCustomMenu.txt file. A
working example is also provided.
Custom menus can be installed/removed using the [F6 Devices]->[F5: Options]
screen.
[Install] will compile the named *.txt file to the mainmenu.menu custom file and
copy that file onto the device. At the same time it will remove the file
mainmenu.disabled from the device (if it exists).
[Disable Custom Menu] will rename the mainmenu.menu file to
mainmenu.disabled and save a copy of the mainmenu.disabled to
\Documents\EFILive\V8\User Defined Menus\mainmenu.disabled.
[Enable Custom Menu] will attempt to locate the file named mainmenu.disabled
on the device, if it can't find it on the device then it will try to locate it on the PC in
the folder \Documents\EFILive\V8\User Defined Menus and copy that file to the
Other manuals for AutoCal V3
1
Table of contents
Other EFILive Diagnostic Equipment manuals


