Ecom VT178iCID User manual

ΤΗΛΕΦΩΝΙΚΗ ΣΥΣΚΕΥΗ ΜΕ ΟΘΟΝΗ
Με επιλογή αναγνώρισης καλούντος
ModelNo:
Οδηγίες Χρήσης
•Παρακαλούµε, να διαβάσετε προσεκτικά τις Οδηγίες Χρήσης, της Συσκευής πριν την χρήση της
(Read the manual user before the use it).
•Φυλάξτε, τις Οδηγίες Χρήσης της Συσκευής, για µελλοντική σας χρήση
(Keep the user manual, for future use).
- 2 -
µ
• , µLCD
•
• ()
• (RJ11)
•
1. FSK / DTMF CID
2. µ µ µ &
3. µ µ µ &
4. 10 µ µµ
5. µµ
6. µ ,
7. µ
8. µ
9. µµ
10. LCD , µµ
11. µ Flash Time
12. µ 0
- 3 -
LCD
µµ µ
0 1 M0 1
D 08:30 IN 0 1
1 2 3 4 5 6 7 8 9 0 1 2 3 4 5 6
µ & µµ
1) µµ µ3 µ
2) µµ
µµ
- 4 -
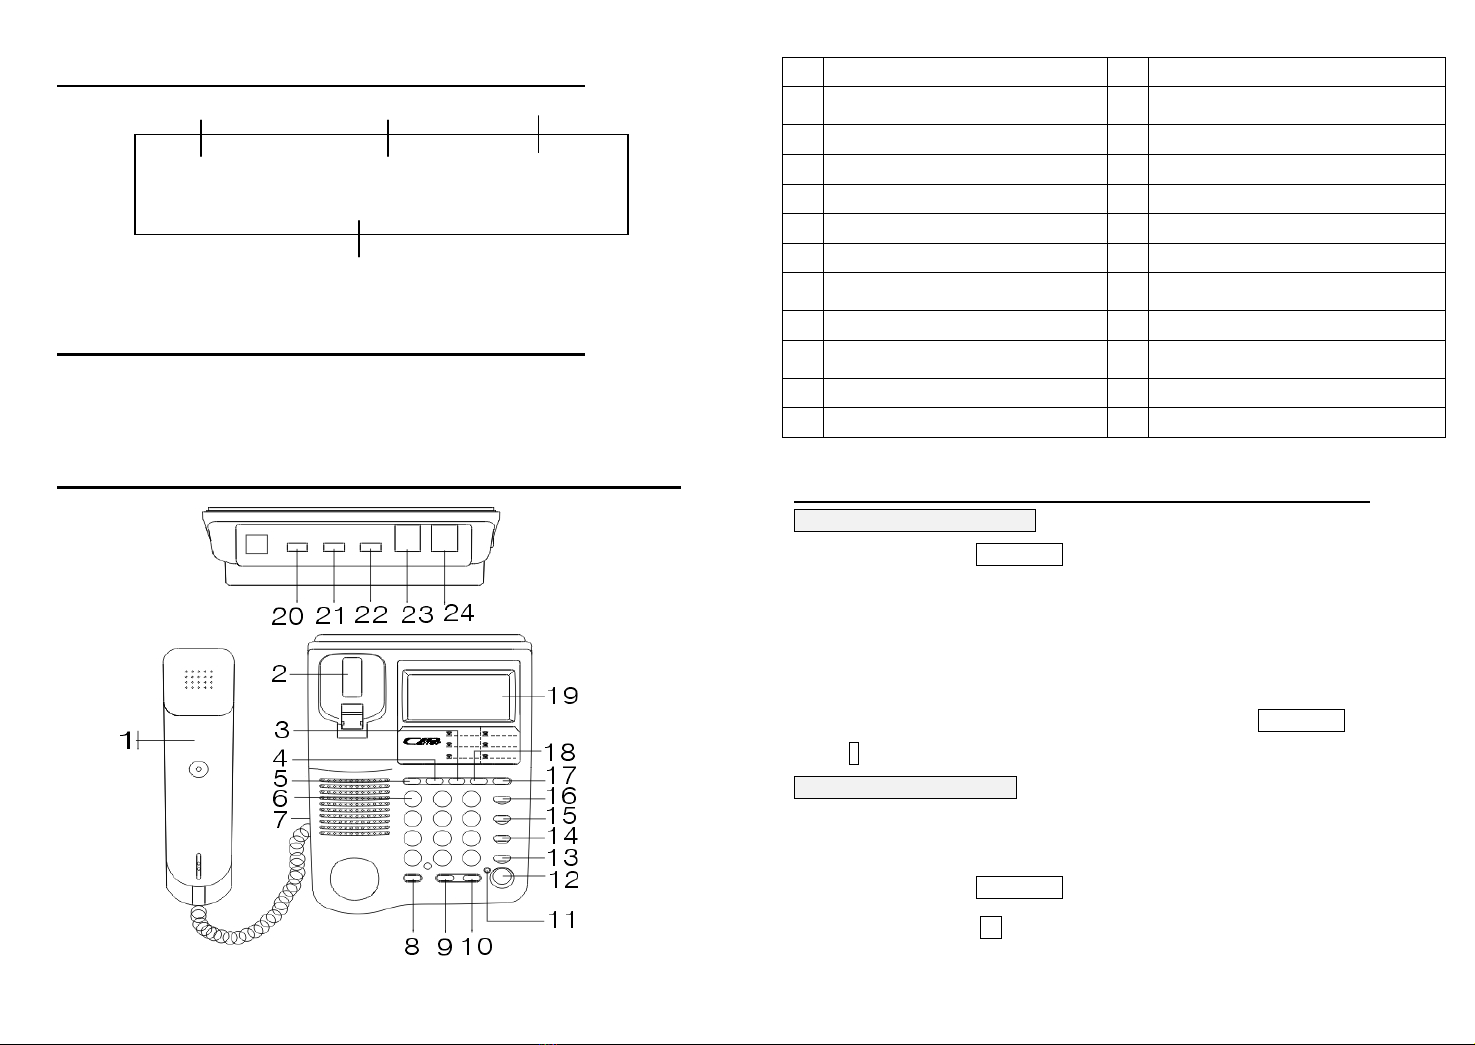
1 Χειρακουστικό 13 BACK Πλήκτρο Επανάκλησης
2 Άγκιστρο Στήριξης Χειρακουστικού 14
SET/HOLD Πλήκτρο Προγραµµατισµού &
Αναµονής Κλήσης
3 DOWN/- Πλήκτρο Πλοήγησης 15 DEL Πλήκτρο ∆ιαγραφής
4 OUT/X Πλήκτρο Εξερχοµένων Κλήσεων 16 RECALL Πλήκτρο Κλήσης Μνηµών
5 STORE/VIP/÷ Πλήκτρο Αποθήκευσης 17 CAL Πλήκτρο Κλήσης
6 Αριθµητικό πληκτρολόγιο 18 UP/+ Πλήκτρο Πλοήγησης
7 Είσοδος χειρακουστικού 19 LCD Οθόνη
8 BRIGHT Πλήκτρο Φωτεινότητας Οθόνης
LCD
20 Ρύθµιση έντασης φωνής
9 FLASH Πλήκτρο Μεταβίβασης 21 Ρύθµιση κουδουνισµού
10 RD/PA Πλήκτρο Επανάκλησης Τελευταίου
Αριθµού 22 Ρύθµιση τονικά παλµικά
11 IN-USE Λυχνία Λειτουργίας 23 ∆ευτερεύουσα εισ. Γραµµής
12 SP-PHONE Πλήκτρο Ανοικτής Συνοµηλίας 24 Είσοδος γραµµής
µ
(1) µ µµ
1. SET/HOLD µ , LCD µ “-0123456-”.
2. “1” , “2003” .
3. µ µµ.
µ , , , .
1. LCD µ µ
µ ..“3:58 p.m., 25th Jan 2003”, SET/HOLD µ ,
µ 1 , “0301251558” .
(2) µ LCD
1 5 . µ
“LCD 3”
1. SET/HOLD µ , LCD µ “-0123456-”.
2. 2 , LCD µ: “ LCd – 3 - ”

- 5 -
3. UP/+DOWN/- .
4. SET/HOLD .
(3) µ
1. SET/HOLD µ , LCD µ “-0123456-”.
2. 3 , LCD µ:: “ArEA - - - - -”
3. µ µ .
#/= µ µ
.
4. SET/HOLD .
5. µ .. “0755”, µ “0755” µ LCD
µ “ArEA - - - - -”.
(4) µ FLASH
1. SET/HOLD µ , LCD µ: “-0123456-”
2. “4” LCD µ “ FLASH 6 0 0 ”
3. UP/+DOWN/- FLASH time:
FLASH 1000 - FLASH 1000 ms
FLASH 600 - FLASH 600 ms
………………..
FLASH 90 - FLASH 90 ms
6. SET/HOLD .
(5) µ µ,
1. SET/HOLD µ , LCD µ: “-0123456-”
2. 5 LCD µ: “ AL 123”.
( µ µ .)
3. 1 1 µ, LCD µ
“AL 1 OFF”,
4. */. ON/OFF.
LCD µ “AL 1 12-00” , ON “12-00” ,
- 6 -
µ µ µ (.. “1300”).
5. SET/HOLD .LCD µ “AL 123”
; µ 2 3µ µ µ.
µ µ
.
(6) µ µ µ
1. SET/HOLD µ ,LCD µ: “-0123456-”
2. 6 , LCD µ: “LCOdE - - - - -”
3. µ µ.
µ #/= µ µ
.
4. SET/HOLD µ .
µµ µ µUP/+
DOWN/ µµµ µ BACK
.
(7) – Tone / Pulse
1. µ Tone/Pulse “Tone”
2. µµ µµ
“Pulse”.
(8) µ µ-RINGER
µ µ
Hi/Low µ µ.
(9) µ µ-VOLUME
µ µ
Hi/Low µ µ.
(10) µ IDD Lock
µ µ
“0”:
- 7 -
(1) -
(2) - “0” .
µ
(1) µ
1. SP-PHONE .
2. µ.
3. µ SP-PHONE .
(2) µ
1. SP-PHONE.
2. RD/PA µ µ µ.
(3) µ µ
1. SP-PHONE
2. µµ µ BACK
SP-PHONE .
3. µ µ .
(4) µ
1. µ SET/HOLD .
2. , µµ µ
µµ µ µ µ µ
µ UP/+DOWN/-.
3. µ
SP-PHONE .
µ
1. SP-PHONE
.
2. µ SP-PHONE
- 8 -
µ
(1) µ
1. UP/+DOWN/- µµ,
µµ µ .
2. UP/+µµ.
3. DOWN/ µµ.
4. µ µ 5sec.
(2) µ
1. UP/+DOWN/-µµ .
2. µ µ BACK µ , µ
µ.
3. µ µ
BACK , µ “0” µ
µ.
(3) µ µ µ
1. UP/+DOWN/-µµ
µ µ .
2. DEL .
(4) µ
1. UP/+DOWN/-µ .
2. DEL µ µ 3sec
.
µµµ
(1) µµ
1. OUT/x µµ µµ.
2. µ µ 5sec.
(2) µµ
1. OUT/x µµ µµ.

- 9 -
2. BACK , µ µ.
(3) µµ
1. OUT/x µµ µµ
.
2. DEL µµ.
3. µ DEL 3sec µµ.
(1) µ µ µ
SP-PHONE .
(2) µµ µ
DEL .
(3) µµ µ µ BACK .
VIP
(1) µ µµ VIP
1. UP/+、DOWN/-OUT/x µµ
µ µ.
2. STORE/VIP/÷ , µ VIP µµ.
µ LCD .
(2) µµ VIP
1. UP/+、DOWN/-OUT/x µµ
µ µ .
2. STORE/VIP/÷ VIP µµ.
µµ
1. CAL , LCD µ: CAL 0
2. µ µ 12 µµ.
- µ . .
- OUT/x
- 10 -
- STORE/VIP/÷
- UP/+
- DOWN/-
- */.
- #/= µ
- DEL
µµ
(1) µµ
1. STORE/VIP/÷ µ .LCD µ“ InPUt ”
2. µ.
3. STORE/VIP/ ÷ .
4. µ (0~9) µ.
z.. µ “0”
STORE/VIP/ ÷ + 98765432 + STORE/VIP/ ÷ + 0
(2) µ µµ
1. SP-PHONE .
2. RECALL .
3. (0~9) µ
µµ. µ .
(3) µµ
a) RECALL .
b) (0~9) .
(4) µµ
1. RECALL .
2. (0~9) .
3. DEL .

- 11 -
µ
µµ µ 44/2002 (RTTE Directive
1999/5/EC) µ .
µµ µ µ
µ:
(«A-GLS » - 56 – 153 51 – - .: +30/210 6034642,
www.agls.gr) .
µ
µµ µ 2002/95/
27
2003, µ µ µ
µ µ
µ µ 2002/96/
27 2003 µ
µ () µµ
µ µ µ
µ µµ
µ µ
µ.
µ µ
.
- 12 -
In the Package
• Telephone Set , with LCD Display
•Handset
• Cable of Telephone Set
• Cable of Network (RJ11)
• User Manual
Features
1. FSK / DTMF dual system CID
2. Call-in number displayed, stored & review
3. Dial-out number displayed, stored & review
4. 10-group two touch memories
5. Calculator Function
6. Alarm clock function
7. Music on hold function
8. Auto redial function
9. Pre-dialing & clearing function
10. LCD brightness adjustable
11. Adjustable Flash Time
12. 2-way IDD Key lock

- 13 -
LCDDisplay
Date Time Total Calls
0 1 M0 1
D 08:30 IN 0 1
1 2 3 4 5 6 7 8 9 0 1 2 3 4 5 6
Telephone number and Calculator
Connecting the Telephone
(1) Inserting 3 AA batteries
Before use this phone, you should insert 3 AA batteries in the Battery socket of this phone
firstly.
(2) Connecting the Handset / Telephone line
Connect the Handset Coiled Line and Telephone Line to the Base Unit.
Layout
- 14 -
1 Handset 13 BACK Button
2 Hook Switch 14 SET/HOLD Button
3 DOWN/- Button 15 DEL Button
4 OUT/X Button 16 RECALL Button
5 STORE/VIP/÷ Button 17 CAL Button
6 Number Keypad 18 UP/+ Button
7 Headset Socket 19 LCD Display
8 BRIGHT Button 20 Volume Hi/Low Switch
9 FLASH Button 21 Ringer Hi/Low Switch
10 RD/PA Button 22 Tone/Pulse Switch
11 IN-USE Indicator 23 Extension Line Socket
12 SP-PHONE Button 24 Telephone Line Socket
Setting the Telephone
(1) Setting the Date and Time
1. Press SET/HOLD button once, the LCD display “-0123456-”.
2. Then press number key “1” , the Year “2003” will flash.
3. Press Number Key to set two-digits of the YEAR. Then the Month will flash, press
Number Key to set MONTH, DATE, HOUR, MINUTE.
2. LCD will display the corresponding Calendar after setting.
For example, to set “3:58 p.m., 25th Jan 2003”, press SET/HOLD button once, then press 1 ,
then press Number Key“0301251558” directly to set up.
(2) Setting the LCD Contrast
You can select the LCD contrast level from 1 to 5 by programming. Your phone comes
from the factory set to “LCD 3”
1. Press the SET/HOLD button once, the LCD display: “-0123456-”
2. Press the number key 2 again, the LCD display: “ LCd – 3 - ”
3. Press UP/+or DOWN/-button to select the LCD Contrast.

- 15 -
4. Press the SET/HOLD button to confirm.
(3) Setting the Local Area Code
1. Press SET/HOLD button, the LCD display: “-0123456-”
2. Press the number key 3 again, the LCD display: “ArEA - - - - -”
3. Then press Number Key directly to set the Local Area Code.
To change preset Local Area Code, you could press #/= once to delete the preset
local area code. Then input new Area Code.
4. Press SET/HOLD button again to complete the setting.
3. For example, if need to set the local area code “0755”, press Number Key “0755”
directly when LCD displayed “ArEA - - - - -”.
4. To change the preset Local Area Code, when the LCD display
“ArEA 0755”, you could press #/= once to delete the preset local
area code. Then press Number Key to set the new Local Area Code.
(4) Setting the FLASH time
1. Press SET/HOLD button once, the LCD display: “-0123456-”
2. Press the number key “4” again, the LCD display “ FLASH 6 0 0 ”
3. Press UP/+or DOWN/-button to select FLASH time:
FLASH 1000 - The FLASH time will be 1000 ms
FLASH 600 - The FLASH time will be 600 ms
………………..
FLASH 90 - The FLASH time will be 90 ms
4. Press SET/HOLD button again to complete the setting.
(5) Setting the Alarm Clock
1. Press SET/HOLD button once, the LCD display: “-0123456-”
2. Press the number key 5 again, the LCD display: “ AL 123”.
( that means there are 3 groups alarm clock selectable.)
3. Press number key 1 to enter the first alarm clock setting, LCD will display “AL 1
OFF”,
- 16 -
4. Press the */. button to select the ON/OFF state. LCD will display
“AL 1 12-00” and “12-00” will flash after selected the ON state, and then press
Number Key to set the alarm time (for example, press “1300”, that means the Alarm
Clock time is preset at 1:00 a.m.).
5. Press the SET/HOLD button to confirm after finished. LCD will display “AL 123”
again; set the second & the third alarm clock as above steps.
After setting the alarm clock, the phone will make alarm sound at the preset time, you
could press any key to stop the alarm.
(6) Setting the Long-Distance Code
1. Press SET/HOLD button, the LCD display: “-0123456-”
2. Press the number key 6 again, the LCD display: “LCOdE - - - - -”
3. Then press Number Key directly to set the Long-Distance Code.
To change preset Long-Distance Code, you could press #/= once to delete the
preset long-distance code. Then input new Code.
4. Press SET/HOLD button again to complete the setting.
After set-up of the Long-distance Code, press UP/+ or DOWN/- button
to review the desired Caller ID memory, then press BACK button twice,
this phone will add the Long-Distance Code in front of the desired
memory and dial out.
(7) Selecting the Dialing Mode – Tone / Pulse
zPut the Tone/Pulse Switch at the position “Tone”
zIf you can not dial, put the Tone/Pulse Switch at the Position “Pulse”
(8) Setting the Ringer Volume
You can select the Ringer Volume Hi/Low by setting the Ringer Volume switch on the right
side of this unit.
(9) Setting the Hands-free Speakerphone Volume
You can select the Hands-free speakerphone Volume Hi-Low by setting the Hands-free
Volume switch on the right side of this unit.

- 17 -
(10) Setting the IDD Lock
You can use the key to set the IDD Lock at the positions as below:
(1) Red Dot - All telephone numbers can be dialed out.
(2)Green Dot - All telephone numbers with first digit “0” can not be dialed.
MakingCalls
(1) Make Calls
1. Lift the handset or press the Hands-free SP-PHONE button.
2. Dial a phone number.
3. To hang up , place the handset on the cradle or press SP-PHONE button.
(2) To redial the Last Dialed Number
1. Lift the handset or press Hands-free SP-PHONE button.
2. Press RD/PA button once, the last number dialed will be redialed automatically.
(3) To Auto-redial the Last Dialed Number
1. Lift the handset or press Hands free SP-PHONE button and dial.
2. If the line is busy, you could press the BACK button directly without hanging up the
handset or press SP-PHONE button.
3. Then this phone will auto-redial the number again and again until the other party is
connected.
(4) To Put a Call on Hold
1. Press SET/HOLD button when you are talking.
2. You may place the handset on the cradle, the line will still be hold and the other
party will hear a music sound. At this moment, the phone will ring, then use UP/+or
DOWN/-to select the types of music on hold (You could select 8 types of
Music-On-Hold).
3. To release the hold, pick up the handset or press the Hands-free
SP-PHONE button again.
- 18 -
AnsweringCalls
1. When the unit rings, lift the handset or press Hands-free SP-PHONE button to
answer.
2. When finished talking, hang up the handset or press Hands–free SP-PHONE
button again.
UsingtheCallerList
(1) Review the Caller List
1. Press UP/+or DOWN/-button to backward or forward review the number,
date and time of the incoming call.
2. To search from the latest call, press UP/+button repeatedly.
3. To search from the oldest call, press DOWN/-button repeatedly.
4. To return to the standby mode, please wait for 5 seconds.
(2) Call Back from the Caller List
1. Press UP/+or DOWN/-button repeatedly to find the desired caller.
2. To dial back local number, directly press BACK button once, the desired caller’s
number will be dialed out automatically.
3. To dial back long-distance number, press BACK button twice, the phone will auto
add “0” or the Preset Long-distance Code before the desired caller’s number and
then dial out automatically.
(3) Erase Caller List Information
Toerase a specific callerinformation from the CallerList:
1. Press UP/+or DOWN/-button repeatedly to find the caller information you
want to erase from the Caller List.
2. Press DEL button twice to erase the desired Caller information.
Toerase all callerinformation from the CallerList:
1. Press UP/+or DOWN/-button to enter the list.
2. Press and hold DEL button for more than 3 seconds to erase all
- 19 -
caller information.
Using the Dial-out Memories Function
(1) Review Dial-out Memories
1. Press OUT/x button repeatedly to view all Dial-out Memories.
2. To return to the standby mode, please wait for 5 seconds.
(2) Call Back from the Dial-out Memories
1. Press OUT/x button repeatedly to find the desired Dial-out Memories.
2. Press BACK button, the desired Dial-out Memories will be dialed out.
(3) Erase Dial-out Memories
1. Press OUT/x button repeatedly to find the Dial-out Memories you want to erase.
2. Press DEL button to erase the desired Dial-out Memory.
3. Press and hold DEL button for more than 3 seconds to erase all Dial-out
Memories.
Using the Pre-dialing Function
(1) You can pre-dial the telephone number without picking up the Handset or pressing
Hands-free SP-PHONE Button.
(2) If any digits wrongly-dialed, you could press DEL button to delete it.
(3) All number dialed, you can press BACK button to dial out.
Using the VIP Function
(1) Store Phone Number in the VIP Memories
1. Press UP/+、DOWN/-or OUT/x button repeatedly to find the desired phone
number.
2. Press STORE/VIP/÷ button, the number will be stored as VIP memories.
There will be a Lock Symbol on the left side of the LCD Display.
(2) Erase VIP Memories
1. Press UP/+, DOWN/-or OUT/x button repeatedly to find the desired VIP
- 20 -
Memories you want to erase.
2. Press STORE/VIP/÷ button again to erase the desired VIP Memory.
Calculator Function
1. PressCALbutton,theLCDdisplay: CAL 0
2. You can start to use this phone as a 12-digits calculator.
- Press Number Keypad To input digits
- Press OUT/ x Button Multiply function
- Press STORE/VIP/ ÷ Button Divide function
- Press UP/+Button Plusfunction
- Press DOWN/-Button Minusfunction
- Press */ . Button Add a dot
- Press #/= Button Calculate the result
- Press DEL Button Clear one input data
Using the Fast-dialing Memories Function
(1) Store Fast-dialing Memories
1. Press STORE/VIP/÷ button once.The LCD display “ InPUt ”
2. Press Number Key to input the Telephone number.
3. Press STORE/VIP/ ÷ button again.
4. Press the one key (0~9) to store the telephone number
zFor example, if you want to store the telephone number “98765432” into the
key “0”, you need to press:
STORE/VIP/ ÷ + 98765432 + STORE/VIP/ ÷ + 0
(2) Dial-out Fast-dialing Memories
1. Lift up the Handset or press SP-PHONE to hear a dialing tone.
2. Press the RECALL button.
3. Then press the one key (0~9) that stored desired Fast-dialing memory. This
phone will dial-out the fast-dialing stored memories.

- 21 -
(3) Review Fast-dialing Memories
In on-hook state, press “0” (or 1~9), LCD will display the stored numbers or “NO
CodE” if no stored numbers.
a) In on-hook state, press RECALL button.
b) Press one Key (0~9) to review.
(4) Erase Fast-dialing Memories
1. In on-hook state, press RECALL button.
2. Press one Key (0~9) to review.
3. Press DEL key twice to delete this stored numbers,
- 22 -
Stamping of Product
The present product is arranged with the requirements of PD 44/2002 (RTTE Directive
1999/5/EC) and brings the labeling .
Copy of Statement of Conformity you can be supplied from the supplier:
(“A-GLS LTD” - Leontarioy 56 – 153 51 Pallini – Attica – Greece. Tel.: +30/210 6034642,
www.agls.gr).
Collection of Products
The present product is arranged with the requirements of directive of 2002/95/EC
EUROPEAN PARLIAMENT AND COUNCIL of 27 January 2003, with regard to the
restriction of use of certain dangerous substances in types electric and electronic equipment
and brings the following labeling:
According to the requirements of directive of 2002/96/ EUROPEAN PARLIAMENT AND
COUNCIL of 27 January 2003 with regard to the waste of types electric and electronic
equipment ([AHHE) the included in the directives products and individual elements of
these afterwards the use or their scorn should not be flown in the waste with the other
domestic litter but be returned in the point of sale or in suitable point of recycling electric
and electronic equipment. For more information you will communicate with the services of
cleanness of your municipality.
Table of contents
Languages:
Popular Telephone manuals by other brands


Zycoo
Zycoo ZX20 SERIES quick start guide

Panasonic
Panasonic KX-TG2257S - 2.4 GHz Digital Cordless... operating instructions

Bell
Bell 630 Series Common Installation and maintenance information

Samsung
Samsung GT-I9100T user manual

Orchid Telecom
Orchid Telecom XL250 user guide

Toshiba
Toshiba Strata DK 24 Quick reference guide


