1
2
3
4
5
6
7
8
9
10
11
12
13
14
15
16
30mg
50mg
2 min
3 min
4 min
5 min
6 min
7 min
8 min
15 min
Program NumberFrequency Output
1 2 3 4 5 6 7 8
Program Output Frequency Suggested Ouput & Freq.*
*Suggested settings
are designed for optimal
performance over
approximately one month
5 6 7 8
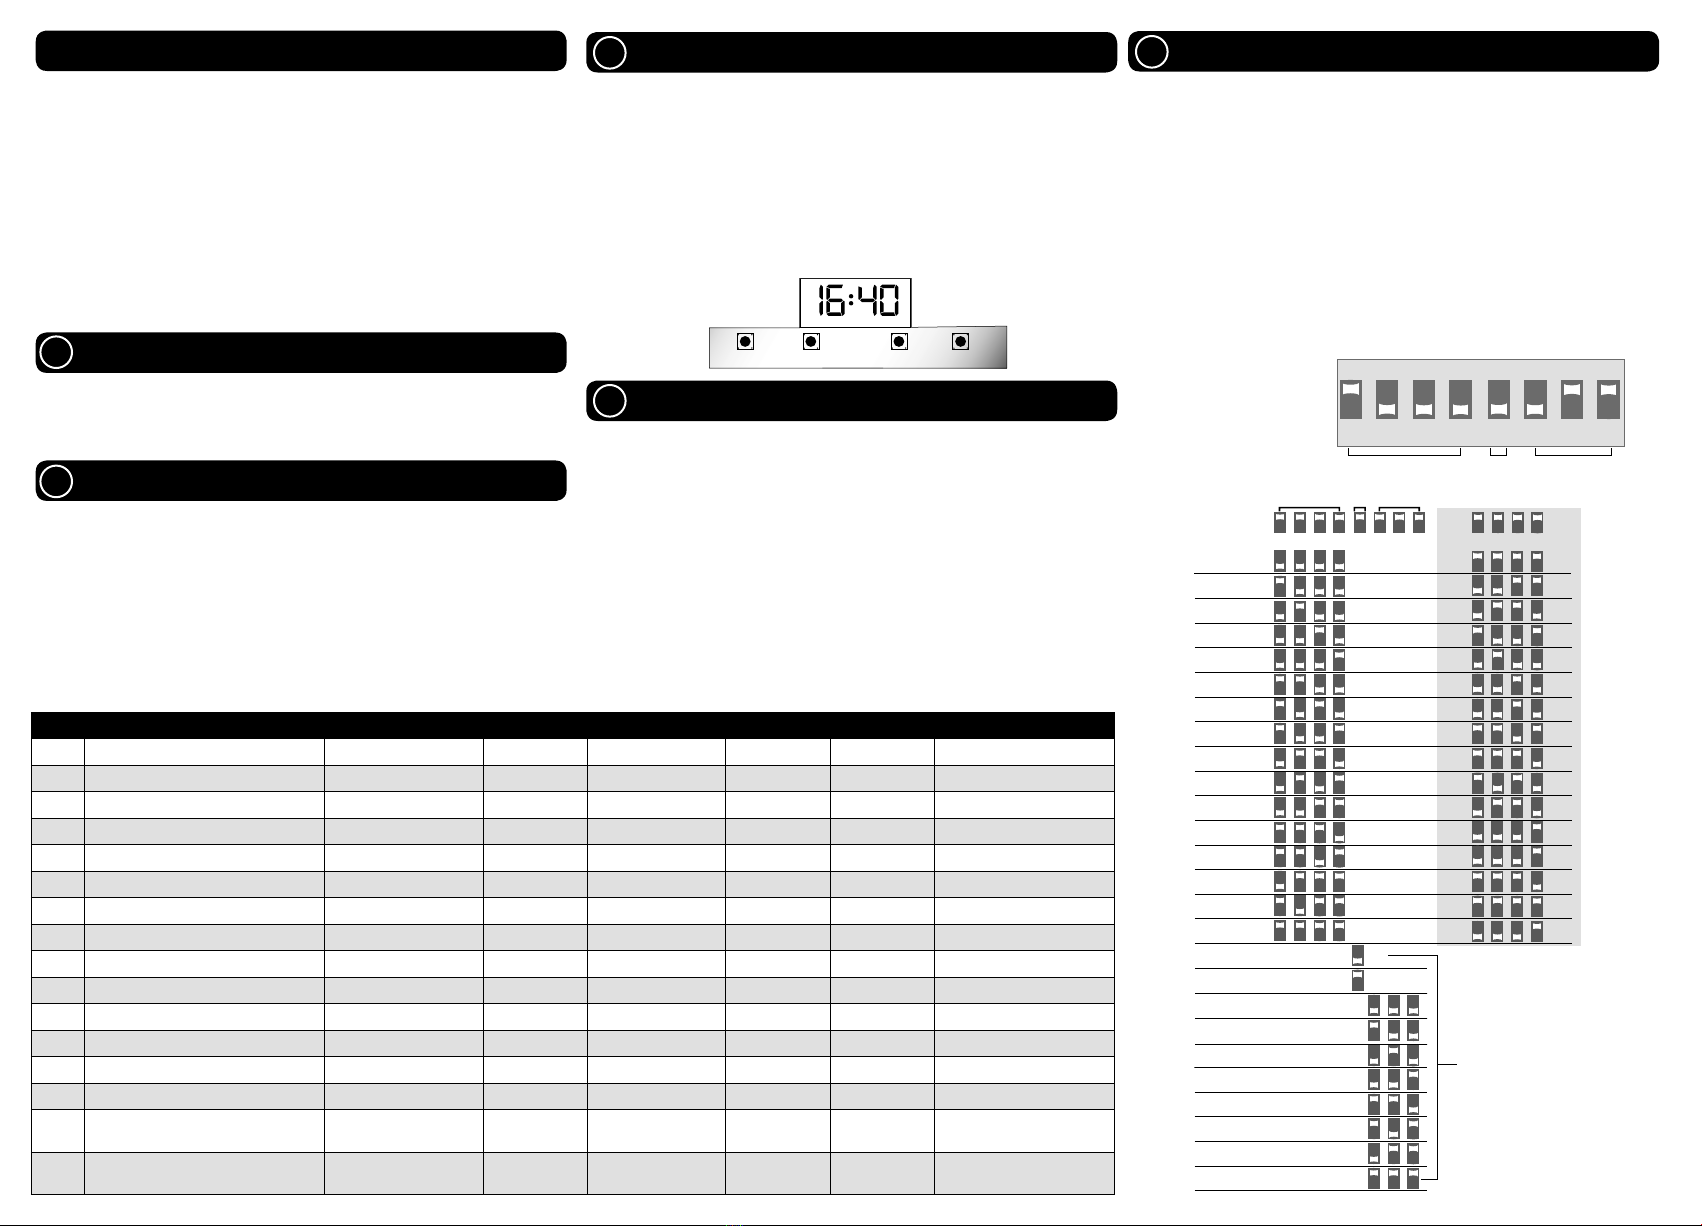
The program can be changed at any time to suit you. There are 16
standard programs to choose from as detailed in g 1. These are
selected bychangingdipswitches1-4onthecircuitboard.Theamount
of product dispensed (output) and frequency of the output can be
varied for each of the programs by changing dipswitches 5-8. The
individual dipswitchsettingsforeachprogramareshownbelowin g3
To set the program: Once the dipswitches have been changed, hold
the reset button for 4 seconds, the expected can life (in days) will be
displayed on the LCD on the circuit board. Release the button, and
as the LCD changes to display the time the unit will spray once to
conrm the program has been accepted.
Instructions for Use Setting a Program
Setting the Clock
Prog Application Days Hours Output & Freq Days Hours Output & Freq
1 Constant Mon-Sun always on as per dipswitch
2 Home Mon-Sun 6am-10pm as per dipswitch Mon-Sun 10pm-6am 30mg; 15 min
3 Standard Business/Retail Mon-Sun 9am-6pm as per dipswitch Mon-Sun 6pm-9am 30mg; 15 min
4 5 day Retail, late night Thurs Mon-Wed & Fri 8am-6pm as per dipswitch Thurs 8am-9pm as per dipswitch
5 5 day Retail, late night Fri Mon - Thurs 8am-6pm as per dipswitch Fri 8am-9pm as per dipswitch
6 7 day Retail, late night Thurs Mon-Wed & Fri-Sun 8am-6pm as per dipswitch Thurs 8am-9pm as per dipswitch
7 7 day Retail, late night Fri Mon - Thurs, Sat-Sun 8am-6pm as per dipswitch Fri 8am-9pm as per dipswitch
8 7 day Retail, late night Thurs & Fri Mon-Wed, Sat-Sun 8am-6pm as per dipswitch Thurs & Fri 8am-9pm as per dipswitch
9 6 day Retail Mon-Sat 8am-6pm as per dipswitch
10 School - General Mon-Fri 8am-4pm as per dipswitch
11 5 day Retail - Early Opening Mon-Fri 6am-6pm as per dipswitch
12 7 day Retail - Early Opening Mon-Sun 6am-6pm as per dipswitch
13 7 day Hospitality/Food Service Mon-Sun 11am-12am as per dipswitch
14 5 day Hospitality/Food Service Wed-Sun 11am-12am as per dipswitch
15 Aged Care Mon-Sun 5am-7am;
10am-12am as per dipswitch Mon-Sun 7am-10am frequency twice as often as
dipswitch setting
16 School - Restroom Mon-Fri 8am-12pm as per dipswitch Mon-Fri 12pm-4pm frequency twice as often as
dipswitch setting
Congratulations on the purchase of your new EcoProC. To get the most
out of your new dispenser read this set of instructions carefully and
also the instructions on the back of your aerosol can (sold separately).
This kit contains:
1 Ecomist EcoProC Professional Automatic Aerosol Dispenser•
3 x AA type Alkaline Batteries•
Screws for installation of dispenser into plaster board•
Plastic Stand and mounting screws•
Instructions & Warranty Card•
It is important to set the clock for the EcoProC to operate properly.•
Once the batteries have been installed set the day, hour and
minute using the labelled buttons on the Circuit Board (g 2)
Note: The clock is in 24 hour format. eg: 4:40 pm = 16:40
Press the Day button on the circuit board until the correct day of•
the week is shown at the bottom of the LCD screen.
Note: Should the LCD screen switch o, press the reset
button to activate.
How to Replace the Aerosol Can
Turn the dispenser solenoid switch OFF.•
Remove old aerosol can by unscrewing anticlockwise.•
Remove spray nozzle from the top of the new aerosol can.•
Screw the can into the solenoid valve clockwise until nger tight•
ensuring a complete seal. Do not over-tighten.
Face the dispenserawayfromyouand turn the solenoidswitch ON.•
Hold down the reset button for 4 seconds until the expected can
life (in days) is displayed on the LCD. Release the button and as the
LCD changes to show the time again, the dispenser will spray once.
CAUTION: IF ACCIDENTALLY SPRAYED IN EYES FLUSH
IMMEDIATELY WITH WATER.
Programming example:
Prog 2, output: 30mg,
freq: 8mins.
g 1
Variable settings for Programs.
Note: Changes to these settings
will aect can life
Opening Your Dispenser
Alkaline batteries must be used to ensure correct & long life•
operation of dispenser.
Install the 3 Alkaline type AA batteries. Ensure that the•
battery polarities are correct as shown in dispenser (g 4).
Note: Never use rechargable or heavy duty batteries in your
dispenser as they will cause it to malfunction.
Press the reset button on the circuit board to activate the LCD•
display.
To open dispenser separate the front cover from the back plate by
pressing on the bottom of the dispenser and pull apart gently.
g 3
HOUR MINUTE DAY RESET
MO
ON
12345678
g 2
1
Batteries
2
3
4
5
12345678
Program Output Frequency


