EcoQuest Living Water IIs CT User manual
OWNER’S MANUAL
CAUTION: read manual carefully for
proper procedures and operation.
• Restrictions
• Installation
• Operation
• Maintenance
• Changing the Filters
• Changing the UV Lamp
• Specifications
• Warranty
65-00137-004
LW_OM_ENG_01007 Rev. 0107
EcoQuest International
310 T. Elmer Cox Drive
Greeneville, TN 37743
(800) 989-2299
ADVANCED WATER TREATMENT SYSTEMS
�
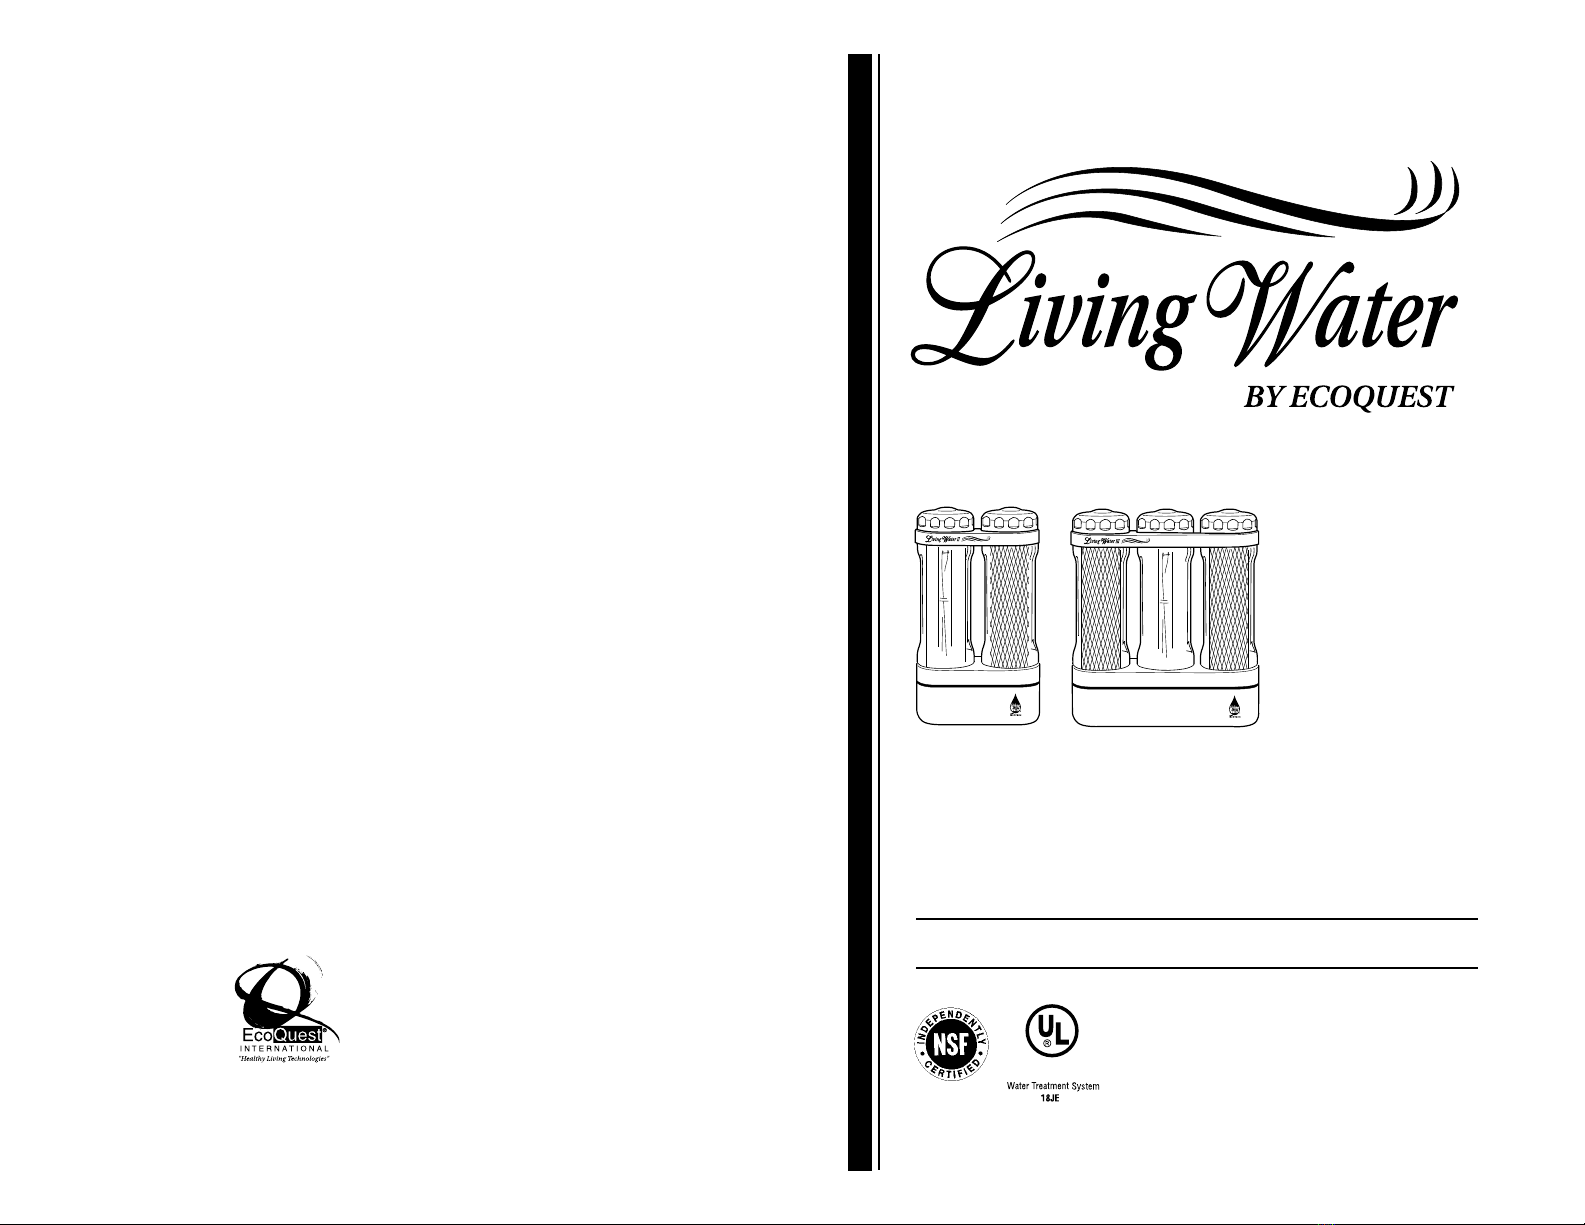
Living Water IIs CT
Countertop
Living Water IIIs CT
Countertop
Thank you for your purchase of the EcoQuest Living Water Advanced Water
Treatment System. This system has been designed to provide you with years of
trouble-free operation and thousands of gallons of safer, great-tasting water with a
minimal amount of maintenance.
Product Registration Card
Please send in your EcoQuest product registration card to:
EcoQuest International, 310 T. Elmer Cox Drive, Greeneville, TN 37743.
Proper registration will serve as proof of purchase in the event your original receipt is
misplaced or lost.
If you have any questions regarding the installation and operation of your Living
Water or you require service, please contact you local authorized EcoQuest Business
Owner or call EcoQuest at 800.989.2299.
Use Restrictions
A minimum water pressure of 15 psi is required to operate the Living Water Unit (45
– 60 psi is recommended).
CAUTION: Do not drink water from the Living Water if the UV Lamp does not
activate or when there is no electricity.
In addition, the Living Water is not designed to process warm or hot water. Allow
only cold or ambient temperature to flow through the system.
Do not use with water that is microbiologically unsafe or of unknown quality without
adequate disinfection before or after the system.
System and installation must comply with local state regulations.
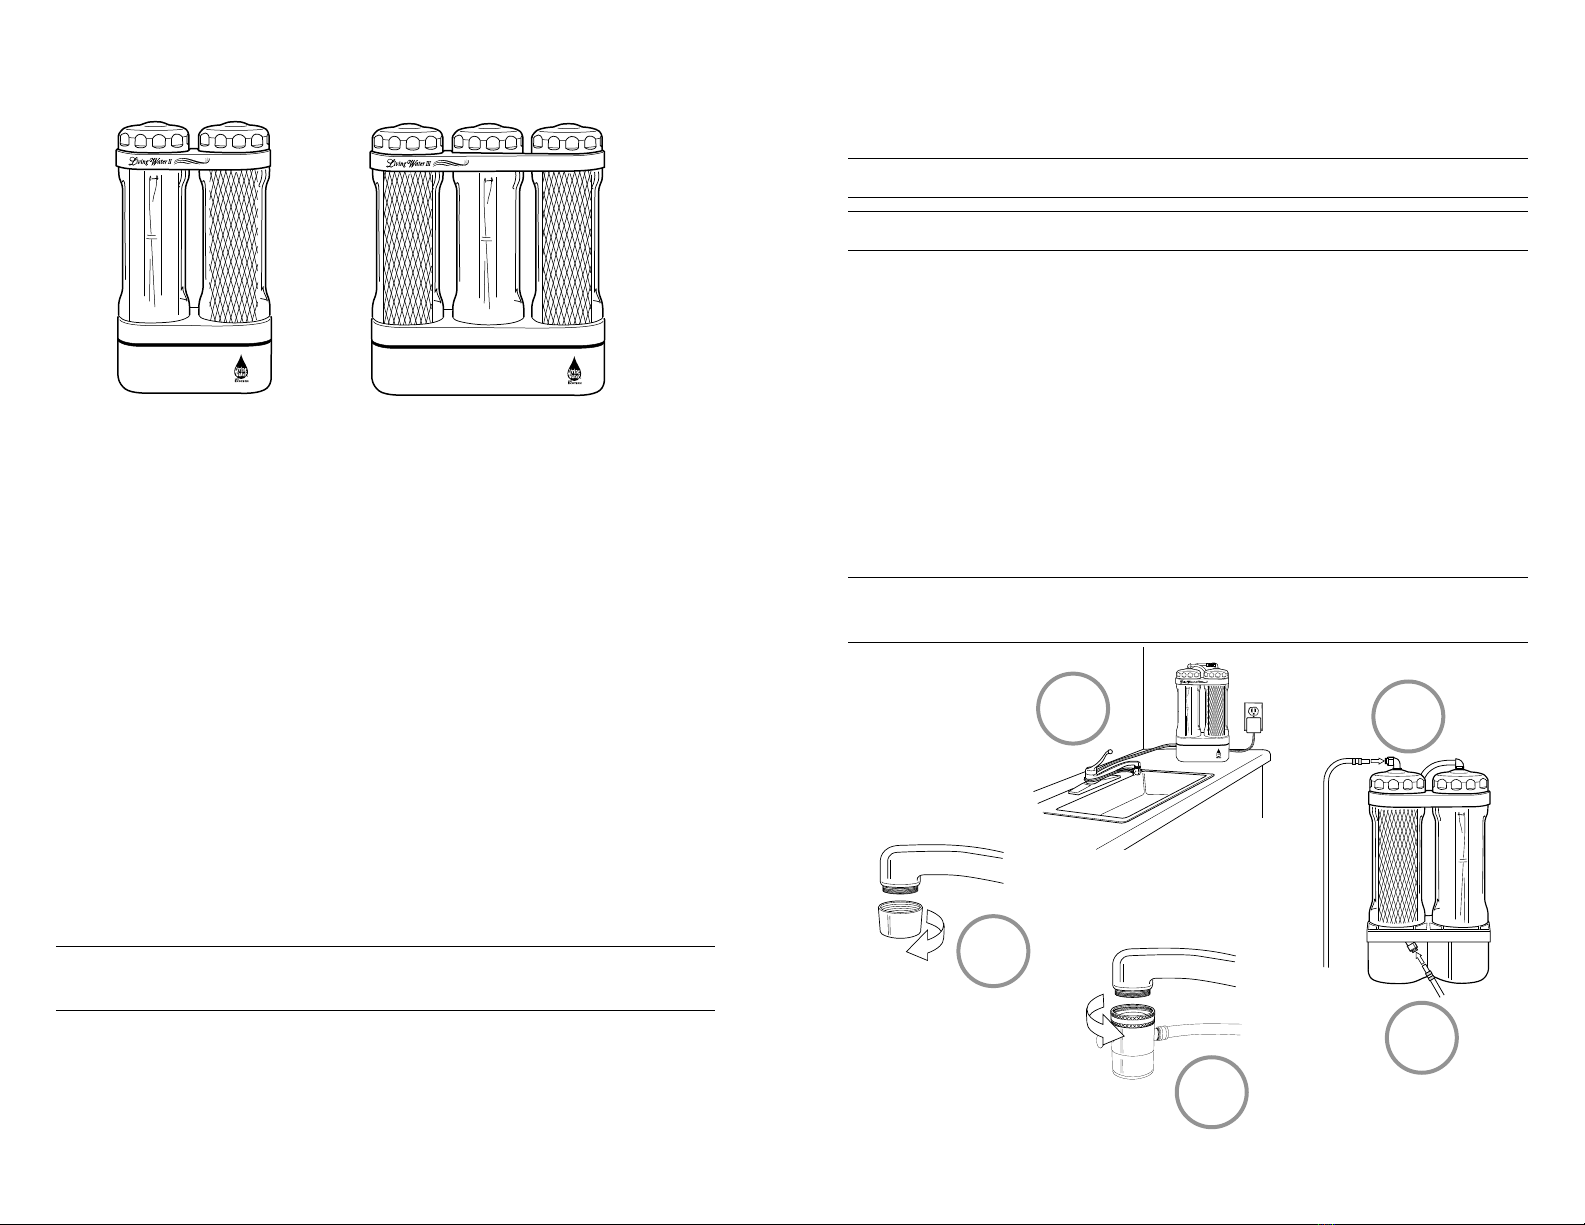
Installation of Countertop Models (CT)
Living Water IIsCT, and IIIsCT all come ready to install to most faucets. Installation
takes just a few minutes and requires a pair of pliers.
NOTE: The unit must be installed vertically (not horizontal)
WARNING: Remove protective packaging from inside the UV lamp housing before operation.
1. Remove the existing aerator and gasket from the faucet. If the threads on the hose
assembly do not match your faucets threads, use the included adapter or obtain one
from your local hardware store.
2. Thread the hose assembly onto the faucet.
3. Connect the shorter tubing of the diverter assembly to the inlet of the system by
simply pushing the metal tube into the lower fitting (located at the rear of the unit,
towards the bottom) until you hear a click.
4. Connect the longer tubing to the outlet of the system by pushing the metal tube into
the top fitting (located in the cap of the post-filter chamber) until you hear a click.
5. Place hoses as shown and plug the power supply into a nearby receptacle.
IMPORTANT: Do not plug your Living Water unit into an outlet that can be turned off with a
switch, such as an outlet for a garbage disposal.
LW IIs LW IIIs
Pre-Filter
Item #US50705
Post-Filter
Item #US50704
UV Lamp
Item #US70015
Post-Filter
Item #US50704
1
2
5
3
4
1 2
UV Lamp
Item #US70015
Filter Maintenance
The filter cartridges in the Living Water require periodic replacement for peak
performance.
CAUTION: Use only replacement filters provided by your Living Water distributor.
Contact your EcoQuest Business Owner for replacement filters.
The pre-filter (Living Water III only - see page 1) should be replaced when it appears
dirty and/or the normal flow of water through the system has decreased.
The post-filter should be replaced when one or more
of the following occur:
• The filter has been in service for one year.
• The filter has processed more than 1000 gallons of
water.
• The system has not been activated for more than
two weeks.
• There is a noticeable decrease in water flow.
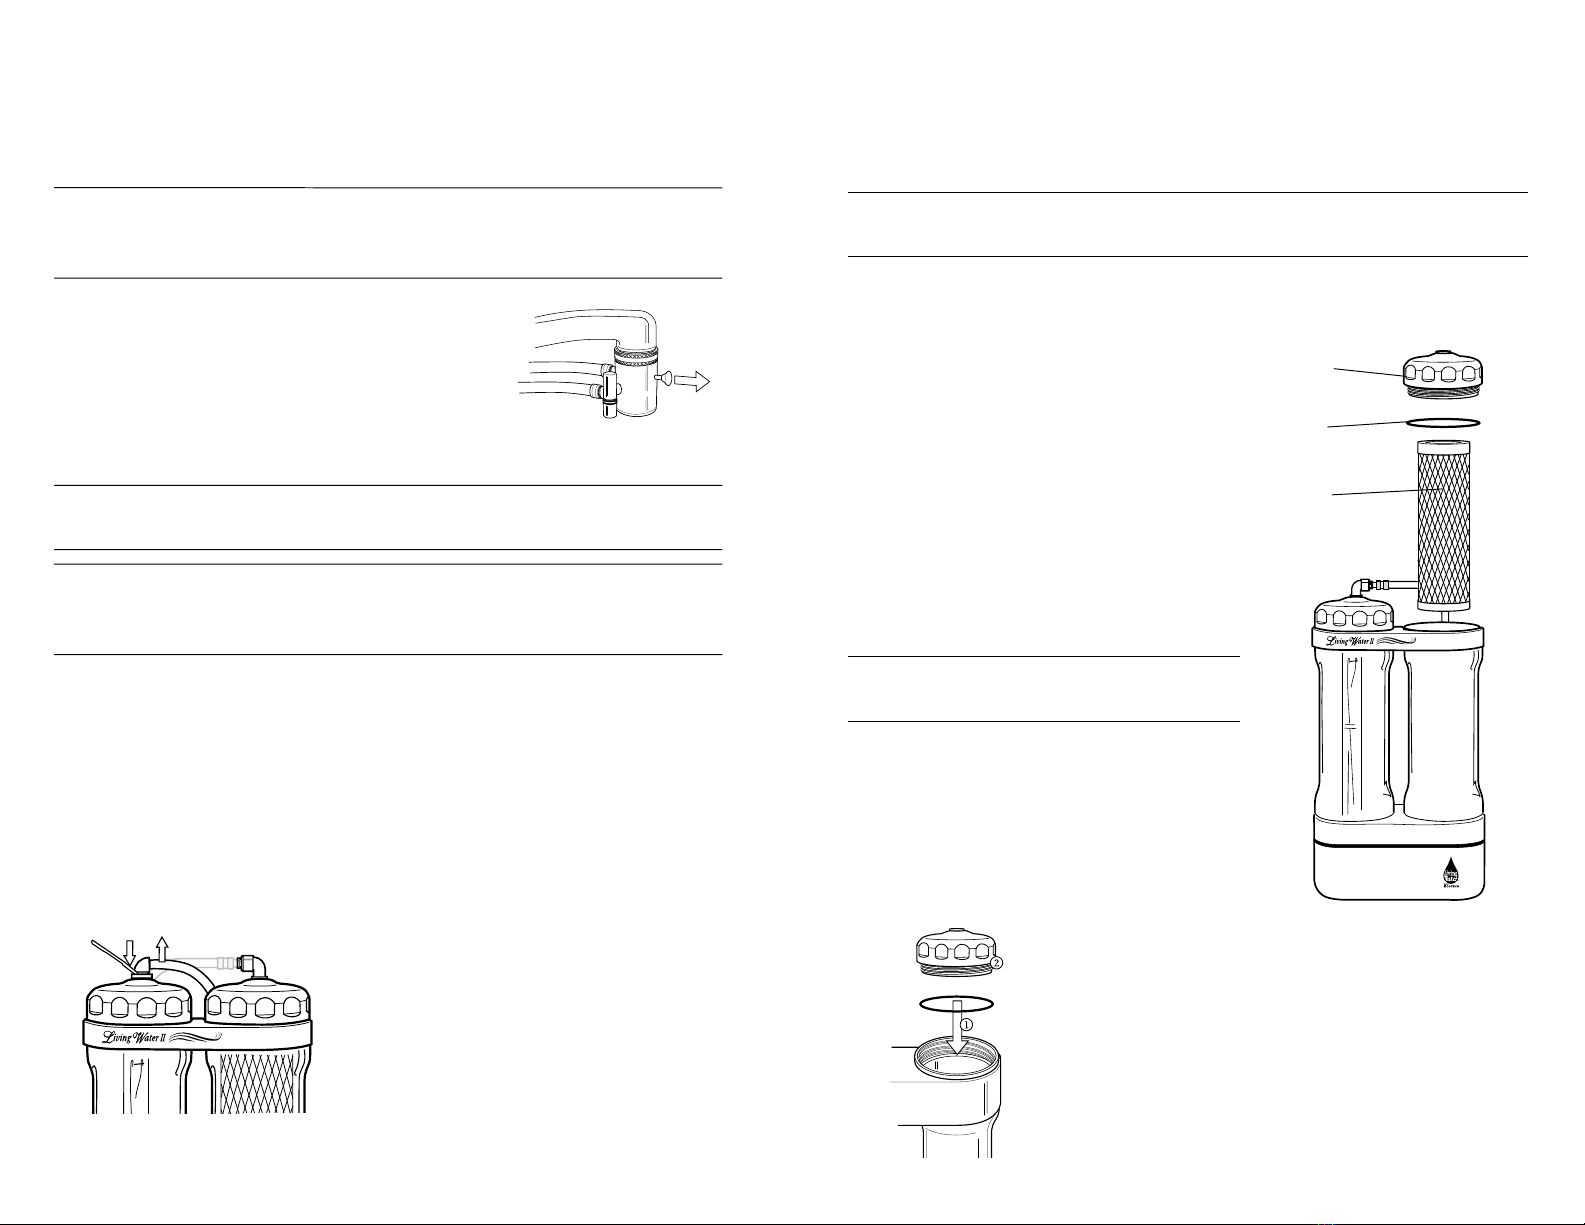
Changing the Filters
CAUTION: Unplug the system to prevent electrical
shock and potential exposure to UV light.
1. Remove the filter chamber cap (see page 3).
2. Remove the filter (B) and discard.
3. Install the new filter (B).
4. Replace the top cap (A) making sure the blue
o-ring (C) is seated properly in the chamber
when the cap is tightened.
A
B
C
Operation
Your new Living Water system has been designed to be exceptionally simple to use.
Be sure to read and follow all instructions before operating.
IMPORTANT: Before using your new Living Water system, allow the water to flow
though the system for at least five (5) minutes. Do not drink the water coming from
the system during this initial startup.
1. To operate the Living Water simply turn on the cold
water and pull the small pin outward. This will direct
water through the system and return the treated water
out of the small spigot. Once the filter chambers are
filled, the UV lamp will activate automatically and
water will flow from the bottom to the top of the
system in a swirling action.
CAUTION: If the water flows from the top of the system to the bottom, the hose connections
are reversed. See page 2 for correct hose installation instructions.
IMPORTANT: If the diverter pin does not remain in the "out" position by itself, or the
UV lamp does not activate, there is not sufficient water pressure (minimum of 15 psi) to
operate the system.
2. If this is the first time you are using your new system, or you have performed
maintenance, see INITIAL STARTUP above. Otherwise you can begin enjoying
great-tasting Living Water immediately.
Note: You can maximize the life of the UV lamp and reduce maintenance cost by
filling one-gallon containers or large pitchers with treated water and storing them in
the refrigerator for use.
Maintenance: Removing the Filter Cap(s)
Maintaining your Living Water will require the
removal of the filter chamber caps. To remove
a cap, disconnect the tubing by pressing down
on the connector collar using the included tool
while pulling up on the tubing. Once the tubing
is disconnected, unscrew the cap and remove.
34
5. Reconnect the tubing by reinserting the connector into
the collar. Press down on the tubing until the connector is
seated properly.
6. Plug in the power supply, turn on the system and allow
water to flow through the new filter for a minimum of five
(5) minutes before drinking the water.
Please Note: If your Living Water unit develops leakage around the top
cap, simply remove the cap, reseat the blue o-ring (C), and carefully
replace the cap (see step 4 above).
Specifications
Living Water II
Flow Rate . . . . . . . . . . . . . . . . . . . . . . . . . . . . . . . . . 1/2 gallon/minute (2 Liters/minute)
Min. Operating Pressure. . . . . . . . . . . . . . . . . . . . 15 psi (105kPa)
Max. Operating Pressure . . . . . . . . . . . . . . . . . . . 100 psi (609kPa)
Water Temp. . . . . . . . . . . . . . . . . . . . . . . . . . . . . . . 40 – 100 F (5 – 38 C)
Electrical Requirements . . . . . . . . . . . . . . . . . . . . 20 watts, 50 – 60 Hz, 110 or 230 volts
Filter . . . . . . . . . . . . . . . . . . . . . . . . . . . . . . . . . . . . . Activated Carbon Block with lead
Adsorbent media
Particulate Reduction . . . . . . . . . . . . . . . . . . . . . . 0.5 micron nominal
Filter Life . . . . . . . . . . . . . . . . . . . . . . . . . . . . . . . . . 1 year or 1000 gallons (4,000 Liters)
Chemical Additives . . . . . . . . . . . . . . . . . . . . . . . . None
UV Lamp Life . . . . . . . . . . . . . . . . . . . . . . . . . . . . . 10,000+ on/off cycles (approx. 2 years)
Dimensions . . . . . . . . . . . . . . . . . . . . . . . . . . . . . . . 7.5 x 13 x 4 in. (19 x 33 x 10 cm)
Dry Weight. . . . . . . . . . . . . . . . . . . . . . . . . . . . . . . . 6 lbs. (2.75 kg)
Living Water III
Same as above except
Dimensions . . . . . . . . . . . . . . . . . . . . . . . . . . . . . . . 11 x 13 x 4 in. (28 x 33 x 10 cm)
Dry Weight. . . . . . . . . . . . . . . . . . . . . . . . . . . . . . . . 8 lbs. (3.65 kg)
This Class B system conforms to NSF/ANSI 55 for the supplemental bactericidal
treatment of disinfected public drinking water or other drinking water which has
been tested and deemed acceptable for human consumption by the state or local
health agency having jurisdiction. The system is only designed to reduce normally
occurring non-pathogenic microorganisms. Class B systems are not intended for
disinfection of contaminated water.
System conforms to NSF/ANSI 42 for the specific performance claims as verified and
substantiated by test data.
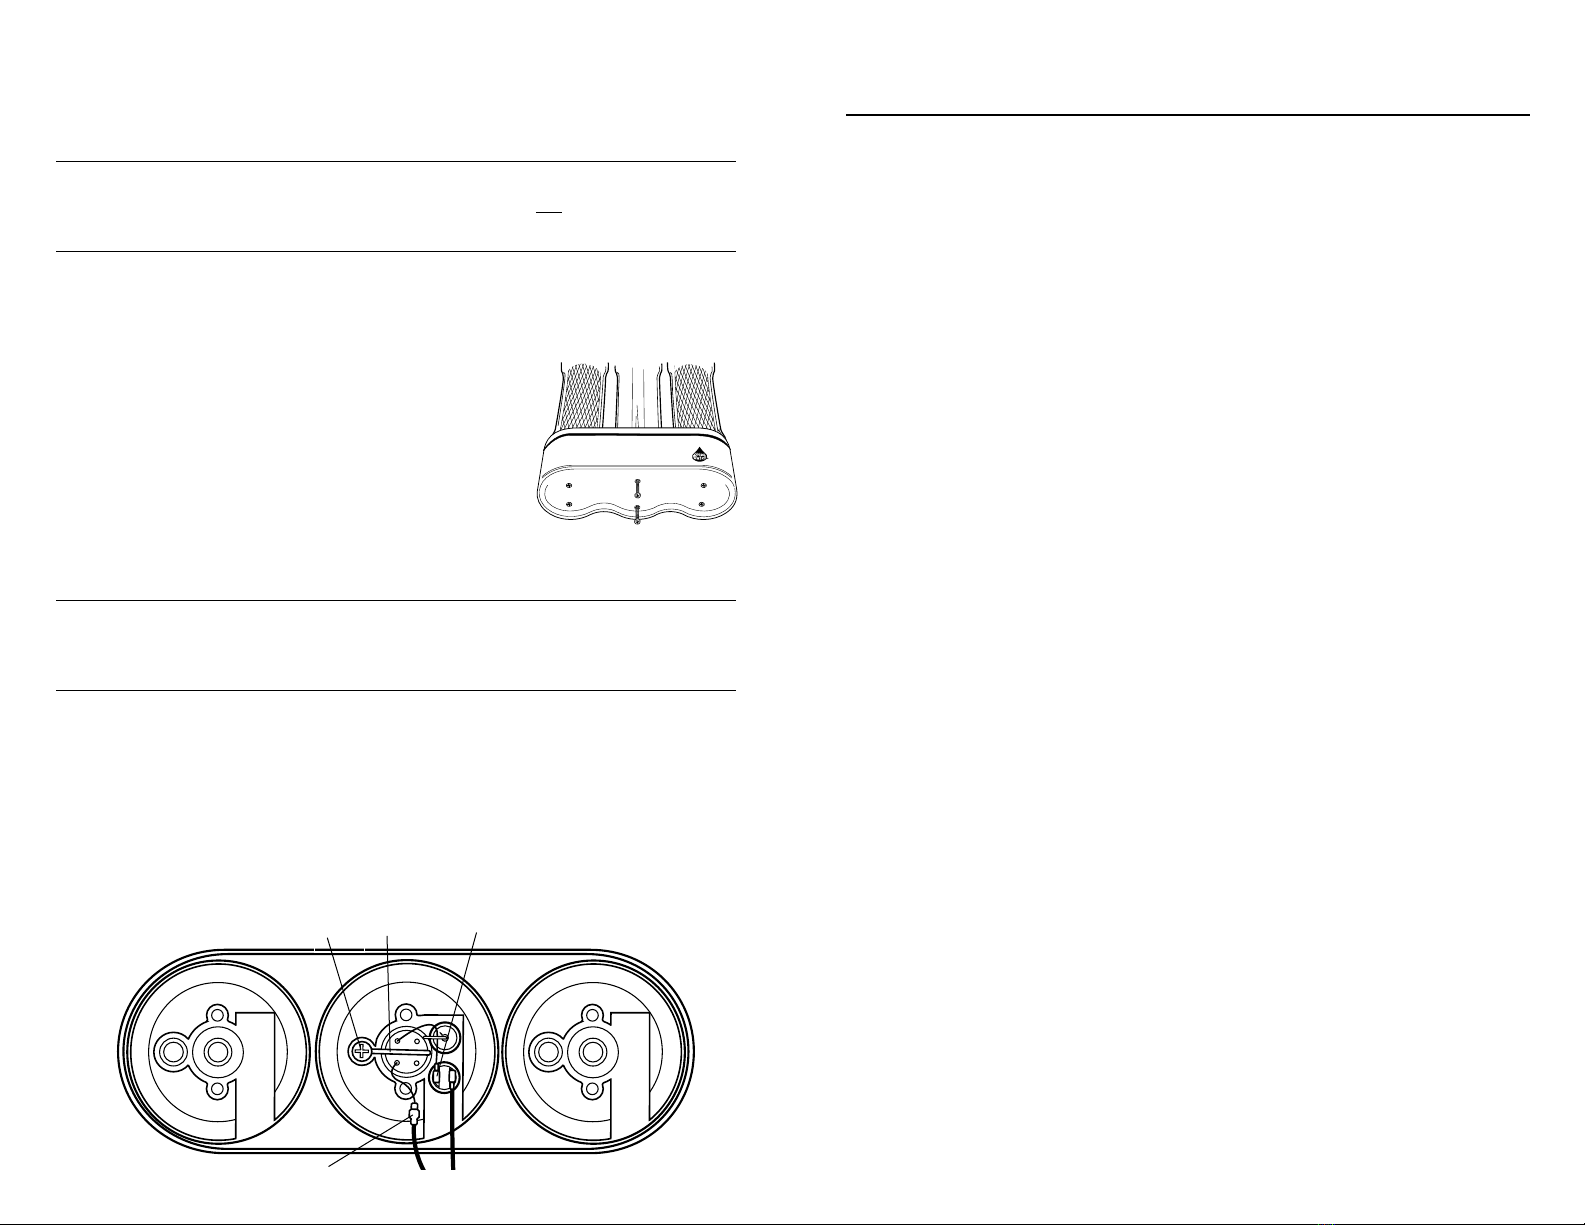
Changing the UV Lamp
It is recommended that you contact your authorized Living Water distributor to replace
the UV lamp when it is no longer working, or every two years.
WARNING: To prevent electrical shock, unplug the power supply from the electrical
outlet. DO NOT PROCEED BEFORE MAKING SURE THERE IS NO ELECTRICITY
GOING TO THE SYSTEM.
1. Disconnect the tubing from the top and bottom of the system. Remove the unit from
the wall mounts if applicable. Lay the system down horizontally.
2. Using a Phillips head screwdriver, remove the four (LWII) or six (LWIII) screws located
on the bottom of the unit.
3. Slide the bottom cup off the unit.
4. Remove the screw (A) and the retainer wire (B)
5. Disconnect the two wire connectors (C) and (D) coming
from the lamp and gently slide the lamp out of the system.
6. Carefully slide the replacement UV lamp into the system
holding it by the ceramic base only. Reconnect the two wire connectors (C) and (D).
NOTE: Touching the glass portion of the bulb will leave an oil deposit and may cause
the bulb to fail prematurely. If you should inadvertently touch the glass, clean the
entire bulb surface using denatured alcohol before installing.
7. Reinstall the retainer wire (B) back into its original position and tighten screw (A).
8. Replace the bottom cup and secure with screws.
9. Remount the system, reconnect the tubing and plug in the power adapter.
If the lamp does not illuminate, contact your authorized EcoQuest Business Owner.
Do not use the system until the lamp is functioning properly. If you do not have an
EcoQuest Business Owner, contact EcoQuest directly at 800.989.2299.
A B C
D
56
This manual suits for next models
1
Table of contents
Popular Water Filtration System manuals by other brands

Atlantic Ultraviolet
Atlantic Ultraviolet Mighty Pure MP16A owner's manual

SunSun
SunSun CBG-500 Operation manual

Hayward
Hayward XStream Filtration Series owner's manual

Contech
Contech DownSpout StormFilter Operation and maintenance

Teka
Teka Airfilter MINI operating instructions

Wisy
Wisy LineAir 100 Installation and operating instructions

Schaffner
Schaffner Ecosine FN3446 Series User and installation manual

Pentair
Pentair FLECK 4600 SXT Installer manual

H2O International
H2O International H20-500 product manual

Renkforce
Renkforce 2306241 operating instructions

Neo-Pure
Neo-Pure TL3-A502 manual

STA-RITE
STA-RITE VERTICAL GRID DE FILTERS S7D75 owner's manual


