ECOVACS ROBOTICS ATMOBOT PRO User manual

Instruction Manual
사용 설명서

2
EN 2
Live Smart. Enjoy Life.
Congratulations on the purchase of your ECOVACS ROBOTICS ATMOBOT!
We hope it brings you many years of satisfaction. We trust the purchase of your new robot will help keep your home
clean and provide you more quality time to do other things.
Should you encounter situations that have not been properly addressed in this Instruction Manual, please contact our
Customer Service Center where a technician can address your specific problem or question.
For more information, please visit the ECOVACS ROBOTICS official website: www.ecovacs.com
The company reserves the right to make technological and/or design changes to this product for continuous
improvement.
Thank you for choosing ATMOBOT!
Instruction Manual �������������������������������������������������������������������������������������������������������������� 2
사용 설명서������������������������������������������������������������������������������������������������������������������������38
EN
KO

3EN
Contents
1. Important Safety Instructions...................................................................................................................................4
2. Package Contents ...................................................................................................................................................6
3. Operating and Programming.................................................................................................................................11
4. Maintenance ..........................................................................................................................................................27
5. Troubleshooting.....................................................................................................................................................32
6. Specifications.........................................................................................................................................................37

4
EN
When using an electrical appliance, basic precautions should
always be followed, including the following:
READ ALL INSTRUCTIONS BEFORE USING THIS
APPLIANCE
SAVE THESE INSTRUCTIONS
This appliance can be used by children aged from 8 years and
above and persons with reduced physical, sensory or mental
capabilities or lack of experience and knowledge if they have been
given supervision or instruction concerning use of the appliance in
a safe way and understand the hazards involved. Children shall not
play with the appliance. Cleaning and user maintenance shall not
be made by children without supervision.
1. Clear the area to be purified. Remove power cords and small
objects from the floor that could entangle the Appliance. Tuck
rug fringe under the rug base, and lift items such as curtains
and tablecloths off the floor.
2. If there is a drop off in the purifying area due to a step or stairs,
you should operate the Appliance to ensure that it can detect
the step without falling over the edge. It may become necessary
to place a physical barrier at the edge to keep the unit from
falling. Make sure the physical barrier is not a trip hazard.
3. Only use as described in this manual. Only use attachments
recommended or sold by the manufacturer.
4. Please make sure your power supply voltage matches the power
voltage marked on the Charging Dock and AC Adapter.
5. For INDOOR household use ONLY. Do not use the Appliance in
outdoor, commercial or industrial environments.
6. Use only the original rechargeable battery, AC Adapter
and Charging Dock provided with the Appliance from the
manufacturer. Non-rechargeable batteries are prohibited. For
battery information, please refer to Specifications section.
7. Do not use without filters in place.
8. Do not operate the Appliance in an area where there are lit
candles or fragile objects.
9. Do not use in extremely hot or cold environments (below
-5
˚C
/23˚F or above 40
˚C
/104˚F).
10. Do not use Appliance on wet surfaces or surfaces with standing
water. Do not use Appliance in areas where they may be
present.
11. Do not touch the plug or the Appliance with wet hands.
12. Take care not to damage the power cord. Do not pull on or
carry the Appliance AC Adapter or Charging Dock by the power
cord, use the power cord as a handle, close a door on the
power cord, or pull power cord around sharp edges or corners.
Do not run Appliance over the power cord. Keep power cord
away from hot surfaces.
13. If the supply cord is damaged, it must be replaced by a special
cord or assembly available from the manufacturer or its service
agent.
14. Do not place the power cord under carpets, furniture, product,
etc. Keep the power cord away from crowded areas.
15. Do not use the Charging Dock or AC Adapter if it is damaged.
16. Do not use with a damaged power cord or receptacle. Do not
use the Appliance, AC Adapter or Charging Dock if it is not
working properly, has been dropped, damaged, left outdoors,
or come in contact with water. It must be repaired by the
manufacturer or its service agent in order to avoid a hazard.
17. Turn OFF the power switch before cleaning or maintaining the
Appliance.
18. The plug must be removed from the receptacle before cleaning
or maintaining the Charging Dock and AC Adapter.
1. Important Safety Instructions

5EN
1. Important Safety Instructions
19. Remove the Appliance from the Charging Dock and AC
Adapter, and turn OFF the power switch to the Appliance
before removing the battery for disposal of the Appliance.
20. The battery must be removed and discarded according to local
laws and regulations before disposal of the Appliance.
21. When not using the Charging Dock or AC Adapter for a long
period of time, please unplug it.
22. The Appliance must be used in accordance with the directions
in this Instruction Manual. ECOVACS ROBOTICS cannot be
held liable or responsible for any damages or injuries caused by
improper use.
23. The robot contains batteries that are only replaceable by
skilled persons. To replace the robot’s battery, please contact
Customer Service.
24. If the robot will not be used for a long time, fully charge the
robot and power OFF for storage, and unplug the Charging
Dock and AC Adapter.
6
EN
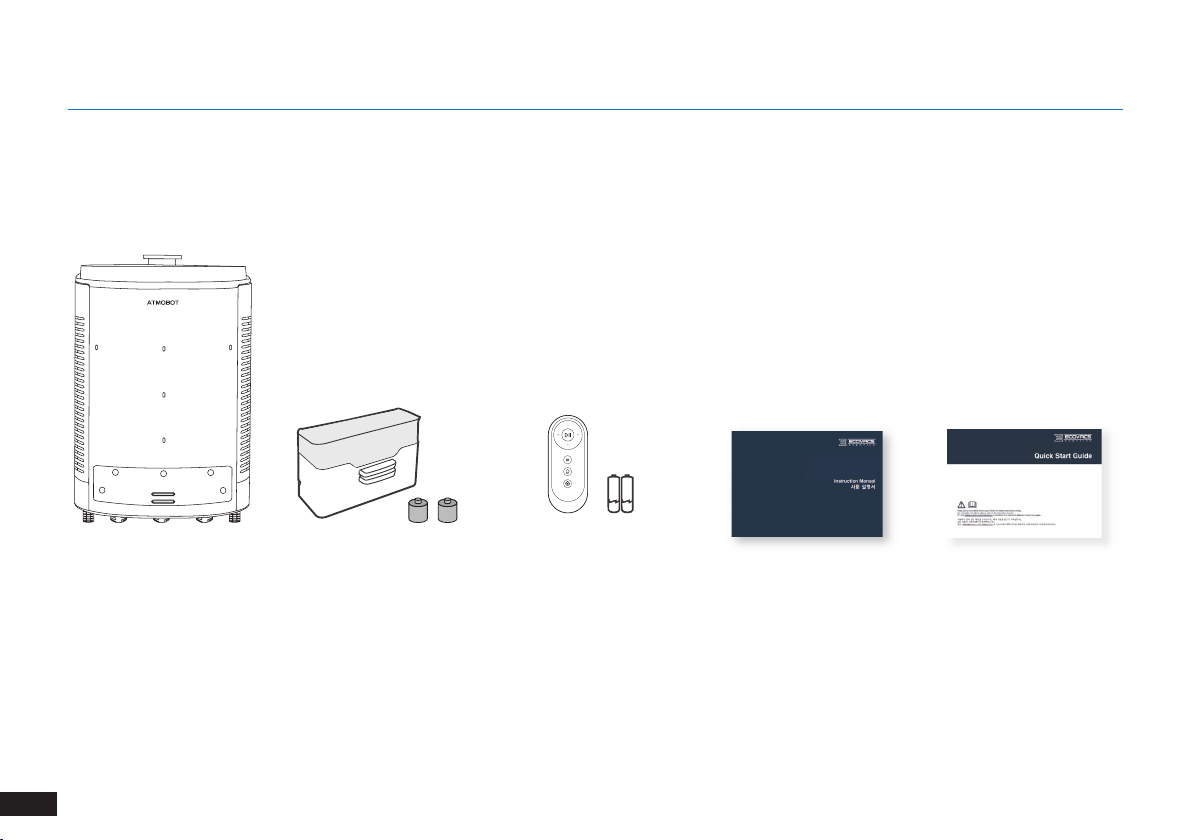
2.1 Package Contents
Robot Charging Dock and
Charging Dock Bumper
Remote Control and
Battery*2 Instruction Manual Quick Start Guide
2. Package Contents
Note: Figures and illustrations are for reference only and may differ from actual product appearance.

7EN
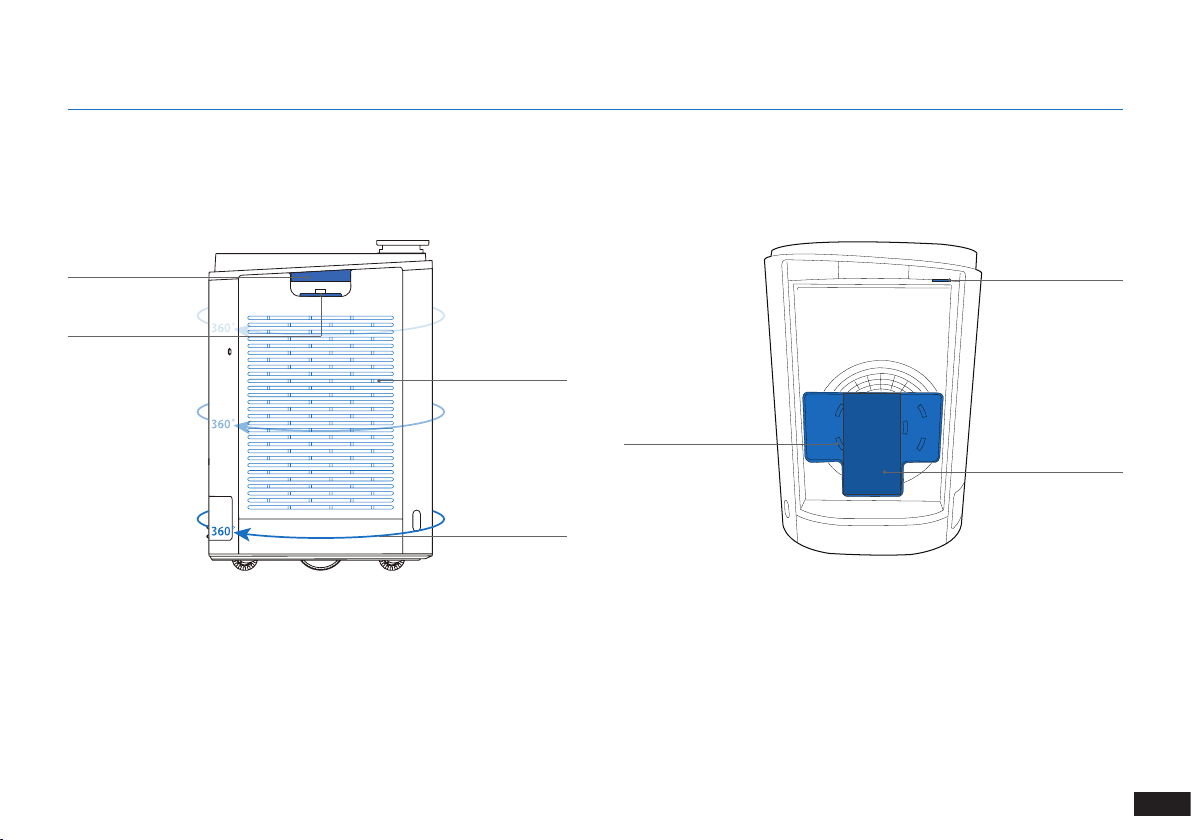
2.2 Product Diagram
Robot
Laser Distance
Sensor (LDS)
Air Outlet
Control Panel AUTO
Air Quality Indicator
BLUE: Excellent
GREEN: Good
ORANGE: Lightly polluted
RED: Heavily polluted
Airflow Adjustment Button
Purification Mode Button
Wi-Fi Indicator
Filter Status Indicator
PM1.0 Indicator
AUTO
2. Package Contents
PM1.0

8
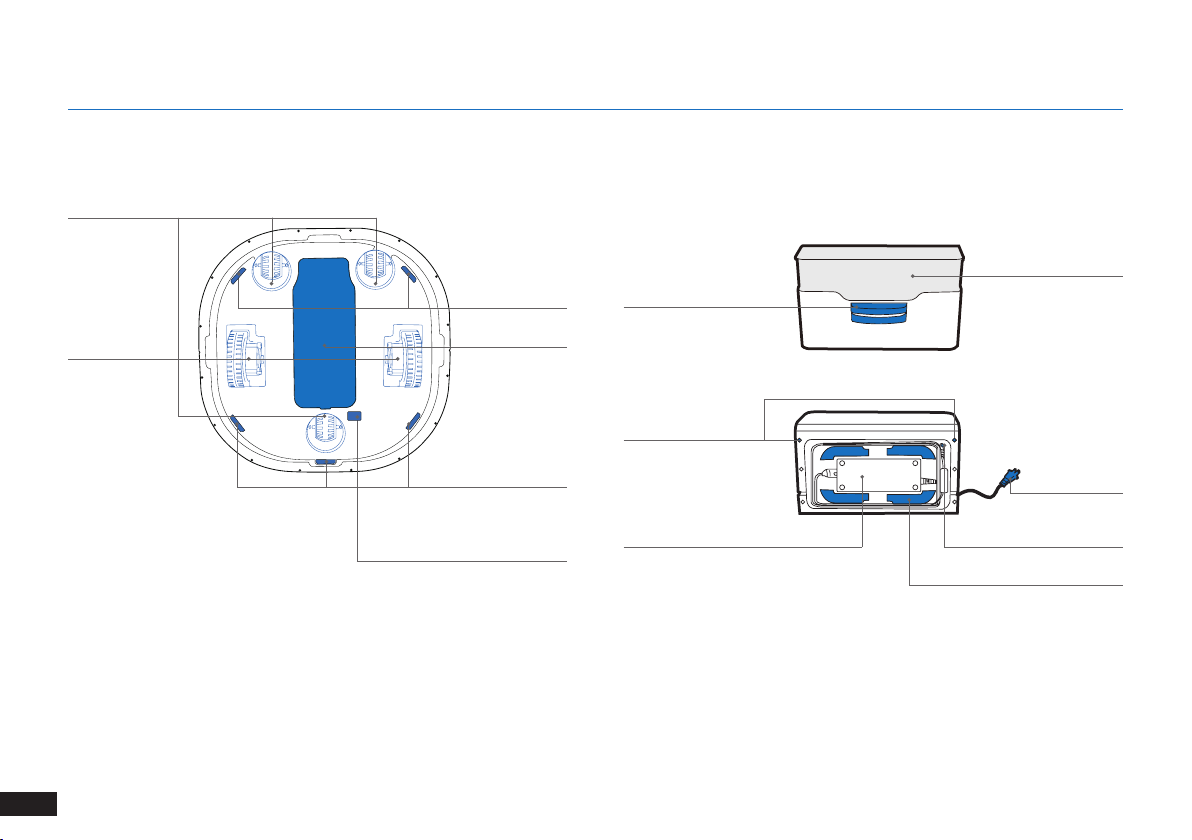
EN
Front Back
Infrared Distance
Sensors
Ultrasonic Anti-
collision Sensors
Charging Contacts
2. Package Contents
Charging Dock
Signal Sensors
Dust Sensor
Power Switch
Cover
Under the Cover
Adapter Port
RESET Button
(Connecting to the Wi-Fi network: Press
the RESET Button . The robot is ready
for Wi-Fi network connection when you
hear a beep tone.
Restoring factory settings: Press and hold
for 5 seconds. The power-up music will
play, and the robot will revert to its factory
settings. Use this button with caution.)
(ATMOBOT can be directly powered by the
adapter. Please choose Spot Purification
mode only when ATMOBOT is being
powered by the adapter.)
Power Switch
(“I” = on, “O” = off.)
9EN
Side Side (Internal)
Air Inlet Grill
Release Button
Air Inlet Grill
Anti-collision
Sensor
Handle
Fan Guard
Foam
(for customer care
use only)
Data Transmission
Port
2. Package Contents
10
EN
Bottom Charging Dock
Universal Wheel
Driving Wheel
Charging Dock Pins
Charging Dock
Bumper Port
Anti-drop Sensor
Anti-drop Sensor
Infrared Signal
Emitter
Power Adapter
Adapter Lock
Adapter Port
Power Plug
Battery Cover
Data Transmission Port
(for customer care use only)
2. Package Contents
11 EN
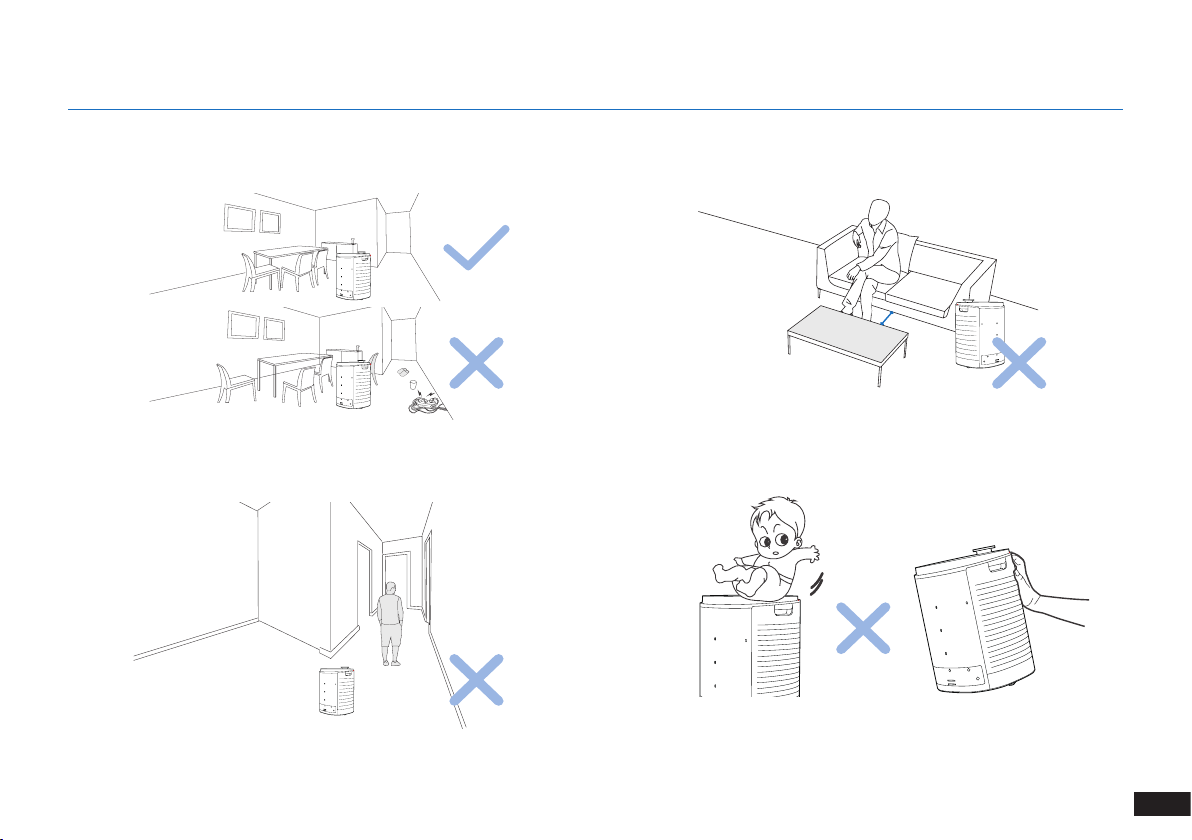
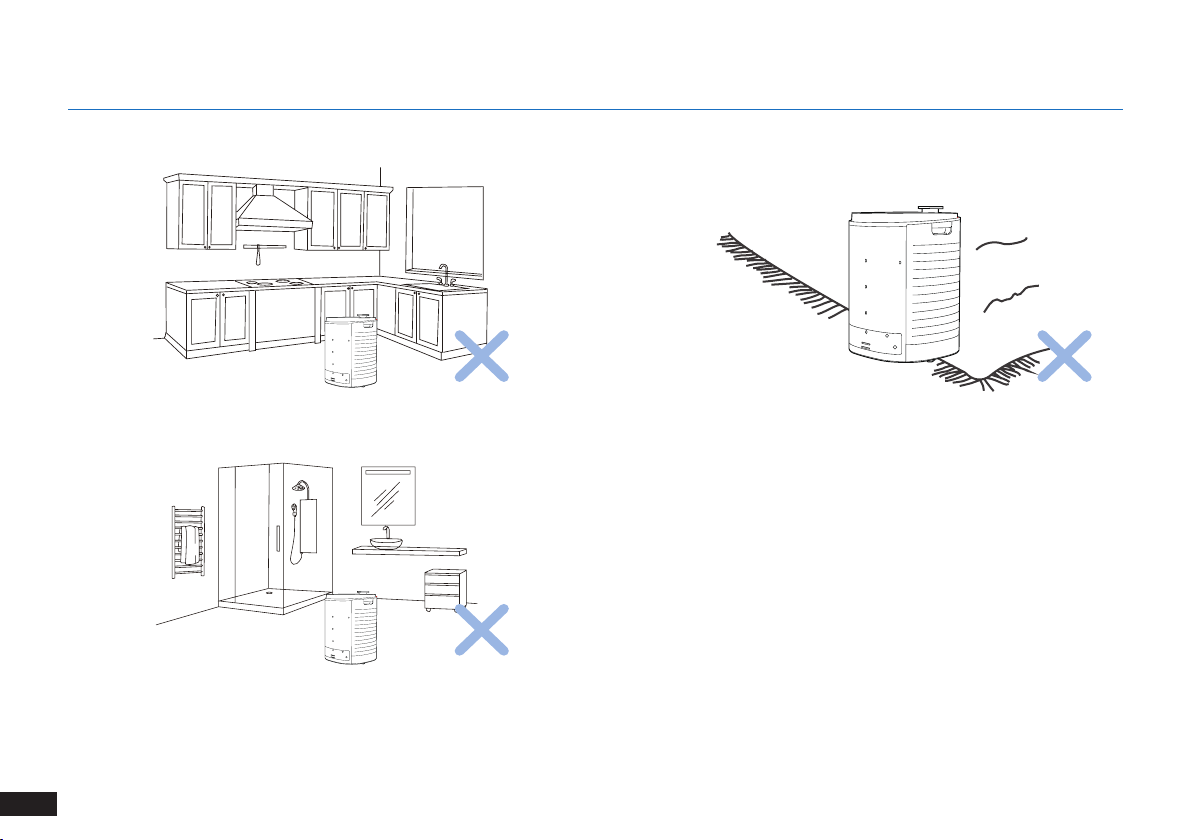
3.1 Notes Before Use
Before each use, tidy up the area by putting furniture in their proper
place and remove loose items such as power cords and toys.
ATMOBOT can pass a space of no less than 65 centimeters in width.
Please do not stand in narrow spaces, such as hallways, to make sure
ATMOBOT purification efficiency.
Do not place items on top of or sit on ATMOBOT or use ATMOBOT
as a seat. Do not push or tip ATMOBOT.
"
I
S
3. Operating and Programming
12
EN
Do not allow ATMOBOT to enter wet areas such as the kitchen or
bathroom. We recommend closing kitchen and bathroom doors before
using ATMOBOT.
ATMOBOT is designed for use on hard floors only. Avoid carpet or
area rugs in the air purification path.
3. Operating and Programming

13 EN
Do not place the charging dock near stairs or a drop off to prevent
the robot from falling over the edge.
Do not place the charging dock near reflective objects such as
mirrors.
Do not place the charging dock in direct sunlight. The strong light
may keep ATMOBOT from finding its way back to the charging dock.
Do not move the charging dock once the path is settled. If the
charging dock is moved to a new location, ATMOBOT may fail to
locate itself and may lose its map.
3. Operating and Programming
14
EN
3.2 Quick Start
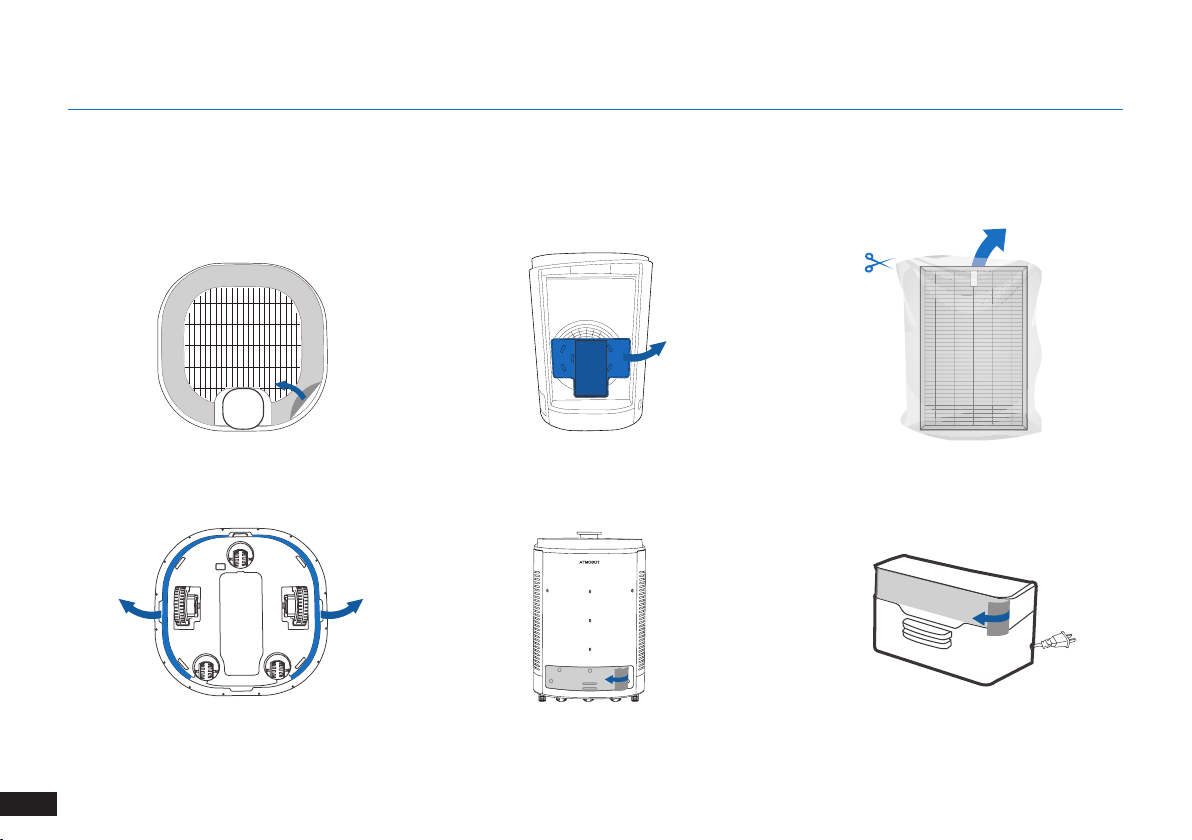
Protective film on top
of ATMOBOT
Protective strip on
bottom of ATMOBOT
Protective film on
ATMOBOT
Protective film on
charging dock
Fan guard (including foam)
on each side
HEPA air bag on each side
Remove Protective Materials
After opening the package, remove the following items:
3. Operating and Programming

15 EN
Charging the Robot
If there are baseboards along the bottom of the walls, install the
provided charging dock Bumpers on the Charging Dock.
Place the charging dock on a level floor surface against a wall with the
base perpendicular to the ground. Keep the immediate area 1.5m / 5’
in front of and on both sides of the charging dock clear of objects and
reflective surfaces. Plug the charging dock in.
Note: The ECOVACS logo on the top of the charging dock should be
facing up.
Place ATMOBOT on the charging dock, ensure the charging contacts
on ATMOBOT and the charging dock Pins make contact.
Note: Charge ATMOBOT for a minimum of 4 hours before the first
use.
Open the power switch cover at the bottom of ATMOBOT. Move the
Bottom Power Switch to the ON position. “I”=power ON; “O”=power
OFF. ATMOBOT is powered ON when it plays a musical tune.
1
Step
2
Step
3
Step
4
Step
AUTO
AUTO
4
3. Operating and Programming

16
EN
Pairing
successful
50 cm
Pairing the Remote Control With ATMOBOT
1
Step
2
Step
3
Step
Take the batteries for the ATMOBOT remote control out of the
package. Open the battery cover on the back of the remote control
and insert the batteries.
Slide ATMOBOT’s power switch to “I” to turn the unit on.
Try to remote control the robot. You may begin using the robot if the
remote control works. If not, follow Step 4 to pair the remote control.
Press and hold on the remote control. When you hear “a voice
report,,” it means the remote control is paired.
Note: This step works during the first 90 seconds after turning on
ATMOBOT. Aim the remote control straight at the unit’s control panel
from a distance of no more than 50 cm.
If pairing fails, repeat Steps 2–4.
4
Step
3. Operating and Programming
17 EN
3.3 Use ATMOBOT
Note: ATMOBOT can be operated in three ways: from the main unit, using the App, and using the remote control. Choose whichever method
that suits your needs.
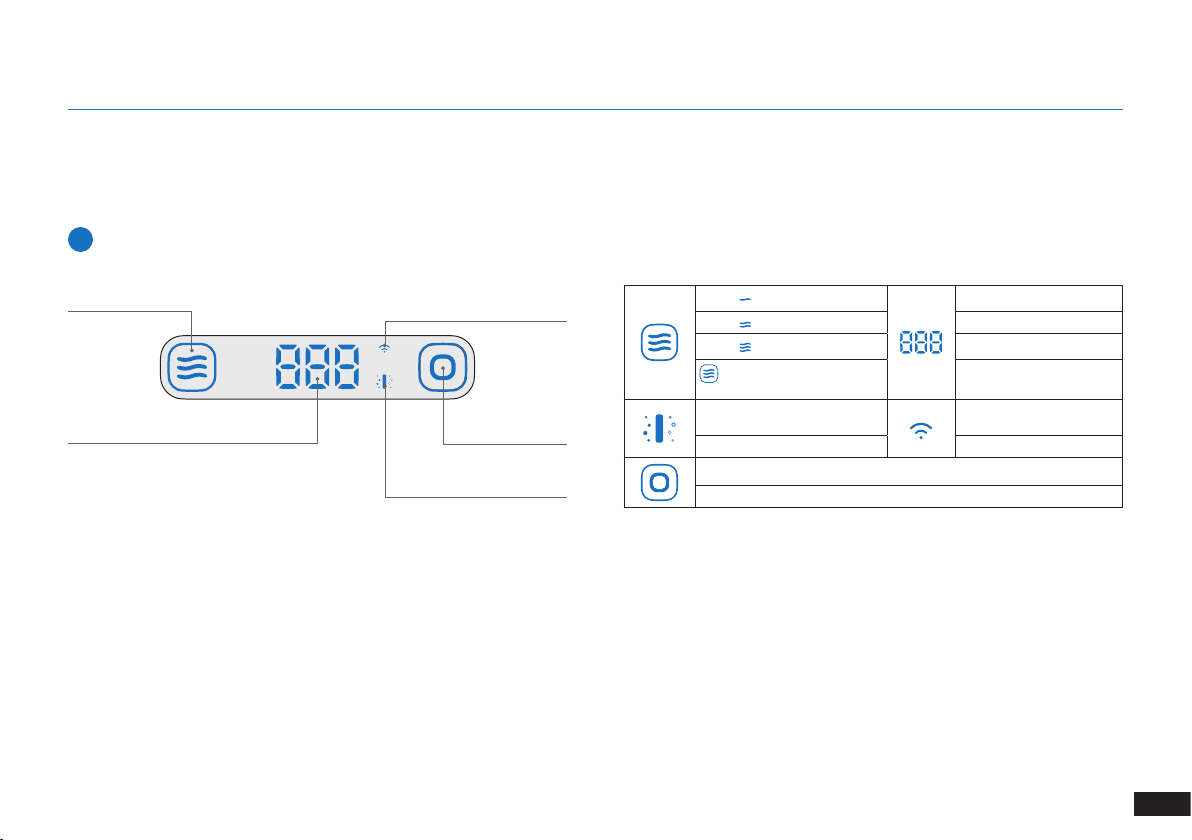
Control Panel
1
Quiet 0–15 Excellent
Normal 16–35 Good
High 36–75 Lightly polluted
Smart airflow (Switch among
the 3 airflow levels) Over 76 Heavily polluted
Flashing: Indicates filter is near
end of service life Flashing: Pairing
Solid: Indicates replace filter Solid: Pairing successful
AUTO Press and hold for 3 seconds to start mobile purification.
Press to start spot purification.
3. Operating and Programming
AUTO
PM1.0 Indicator
Purification
Mode Button
Filter Status
Indicator
Wi-Fi Indicator
Airflow Adjustment
Button
PM1.0

18
EN
Press and hold AUTO for 3 seconds. The unit will leave the charging
dock and move to each room, scanning and mapping your
home.
Mobile purification
1
Step
3. Operating and Programming
Note:
1. You can run two purification modes from the main unit: spot purification and mobile purification. Choose the mode that fits your needs.
2. The first time you use mobile purification, ATMOBOT will first create a map and establish the spots to be purified before proceeding with
purification.
3. The first time you use mobile purification, make sure ATMOBOT stays connected to the charging dock and keeps charging.
4. To avoid causing an error in a map, do not follow ATMOBOT around as it does its mapping.
Starting purification
2
When ATMOBOT is docked at the charging dock, or directed to
the desired spot by remote control, press AUTO . This will start the spot
purification.
Spot purification
or
AUTO
PM1.0
AUTO
PM1.0

19 EN
When it has finished scanning and mapping, ATMOBOT will
return to the charging dock. The means the spots to be purified
have been established.
1
1
1
2
1
3
2
Step
Once ATMOBOT is completely charged, press and hold AUTO for 3
seconds. ATMOBOT will leave the charging dock and move to
each purification spot to start purifying.
1
1
1
2
1
3
3
Step
3. Operating and Programming
AUTO
PM1.0

20
EN
ATMOBOT has four airflow levels:
Smart airflow, quiet airflow, normal airflow, and high
airflow.
Stopping: Press AUTO while ATMOBOT is purifying.
Stopping purification during mobile purification will terminate the
current task.
Use on the main unit’s control panel to switch among these levels.
Powering off: Slide the power switch to the “O” (off) position. All
indicator lights on the unit will go dark. The means the unit has
successfully powered off.
Deep sleep: With ATMOBOT in standby mode, press and hold
for 5 seconds to put it in deep sleep mode. ATMOBOT will lose its
map when it goes into this mode.
Adjusting airflow volume
3
Powering off
5
Stopping purification
4
Deep sleep
6
3. Operating and Programming
AUTO
PM1.0
AUTO
PM1.0
This manual suits for next models
1
Table of contents
Popular Air Cleaner manuals by other brands


Boneco
Boneco Envion Allergy Pro AP200 manual

Daikin
Daikin MC707PVM Operation manual

AirFiltronix
AirFiltronix HS3000A4 Assembly and installation instructions

Amway
Amway Atmosphere Sky owner's guide

MANN+HUMMEL
MANN+HUMMEL OurAir TK 850 Original operating manual

BIELMEIER
BIELMEIER HEPA BHG 280 instruction manual