Eden Branch Products 101018 User manual

MADE IN CHINA
©2021 J & J Global, LLC
Distributed By:
J & J Global, LLC
Dallas, TX 75234

Please keep this instruction manual for future reference
Read the instructions and precautions before use of this product
For warranty information, please refer to the back page of
this instruction manual.
Wall Mounted Carbon Fiber Patio Heater W/ Remote
Sku: 101018
Warranty by EzReplacemnet.com does not cover the defects arising out of the improper use the appliance. The warranty
does not cover the situations below:
1. The damages and defects arising out of improper use.
2. The damages and defects having occurred during the transportation after the delivery of the product to the customer
by the company.
3. The damages and defects arising out of low or excessive voltage, ungrounded plug usage, faulty electricity systems,
operating the appliance in different voltage values other than specified in the instructions.
4. The damages and defects arising out of fire and lightening.
5. The damages and defects arising out of repairs and maintenance by persons other than Authorized Services.
6. The defects arising out of the breach of the instructions in the manual.
7. The damages and defects arising out of the transportation of the product instead of repair.
Attention! Faulty maintenance and cleaning are not covered by the warranty.
1. The dust and polluters in the environment.
2. Damage in the reflector or filament due to faulty cleaning.
3. Faulty installation or dismantlement.
4. Operating with damaged filament, frame or power cord.
Above mentioned defects and services are not covered by the warranty.
Should this product be proven defective in workmanship or material, the consumer’s sole remedies shall be such repair
or replacement as provided by the terms of this warranty. Under no circumstances shall we be liable for any loss or
damage, direct, consequential, or incidental, arising out of the use of or inability to use this product.
This warranty will be voided if the certificate of warranty lacks the stamp and signature of the supplier as well as the
date of purchase.
This warranty will become void if the serial number ( if applicable), model number identification, or brand have been
wholly or partially removed or erased.
Warning Instructions
Voltage Rating
Power Consumption
Unit Size
120V ~ (60 Hz)
1500W
660 x 95 x 200mm
Specifications
10
Cleaning and Maintenance Instructions
Warnings
Attention! Careful and regular maintenance of infrared Heater is required to attain a long and efficient operation of your
appliance.
1. Check the cleanliness of the reflector and IR-filament at least once a month. If necessary, apply cleaning and
maintenance instructions.
2. The number of checks may be increased considering the amount of the dust in the environment.
3. Check the deformation of the reflector, wire and frame visually while cleaning the appliance. In case of any
deformation, consult a qualified technician.
4. Check the power cable and plug visually while cleaning the appliance. In case of any deformation, consult a qualified
technician.
5. It is recommended to change the reflector every 2 years for more efficient operation.
Cleaning
Attention! Regular and careful cleaning helps your heater operate for longer years and more efficiently.
1. Unplug your power cable for your safety before cleaning your appliance.
2. Take out the front grid wire through the inlets on the frame using a slotted screwdriver.
3. Make sure that the power is off for your safety. Power cable plug must be unplugged.
4. The reflector and filament must be cleaned with a soft cloth, a smooth brush or cool or dry air. The cloth may be
damp but never too wet and the cleaner should not include any chemical.
5. Refrain from using cleaning material likely to damage the reflector (cleanser etc.).
6. Insert the wire grid using a slotted screwdriver.
Appropriate installation, operation and maintenance are of great importance for the safety of you and of those who are
to benefit from the heater.
Please keep this manual in a safe place for future reference and urgent needs.
2.1 Safety Instructions (A+B)
A-Electrical Connection Safety
• Check whether your appliance and power cord are damaged before operating your appliance.
• Check whether there is any crack, disjoint or scratch on the filament (heating tube). If any, contact with your
authorized technical service.
• If your appliance or power cord is damaged, do not operate your appliance and return it to retailer.
• Make sure that the main electricity circuit is 120V and the connection is fused.
• Check the safety of the network. The fuse must be 25A.
• Do not use your infrared heater together with another appliance plugged to the same multiple sockets or connected to
the same fuse.
• Use your appliance with a properly earthed plug.
• The earthed plug must fall outside heating field and hot surface.
• The power cord must not be left on or around the frame of your infrared appliance.
• Unplug your appliance when you won’t operate it for a long term or will conduct cleaning or maintenance.
• The damaged heater glass must be exchanged.
• If the cable of the heater is damaged, this may be replaced only by the authorized service.
• If has to be notified that the mounting in the bath must be so that the persons in the bath can not reach the controls.
• It has to be notified that the product has to be installed at a dry location and may not be wet.
B-Safe distances required for installation on the wall, high temperature and fire protection
• Attention! The appliance must only be operated in a horizontal position with max±15°slope. In case of operations in
angels larger than 5°in horizontal position or of vertical operations, the heating loop wire may fall into disuse shortly.
• Never install your appliance on a combustible surface (carton etc.)
The distance of your appliance from the ground is to min 1.8 m (6 feet).
• The distance of your appliance from the ceiling is to be min 0.5 m (2.5 feet).
• The distance of your appliance from the corners to be installed is to be min 0.4 m (1.5 feet) and from the combustibles
like curtains must be min 1 m (3.5 feet).
• The distance of your appliance from the living beings is to be min 1 m (3.5 feet).
• The distance of heating area of your appliance from the materials such as wood, carton, cloth etc., must be min 1 m
(3.5 feet).
• Do not cover your appliance and do not hang any clothing over the heater or do not place any clothing on or near the
appliance.
• Do not stick anything into the protective grid.
• Do not make use of your heater to light up cigarette or similar materials.
• Supervision is needed when this product is used anywhere near children. The appliance is not intended for use by
children or other persons without assistance or supervision if their physical, sensory or mental capabilities prevent
them from using it safely.
• Risk of Fire-keep combustible material such as furniture, papers, cloths, and curtains at least 0.9 m (3 feet) from the
front of the heater and away from the sides and rear.
Important Instructions
1 Do not place any objects such as furniture, papers, cloths, and curtains at least 0.9m (3 feet) from the front of the
heater and away from the sides and rear when the heater is plugged in.
2 Do not place the heater near a bed because objects such as pillows or blankets can fall off the bed and be ignited by the
heater.
3 Always unplug the heater if it is not being used.
4 Avoid the use of an extension cord because the extension cord may overheat and cause a risk of fire. However, if you
have to use an extension cord, the cord shall be 1.5mm² minimum size .Do not operate within 7.6 m (25 feet) of
flammable material.
• Never block the front grill of the heater.
• The heater is not suitable for hazardous locations.
Never attempt to service the heater without disconnecting its power source.
2.2 Safety Instructions (C+D+E)
C-The distance from bath tub, washbasin or other sanitary installations
You may operate your heater in the bathroom and outdoors considering the items below:
• The distance of your appliance from bath tub, washbasin or other sanitary installations is to be min 0.6 m (2 feet). The
distance of 1 m (3.5 feet) is recommended for more safety.
• The distance of the earthed plug from bath tub, washbasin or other sanitary installations must be min 0.6 m (2 feet).
• 1 m (3.5 feet) distance is recommended for more safety.
9 2
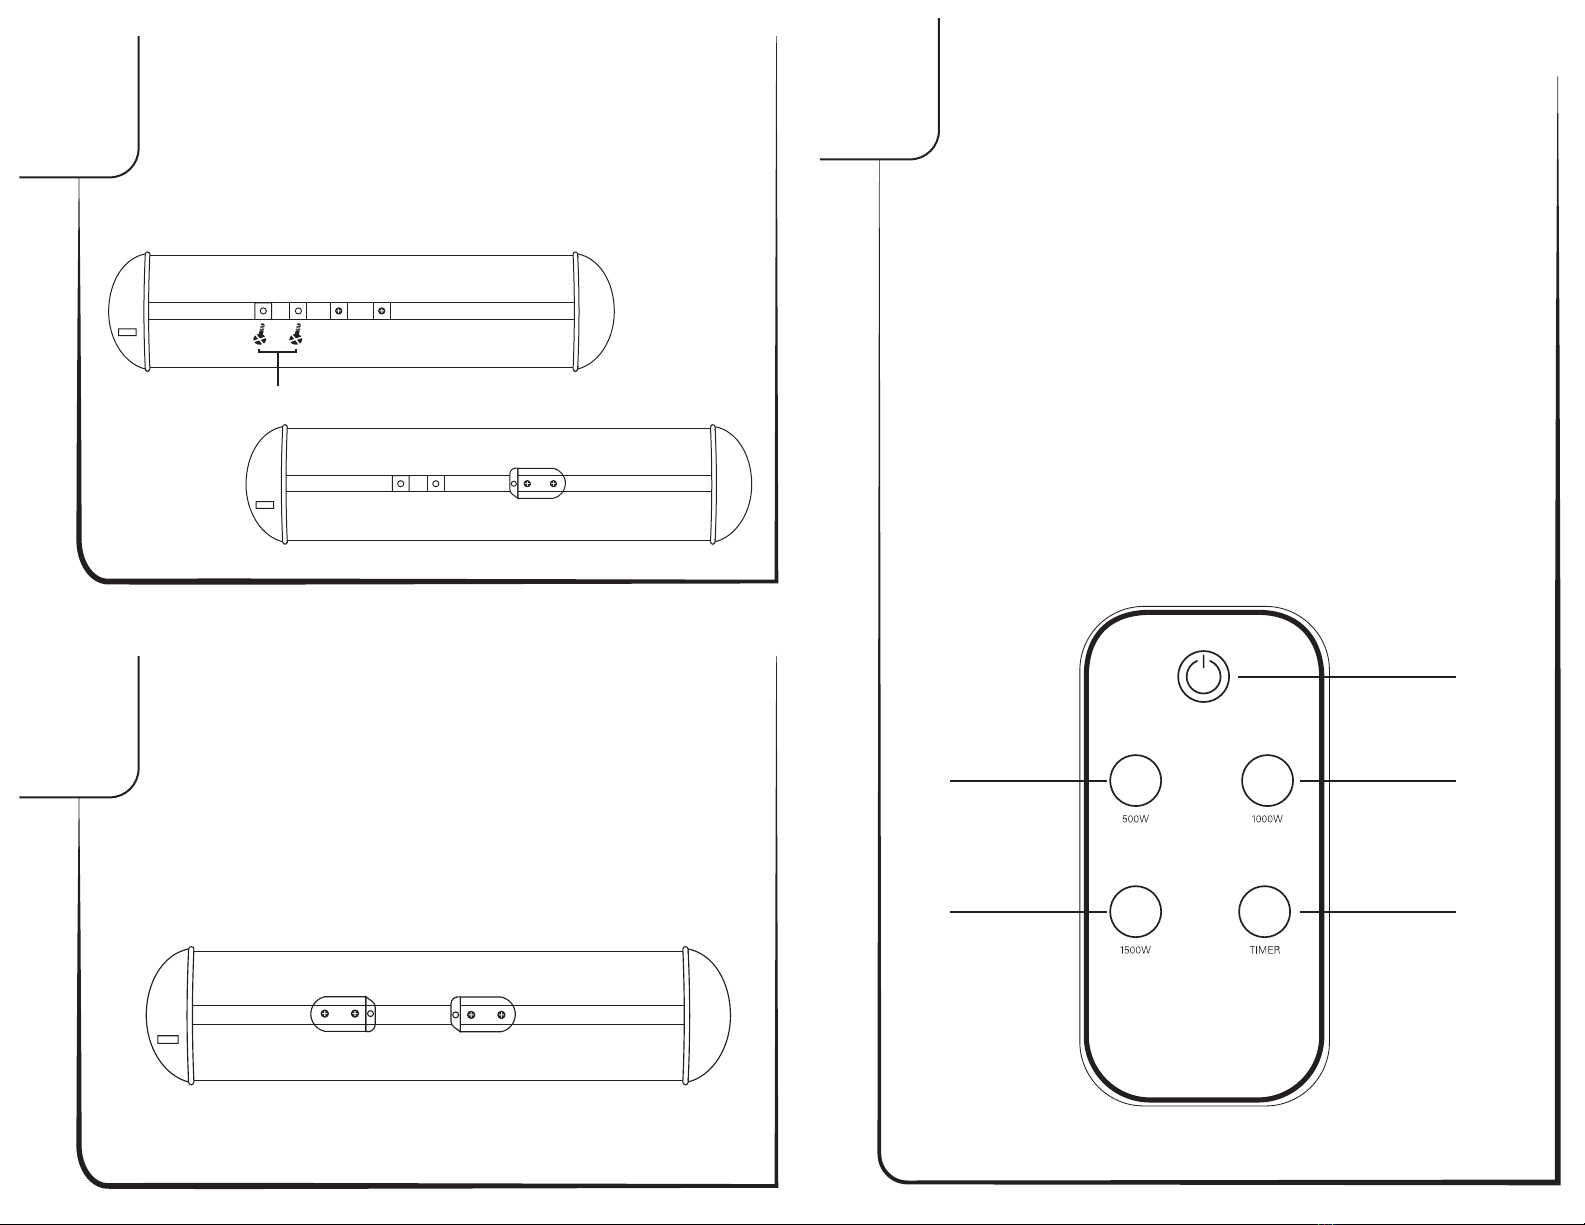
1Installation Instructions
There are 4 brackets and fasteners used with the heater. Furthermore, in the canal of
back side of the heater there are 4 square fastener washers 25×25mm. Retrieve
square washers(see figure below)and fasten 2 brackets to the canal of the backside of
the heater by the help of screws(see figure below)
Adjusting Brackets
Fasten the brackets at the appropriate distance of each other(45-55cm)
2
M5 * 10
8Remote Control Operation
Definitions of the Buttons on the Remote Control
The functions of the heater may be controlled via the buttons on your remote control
and LED screen. You may also control some of the functions of your heater through the
buttons on the front side of the heater.
Remote Control
1. On/Off Switches heater on or off.
2. After turning heater on, this turns on low heating.
3. After turning heater on, this turns on medium heating.
4. After turning heater on, this turns on high heating.
5. Turns on timer option, heater turns off after selected time has expired.
1
2
4 5
3
8
3
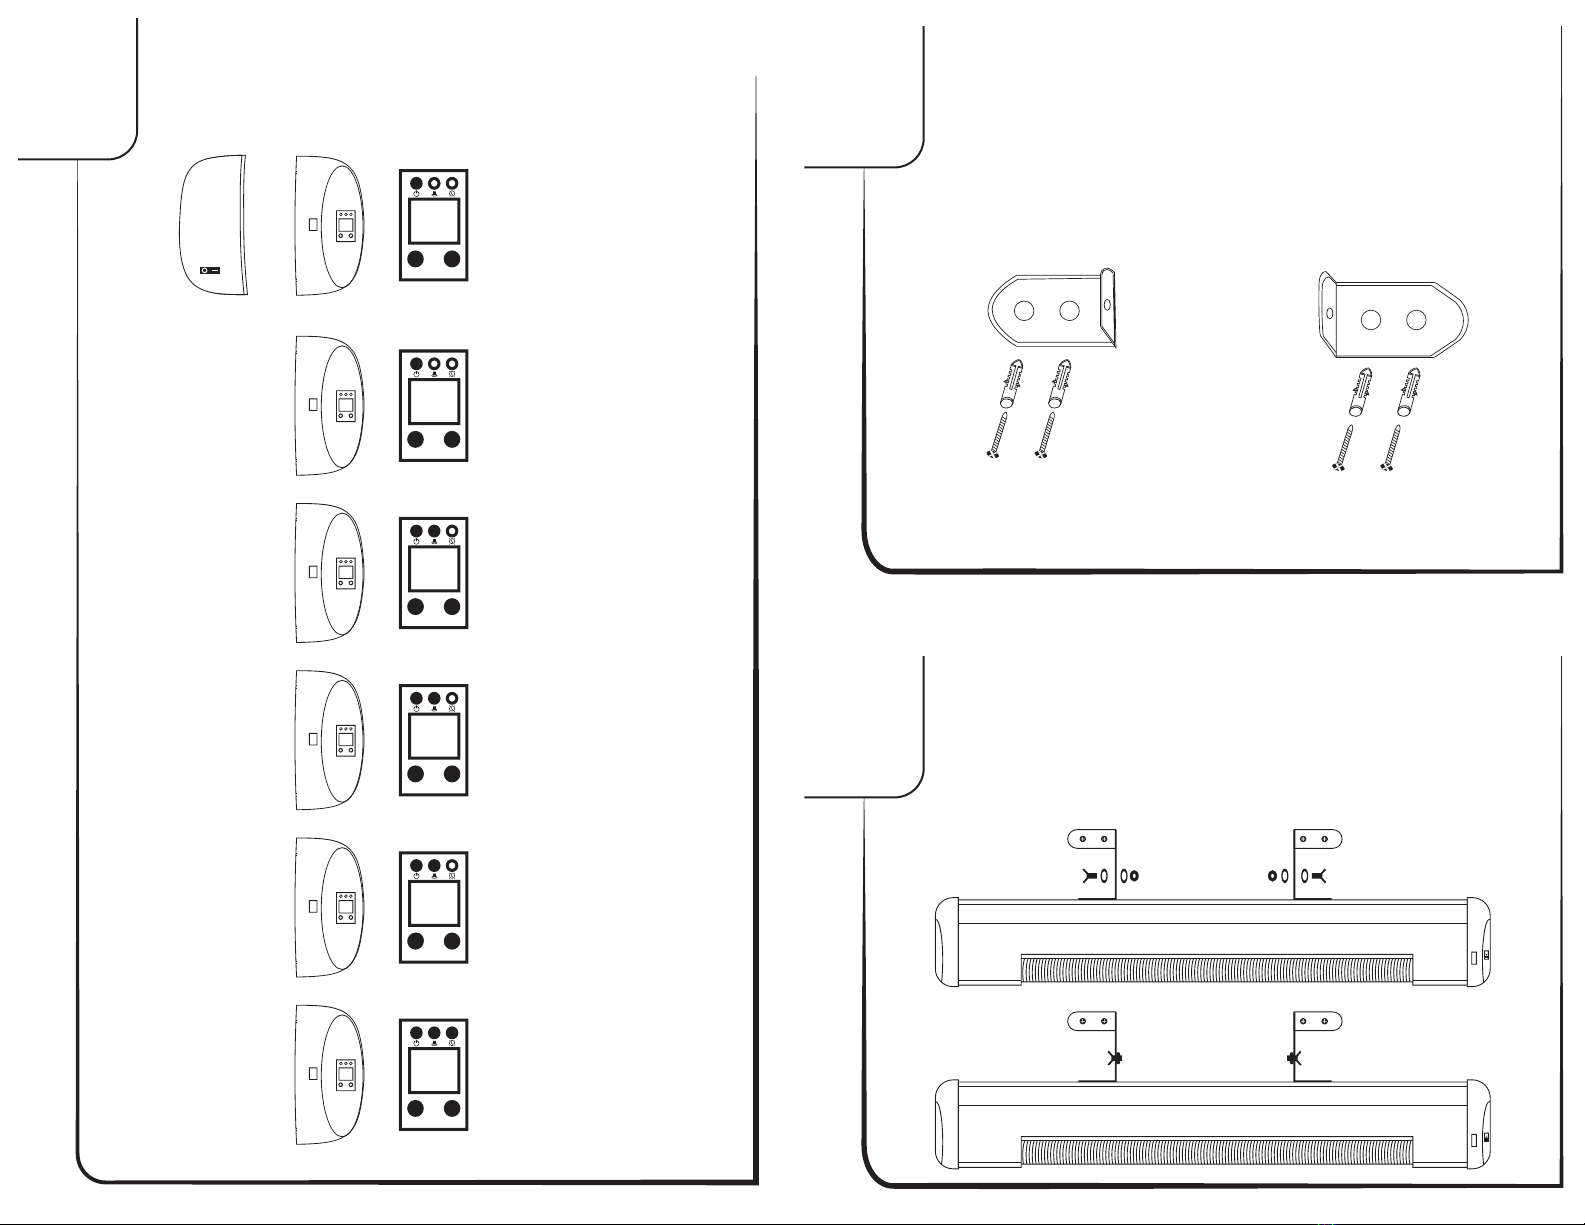
3Attaching Brackets To Wall
Two other brackets are fastened by the help of fasteners at the appropriate
distance on the wall parallel to the floor(At least 1.8 m from the floor and at
least 0.5 m from the ceiling).(See figure below)
Attaching Brackets On Heater To Brackets On Wall
Join the brackets on the heater with the brackets, fastened on the wall, with help of
figured screw-nuts(Figure 6).Install the heater under necessary angle(in the direction to
the area being heated).Look at issue 4:(Main rules of heater using).
4
7Operating Instructions
Plug the power cord into the outlet
Press the rocker power switch to “-”
position, and the switch indicator light
will be on, indicating power is on.
Press MODE once, the digital screen
shows “P0” which means appliance is
now in stand by mode.
Press MODE once, the digital screen
shows “P1” which means first power
setting
Press MODE two times, the digital
screen shows “P2” which means
second power setting
Press MODE three times, the digital
screen shows “P3” which means third
power setting
After setting power mode, press timer
button. The digital screen shows”01”
indicates one hour timer, “02”
indicates two hours timer etc.
P0
P0
P1
P1
P2
P2
P3
P3
01
Mode Timer
Mode Timer
Mode Timer
Mode Timer
Mode Timer
Mode Timer
7 4

5Correct Installation Positions 6Correct Installation Positions (Continued)
Safety Distances: Minimum Distance Required For Safety
Notice: Electrical wiring for heater has to be done by a qualified specialist.
!
Notice: Installation Positions: Fixing only at ±5°horizontally is of great importance for permanent
operation.
!
Notice: Point heater towards the most appropriate angle. Do NOT let the light out through a window, glass
etc. as the heater primarily heats the locations onto which its light falls.
!
Wrong
Minimum distances from wall corners Minimum distances from coverage area
and other objects
5º or more slope
Wrong Correct
Min. 16in.
Min. 39in.
Min. 16in.Min. 71in.
6
5
Table of contents
Other Eden Branch Products Patio Heater manuals

Popular Patio Heater manuals by other brands

Blue Sky Outdoor Living
Blue Sky Outdoor Living WBFP29SCROLL owner's manual

DCS
DCS CE-PHFS-DW-BK-L Use and care guide

Nexgrill
Nexgrill T-007 Installation, operation and maintenance instructions

for Living
for Living 085-1523-8 instruction manual

Dancover
Dancover HE94020 Safety instructions and operation manual

Firesense
Firesense LIP-10A-TGG owner's manual


BlueRhino
BlueRhino Endless Summer 62900 owner's manual

Sun Heat
Sun Heat PHRDBK owner's manual

Homebase
Homebase PTG018S Assembly instructions

HAMPTON BAY
HAMPTON BAY 68164 Use and care guide

BlueRhino
BlueRhino Endless Summer 233010 owner's manual

Firesense
Firesense 2127168 Assembly / care & use instructions