Edwards Signaling 517TH Series User manual

P/N 550-0171-002 © 2001
CHESHIRE, CT 203-699-3300 FAX 203-699-3365
517T, 517TH & 517TC Series Photoelectric Type
Single Station/Multi-Station Smoke Alarms
AC Powered, 120V 60 Hz
INTRODUCTION
The 517T Series Smoke Alarm is a Photoelectric Type Alarm for use as
an evacuation device. Each alarm has a solid state piezo that emits a temporal
3 si nal to warn and alert the household to the presence of threatenin smoke.
The 517TH Series Smoke Alarm is a combination photoelectric alarm and
heat detector. The heat detector is an isolated 135ºF fixed temperature detec-
tor.
The 517TC Series Smoke Alarm also has a form A / form C relay con-
tact.
Your Photoelectric alarm is desi ned to detect the smoke that results
from an actual fire. Consequently, it is uncommon for household smoke
such as ci arette smoke or normal cookin smoke to cause an alarm.
NOTE: Loss of electrical input will cause the alarm not to function. For
maximum safety you should install both battery operated and AC powered
smoke alarms.
HOW YOUR SMOKE ALARM WORKS
The 517T Series Smoke Alarm operates on the photoelectric li ht scat-
ter principle. The units sensin chamber houses a li ht source and a li ht
sensor.
The darkened sensin chamber is exposed to the atmosphere and de-
si ned to permit optimum smoke entry from any direction while rejectin
li ht from outside the alarm.
The li ht source is an infrared (invisible) LED which pulses every 8 sec-
onds. The li ht sensor is a photodiode matched to the li ht frequency of
the LED li ht source.
Under normal conditions, the li ht enerated by the pulsin infrared LED
is not seen by the li ht sensor, as it is positioned out of the direct path of
the li ht beam. When smoke enters the sensin chamber, li ht from the
pulsin LED li ht source is reflected by the smoke particles onto the pho-
todiode li ht sensor. At the first si htin of smoke, the alarm is put into a
pre-alarm mode. This is indicated by a rapidly flashin LED on the face of
the alarm. Once the li ht sensor confirms smoke for 2 consecutive pulses
inside the chamber, the li ht sensor produces the si nal necessary to tri -
er the alarm.
This technique of verifyin the smoke condition, combined with a 5-to-1
si nal-to-noise ratio, substantially reduces the possibility of nuisance alarms.
Installation Instructions - Owner's/User's Information Manual
READ CAREFULLY AND SAVE
·When turnin the test knob on the alarm to test 1 the red li ht emittin diode
should low steady RED and horn should sound. On some units, the red
LED will flash rapidly instead of lowin steady. If AC power fails, the reen
LED will turn off.
NOTE: Tandem Interconnect Models.
·When testin one alarm, the alarm that is activated will li ht the red
indicator li ht emittin diode and sound its alarm horn, all other units will
sound the alarm horn with red indicator li ht emittin diodes remainin
off.
·The test knob of your alarm simulates actual smoke conditions.
FIRE PROTECTION PLAN
This Smoke Alarm can quickly alert you to the presence of smokeit
cannot prevent fire. Please note that there are hazards a ainst which smoke
detection may not be effective, such as smokin in bed, explosions, when
a closed door separates the alarm from the source of the smoke, etc. The
ultimate responsibility for fire protection rests solely on you.
1. To minimize fire hazardsavoid improper stora e of flammable liquids
and dont leave small children home alone.
2. Bedroom doors should be closed while sleepin if a smoke alarm is
installed in the bedroom. They act as a barrier a ainst heat and smoke.
3. Establish an escape plan:
(a) Post a detailed floor plan depictin the chosen escape routes.
(b) Each bedroom should have at least two escape routes.
(c) Make sure your children know what to do in case of fire and teach
them to follow the escape plan you have posted.
(d) A ree on an outside meetin place.
(e) Conduct fire drills at least twice a year.
(f) Be sure each member of the family is familiar with the smoke alarm
so they can react properly.
If the alarm should sound:
1. Never waste time dressin or atherin valuables. Follow the escape
route and leave the house immediately.
2. Check bedroom doors before openin . If the door is hot or smoke is
leakin in around the ed esDO NOT OPENuse the alternate es-
cape route.
3. If there is smoke in the escape routekeep close to the floor and take
short breaths. If possible, cover your nose and mouth with a wet cloth.
4. Do not use your own telephonecall the Fire Department from your
nei hbors house.
5. Once out, do not re-enter your house, but proceed to your prearran ed
meetin place.
WHAT ELSE YOU CAN DO TO MAKE YOUR
FAMILY SAFE FROM FIRES
Puttin up smoke alarms is just the first step in protectin your family
from fires. You also must reduce the chances that fires will start in your
home and increase your chances of safely escapin if one does start. To
have an effective fire safety pro ram:
a. Install smoke alarms properly following the instructions in this
manual. Keep your smoke alarms clean. Test your alarm weekly
and have it repaired or replaced it when it no longer functions. As
with any electronic product, alarms have a limited life, and alarms that
dont work cannot protect you.
b. ollow safety rules and prevent hazardous situations:
·Use smokin materials properly; never smoke in bed.
·Keep matches and ci arette li hters away from children.
·Store flammable materials in proper containers and never use them near
open flames or sparks.
HOW TO TELL IF YOUR SMOKE ALARM IS
WORKING PROPERLY
·Your alarm is provided with an alarm horn and pulsatin Li ht Emittin (indi-
cator) Diode, which pulses every 15-30 seconds, and a reen AC power on
LED on some models.

·Keep electrical appliances and cords in ood workin order and do
not overload electrical circuits.
·Keep stoves, fireplaces, chimneys, and barbecue rills rease-free and
make sure they are properly installed away from combustible materials.
·Keep portable heaters and open flames such as candles away from com-
bustible materials.
·Do not allow rubbish to accumulate.
c. Develop a family escape plan and practice it with your entire fam-
ily, especially small children.
·Draw a floor plan of your home and find two ways to exit from each
room. There should be one way to et out of each bedroom without
openin the door.
·Teach children what the smoke alarm si nal means, and that they
must be prepared to leave the residence by themselves if necessary.
Show them how to check to see if doors are hot before openin them,
how to stay close to the floor and crawl if necessary, and how to use
the alternate exit if the door is hot and should not be opened.
·Decide on a meetin place a safe distance from your house and make
sure that all your children understand that they should o and wait for
you if there is a fire.
·Hold fire drills at least every 6 months to make sure that everyone,
even small children, know what to do to escape safely.
·Know where to o to call the fire department from outside your resi-
dence.
·Provide emer ency equipment such as fire extin uishers and teach
your family to use this equipment properly.
WHAT TO DO IF THERE IS A FIRE
IN YOUR HOME
If you have prepared family escape plans and practiced them with your
family, you have increased their chances of escapin safely. Review the
followin rules with your children when you have fire drills so everyone will
remember them in a real fire emer ency:
a. Dont panic; stay calm. Your safe escape may depend on thinkin
clearly and rememberin what you have practiced.
b. Get out of the house followin a planned escape route as quickly as
possible. Do not stop to collect anythin or to et dressed.
c. Open doors carefully only after feelin to see if they are hot. Do not
open a door if it is hot; use an alternate escape route.
d. Stay close to the floor; smoke and hot ases rise.
e. Cover your nose and mouth with a cloth, wet if possible, and take short,
shallow breaths.
f. Keep doors and windows closed unless you open them to escape.
. Meet at your prearran ed meetin place after leavin the house.
h. Call the Fire Department as soon as possible from outside your house.
Give the address and your name.
i. Never re-enter a burnin buildin .
Contact your local Fire Department for more information on makin your
home safer from fires and about preparin your familys escape plans.
WHAT THIS SMOKE ALARM CAN DO
This alarm is desi ned to sense smoke enterin its sensin chamber. It
does not sense as, heat (except 517TH), or flames.
When properly located, installed, and maintained, this smoke alarm is
desi ned to provide early warnin of developin fires at a reasonable cost.
This alarm monitors the air and, when it senses smoke, activates its built-
in alarm horn. It can provide precious time for you and your family to
escape from your residence before a fire spreads. Such an early warnin ,
however, is possible only if the alarm is located, installed, and maintained
as specified in this Users Manual.
NOTE: This smoke alarm is desi ned for use within sin le residential
livin units only; that is, it should be used inside a sin le-family home or
one apartment of a multi-family buildin . In a multi-family buildin , the
alarm may not provide early warnin for residents if it is placed outside of
the residential units, such as on outside porches, in corridors, lobbies, base-
ments, or in other apartments. In multi-family buildin s, each residential
unit should have alarms to alert the residents of that unit. Alarms desi ned
to be interconnected should be interconnected within one family residence
only; otherwise, nuisance alarms will occur when an alarm in another livin
unit is tested.
IMPORTANT NOTE: WHAT SMOKE ALARMS
CANNOT DO
Smoke alarms will not work without power. Battery-operated
alarms will not work without batteries, with dead batteries, or if the batter-
ies are not installed properly. AC powered alarms will not work if their AC
power supply is cut off by an electrical fire, an open fuse or circuit
breaker, or for any other reason. If you are concerned about the reliability
of either the batteries or your AC power supply for any of the above
reasons, you should install both battery and AC powered alarms for
maximum safety.
Smoke alarms may not sense fire that starts where smoke
cannot reach the alarms such as in chimneys, in walls, on roofs, or on
the other side of closed doors. If bedroom doors are usually closed at
ni ht, alarms should be placed in each bedroom as well as in the common
hallway between them.
Smoke alarms also may not sense a fire on another level of a
residence or building. For example, a second-floor alarm may not
sense a first-floor or basement fire. Therefore, alarms should be
placed on every level of a residence or building.
The horn in your alarm meets or exceeds current audibility require-
ments of Underwriters Laboratories. However, if the alarm is located
outside a bedroom, it may not wake up a sound sleeper, espe-
cially if the bedroom door is closed or only partly open. If the alarm is
located on a different level of the residence than the bedroom, it is even
less likely to wake up people sleepin in the bedroom. In such cases, the
National Fire Protection Association recommends that the alarms be inter-
connected so that an alarm on any level of the residence will sound an
alarm loud enou h to awaken sleepers in closed bedrooms. This can be
done by installin a fire-detection system, by connectin alarms to ether,
or by usin radio frequency transmitters and receivers.
All types of smoke alarm sensors have limitations. No type of
smoke alarm can sense every kind of fire every time. In gen-
eral, alarms may not always warn you about fires caused by
carelessness and safety hazards like smoking in bed, violent
explosions, over-loaded electrical circuits, children playing with
matches, escaping gas, improper storage of flammable materi-
als, or arson.
NOTE: This alarm is not desi ned to replace special-purpose fire de-
tection and alarm systems necessary to protect persons and property in
non-residential buildin s such as warehouses, or other lar e industrial or
commercial buildin s. It alone is not a suitable substitute for complete
fire-detection systems desi ned to protect individuals in hotels and mo-
tels, dormitories, hospitals, or other health and supervisory care and
retirement homes. Please refer to NFPA 101,The Life Safety Code, and
NFPA 72 for smoke alarm requirements for fire protection in buildin s not
defined as households.
Installin smoke alarms may make you eli ible for lower insurance rates,
but smoke alarms are not a substitute for insurance. Home owners
and renters should continue to insure their lives and property.
PLACEMENT OF SMOKE ALARMS
THIS EQUIPMENT SHOULD BE INSTALLED IN ACCORDANCE WITH
THE NATIONAL FIRE PROTECTION ASSOCIATIONS STANDARD 72
(National Fire Protection Association, Batterymarch Park, Quincy, MA
02269).
For your information, the National Fire Protection Associations Stan-
dard 72, reads as follows:
Smoke detectors shall be installed outside of each separate sleepin area
in the immediate vicinity of the bedrooms and on each additional story of the
family livin unit includin basements and excludin crawl spaces and unfin-
ished attics. In new construction, a smoke detector shall be installed in each
sleepin room.
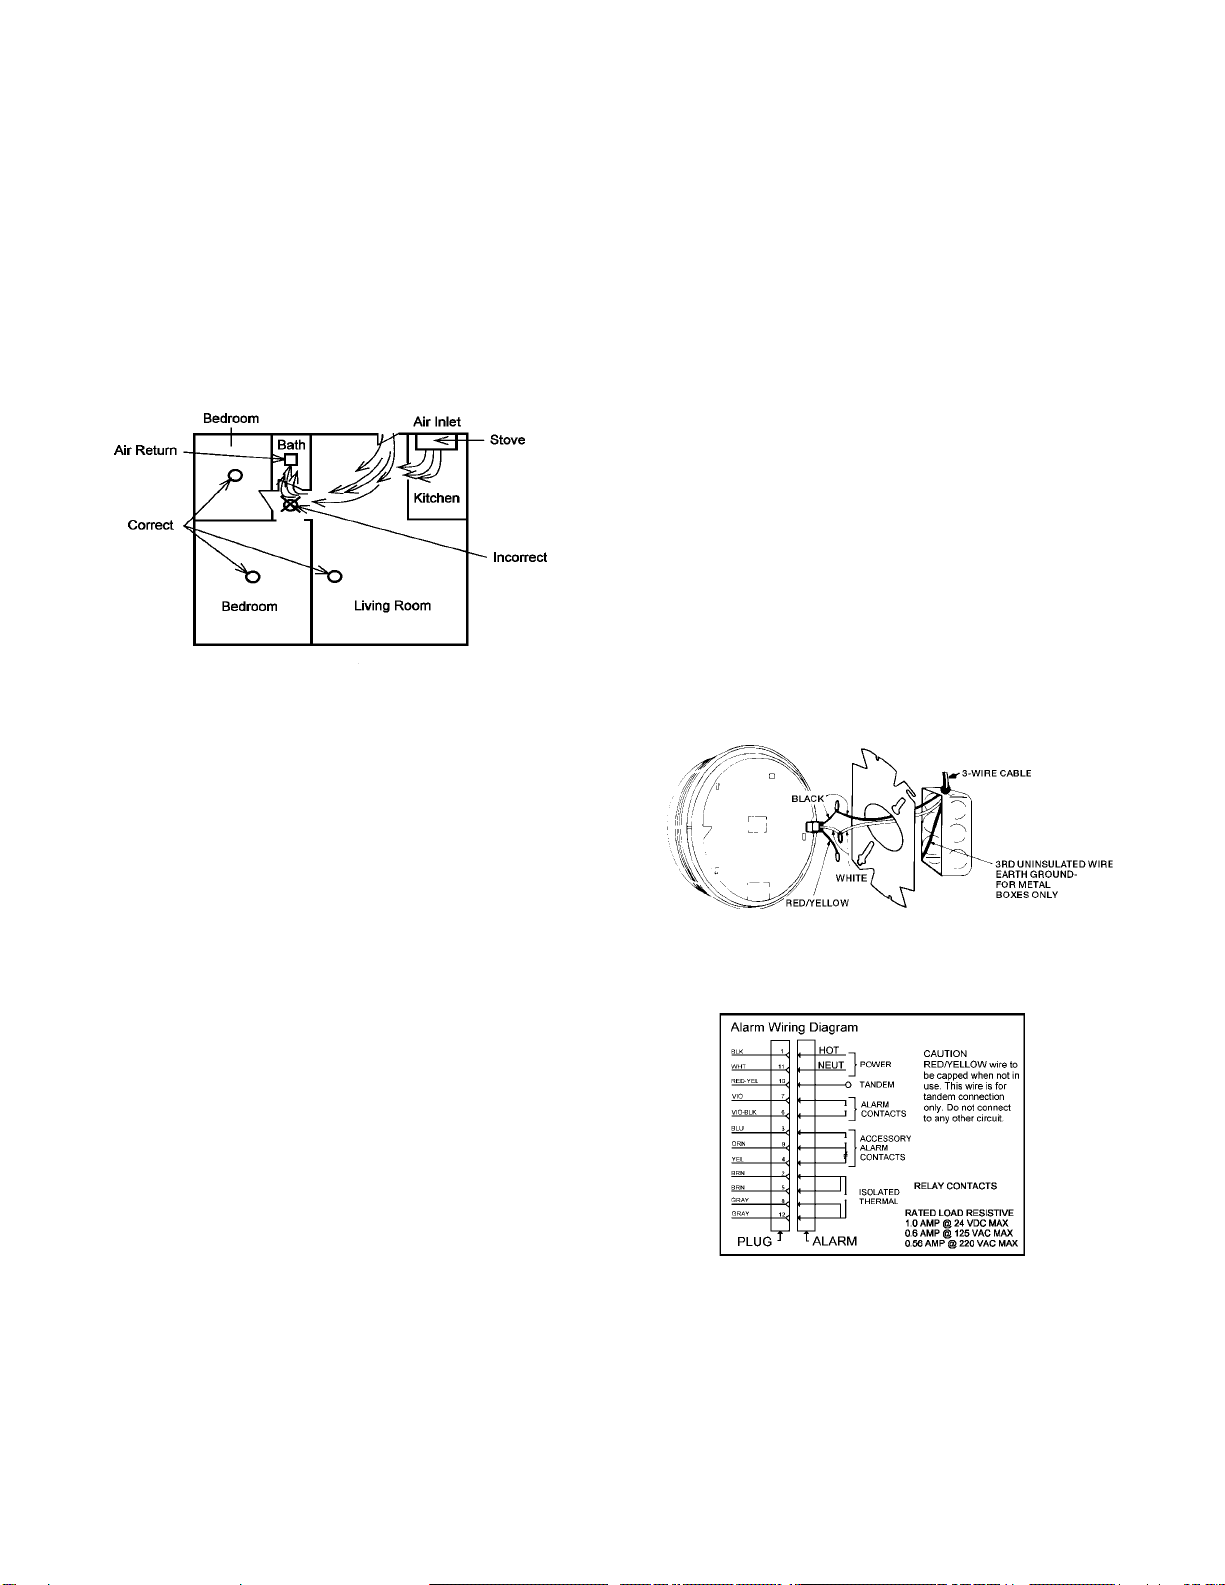
Where to Locate the Required Smoke Detectors in Existing Construction.
The major threat from fire in a family livin unit is at ni ht when everyone is
asleep. The principal threat to persons in sleepin areas comes from fires in
the remainder of the unit; therefore, a smoke alarm(s) is best located between
the bedroom areas and the rest of the unit. In units with only one bedroom
area on one floor, the smoke alarms should be located as shown in
Fi ure 1.

In family livin units with more than one bedroom area or with bedrooms
on more than one floor, more than one smoke alarm will be needed, as
shown in Fi ure 2.
In addition to smoke alarms outside of the sleepin areas, NFPA 72
requires the installation of a smoke alarm on each additional story of the
family livin unit, includin the basement. These installations are shown in
Fi ure 3. The livin area smoke alarms should be installed in the livin
room or near the stairway to the upper level, or in both locations. The
basement smoke alarm should be installed in close proximity to the stair-
way leadin to the floor above. When installed on an open joisted ceilin ,
the alarm should be placed on the bottom of the joists. The alarm should
be positioned relative to the stairway so as to intercept smoke comin
from a fire in the basement before the smoke enters the stairway.
IMPORTANT CONSIDERATION
We recommend replacin your alarm(s) every ten (10) years; why:
·Dust, dirt, and other environmental contaminants can affect your alarm over
a prolon ed period.
·Fast chan in industry consensus standards and codes on all alarms
make it advisable to periodically up rade your alarm to maximize life
safety.
·Assurance that your smoke alarm needs are kept abreast with the con-
stantly improvin electronic technolo y.
·Smoke alarms are reco nized as one of the lowest cost ways to protect
dwellin inhabitants a ainst the dan er of fire(s). It makes ood com-
mon sense to periodically replace and update your smoke alarm that
contributes so much to life safety.
MOUNTING LOCATION
This smoke alarm can be mounted on a ceilin or wall with equal effi-
ciency in either location.
·Ceilin locationalarm should be mounted as close as possible to the
center of a hallway or room. If this is not possible, the ed e of the alarm
should be at least 4 inches from any wall.
·Wall locationlocate the top of the alarm at least 4 inches and not more
than 12 inches from the ceilin .
Fi ure 4: RECOMMENDED SMOKE ALARM MOUNTING LOCATIONS
Fi ure 1: A SMOKE ALARM SHOULD BE LOCATED BETWEEN THE SLEEP-
ING AREA AND THE REST OF THE FAMILY LIVING UNIT.
Where to Locate the Required Smoke Alarms in New Construction.
All of the smoke alarms specified for existin construction are required,
and, in addition, a smoke alarm is required in each bedroom.
Are More Smoke Detectors Desira le? The required number of smoke
alarms may not provide reliable early warnin protection for those areas
separated by a door from the areas protected by the required smoke alarms.
For this reason, it is recommended that the householder consider the use
of additional smoke alarms for those areas for increased protection. The
additional areas include: basement, bedrooms, dinin room, furnace room,
utility room and hallways not protected by the required smoke alarms. The
installation of smoke alarms in kitchens, attics (finished or unfinished), or
ara es is not normally recommended, as these locations occasionally
experience conditions that can result in improper operation.
Fi ure 2: IN FAMILY LIVING UNITS WITH MORE THAN ONE SLEEPING
AREA, A SMOKE ALARM SHOULD BE PROVIDED TO PROTECT EACH
SLEEPING AREA IN ADDITION TO ALARMS REQUIRED IN BEDROOMS.
Fi ure 3: A SMOKE ALARM SHOULD BE LOCATED ON EACH STORY.
Fi ure 5: RECOMMENDED SMOKE ALARM LOCATION IN ROOMS WITH
SLOPED, GABLED, OR PEAKED CEILINGS.
The placement of the alarm is critical if maximum speed of fire detec-
tion is desired. Thus, a lo ical location for an alarm is the center of the
ceilin . At this location, the alarm is closest to all areas of the room.
WHERE SMOKE ALARMS SHOULD BE PUT IN
MOBILE HOMES
In mobile homes built after about 1978 that were desi ned and insu-
lated to be ener y-efficient, smoke alarms should be installed as described
in the section above.
In older mobile homes that have little or no insulation compared to
todays standards, uninsulated metal outside walls and roofs can transfer
heat and cold from outdoors, makin the air ri ht next to them hotter or
colder than the rest of the inside air. These layers of hotter or colder air
can prevent smoke from reachin a smoke alarm. Therefore, put smoke
alarms in such units only on inside walls, between 4 and 12 inches (10
and 30 cm) from the ceilin . If you are not sure about the insulation level
in your mobile home, or if you notice that the walls or ceilin are unusually
hot or cold, put the alarm on an inside wall.

Minimum protection requires one alarm as close to the sleepin area as
possible. For better protection, put one alarm in each room, but first read the
Locations to Avoid.
LOCATIONS TO AVOID
Nuisance alarms are caused by placin alarms where they will not operate
properly. To avoid nuisance alarms, do not place alarms:
·In or near areas where combustion particles are normally present
such as kitchens; in garages where there are particles of combustion
in vehicle exhausts; near furnaces, hot water heaters, or gas space
heaters. Install alarms at least 20 feet (6 meters) away from kitch-
ens and other areas where combustion particles are normally
present.
·In air streams passing by kitchens. Fi ure 6 shows how an alarm
can be exposed to combustion particles in normal air movement paths,
and how to correct this situation.
WIRING/GENERAL
1. Use U.L. Listed cable with Class 1 insulation.
2. Observe local code requirements. Use box connector to anchor cable
to outlet box.
3. Metal outlet boxes must be rounded to earth round.
CAUTION: Turn off electricity to prevent SHOCK and dama e to alarm.
Be sure the power line to the alarm is not controlled by any on/off switch, or
other type of switch, other than a fuse or circuit breaker.
IMPORTANT: Insure that all fluorescent li htin fixtures are properly
rounded.
WARNING: Alarm installation must conform to the electrical codes in your
area and to Article 760 of the U.S. National Electrical Code. Wire installa-
tion should be performed only by a licensed electrician.
MOUNTING OUTLET BOX
Use a 2 x 3 switch box or a 4 square or octa on junction box. Mount a
box for each alarm. If wall mountin is desired, be sure the box screws are
oriented to upper ri ht and lower left corners. Be sure to use supplied
mountin plate.
NOTE: For trouble areas where there can be a lar e volume of air blowin out
throu h the electrical junction box. You must first insert the cardboard shield
packa ed with your smoke alarm to the backside of alarm before securin it to
mountin plate.
WIRING ONE ALARM
1. Run a minimum of 16 au e, 2-conductor cable, plus round (3 wires)
to the alarm junction box from a power supply. Use U.L. Listed Class
1 wire.
2. Make wire connections to the supplied plu -in connector as follows:
black to black, white to white, and connect the round wire to the
metal outlet box.
Fi ure 6
·In damp or very humid areas, or next to bathrooms with showers.
The moisture in humid air can enter the sensin chamber as water
vapor, then cool and condense into droplets that cause a nuisance
alarm. Install alarms at least 10 feet (3 meters) away from bath-
rooms.
·In very cold or very hot environments, or in unheated buildings
or outdoor rooms, where the temperature can o below or above the
operatin ran e of the alarm. Temperature limits for proper operation
are 40° to 100°F (4.4° to 37.8°C).
·In very dusty or dirty areas. Dust and dirt can build up on the alarms
sensin chamber and can make it overly sensitive, or block openin s to
the sensin chamber and keep the alarm from sensin smoke.
·Near fresh air inlets or returns or excessively drafty areas. Air con-
ditioners, heaters, fans, and fresh air intakes and returns can drive smoke
away from smoke alarms, makin the alarms less effective.
·In dead air spaces at the top of a peaked roof or in the corners
between ceilings and walls. Dead air may prevent smoke from reach-
in an alarm. See Fi ures 4 and 5 for recommended mountin loca-
tions.
·In insect-infested areas. If insects enter an alarms sensin chamber,
they may cause a nuisance alarm. Get rid of the bugs before install-
ing alarms where bugs are a problem.
·Near fluorescent light fixtures. Electrical noise from nearby fluo-
rescent li ht fixtures may cause a nuisance alarm. Install alarms at
least 5 feet (1.5 meters) away from such light fixtures.
WARNING: Never disconnect power from an alarm to silence a nuisance
alarm. Open a window or fan the air around the alarm to remove the
smoke. The alarm will automatically turn off when the smoke in the air is
completely one. Do not stand close to the alarm. The sound produced by
the alarm is loud because it is desi ned to awaken you in an emer ency.
Prolon ed exposure to the horn at a close distance may be harmful to your
hearin .
INSTALLATION
CAUTION: New Construction: DO NOT attach alarm head until AFTER
sandin , insulation, paintin , and other dust creatin situations are finished
and cleaned up.
NOTE/RED-YELLOW WIRE: The red-yellow wire from the alarm is for
tandem connection only. DO NOT USE, AND DO NOT REMOVE INSULA-
TION CAP UNLESS CONNECTING ANOTHER ALARM.
WIRING TWO OR MORE ALARMS
Tandem In tallation
CAUTION: All alarms in a tandem installation must be controlled by the
same fuse or circuit breaker. Otherwise tandem units will not operate.
LIMITATIONS: A maximum of 12 alarms (517T or 517TH) may be
connected to ether. Do not exceed 125 feet between each alarm. Do not
exceed 1125 feet between first and last alarm.

NOTE: A maximum of six (6) alarms of model 517TC with the relay
option may be tandem interconnected.
Wire used for interconnectin shall be in accordance with the latest
edition of article 760 of the National Electrical Code (NFPA 70) and must
not exceed a resistance of 10 ohms.
CHECKOUT & TROUBLESHOOTING
1. Turn test knob to the NORMAL position and supply house power to the
alarm. The red indicator li ht should flash approximately every 15-30
seconds, showin that the alarm is operatin properly.
2. If red li ht is not flashin or the reen LED is not on:
a. Check the house current.
b. Check the connector plu and wire connections. NOTE: Be sure
you turn off power before checkin wire connections.
c. If the power supply and wirin check out, but the red li ht does not
flash, return the alarm to the manufacturer.
d. When powerin up alarms in a tandem installation and all the alarms
sound immediately, inspect all alarms for those with an illuminated
indicator li ht. These will be the trouble units.
3. Testin with the Test Knob:
a. Rotate the test knob counter-clockwise to the TEST 1 position and
wait up to 20 seconds for the alarm to sound. If the alarm does not
sound after 20 seconds, return the alarm for service.
b. After successfully testin alarm, return test knob to NORMAL
(non-test) position and wait 20 seconds for the alarm to stop
soundin .
3. Place the alarm up to the mountin plate, rotatin it clockwise until
alarm firmly snap locks into place. Keep the alarm parallel to the
mountin plate so upper and lower tabs on the plate seat correctly
into the alarm.
c. To test alarm for hi h sensitivity, turn test knob clockwise to TEST
2 position. Alarm should remain silent.
Make sure to return test knob back to its normal position.
If your alarm sounds durin this test it means the alarms sensitivity
has become too hi h and may cause false alarms.
This could mean your alarm is dirty and should be cleaned as
described in the maintenance procedure below.
d. To check for proper smoke entry into your alarms sensin cham-
ber, Edwards recommends usin the Home Safeguard Smoke
Alarm spray.
This test should be performed once a year and should be sprayed from
a distance no closer than 12 inches from the smoke alarm.
MAINTENANCE
After your alarm has been in operation for a period of time or if it was in-
stalled prior to the completion of all buildin construction, your alarm may have
become more sensitive due to dirt build-up in the alarms optic sensin cham-
ber which could cause nuisance alarms or could cause activation from small
amounts of smoke build-up.
If this should occur, followin this simple washin procedure will restore
your smoke alarm back to its ori inal condition.
For further information, re ardin frequency of cleanin and testin ,
refer to NFPA 72, NFPA, Batterymarch Park, Quincy, MA 02269.
IMPORTANT: ailure to follow full cleaning instructions could result
in damage to this smoke alarm.
DO NOT remove all alarms at the same time for cleaning.
1. Turn off electrical power to the alarm
2. Twist the alarm counter-clockwise to remove it from its mountin plate.
3. Unplu the connector from the back of the alarm. Do not remove the
wire connection; leave the connection for your replacement alarm or
jumper plu .
12
12
1. Run a minimum of 16 au e, 3-conductor cable, plus round (4 wires)
to the first alarm junction box from a power supply and between all
alarms that are to be connected to ether. Use U.L. Listed Class 1
wire.
2. Make wire connections to the supplied plu -in connector as follows: black
to black, white to white, 3rd conductor to the red/yellow wire. The
red/yellow wire should be stripped to make the connection. Connect
round wire between metal outlet boxes.
NOTES ON TANDEM INTERCONNECTING MODELS
·Only Edwards models 517T, 517TC and 517TH may be connected. DO
NOT connect Edwards smoke alarms to other manufacturers' smoke
alarms.
·No more than 12 Edwards models 517T and 517TH may be connected in
tandem.
·No more than 6 Edwards model 517TC may be connected in tandem.
·All units connected in tandem MUST et their power from the same cir-
cuit, that is, all smoke alarms in tandem must be controlled by the same fuse
or circuit breaker.
After installation to verify proper workin conditions all horns must sound
in this system.
IMPORTANT WARNING:
Failure to observe any of the conditions set forth may cause system
malfunction and dama e to the alarm.
MOUNTING: PLATE & ALARM
1. Lace the connector throu h the provided mountin plate and secure
the plate to the junction box.
2. Plu the wire connector into the alarm base.

4. Select three (3) standard size wash buckets and fill them each with
one allon of normal tap water (distilled or de-ionized treated
water is recommended as a final rinse if water is extremely
hard in your area).
5. Add 1/8 cup of Ivory dishwashing liquid to the first bucket of
water and allow it to mi thoroughly, then place one dirty alarm
into the soap water mi ture until it becomes completely cov-
ered or submerged.
NOTE: If the alarms are e ceptionally dirty, you may wish to
first wipe off any e cess dirt before washing alarm so as not to
dirty the wash water too quickly.
DO NOT open alarm for cleaning.
WARNING: ONLY IVORY DISHWASHING LIQUID IS TO BE
USED. OTHER BRANDS ARE NOT RECOMMENDED
AND MAY CAUSE YOUR ALARM TO MALFUNCTION.
6. Allow alarm to soak for appro imately 10 minutes (longer if e -
tremely dirty). Then agitate for 5 or 10 seconds to flush out any
remaining dirt left inside alarms housing.
7. Remove alarm from wash water and transfer directly to one of
the first rinse buckets containing clear water. Again, allow alarm
to become completely submerged, agitate once more for 5 or
10 seconds to remove soap residue.
8. Finally, transfer alarm to your second and final rinse bucket,
repeating method found in Step 7, then remove alarm to a
clean dry area for a period of 48 hours to allow it to thoroughly
dry.
WARNING: SMOKE ALARMS ARE TO BE AIR DRIED ONLY.
DO NOT PLACE ALARM IN OVEN, MICROWAVE OR USE A HOT
AIR BLOWER TO ACCELERATE DRYING TIME. THIS COULD
RESULT IN DAMAGE TO YOUR SMOKE ALARM.
IMPORTANT: IT IS RECOMMENDED TO CHANGE WASH AND RINSE
WATER AFTER FIVE (5) ALARMS. IF YOUR ALARMS ARE EX-
TREMELY DIRTY, WATER SHOULD BE CHANGED MORE FRE-
UENTLY.
In the event you e perience difficulty in the cleaning of your smoke
alarm or if you have any questions, please contact Edwards or
your local Edwards distributor.
WARNING:
If the smoke alarm does not work properly, do not try and fi it
yourself. This will void your warranty. DO NOT TRY TO FIX IT
YOURSELF.
IMPORTANT: Edwards recommends alarms be tested a mini-
mum of once a week.
WARNING: Never use an open flame of any kind to test your
alarm. You may ignite and damage the alarm as well as your
home. The test feature accurately simulates smoke conditions
and tests the alarms functions as required by Underwriters Labo-
ratories.
WARNING: Do not cover, tape, or otherwise block the open-
ings of your smoke alarm. These openings are designed to allow
air to pass through your smoke alarm, thus sampling the air around
the alarm.
FAILURE TO REGULARLY CLEAN THIS SMOKE ALARM WILL
RESULT IN FALSE ALARMS. A BUILD UP OF DUST CREATES
AN OBSCURATION THAT SIMULATES SMOKE. THIS MEANS
THE UNIT WILL GO INTO ALARM WITHOUT A FIRE CONDI-
TION.
LIMITED WARRANTY
Providing Purchaser or Distributor notifies us promptly if within two (2) years from date of
shipment from Edwards Company, equipment or parts manufactured by us fail to function
properly under normal use because of defects in material or workmanship demonstrated
to our satisfaction to have existed at the time of delivery or because examination proves
them not to be operating within the specified limit of calibration, the Company, reserving
the right to either inspect them in your hands or request their return to us, will at our
option repair or replace at our expense F.O.B. shipping point, such equipment or parts
determined by us to be defective, if returned transportation prepaid by Purchaser. Specific
products may carry a greater or lesser warranty but if so they will be so identified.
Replacement parts and factory repairs are warranted for a period of ninety (90) days from
date of shipment from the Edwards Company.
The foregoing shall not apply to equipment that shall have been altered or repaired after
shipment to you by anyone except our authorized employees or agents and the Company
will not be liable in any event for alterations or repairs except those made with its written
consent. Purchaser shall be solely responsible for determining suitability for use and the
Company shall in no event be liable in this respect. The equipment or parts manufactured
by others but furnished by us will be repaired or replaced only to the extent of the original
manufacturer's guarantee. No guarantee whatsoever is given as to electronic tubes, and
the Company shall have no repair or replacement obligations as to these. Our obligations
and liaibilities hereunder shall not be enforceable until such equipment has been fully paid
for. Purchaser agrees that if the products sold hereunder are resold by purchaser, he will
include in the contract for resale, provisions which limit recoveries against us in accordance
with this section. THE FOREGOING OBLIGATIONS ARE IN LIEU OF ALL OTHER OBLIGATIONS
AND LIABILITIES INCLUDING NEGLIGENCE AND ALL WARRANTIES OF MERCHANTABILITY
OR OTHERWISE, EXPRESS OR IMPLIED IN FACT OR BY LAW, AND STATE OUR ENTIRE AND
EXCLUSIVE LIABILITY AND BUYER'S EXCLUSIVE REMEDY FOR ANY CLAIM OF DAMAGES
AND IN CONNECTION WITH THE SALE OR FURNISHING OF GOODS OR PARTS, THEIR DESIGN,
SUITABILITY FOR USE, INSTALLATION OR OPERATION. WE WILL IN NO EVENT BE LIABLE
FOR ANY DIRECT, SPECIAL OR CONSEQUENTIAL DAMAGES WHATSOEVER, AND OUR
LIABILITY UNDER NO CIRCUMSTANCES WILL EXCEED THE CONTRACT PRICE FOR THE
GOODS FOR WHICH LIABILITY IS CLAIMED.
EdwardsSignaling
90FieldstoneCourt,Cheshire,CT 06410
Phone: 1-203-699-3300
This manual suits for next models
4
Table of contents
Other Edwards Signaling Smoke Alarm manuals

Edwards Signaling
Edwards Signaling SuperDuct ESD-2W User manual

Edwards Signaling
Edwards Signaling SuperDuct TSD-CJ Service manual

Edwards Signaling
Edwards Signaling 517TCSB Series User manual

Edwards Signaling
Edwards Signaling 517TCS Series User manual

Edwards Signaling
Edwards Signaling E-SDPCB Assembly instructions

Edwards Signaling
Edwards Signaling 517T Series User manual

Edwards Signaling
Edwards Signaling SuperDuct TSD-SJ Assembly instructions