EEVEE Cooking Master K1621 User manual

Cooking Master
K1621

I- SECURITY INSTRUCTIONS
I.1 GENERAL SAFETY INSTRUCTIONS
1. Inspect the appliance for visible signs of damage before use. Do
not use a damaged device.
2. This appliance is intended for private a nd non- commercial use.
Any use other than previously stated is considered as improper use.
No claims of any kind will be accepted for damage resulting from use
of the appliance for other than its intended purpose. The risk must be
borne solely by the user.
3. This appliance is intended to be used in household and similar ap-
plications such as:
–staff kitchen areas in shops, offices and other working environ-
ments;
–farm houses
–by clients in hotels, motels and other residential type environments;
–bed and breakfast type environments.
4. This appliance complies with the standards in force for this type of
product.
5. Place the product on a stable surface. Do not slot it in.
6. Always connect the appliance to an accessible power outlet.
Read these instructions thoroughly before using
the appliance. Keep this instruction manual for
future reference or new users.
1

7. When unplugging the power cord, always pull it at the plug; do not
pull on the cord.
8. Do not run the appliance with an empty jug.
9. Do not use the appliance without the lid being securely clipped in
place.
10. Do not move the appliance whilst in use.
11. Always make sure there is sufficient ventilation around the appli-
ance when it’s in use.
12. The jug body becomes hot during use, always use the handle pro-
vided.
13. Do not use the appliance outdoors.
14. Do not use the appliance :
–if the plug or the power cord are damaged
–if the appliance is in anyway damaged
–if it fell down
15. Do not let the power cord hang over the edge of a table or the
work surface and make sure it does not come into contact with hot
surfaces.
16. Do not place and do not use this product near by any heat source
(hob, heating, etc.).
17. Avoid wrapping the cord around the appliance and do not bend it.
18. Use only the accessories supplied with the appliance.
19. Never immerse the appliance, its power cord or its plug in water
or any other liquid.
20. Do not handle the cord or appliance with wet hands
21. Make sure to unplug the unit when you do not use it.
2

24. If the product is damaged, it must be repaired by the manufactur-
er or by a third person with similar qualification, in order to avoid all
risks. This particularly applies to replacing a damaged connection
cable. Unqualified repairs can lead to considerable danger for the
user.
25. If the supply cord is damaged, it must be replaced by the manu-
facturer, its service agent or similarly qualified persons in order to
avoid a hazard.
26. Keep the appliance out of the reach of children when it is plugged
in or cooling.
27. Do not use the plastic lid cap for carrying food or hot liquids.
28. When mixing hot liquids, take care to avoid splashing any hot
liquid that could cause burns.
29. Do not remove the lid when the water is boiling.
30. Always leave the appliance to cool down before cleaning.
31. This appliance can be used by persons with reduced physical,
sensory or mental capabilities or lack of experience and knowledge if
they have been given supervision or instruction concerning use of the
appliance in a safe way and understand the hazards involved. Chil-
dren shall not play with the appliance.
32. Do not allow children to use this appliance. Keep the appliance
and its cord out of the reach of children.
33. Regarding the detailed information on how to use the accesso-
ries, refer to the paragraph “instructions” in this manual.
34. It is essential to keep this appliance clean since it is in direct con-
tact with food.
35. Regarding the instructions for cleaning surfaces in contact with
food or oil, thanks to refer to the below paragraph “cleaning” in this
3

36. Children must be kept under supervision to ensure that they do
not play with the appliance.
37. Great care must be taken when handling the blades when empty-
ing the bowl and during cleaning.
38. Switch off the appliance and unplug it from the power supply
before changing the accessories or handling or getting near to any of
the parts that move during operation.
39. Always unplug the appliance from the power supply if left unat-
tended and before assembling, dismantling or cleaning.
40. Improper use may result in injury.
41. Be careful when pouring a hot liquid into the cooking processor
or blender to avoid any splashes escaping from the appliance caused
by sudden boiling.
42. Warning: avoid spillage on the connector.
44. The appliance is only to be used with the stand(motor unit) pro-
vided.
45. The heating element surface is subject to residual heat after use.
46. Care shall be taken when handling the sharp cutting blades,
emptying the bowl and during cleaning.
47. Be careful when you touch front grip when you open the lid (when
unit just finished working) – Hot surface
48. WATCH OUT! BLADES ARE SHARP. HANDLE THEM WITH CARE!
49. If the blades are blocked when mixing, always unplug the appli-
ance before removing the food responsible for blocking.
4

50. Regarding the instructions for the use of accessories, opera-
tion times and speed settings, refer to the below paragraphs.
51. The appliance must not be immersed.
52. Warning: potential injury from misuse.
50. Regarding the instructions for the use of accessories, opera-
tion times and speed settings, refer to the below paragraphs.
51. The appliance must not be immersed.
52. Warning: potential injury from misuse.
I.2 SPECIAL SAFETY INSTRUCTIONS
1. Check the main body, jar, steamer and other components reg-
ularly for damage. If any damage is detected, do not use the ap-
pliance.
2. The hole on the Jar lid can only be covered with the measuring
cup. Do not use clothing or other objects.
3. Do not exceed the MAX mark on the Jar body.
4. The Jar’s surface may reach high temperature when operating
over 60°C , use some type of protection to touch or move it.
5. The instructions for food processors and blenders warm
against misuse.
6. Be careful if hot liquid is poured into the food processor or
blender as it can be ejected out of the appliance due to a sudden
5

steaming.
7. When using the steamer: make sure the steamer and the jar
are properly fixed.
8. When use the machine at high speed, use it only with its lid in
the correct place.
9. Do not expose any body part to the steam produced during op-
eration.
10. Make sure the vents on the product’s back are not covered or
blocked to avoid the appliance from damaging.
6

I.1 GENERAL SAFETY INSTRUCTIONS
1. Inspect the appliance for visible signs of damage before use. Do
not use a damaged device.
2. This appliance is intended for private a nd non- commercial use.
Any use other than previously stated is considered as improper use.
No claims of any kind will be accepted for damage resulting from use
of the appliance for other than its intended purpose. The risk must be
borne solely by the user.
3. This appliance is intended to be used in household and similar ap-
plications such as:
–staff kitchen areas in shops, offices and other working environ-
ments;
–farm houses
–by clients in hotels, motels and other residential type environments;
–bed and breakfast type environments.
4. This appliance complies with the standards in force for this type of
product.
5. Place the product on a stable surface. Do not slot it in.
6. Always connect the appliance to an accessible power outlet.
II.1 GLOBAL DESCRIPTION OF THE PRODUCT
II-CHARACTERISTICS OF THE PRODUCT
1
13
24
5
3
9
8
7
6
10
12
11
7

II.2PACKAGE CONTENTS
1. Main body 2. Jar
3. Jar lid 4. LCD display
5. Start / pause / reset knob 6. Big steamer body
7. Big steamer rack 8. Big steamer cover
9. Spatula 10. Kneading blade
11. Mixing blade 12. Filter basket(small steamer)
13. Butterfly whisk 14. Fixing support
15. Measuring cup
·1 Cooking Robot
·1 Measuring cup
·2 Steam baskets
14
15
8

·1 Butterfly whisk
·2 Blades
·1 Spatula
·1 Instruction manual
II.3 TECHNICAL CHARACTERISTICS OF THE PRODUCT
·The Robot will help you to create great recipes to share with your family and
friends!
·Stainless steel jug with a capacity of 2L
·LCD screen with touch keys
·5 Automatic programs: steam, kneading, slow cook, soup, self-cleaning, and 13
sub programs
·5 Manual programs: timer, speed, temperature, power, turbo
·Reset function : press the start/pause knob for 2 seconds
·Start / pause button
·4 non-slip feet
·Materials used: SS (stainless steel), ABS (plastic) and polypropylene
·Several accessories included
·Power: 1700W ( motor power: 700W and heating power: 1000W)
II.4 POSSIBLE FUNCTIONS
1. Chop: chop vegetables and meat to the desired size.
2. Mince: mince vegetables, herbs, meat, garlic and nuts in just a few seconds. It
even crushes ice for you to prepare cocktails and smoothies.
3. Grind: prepare milkshakes, sauces, dips, creams and purees with smooth and silky
texture.
4. Mill: the food processor allows milling an endless number of foodstuffs and allows
preparing condiments and dressings such as parsley, basil and cinnamon with natu-
ral ingredients. Moreover, you will be able to boast about brewing your own coffee
at home. The machine mills coffee beans in just some seconds.
9

9
5. Pulverize: pour sugar inside your machine and create your own icing sugar to
decorate the most delicious desserts.
6. Grate: grates chocolate, chickpeas, cheese, tomato, butter, bread, coconut, nuts,
peanuts, almonds and much more.
7. Beat: with the butterfly accessory, you will be able to beat easily eggs to prepare
perfect omelette.
8. Whip: turn into a confectionery professional, whip egg whites to prepare meringue
or cream and cook delicious sweets in the most quick and simple way.
9. Emulsify: Kneading blade homogeneously prepares amazing salad dressings such
as mayonnaise and aioli (garlic and olive oil sauce) to accompany your best dishes.
10. Mixes: with this appliance mix any ingredients you desire in the most efficient
way.
11. Cook: you can heat, cook and fry in the same container. With this appliance ’ s
absolute precision, the cooking temperature can be totally controlled. Thanks to its
smart heating- power system, ensures continuous cooking without exceeding the
set temperature, avoiding foodstuffs from sticking or burning.
12. Stir: Kneading blade stirs food while it cooks it ensuring uniform heating. This
function is perfect for preparing risottos, rice pudding, custards or bechamel,
achieving professional consistence and texture thanks to its motor’s innovating su-
perpower.
13. Steam: the perfect function for cooking complete, low-calorie and healthy food
maintaining all the natural properties. The steamer allows steaming at 2 different
levels and cooking at the same time in the jar. For example, you will be able to
steam salt- roasted bream and vegetables in the steamer, while at the same time
you cook meatballs and tomato sauce in the jar’s base. All these at the same time,
making the most out of the used energy and without affecting each food’s flavour.
14. Poach: thanks to kneading blade’s great precision, achieve perfect poaching
without having to worry about stirring it or controlling time.
15. Candy: candy with aromatized oils without burning them and preserving all the
flavour, thanks to the precise temperature control of this food processor.
16. Knead: You can prepare bread dough in big quantities in just 1 piece. Thanks to
its exclusive kneading accessory, you can prepare perfect bread.
17. Boil: fill in the jar with water and boil any food you desire.
18. Warm: if you want any food you have prepared to stay warm, set the appliance
until 100ºC and serve your meal whenever you desire.
19. Accurate cooking degree by degree: its degree-by-degree control, its adjust-
able 12 hours and its 10 heating power levels make it a great-precision cooking tool.
20. Ferment: ferment any dough at any temperature in order to improve your dough.
21. Bain-marie: achieve proper bain-marie textures with its steamer.
22. Reheat: set the temperature until 100 ºC to reheat any precooked meal.
23. Turbo: this is the perfect function for processing the hardest foods. It can be
used to crush solid ingredients intermittently such as garlic, ice, chocolate or ham.
III.1 USE & ASSEMBLY
Stainless steel jar assembly
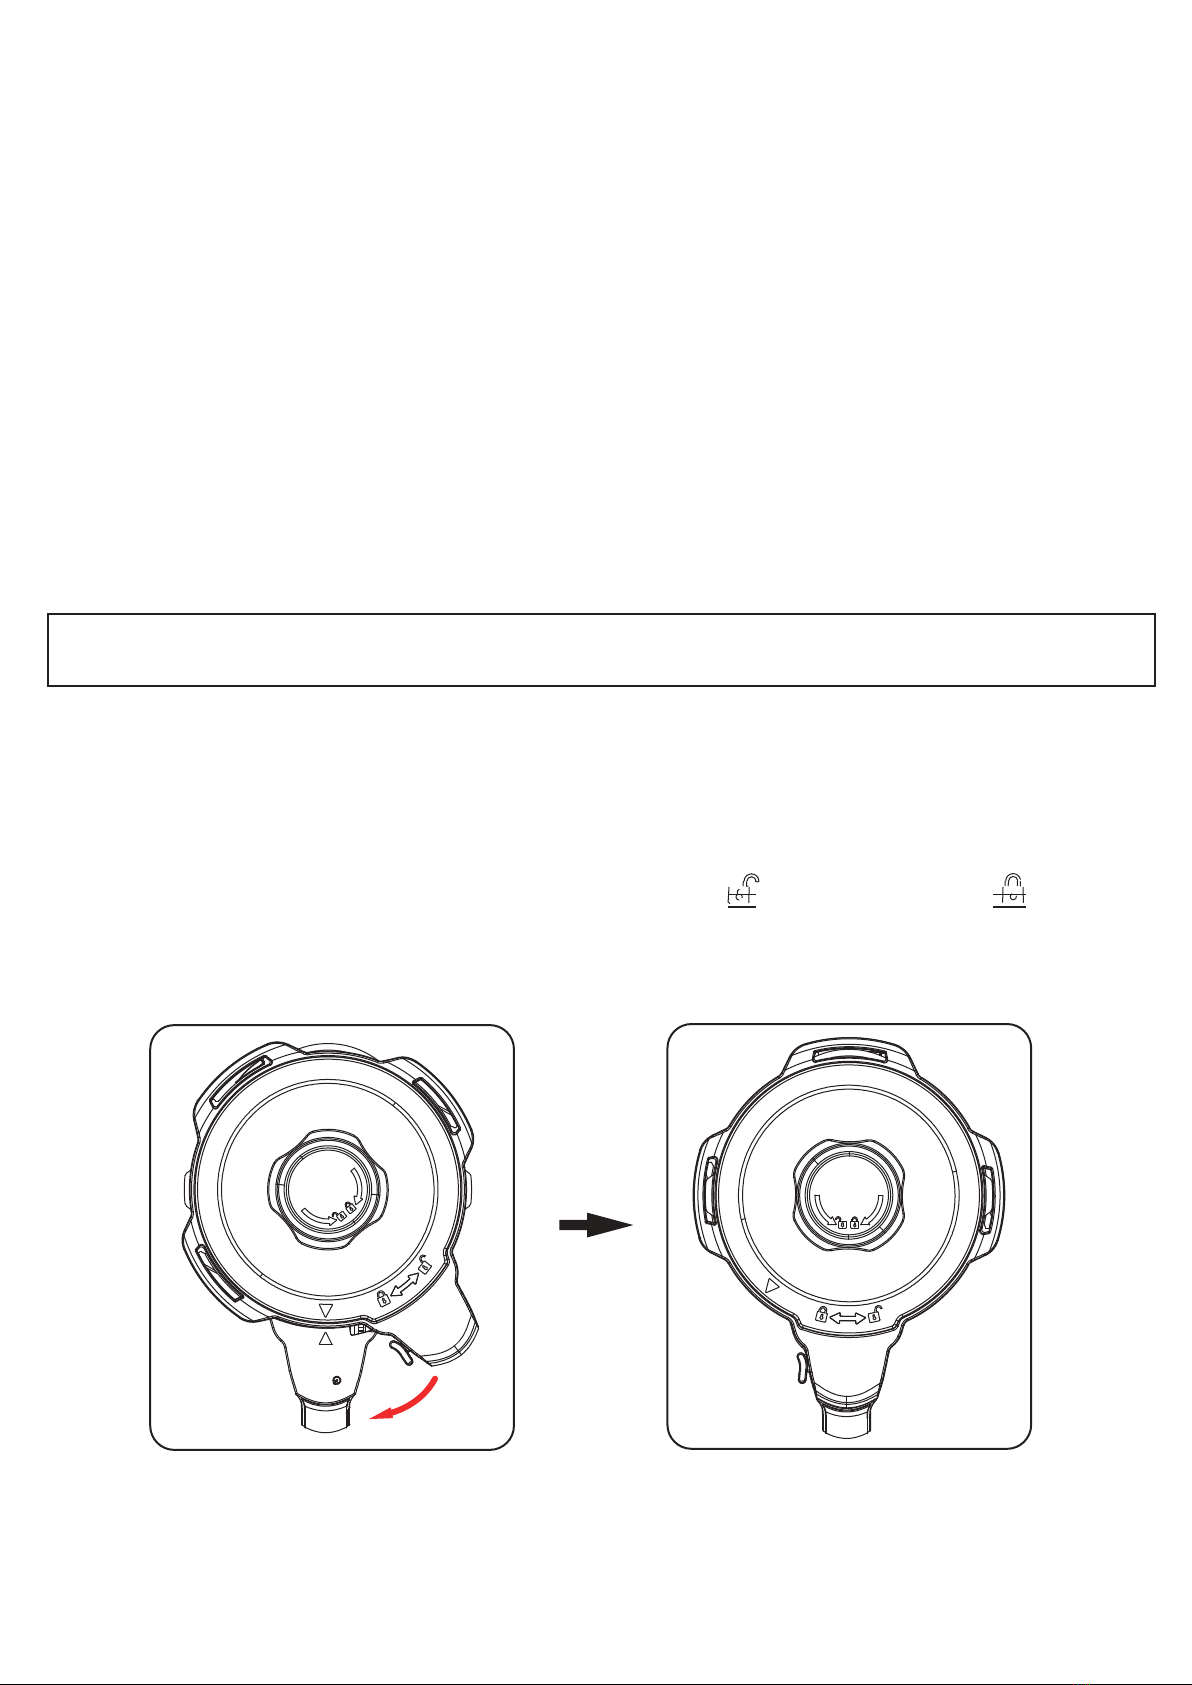
1. Place the lid on the stainless steel jar so that the two small arrows on the
lid and on the jar handle are properly aligned.
2. Then turn the cover clockwise from the open lock to the closed lock until it
is closed securely. If the lid is not closed properly, the product will not work (see
diagram below).
III- USE OF ACCESSORIES
Note: The jar has marks on one of its sides and the effective maximum capacity
is 2L. Do not exceed this quantity to ensure good operation.
10

3. Place the jar on the main body making sure it fits properly in its correct position.
If the jar is not properly placed, the product will not operate.
1. Fix the sealing ring on the blades unit
2. Place the blade on the location provided on the base of the jar. Make sure the
base of the blade aligns with opening provided (see diagram below)
3. Turn the jar over while holding the blade gently so that it does not fall.
4. Then place the fixing support correctly on the underside of the bowl and turn it
clockwise to secure the blade .
Mixing blade and kneading blade assembly
Align the base of the with the
opening location on the jar
11

To remove the blade from its location :
1. Turn the jar over and turn the fixing support counterclockwise
2. Then remove the blade carefully. Make sure it does not fall suddenly. It may
damage it.
NB :
•Use a cloth to cover the blades before handling to avoid injury.
•If the blade is not properly attached, food or liquids during cooking may splash.
•The kneading blade is designed to knead, mix and mix foods without cutting them
•Do not use the kneading blade for speeds above 3 as the bowl may vibrate and
present a risk.
•The distance between the kneading blade and the bowl wall is 1 cm, which could
cause food to get stuck. If this happens, the unit's engine will stop working and
go into self-protection mode. Use the spatula to mix and remove stuck food so
that the appliance can resume cooking.
12

Measuring cup assembly
The measuring cup is used as the product’s lid to prevent splashing and heat loss
and is used to measure food quantity. Its maximum capacity is 100 ml.
1. Place the measuring cup on the cover’s gap.
2. Turn it clockwise to lock it and anticlockwise to open it and take it out.
Spatula
The spatula is the only tool suitable for stirring food inside the jar, other tools could
scratch and damage the surface.
Warnings:
•Use this measuring cup and do not use other accessory or object to close the
jar’s cover.
•Turn the measuring cup clockwise until fixed to cook without temperature (mash,
stir, mince…).
•If you wish to cook with temperature, place the measuring cup in its place on the
cover without turning it. This way, steam will be able to be released.
13
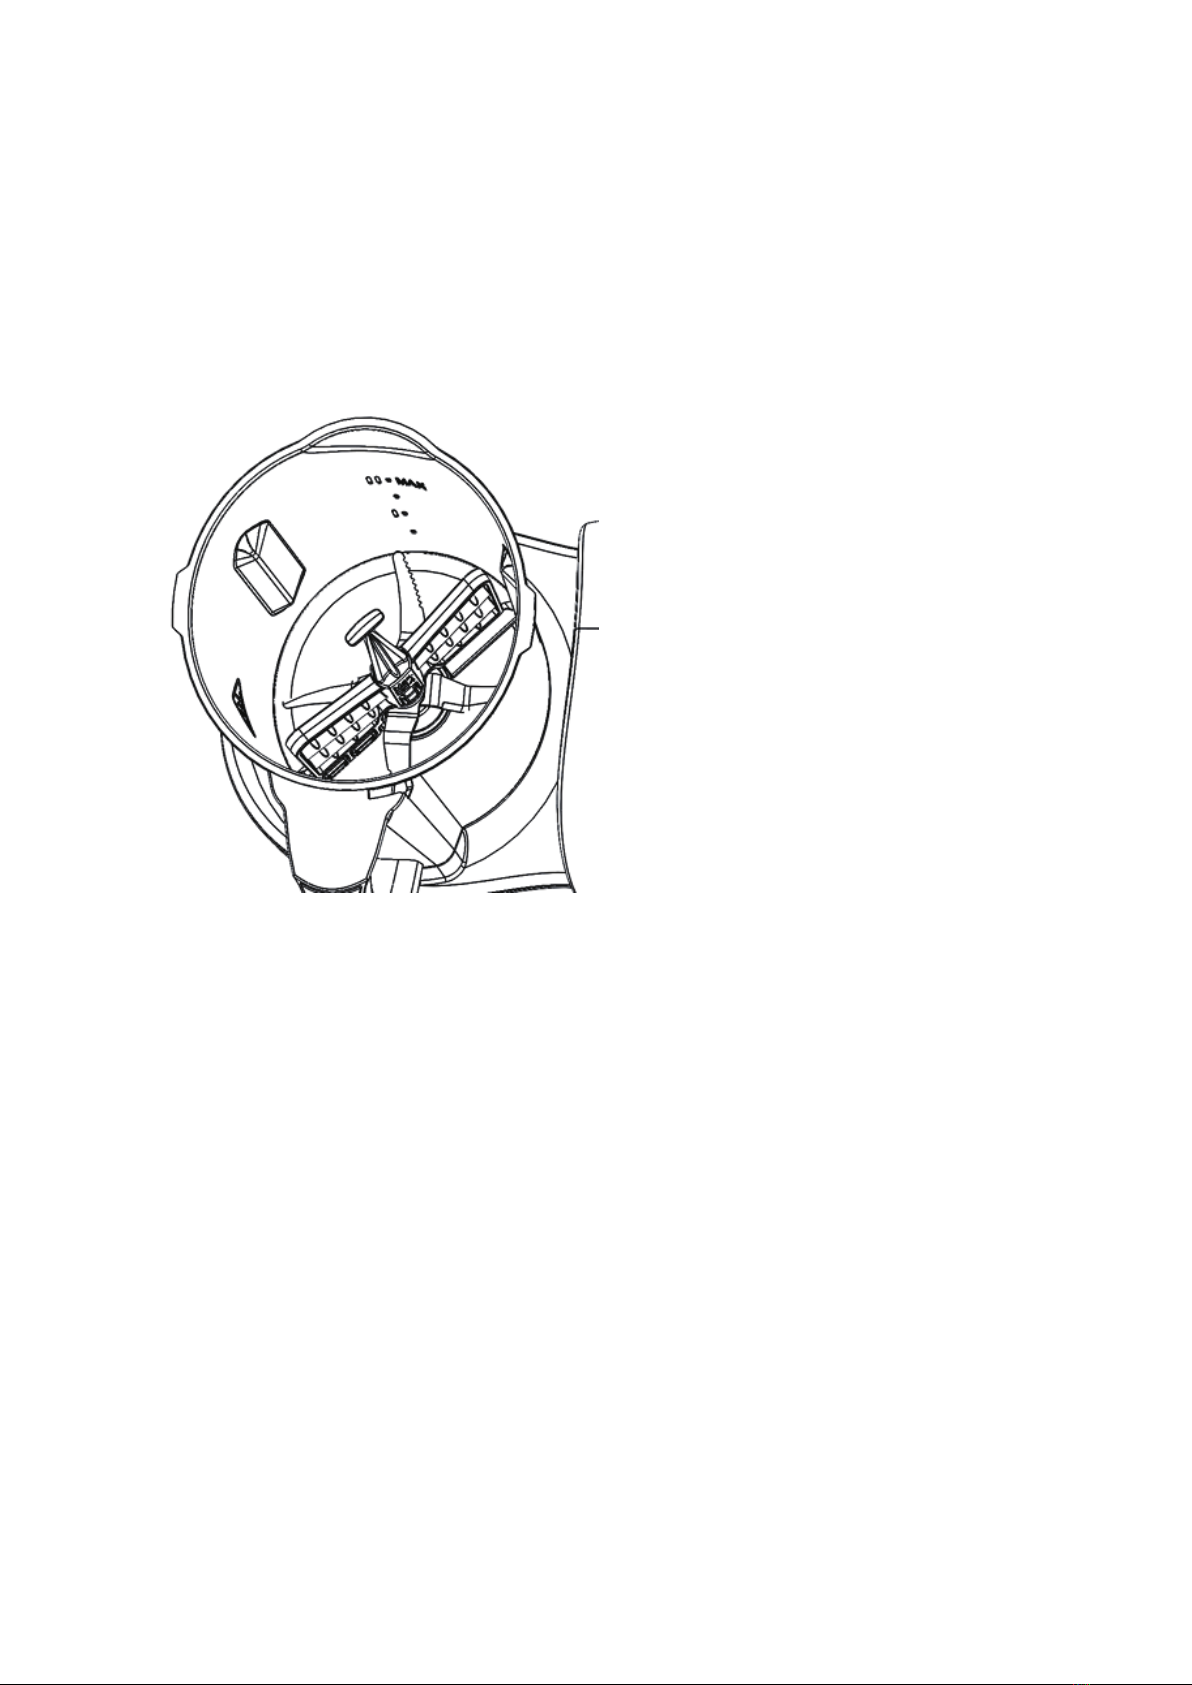
Butterfly
This accessory works installed on top of the blades unit, this way it helps mixing
food. It helps food mixing and removes lumps. Install the butterfly on the blades unit
by matching the shaft’s centre with the butterfly’s gap and push it down.
Big Steamer
The big steamer includes 3 parts: steamer body, steamer cover and rack. The ca-
pacity is 3.5L.
1. Close the steamer with its cover before using it.
2. Place the steamer on the jar, making sure it fits well.
Warnings :
•
•
•
•
Warnings : It cannot be used while the product is operating with the blades or
the butterfly whisk.
Do not operate the appliance unless the accessory is fixed in its place
Do not operate it with speeds over 4
Do not use the butterfly at the same time as the spatula
Do not pour food in while it is operating with this accessory to avoid it from dama
-ging or getting blacked
14

Small steamer
This small steamer is designed for several purpose. The capacity is 1L.
1.To make all kind of recipe related to steam (e.g. Pasta, noodles, steamed vege-
tables…)
2.It can also be used as a filter or a strainer.
Warnings:
•Do not touch or get close to the steamer to avoid scald.
•Do not cover the steamer’s holes with any cloth or objects. The steam may come
out from the edge or other parts which may cause risk of scald.
•It is best to put foods difficult to cook on the bottom layer of the steam basket
and foods easier to cook on the top layer of the steam basket.
15

III.2 SUGGESTED SPEED AND CAPACITY FOR EACH ACCESSORY
1. Take the product our of the box and remove all packaging materials.
2. Make sure the product is in good conditions. If any sign of visible damage is ob-
served, contact immediately with our official Technical Support Service.
3. Place the appliance on a clean, stable and flat surface. Do not place it close to
the edge, inside build-in wardrobes or handing brackets.
4. Clean the appliance before using it for the first time: wipe the body of the appli-
ance with a soft, dry cloth and wash the blades with warm water and washing up
IV.1 BEFORE THE USE
Note: The product will produce a light smell when it is used for the first time and
will disappear after a few minutes. This is due to the manufacturing rests and do
-es not affect to it’s operating.
IV- USE OF THE PRODUCT
16

liquid. Rinse with clear water and dry carefully with a soft cloth.
5. Connect it to a power supply and press the power switch to turn it on. The
machine will beep and the display will turn on.
•After use, the jar may be hot. Do not touch the surface of stainless steel jar.
•The total amount of ingredients and liquid must not exceed the MAX limit line (2L
for cold preparation and 1.5L for hot preparation). In case of overflow, there may
be a risk of overflow and burns.
•If you are unsure of the quantities you can use the measuring cup included.
•You can stir your ingredients on the jar before putting the lid on, this prevents the
ingredients from sticking to the bottom of the jar.
•Remove your hot preparation from the jar when the cycle is finished because the
bowl is still hot and may burn your preparation.
•If the product does not work after power-up, check if the jar and / or lid are in
the correct position. If not, remove the jar and / or lid and replace them properly.
The device is equipped with 5 manual programs buttons : Time, Speed, Tempera-
ture, Power and WiFi. This allows you to adjust the programs yourself depending
on the preparation you want to do..
IV.2 PRACTICAL ADVICE
IV.3 MANUAL PROGRAMS
Time
Time
Speed
Speed
Temperature
Temperature
Heat power
Heat power
WiFi
WiFi
Possibility of setting seconds, minutes and hours
Possibility to adjust speeds : from 1 to 10
Possibility to adjust the temperature : from 37°C to 120°C
Possibility to adjust the heating power : from 1 to 10
Possibility to contact WiFi
17

Timer
The display shows for hr :min:sec.
1. Press the timer button once, the minute digits will flash. After minutes setting,
press it again it switches to seconds setting, the seconds digits will flash. And then
press it again it will switch to hours setting, hours digits will flash. Turn the knob left
or right to adjust the desired minutes/seconds/hours. ”
Start/Pause knob and Reset function
1. Use the knob to adjust all settings: time, temperature etc. Turn it clockwise to
increase the value and anticlockwise to decrease it.
2. Once the desired setting or program has been selected, press the knob to activate
it and the appliance will start operating.
3. During the setting process or machine working process, long-press the knob for
2 seconds, appliance will clear all set program and return to standby mode.
4. If no operation on appliance during standby mode for 10 minutes, the appliance
will automatically turn off.
5. While appliance is cooking, chopping, kneading etc. You can press the
start/pause knob. The cooking process will go into pause mode and the dis-
play will show “PAUSE” . This way, you can open the lid, remove the jar or add
missing ingredients.
Once food has been added, place every element back in its correct position and
press the start/pause knob again to resume operation. After 10 minutes in “PAUSE”
status without any operation, the appliance will automatically turn off
ON/OFF SWITCH
The switch is on the back of appliance.
Use this switch to switch the appliance on or off.
18
Table of contents


