DESCRIPTION
IIt allows to control the operation of an electric installation or equipment according to a daily or weekly program. It can memorize the a
maximum capacity of 32 Programs. The output functions are ON, OFF and Impulse from 1 to 59 seconds. It automatice, adjusts the time in
Summer and Winter. It’s possible to program a Stand By period.
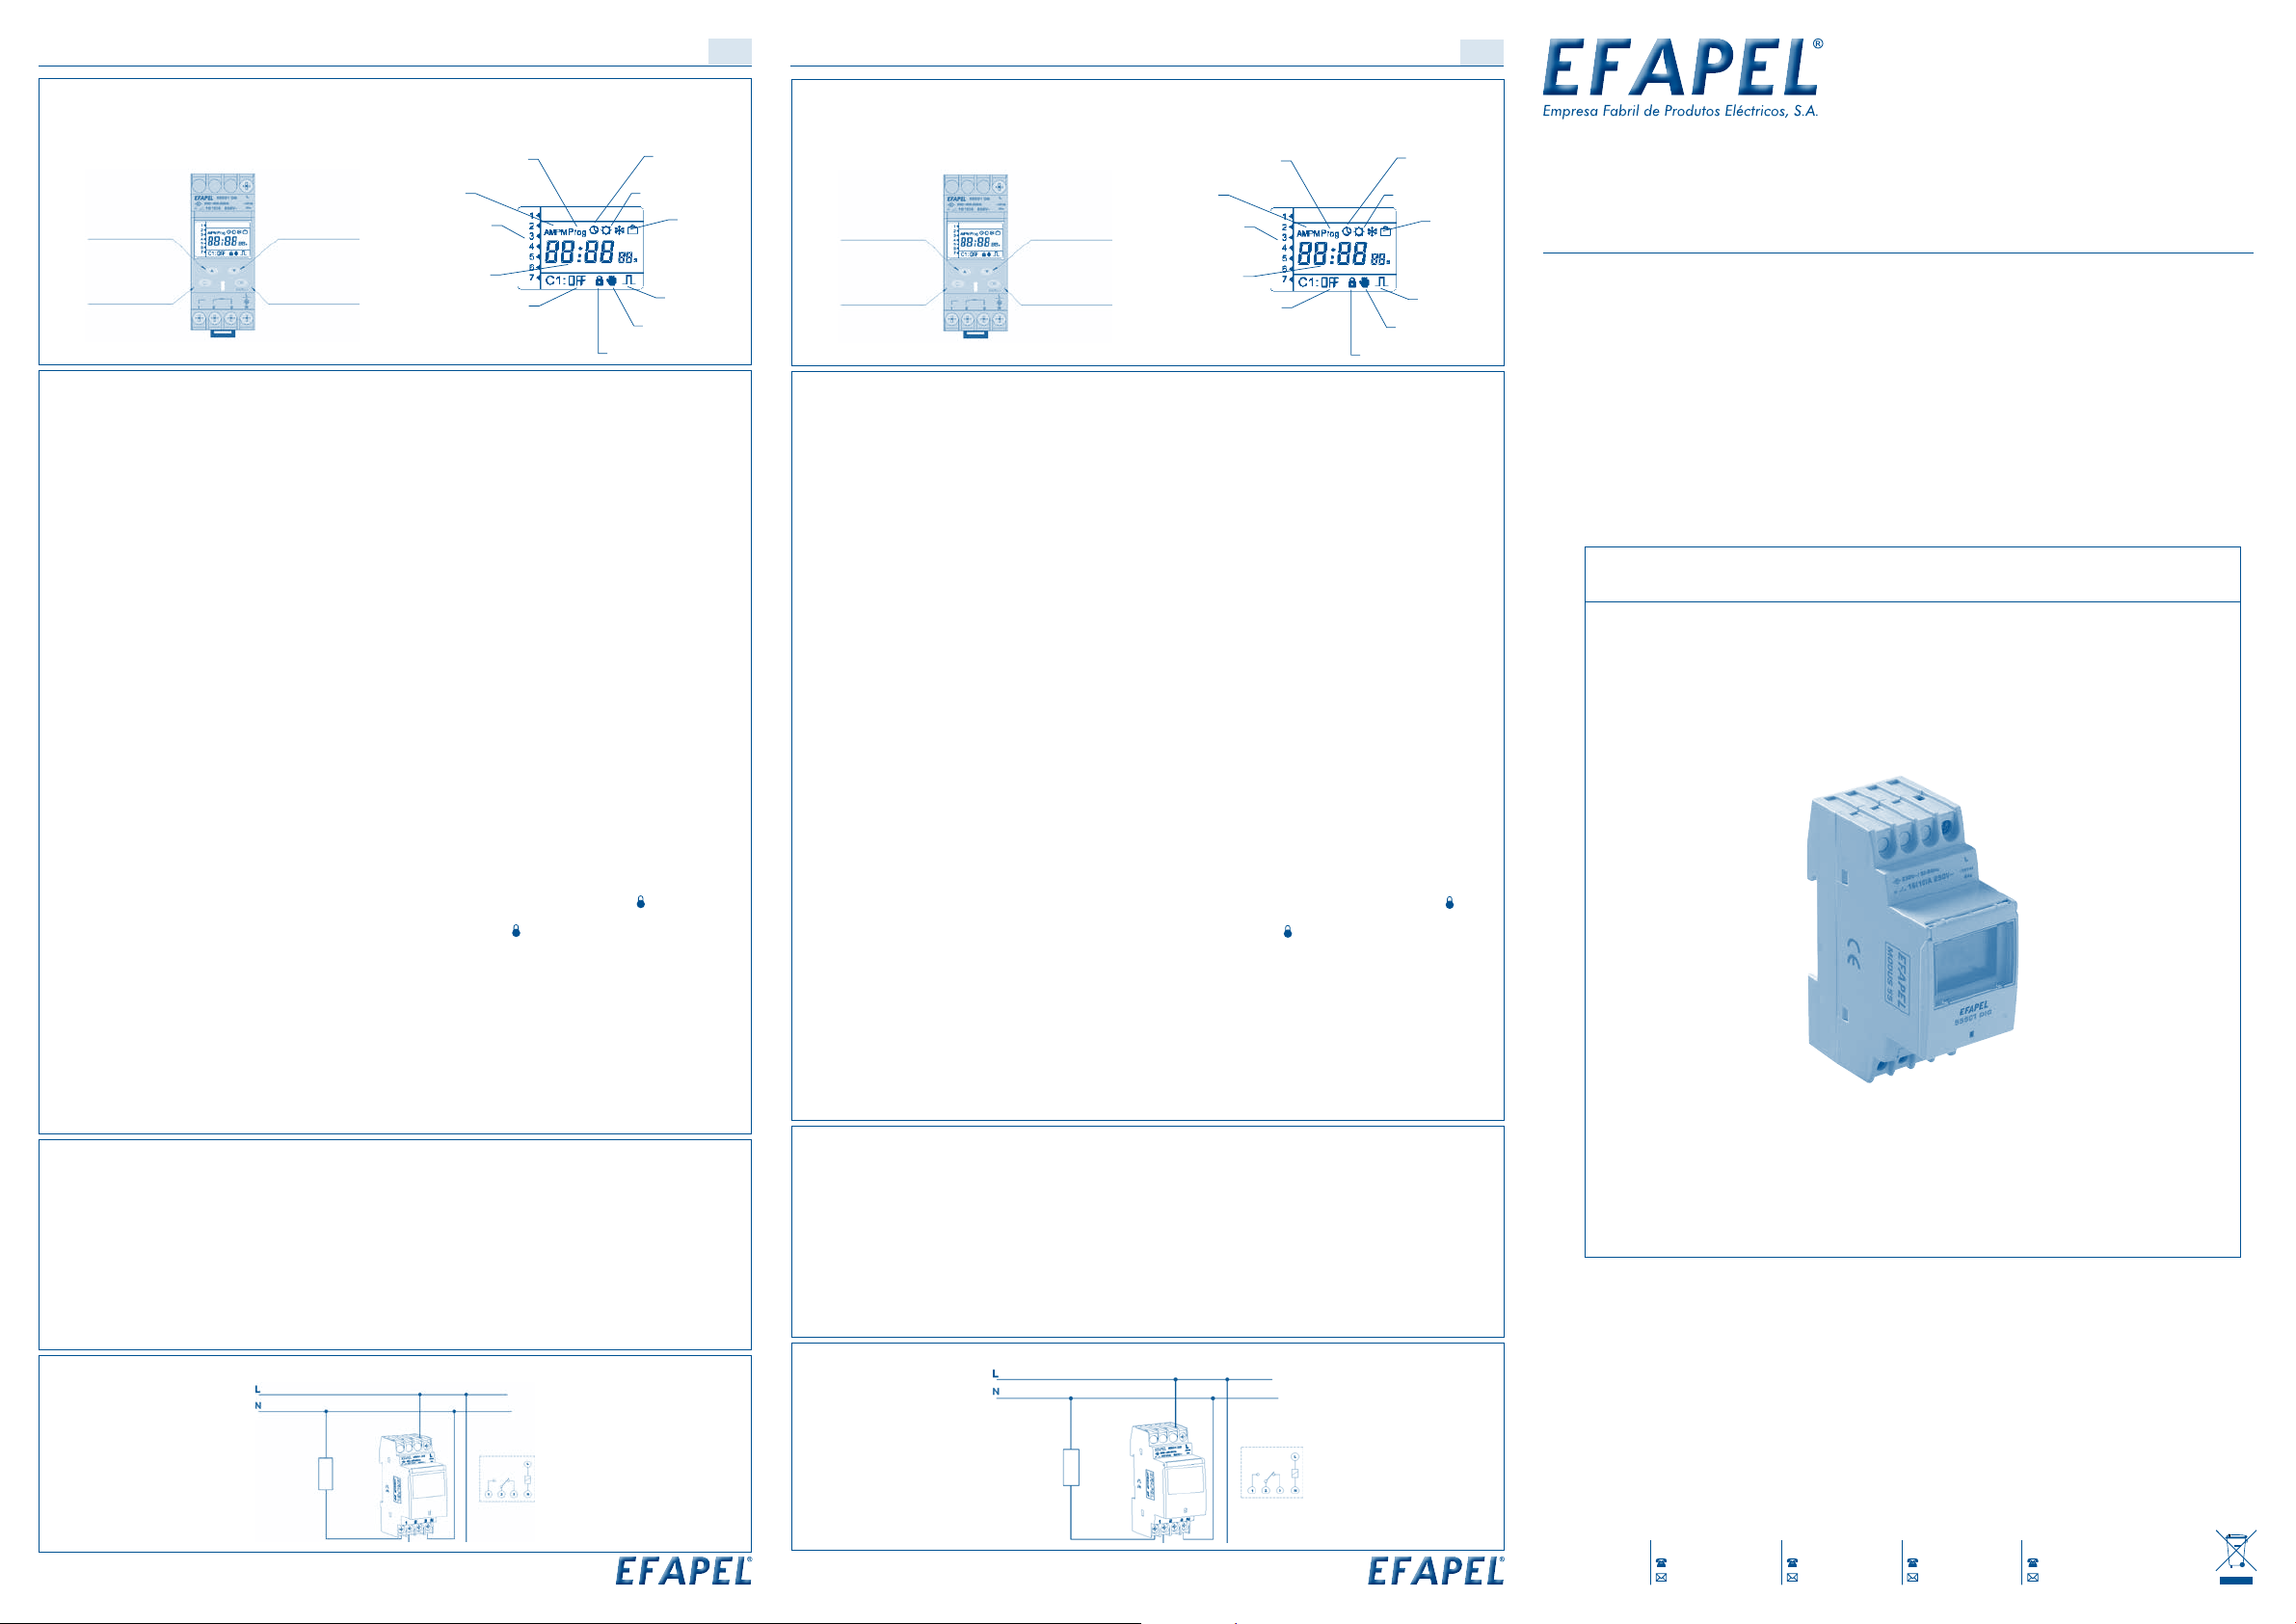
Increase Decrease
Manual Control
Menu Access
Acknowledge
Cancel
Block Status
(C + q)
Programming Time Adjustment
Winter/Summer Time
Impulse
Standby
Day of the Week
Hours:Minutes
Status Indication
Operation Blocked
Manual Operation
12h/24h
OPERATING INSTRUCTIONS
1. DATE AND HOUR SETTING
Press “Ok”.
Press “5” until “º” arrows; press “Ok”.
Set the Year with “5” or “6”; press “Ok”.
Set the Month with “5” or “6”; press “Ok”.
Set the Day with “5” or “6”; press “Ok”.
Set the Day of the Week (1¨monday) with “5” or “6”; press “Ok”.
Set the Hour with “5” or “6”.
Note: To change between 12/24 press “5” or “6”; press “Ok”.
Set the Minutes with “5” or “6”; and press “Ok” to end programming and return to initial display status.
2. PROGRAMMING
Press “Ok”.
Press “5” until “Prog” flickers.
Press “Ok”- The 1st programmed operation is displayed. If empty it displays “- - / - -“.
By pressing “Ok” and “5” or “6” we select:
a. Operation mode - ON, OFF or IMPULSE.
b. Hour and minute. Duration of IMPULSE in seconds.
c. Day - Ok to select “5” or “6” to delete operation.
Press “Ok” at the end to jump to the next program.
Note: By pressing “5” it displays number of free memories.
To return to initial display press “C”.
3. SEEING, EDITING OR DELETING A PROGRAM
Press “Ok”.
Press “5” until “Prog” flickers; press “Ok”.
Select the program using the “5” or “6”.
To Edit a program follow steps described in “2-Programming”.
To Delete a program press “Ok” followed by “C”.
To Reset all programs press “5” until the number of free memories is displayed then “Ok” followed by “C”. The number of free
memories “32” is displayed.
Press “C” to return to initial display status”.
4. MANUAL OPERATION
By pressing “5” or “6” the circuit switches between (ON and OFF) and the symbol “I”is displayed. The next programmed
operation clears the manual operation and the “I” disappears.
5. PERMANENT MANUAL OPERATION
To override all programmed operations press simultaneously “C” and “6” and the screen displays “ ”. The device will work only
in manual operation mode.
To re-enable all programs repeat the previous steps. The “ ” symbol disappears from the display.
6. WINTER/SUMMER MODE
Press “Ok”, and press “5” until “Rf” flickers.
Press “5” or “6” and “Ok” to select Winter/Summer mode:
AUTO - Changes May’s last Sunday at 2:00 AM and October’s last Sunday at 3:00AM.
PRO - Allows to choose Month/Day/Hour/Min when Winter/Summer mode is enabled, first Winter/Summer then Summer/Winter.
OFF - Disables Winter/Summer mode.
7. HOLIDAY PROGRAM
Allows to stop all programs from 1 to 99 days. After that period all memories are re-enabled automatically.
Press “Ok”; and press “5” until “0” is displayed.
Press “Ok” and “5” or “6” to determine number of days from the present day onwards. The device will be disabled until 23:59:59
of the programmed day.
CARACTERÍSTICAS
16(10)A - 230V~ - 50/60Hz.
Recommended Maximum Loads::
– Incandescent Lamps: 3000W.
– Fluorescent Lamps: 1200W (with Compensation).
– Halogen Lamps MBT: 2000VA (with Transformer).
– Halogen Lamps 230V~: 3000W.
– Energy Saving Lamps and LEDs: 600W.
Power Consumption: 1W.
Memory Capacity: 32 Blocks.
Output Functions: ON, OFF and Impulse (1 to 59 sec.).
Precision: 1sec./day.
Size: 2 Modules DIN.
Operating Temperature Range: -10ºC to +50ºC.
Protection Index: IP20.
Insulation Class: II.
WIRING DIAGRAM
DESCRIÇÃO
Permite controlar uma instalação ou equipamento em função de uma programação diária e/ou semanal. Possui capacidade para
memorização de 32 manobras. Funções ON, OFF e Impulso de 1 a 59 segundos. Mudança automática de hora verão/inverno e
possibilidade de programação de período de inatividade.
Aumentar Diminuir
Comando Manual
Aceder ao Menu
Validar
Cancelar
Bloquear Estado
(C + q)
Programação Acertar Hora
Hora inverno/verão
Impulso
Standby
Dia da Semana
Horas:Minutos
Indicação de Estado
Comutação Bloqueada
Comutação Manual
12h/24h
MODO DE UTILIZAÇÃO
1. ACERTO DE DATA E HORA
Pressionar “Ok”.
Pressionar “5” até o símbolo “º” piscar; pressionar “Ok”.
Acertar Ano com as teclas “5” ou “6”; pressionar “Ok”.
Acertar Mês com as teclas “5” ou “6”; pressionar “Ok”.
Acertar Dia com as teclas “5” ou “6”; pressionar “Ok”.
Acertar Dia da Semana (1¨segunda-feira) com as teclas “5” ou “6”; pressionar “Ok”.
Acertar Hora com as teclas “5” ou “6”.
Nota: para alterar o formato da hora (12/24) pressionar “5” ou “6”; pressionar “Ok”.
Acertar Minutos com as teclas “5” ou “6”; e pressionar “Ok” para concluir e voltar ao display inicial.
2. PROGRAMAÇÃO
Pressionar “Ok”.
Pressionar “5” até o símbolo “Prog” piscar.
Pressionar “Ok”- Aparece a 1ª manobra programada. No caso de não existir nenhuma programação aparece “- - / - -“
Pressionando “Ok” e “5” ou “6” seleccionamos:
a. Tipo de Operação - ON, OFF ou IMPULSO.
b. Hora e Minuto. Tempo de duração do impulso em segundos.
c. Dia - OK para seleccionar “5” ou “6” para eliminar.
Pressionar “Ok” no final para passar ao programa seguinte.
Nota: Pressionando “5” aparece o nº de memórias livres.
Para voltar ao display inicial pressionar em “C”.
3. VER, ALTERAR OU ELIMINAR PROGRAMAÇÃO
Pressionar “Ok”.
Pressionar “5” até o símbolo “Prog” piscar; pressionar “Ok”.
Seleccionar o programa pretendido com “5” ou “6”.
Para alterar proceder como em 2. Programação.
Para eliminar pressionar “Ok” e depois “C”.
Para eliminar todas as programações pressionar “5” até aparecer o nº de memórias de programação livres e depois
simultaneamente em “Ok” e em “C”. Aparece a indicação “32” correspondente ao nº máximo de memórias.
Para voltar ao display inicial pressionar em “C”.
4. OPERAÇÃO MANUAL
Ao pressionar “5” ou “6” altera o estado do circuito (ON ou OFF) e aparece no display o símbolo “I”. A próxima acção elimina
a operação manual e o símbolo “I” desaparece.
5. OPERAÇÃO MANUAL PERMANENTE
Para suspender todas as acções programadas pressionar simultaneamente em “C” e “6” aparecendo no display o símbolo “ ”.
O aparelho passa a funcionar só no modo manual.
Para reativar todas as programações proceder da mesma forma. O símbolo “ ” desaparece do display.
6. MUDANÇA DE HORA INVERNO / VERÃO
Pressionar “Ok”; e pressionar “5” até o símbolo “Rf” piscar.
Com as teclas “5” ou “6” e “Ok” seleccionar o modo pretendido:
AUTO - Altera no último domingo de Maio às 2:00 horas e no último domingo de Outubro às 3:00 horas.
PRO - Permite programar o mês, dia, hora e minutos de mudança de hora, primeiro Inverno-Verão e depois Verão-Inverno.
OFF - Não efetua mudança de hora.
7. SUSPENSÃO DA PROGRAMAÇÃO (FÉRIAS)
Permite suspender todas as ações programadas durante 1 a 99 dias a contar do próprio dia. Decorrido o prazo programado todas
as ações retomam automaticamente.
Pressionar “Ok”; e pressionar “5” até o símbolo “0”.
Pressionar em “Ok” e “5” ou “6” para definir o nº de dias a contar do dia presente. O aparelho permanecerá em OFF até às
23:59:59 horas do dia programado.
CARACTERÍSTICAS
16(10)A - 230V~ - 50/60Hz.
Cargas Máximas Recomendadas:
– Lâmpadas Incandescentes: 3000W.
– Lâmpadas Fluorescentes: 1200W (com Compensação).
– Lâmpadas de Halógeneo MBT: 2000VA (com Transformador).
– Lâmpadas de Halógeneo 230V: 3000W.
– Lâmpadas Economizadoras e LEDs: 600W.
Consumo: 1W (aprox.).
Espaços de memória: 32.
Tipos de Manobras: ON, OFF e Impulso (1 a 59 seg.).
Precisão de Manobras: 1seg./dia.
Dimensão: 2 Módulos DIN.
Temperatura de Funcionamento: -10ºC a +50ºC.
Índice de Proteção: IP20.
Classe de Isolamento: II.
ESQUEMA DE LIGAÇÃO
PT EN
INTERRUPTOR HORÁRIO DE 1 CANAL DIÁRIO/SEMANAL DIGITAL
DIGITAL DAILY/WEEKLY CLOCK SWITCH OF 1 CHANNEL
A EFAPEL reserva o direito de modificar este documento ou os produtos nele contidos sem aviso prévio. Em caso de dúvida, contacte a EFAPEL. EFAPEL reserves the right to amend this document or the products contained in it without notice. If in doubt please contact EFAPEL.
EFAPEL se reserva el derecho de modificar este documento o los productos contenidos en él sin previo aviso. En caso de dudas, por favor póngase en contacto con EFAPEL.
ES
INTERRUPTOR HORARIO DE 1 CANAL DIARIO/SEMANAL DIGITAL
DESCRIPCIÓN
Permite controlar una instalación o equipo en función de una programación diaria o semanal. Tiene capacidad para memorizar 32
maniobras. Funciones ON, OFF e Impulso de 1 a 59 segundos. Cambio automático de horario de verano/invierno y posibilidad de
programación del periodo de inactividad.
Aumentar Diminuir
Comando Manual
Acceder al Menú
Validar
Cancelar
Bloquear Estado
(C + q)
Programación Ajustar la Hora
Hora invierno/verano
Impulso
Standby
Día de la
Semana
Horas:Minutos
Indicación del Estado
Conmutación Bloqueada
Conmutación Manual
12h/24h
MODOS DE FUNCIONAMIENTO
1. AJUSTE DE FECHA Y HORA
Presionar “Ok”.
Presionar “5” hasta que el símbolo “º” parpadee; presionar “Ok”.
Ajustar el año con las teclas “5” o “6”; presionar “Ok”.
Ajustar el mes con las teclas “5” o “6”; presionar “Ok”.
Ajustar el día con las teclas “5” o “6”; presionar “Ok”.
Ajustar el día de la semana (1¨lunes) con las teclas “5” o “6”; presionar “Ok”.
Ajustar la hora con las teclas “5” o “6”.
Nota: para cambiar el formato de la hora (12/24) presionar “5” o “6”; presionar “Ok”.
Ajustar los minutos con las teclas “5” o “6”; e presionar “Ok” para terminar y volver a la pantalla inicial.
2. PROGRAMACIÓN
Presionar “Ok”.
Presionar “5” hasta que el símbolo “Prog” parpadee.
Presionar “Ok”- Aparece la 1ª maniobra programada. Si no existe ninguna programación aparece “- - / - -“
Presionando “Ok” y “5” o “6” seleccionamos:
a. Tipo de operación - ON, OFF o IMPULSO.
b. Hora y minuto. Tiempo de duración del impulso en segundos.
c. Día - OK para seleccionar “5” o “6” para eliminar.
Presionar “Ok” al finalizar para pasar al programa siguiente.
Nota: Presionando “5” aparece el nº de memorias libres.
Para volver a la pantalla inicia presionar “C”.
3. VER, CAMBIAR O ELIMINAR LA PROGRAMACIÓN
Presionar “Ok”.
Presionar “5” hasta que el símbolo “Prog” parpadee; presionar “Ok”.
Seleccionar el programa deseado con “5” o “6”.
Para cambiar hacer lo indicado en el punto 2. Programación.
Para eliminar presionar “Ok” y después “C”.
Para eliminar todas las programaciones presionar “5” hasta que aparezca el nº de memorias de programación libres y después
simultáneamente en “Ok” y en “C”. Aparece la indicación “32” correspondiente al nº máximo de memorias.
Para volver a la pantalla inicia presionar “C”.
4. OPERACIÓN MANUAL
Al presionar “5” o “6” se cambia el estado del circuito (ON u OFF) y aparece en la pantalla el símbolo “I”. La próxima acción
elimina la operación manual y es el símbolo “I” desaparece.
5. OPERACIÓN MANUAL PERMANENTE
Para suspender todas las acciones programadas, presionar simultáneamente en “C” y “6” en la pantalla aparecerá el símbolo “
”. El aparato pasa a funcionar solo en el modo manual.
Para reactivar todas las programaciones, seguir el mismo procedimiento. El símbolo “ ” desaparece de la pantalla.
6. CAMBIO DE HORARIO INVIERNO / VERANO
Presionar “Ok”; y presionar “5” hasta que el símbolo “Rf” parpadee.
Con las teclas “5” o “6” y “Ok” seleccionar el modo deseado:
AUTO - Cambia el último domingo de mayo a las 2:00 horas y el último domingo de octubre a las 3:00 horas.
PRO -
Permite programar el mes, día, hora y los minutos con el cambio de hora, primero invierno-verano y después verano-invierno
.
OFF - No lleva a cabo el cambio de hora.
7. SUSPENSIÓN DE LA PROGRAMACIÓN (VACACIONES)
Permite suspender todas las acciones programadas durante 1 a 99 días, incluyendo el día actual. Pasado el plazo de programación
se reanudan automáticamente todas las acciones.
Presionar “Ok”; e presionar “5” hasta el símbolo “0”.
Presionar en “Ok” y “5” o “6” para definir el nº de días, incluyendo el día actual. El aparato permanecerá en OFF hasta las
23:59:59 horas del día programado.
CARACTERÍSTICAS
16(10)A - 230V~ - 50/60Hz.
Cargas máximas recomendadas:
– Bombillas incandescentes: 3000W.
– Bombillas fluorescentes: 1200W (con compensación).
– Bombillas halógenas MBT: 2000VA (con transformador).
– Bombillas halógenas 230V: 3000W.
– Bombillas economizadoras y LED: 600W.
Consumo: 1W (aprox.).
Espacios de memoria: 32.
Tipos de maniobras: ON, OFF e Impulso de (1 a 59 seg.).
Precisión de maniobras: 1seg./día.
Dimensión: 2 módulos DIN.
Temperatura de funcionamiento: -10 ºC a +50 ºC.
Índice de protección: IP20.
Clase de aislamiento: II.
ESQUEMA DE LIGAÇÃO