Efento NB-IoT Sensor User manual

EFENTO
NB-IoT SENSORS
User manual
Sensor FW v 05.08
28.07.2020

Efento SP. J.
Ul.Krupnicza 14/5
31-123 Kraków
Table of contents
Table of contents 2
Product overview 3
Product description 3
Physical dimensions 5
Operating Modes 5
LEDs 6
Battery life 6
Getting started 7
SIM card 7
Batteries 7
Sensor’s startup 7
Configuration 8
Network configuration 8
Efento Cloud 10
Configuration with Efento Cloud 11
Configuration with a custom server 12
Device settings 12
Sensor status 17
Cellular status 17
Battery status 18
Installation mode 19
Firmware updates 19
Troubleshooting 20
Appendices 20
Security 20
Power saving features 21
Data usage 21
www.getefento.com | +48 574 753 980 | [email protected]

Efento SP. J.
Ul.Krupnicza 14/5
31-123 Kraków
Product overview
Product description
Efento NB-IoT sensors transmit the data over cellular networks (Narrowband IoT) and do not
require any additional devices (router, gateway, etc.). Sensors are also equipped with Bluetooth
Low Energy interface, what allows quick and easy configuration with a smartphone.
Efento NB-IoT sensors measure a number of parameters, including temperature, humidity, air pressure,
soil moisture, state (open / close), number of pulses (pulse counters), air quality and various gases or
water leakage.
Efento NB-IoT sensors communicate over CoAP protocol (RFC 7252) and can be integrated into any
cloud platform or server based solution. Sensors can also work out of the box with Efento Cloud
platform. Devices can be fully managed remotely, including the remote configuration and secure
software over the air (SoTA) updates.
Sensors are battery powered and can operate (depending on the signal quality and transmission
interval) up to 10 years without any maintenance. In case of good signal quality (ECL = 0), the device is
able to transmit the data 130 000 times.
Technical data
Cellular module
NB-IoT bands 8, 20
3GPP Release 13
Power 20 dBm
Battery
2 x AA, 3.6V batteries, 2100 mAh each
Batteries support up to 130 000 transmissions (ECL 0)
Batteries lifetime up to 10 years
Measured values
Each sensor can have up to three slots
Each slot can measure: temperature (internal sensor or probe),
humidity (internal sensor or probe), air pressure, VOC,
open/close, pulse counter, leakage
Measurement and
transmission intervals
Configurable by user
Measurement interval: 1 minute – 10 days
Transmission interval: 5 minutes – 10 days
www.getefento.com | +48 574 753 980 | [email protected]
Efento SP. J.
Ul.Krupnicza 14/5
31-123 Kraków
Memory
60 000 measurements
If there is no network connection, the device buffers the
measurements in its internal memory and transfers them to the
platform once the connection is re-established. Once the memory
is full, the oldest measurements are replaced with the new ones
Communication protocols
CoAP (RFC 7252), supports both confirmable and
non-confirmable data frames
Data is sent in Protocol buffers (protobuf)
Bluetooth Low Energy (for communication with smartphones)
SIM card
Micro SIM (3FF) (default)
Embedded SIM (available on request)
Network settings
APN (auto or manual)
PLMN (auto or manual)
Indicators
(troubleshooting)
LEDs singling the status of the device
Device information, which can be requested by the server
include: signal strength in dBm, total power in dBm, TX power in
dBm, cell ID, ECL, SNR, EARFCN, PCI, RSRQ, total transmitted
bytes, total received bytes, battery voltage, uptime
Diagnostics data, including the network parameters and network
connection status, is also available over Bluetooth
Mechanics
Enclosure material: ABS
Size: 27 x 71 x 71 mm, 100 g
Probes length (for sensor with probes only): by default 1 meter,
other lengths are available on request
Operating range: -35°C to +70°C
Mounting: double side adhesive tape with acrylic glue or 2 x M3
screws
Certifications
CE, RoHS
www.getefento.com | +48 574 753 980 | [email protected]
Efento SP. J.
Ul.Krupnicza 14/5
31-123 Kraków
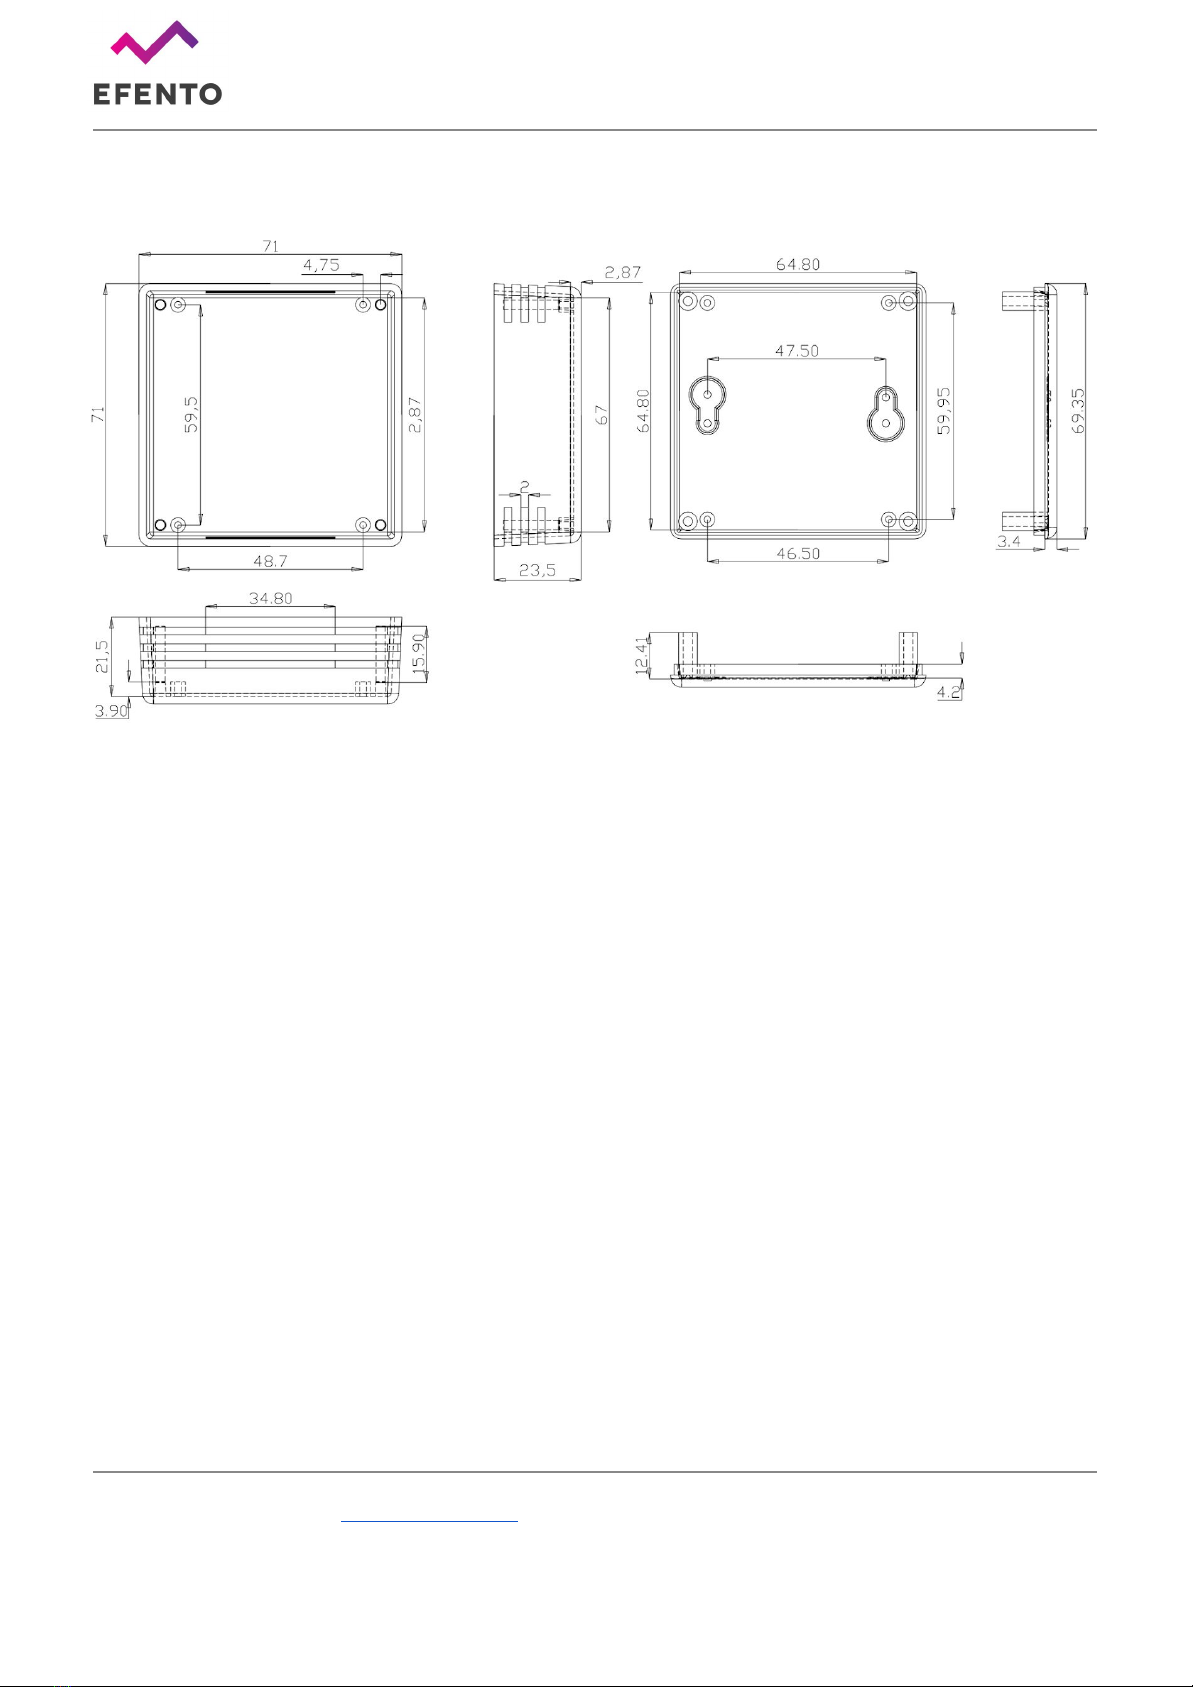
Physical dimensions
Operating Modes
Power saving mode (PSM)
This is the mode of the reduced power consumption. The sensor takes measurements with a period
set by the user and saves them in its memory. Users can read the measurements and change
sensor’s settings using mobile devices with Efento mobile application installed. Device does not
send / receive any data over NB-IoT network.
Transmission mode
In this mode sensor sends the data to a server / cloud platform over NB-IoT network. During the
transmission mode the sensor consumes more power, but it only stays a few seconds in this mode.
Devices can receive a new configuration in the response sent by the server. Devices enter the
transmission mode for a few reasons, including the periodic transmission of data, user triggered
transmission, transmission due to a threshold exceedance or retransmission.
In order to save energy, the sensor remains in power saving mode most of the time.
Communication with the server is initiated by the sensor only for the purpose of sending data and
(possibly) receiving a new configuration from the server.
www.getefento.com | +48 574 753 980 | [email protected]
Efento SP. J.
Ul.Krupnicza 14/5
31-123 Kraków
LEDs
NB-IoT sensor is equipped with two LEDs: green and red. If the device is on and works properly
(device is in the Power Saving Mode), both LEDs are turned off all the time. Flashing of the diodes
indicates the current status of the device or the action being performed by it. The LEDs are placed
at the edge of the PCB and are visible through the cuts on the side of the sensor housing. LEDs
flashing indicate:
● Single blink of the red LED once every 15 seconds - problems with registering on the
network
● Double blinking of the red LED - communication problem / no coverage (the has registered
on the network). Retransmission mechanism is started: 1st retransmission after 15 minutes,
2nd after 30 minutes, 3rd after 1 hour, 4th after 2 hours, and then every 3 hours
● Two blinks of the green LED - the device has taken a measurement
● Fast blinking of the green LED - Transmission mode - data is sent over the NB-IoT network
● Red and green LEDs blink five times - Device starts up
● Fast blinking of the red LED - Device clears its internal memory (you can see it on the initial
configuration of the device or when changing the measurement interval)
Getting started
SIM card
Efento Sensors are available in two options: with a plastic SIM card (micro SIM / 3FF) or an embedded
SIM (on request). The SIM card must support NB-IoT.
If your device has an embedded SIM, you do not need to insert a SIM card. Sensor will register on a
network as soon as you power it up.
For security reasons, the micro SIM card holder is placed on the reverse of the sensor PCB. To insert
the SIM card: open the sensor’s enclosure, remove the batteries, unscrew the screws which mount the
PCB, take out the PCB from the enclosure, insert the SIM card, place the PCB back in the enclosure
and put the batteries in.
CAUTION:
Make sure that the sensor is off when inserting the SIM card. Inserting the SIM card
when the device is on may damage the sensor!
Batteries
Sensor comes with 2 x AA, 3.6V batteries, 2100 mAh each (ER14505M). In order to start the device,
insert the batteries in the battery holders as marked on the PCB (+ and -). The device will switch on
once the batteries are placed in the holders. There is no additional power switch. When replacing the
www.getefento.com | +48 574 753 980 | [email protected]
Efento SP. J.
Ul.Krupnicza 14/5
31-123 Kraków
batteries, make sure you use ER145050M batteries. Standard AA size batteries provide lower voltage
and will not power up the sensor.
CAUTION:
Danger of explosion if the battery is incorrectly installed. Replace only with the
same or equivalent type.
Protect the environment! Batteries must be recycled or disposed of properly. Follow
your local regulations and guidelines regarding the batteries disposal procedure.
Sensor’s startup
Once you insert a SIM card and the batteries, the device will turn on. On the device startup:
1. Red and green LEDs should blink five times,
2. After that red LED should quickly blink for a few seconds (device clears it’s memory),
3. Green LED should quickly blink for a few seconds (first transmission over NB-IoT network)
From now on, the device operates, takes measurements and saves them in its memory.
www.getefento.com | +48 574 753 980 | [email protected]
Efento SP. J.
Ul.Krupnicza 14/5
31-123 Kraków
Configuration
Network configuration
The initial configuration of Efento NB-IoT sensors is done with Efento Logger mobile application for
Android devices that can be downloaded from Google Play. The application allows you to configure all
parameters of the sensor and read the measurements from the sensor's memory. After that, the
configuration can be either done locally or remotely, from a server.
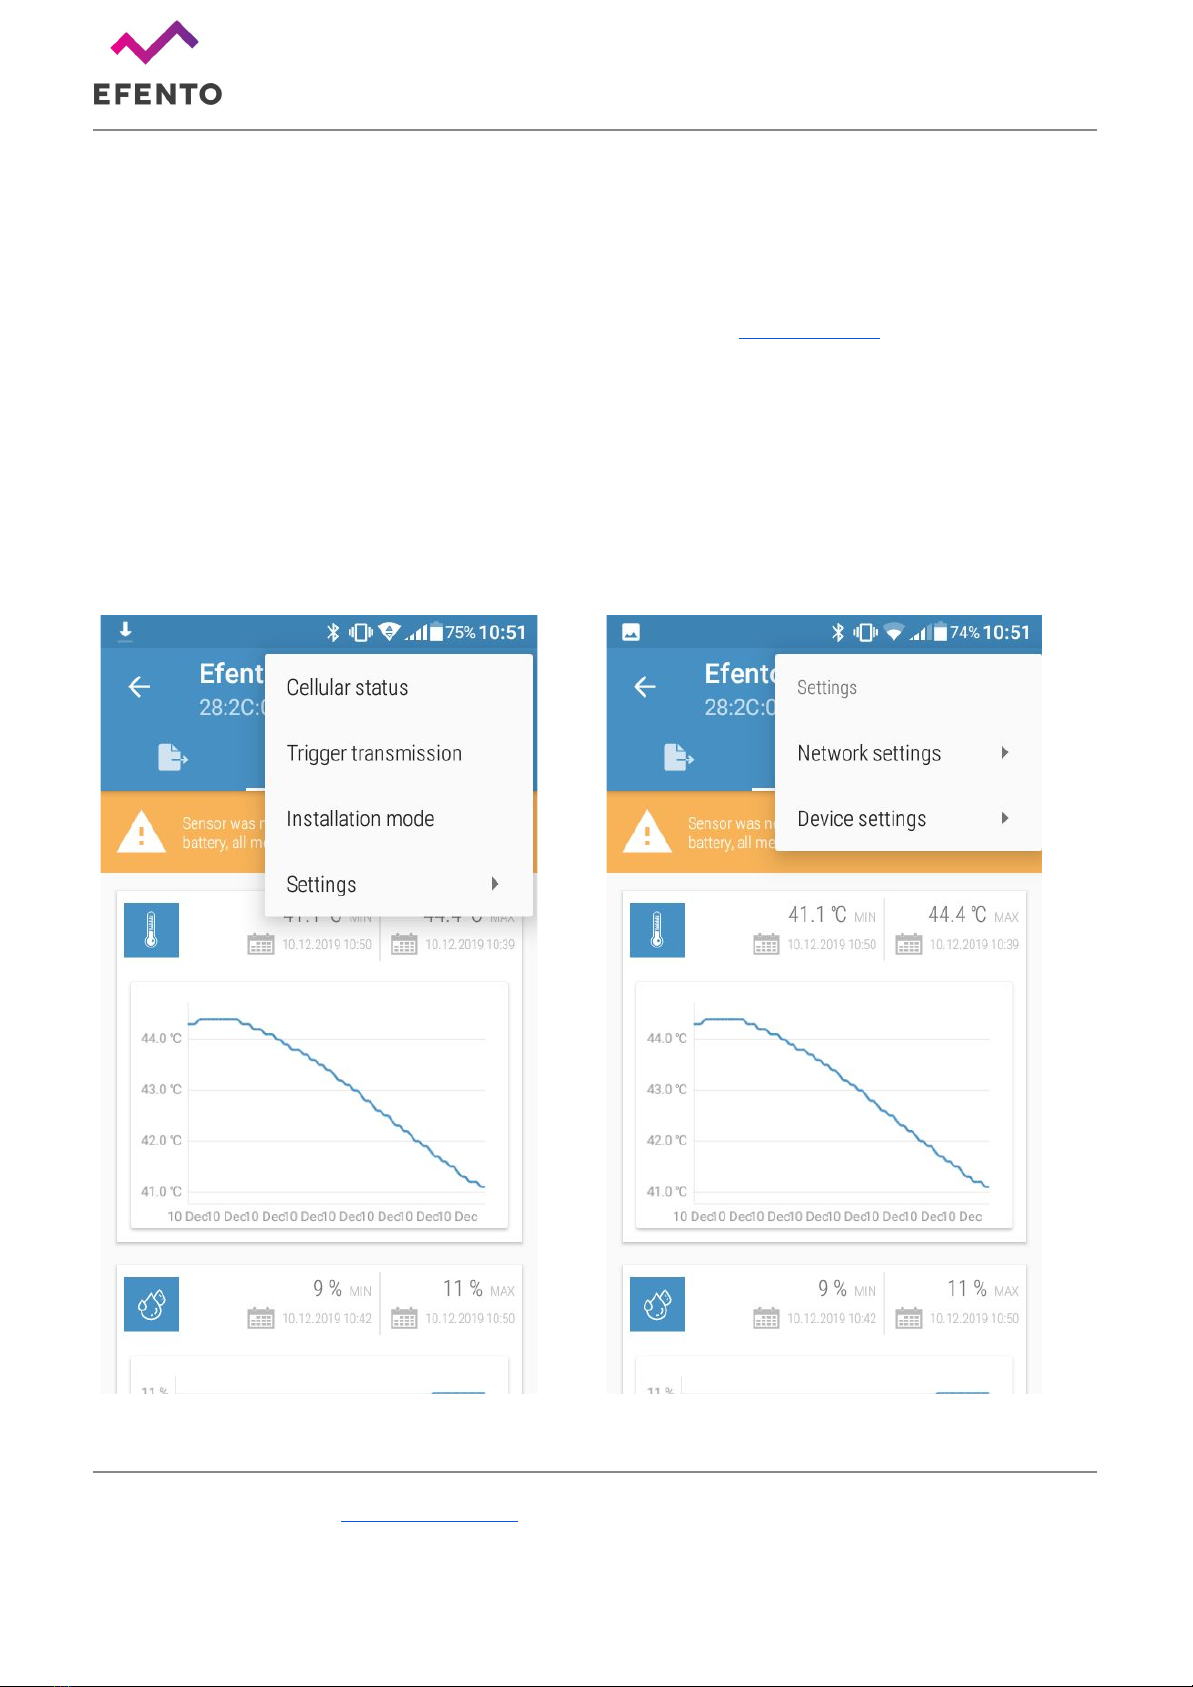
After downloading and launching the app, you will see all the sensors that are in your mobile device’s
range. Tap on the sensor you’re interested in, the app will connect to it and show the sensor’s
information along with its current configuration. To open up the settings menu, tap on the „three dots”
icon in the upper right corner.
www.getefento.com | +48 574 753 980 | [email protected]

Efento SP. J.
Ul.Krupnicza 14/5
31-123 Kraków
Tap on “Cellular status” in order to display the current status of the network communication. Check the
value of the “Registration status” field.
If the value is:
● REGISTERED
● REGISTERED ROAMING
The sensor has registered on the network. You do not
need to change the network settings of the device.
If the value is:
● NOT REGISTERED, SEARCHING
The sensor is still trying to connect to the NB-IoT
network. Wait for 5 minutes and check the status
again. It may also be required to manually select the
network, on which the device has to register (this is
described in the further steps of this manual)
If the value is:
● REGISTRATION DENIED
● REGISTERED EMERGENCY ONLY
● UNKNOWN
The device is not able to properly register on the
network. Contact your mobile operator to identify and
solve the issues. If the device has been rejected by
the network, the reason will be listed in the
“Registration reject cause”. Provide your operator with
that value, to speed up the troubleshooting.
If the value is:
● NOT REGISTERED_NOT_SEARCHING
Most probably there is no NB-IoT network coverage in
the place where the sensor is located.
If the device has not registered on the network automatically, you need to manually select the carrier.
Connect to the sensor with Efento Logger, go to the “Settings” menu and select “Network settings” ->
“PLMN code”. PLMN is an unique operator identifier. You should get the information about the PLMN
code of your operator either from the operator or you can check it here. Set the PLMN code, save
changes and after a few minutes check, if the sensor has successfully managed to register on the
network.
In order to allow the sensor to communicate with the server, you need to assign it to a proper APN. The
APN (Access Point Name) is the name of a gateway between a mobile network and the public Internet.
www.getefento.com | +48 574 753 980 | [email protected]
Efento SP. J.
Ul.Krupnicza 14/5
31-123 Kraków
APN settings define with what servers the sensors can communicate. You should receive the
information about APN settings along with the SIM card. If you did not receive the APN settings, try
setting it to “Auto” (default settings).
Check the required APN and PLMN settings with your mobile operator. If the
settings are not correct the device will not be able to send / receive the data through
the cellular network.
In order to set the APN, connect to the sensor with Efento Logger, go to the “Settings” menu and select
“Network settings” -> “APN”.
After successful network registration, the device will fetch the time from the network. From now on, all
the measurements taken by the device will have the timestamp assigned. If for any reasons the device
is not able to fetch the time from the network, it will try to connect to the Efento Cloud platform and get
time from the server. If the connection with the server is also not possible (e.g. device communicates
with a third party server, or APN is configured incorrectly), it is also possible to set the sensor’s time
using Efento Logger application.
During the registration process the sensor saves the measurements in its volatile memory (RAM), and
after fetching the time from the network, it will assign correct timestamps to the measurements. If the
battery is removed before fetching the time from the network, these measurements will be lost.
If you set both PLMN and APN correctly, but the sensor is not able to register on the network or
communicate with the server, please refer to the “Troubleshooting” section of this manual.
Efento Cloud
Efento Cloud is a platform that receives and stores all the data collected by the sensors. On Efento
Cloud you can preview all the measurements, export them as a PDF or CSV report and set up
notifications. The key functions of Efento Cloud platform are:
●Displaying the data – measurements from sensors can be visualized in the form of a chart or
table, just click on one of the devices in “Dashboard”. The chart range can be modified by
dragging the cursor vertically and horizontally.
●Generating reports – To generate a report you can either click on one of the sensors, then
“Reports”, select the time interval and entry, then choose to export it as a PDF or CSV, or go to
section “Reports” section and do the same thing. In this section, you can also configure
automatic reports, which will be sent to specified email addresses at the scheduled time (e.g.
every month, every day).
●Rules / notifications – Efento Cloud can send SMS / email notification if the measured values
are out of the safe range. Rules can be created in the “Rules” section. To create a rule, you need
to choose one of the physical values, add recipients by typing their emails or phone numbers,
and select for which sensors this rule will be active. There is also a possibility to delay the alarm
www.getefento.com | +48 574 753 980 | [email protected]

Efento SP. J.
Ul.Krupnicza 14/5
31-123 Kraków
●Alarms – if any of the rules are violated, the alarm will be triggered and saved in the platform. All
the historical alarms are visible in the “Alarms” section.
●User management – In the “Users” section you can invite users to your organization, remove
them or change their roles and permissions.
This is only a short list of key functions of Efento Cloud platform. For more information about the
platform and full configuration manual please refer to Efento Cloud User Manual.
Configuration with Efento Cloud
In order to configure the sensor to work with Efento Cloud, set up a new account on cloud.efento.io. If
you already have an account skip this step.
1. Click on the organisation name in the upper right corner and select “Organisation Token”.
Organisation Token is an unique identifier of your Efento Cloud organisation, which allows you to
assign sensors to your cloud account. Copy the value of the organisation token and send it to a
mobile phone, which you use to configure the sensor.
2. Connect to the sensor with Efento Logger, tap on the three dots in the upper right corner ->
“Network settings” -> “Server” -> select “Efento” and in the “Organisation token” field, key in the
Organisation token you copied from Efento Cloud.
3. Go to the “Configuration” tab of Efento Cloud. In the “New sensors” section, you will see the
serial number of the sensor you are setting up. Click on it and add it to your cloud account. In
order to add a sensor, you need a license key. You received it in an email confirming your order.
Sensor is added to your Organisation on Efento Cloud. From now on, all the measurements are
saved in the platform.
4. Configure alert rules, which will send you SMS / email notification, if the values measured by the
sensor are out of the safe range or if the sensor data do not reach the platform. On Efento Cloud
go to the “Rules” tab, set up the rule and save the changes.
If you set a threshold for the sensor (e.g. humidity over 40% RH), the value will be
sent to the sensor during the next communication. From that moment on, if the
measured value exceeds the threshold, the sensor will send the data to Efento
Cloud immediately, no matter what is the transmission interval.
www.getefento.com | +48 574 753 980 | [email protected]

Efento SP. J.
Ul.Krupnicza 14/5
31-123 Kraków
Configuration with a custom server
Efento NB-IoT sensors send data using the CoAP protocol (RFC 7252 Constrained Application
Protocol). CoAP is a lightweight UDP based data exchange protocol that is one of the standard IoT
protocols. The data is sent in Protobuf format, which, thanks to its low overhead, is also very convenient
for sending data by Internet of Things devices.
Efento sensors can be easily integrated with any server application. Integration allows users to access
all the sensors’ features in their application - this includes both receiving the data from the sensors and
remotely configuring the devices. A detailed description of the data format sent in Protobuf is available in
the "Efento NB-IoT Sensors Integration Manual". We can also provide you with a demo source code,
which you can run on your server in order to communicate with Efento NB-IoT sensors. Should you have
any questions about the integration, please contact our support team.
In order to set a sensor to send the data to a custom server:
1. Connect to the sensor with Efento Logger, tap on the three dots in the upper right corner ->
“Network settings” -> “Server”
2. Select “Other” and key in the address and port of the server, to which the data should be sent
3. If you want to, you can use the “Organisation token” field to send additional information to the
server (e.g. API token). Optionally, you can set the sensor to send its IMEI to the server. To
switch that option on, select the checkbox “IMEI as token”.
Device settings
All the settings of Efento sensors described in this chapter can be also done remotely, from the server.
In order to get the information how to configure the device remotely, please refer to the Efento Cloud
User Manual or to the Efento NB-IoT Sensors Integration Manual.
Thresholds
The device allows users to set three types of thresholds for each of the measured physical values. If a
measurement exceeds the threshold value, the transmission to the server takes place immediately, no
matter what the transmission interval is.
●Lower threshold - if a measurement taken by the sensor is lower than the threshold value, the
transmission to the server will be triggered
●Upper threshold - if a measurement taken by the sensor is higher than the threshold value, the
transmission to the server will be triggered
●Differential threshold - if the absolute value of the difference between the current measurement
and the last measurement sent to the server, the transmission to the server will be triggered
Users can also set the sensor to calculate the average value out of a few measurements and compare
this value to the differential threshold value. This feature is used to reduce the effect of measurement
www.getefento.com | +48 574 753 980 | [email protected]

Efento SP. J.
Ul.Krupnicza 14/5
31-123 Kraków
fluctuation. For example, a user can set the sensor to compute the average value of five temperature
measurements, and check if the difference between the last sent measurement and the average value is
larger than 0,5 C.
There are two modes for the average value calculation:
● Moving average mode - device calculates the average value out of the last N samples. If there
is a new measurement, it is taken to the average value calculation instead of the oldest one.
Users can define how many measurements should be taken into the account when calculating
the average value. For instance, if the user set the device to calculate the average value from the
last three samples, the device will calculate the average value from samples N-2, N-1 and N.
Once a new measurement is taken, the average value will be calculated from samples N-1, N,
N+1.
● Window mode - device calculates the average value out of the all samples in the window size.
The window ‘moves’ once the device has taken a number of measurements equal to the window
size. Users can define how many measurements should be taken into the account when
calculating the average value. For instance, if the user set the device to calculate the average
value from the last three samples, the device will calculate the average value from samples N-2,
N-1 and N. The new average value will be calculated as soon as the device has taken three new
measurements (N+1, N+2, N+3).
In order to set the threshold values:
1. Connect to the sensor with Efento Logger, tap on the three dots in the upper right corner ->
“Settings” -> “Device settings” -> “Alarm thresholds”
2. Set the threshold values and types for each slot. If you want to, you can set the threshold for one
slot only or you can only set one type of threshold for a selected slot (lower, upper, differential)
Measurement interval
Measurement interval defines how often the sensor takes a measurement. It is possible to set the
measurement interval to any value from 1 minute to 10 days. Changing the measurement period
removes all measurement data from the device memory.
In order to set the measurement interval:
1. Connect to the sensor with Efento Logger, tap on the three dots in the upper right corner ->
“Settings” -> “Device settings” -> “Change measurement period”
Transmission interval
With this parameter you can set how often the sensor sends data to Efento Cloud platform or a server.
You can set any value from 5 minutes to 10 days. The maximum value of the transmission interval
depends on the measurement interval - it can be set to 60 times the measurement interval (e.g.
measurement interval = 1 minute, transmission interval can be set to any value from 5 minutes to 60
minutes).
www.getefento.com | +48 574 753 980 | [email protected]

Efento SP. J.
Ul.Krupnicza 14/5
31-123 Kraków
If the sensor works with Efento Cloud, the platform informs the user, when the new data from the device
is expected.
Additionally, it is possible to configure how often the message sent by the sensor requires confirmation
of receipt by the server (ACK). If the ACK is not received by the sensor, it will retransmit the data to the
server. The confirmation frame (ACK) is used also to send a new configuration to the device.
Type of messages sent by the sensors depend on the use case. If your use case requires all the
messages to reach the server, then you should set the sensor to always require the ACK. If your use
case is not critical, and you are aware that some data frames can be lost, you can set the device to
require the confirmation less often (e.g. every 24 hours). This will increase the battery lifetime, as the
device stays in the transmission mode for less time.
Do not set the ACK interval to more than once every 24 hours. Device gets new
configuration from the server in the ACK frames
Sensor stores up to 60 000 measurements in its memory. In case of any issues that block the
communication between sensor and server (network issue, server issue, etc.), if the ACKs are enabled,
the sensor will resent the missing data to the server.
In order to set the transmission interval:
1. Connect to the sensor with Efento Logger, tap on the three dots in the upper right corner ->
“Settings” -> “Network settings” -> “Transmission interval”
2. Set the new transmission interval - remember that it can’t be less than measurement interval and
more than 60 times the measurement interval
3. Set the ACK interval. You can set it to:
a. Always - every data frame sent by the sensor will require the ACK form the server. If the
data has not reached the server, it will be retransmitted once the connection is
reestablished
b. Never (not recommended) - all data frames will not require the ACK. This saves the
battery, but sensor is not able to receive the new configuration or firmware updates
c. Every - you can set how often the device should require the ACK from the server (e.g.
every 3rd transmission, every 24th transmission). This is a good balance between making
sure the data reaches the server and battery lifetime
In order to make sure that all the measurements reach the server, set the ACK
interval to “Always”. In case of any transmission issues, the sensor will try to
resend the data until it succeeds.
www.getefento.com | +48 574 753 980 | [email protected]
Efento SP. J.
Ul.Krupnicza 14/5
31-123 Kraków
Transfer limit
Efento NB-IoT sensor allows you to limit the number of transmissions in a given period of time. For
instance, you can set the device to be able to send the data maximum 5 times in a 30 minutes window.
This feature allows you to control the battery life time in an environment, in which the small fluctuations
of the measurements would trigger the transmision very often. By default this function is disabled (there
is no transfer limit set).
You can set up two parameters of the transfer limit function: number of transmissions (N) and time
period (T). After each successful transmission a transmission counter increments by 1. The counter
decrements every time period (T). If a transmission is triggered, but the counter is equal or greater than
the set number of transmissions (N), the communication with the server is blocked, until the counter
derements to a value below the number of transmissions (N). This applies only to regular transmissions
and threshold triggered transmissions. Transmission triggered over Bluetooth will always be sent to the
server.
If you enable the transfer limit, the device may not be able to send the data to the
server, even if an alarm threshold has been exceeded!
In order to set the transfer limit:
1. Connect to the sensor with Efento Logger, tap on the three dots in the upper right corner ->
“Settings” -> “Network settings” -> “Transfer limit”
2. Enable the transfer limit and key in the number of transmissions and the time period for the
transfer limit function
Bluetooth turn off time
You can set up the sensor to automatically switch off the Bluetooth interface after a selected period of
time. This increases the battery lifetime but you will not be able to connect with the sensor and change
its configuration with your mobile device. By default the Bluetooth interface is always on.
If the Bluetooth has been turned off, in order to enable it you either need to restart the device (remove
and insert the batteries again) or turn it on remotely, from the server.
In order to set the Bluetooth turn off time:
1. Connect to the sensor with Efento Logger, tap on the three dots in the upper right corner ->
“Settings” -> “Device settings” -> “BLE turn off time”
Sensor name
You can set the name, under which the sensor will be visible in Efento Logger and other Bluetooth
applications. This name is not sent to Efento Cloud or other servers.
In order to change the sensor name:
www.getefento.com | +48 574 753 980 | [email protected]

Efento SP. J.
Ul.Krupnicza 14/5
31-123 Kraków
1. Connect to the sensor with Efento Logger, tap on the three dots in the upper right corner ->
“Settings” -> “Device settings” -> “Name”
Encryption (Bluetooth)
Enabling the encryption will result in encrypting the data sent by the sensor over Bluetooth Low Energy
interface. The encrypted data sent by the sensor can only be decrypted by a device with the encryption
key.
This feature is useful, if you need to be sure that only the authorized personnel can read the data over
Bluetooth interface. Users who do not know the encryption key, will not be able to read the data.
If the sensor communication is encrypted, only devices with a proper encryption key can read its
measurements (right). Devices without the encryption key are not able to read the data (left)
In order to set the encryption key:
1. Connect to the sensor with Efento Logger, tap on the three dots in the upper right corner ->
“Settings” -> “Device settings” -> “Turn encryption on”
2. Key in the encryption key. Make sure you write it down as you will need to add it in mobile
devices that will access the sensor data
3. From now on, the communication is encrypted. You will need to add the encryption key in Efento
Logger in order to see the data sent by the sensor
In order to switch the encryption off:
1. Connect to the sensor with Efento Logger, tap on the three dots in the upper right corner ->
“Settings” -> “Device settings” -> “Turn encryption off”
If the encryption has been turned on, once you try to connect to the sensor with Efento Logger, you will
be asked to key in the encryption key. Once you add it, the application will store the encryption key and
you will be able to access the sensor without adding it again.
Efento Logger allows you to add up to five default encryption keys. If a sensor communication is
encrypted with any of the added keys, Efento Logger will automatically decrypt the data. This is useful
for managing a fleet of sensors.
In order to add a default encryption key in Efento Logger:
1. Enter the application settings (menu icon in the upper left corner -> “Settings”)
2. Select “Default keys”
3. Press “Add encryption key” button
4. Add the encryption key and its label
www.getefento.com | +48 574 753 980 | [email protected]

Efento SP. J.
Ul.Krupnicza 14/5
31-123 Kraków
If you want to delete an encryption key:
1. Enter the application settings (menu icon in the upper left corner -> “Settings”)
2. Select “Default keys”
3. Tap and hold the encryption key you want to remove
Device time
In order to operate properly, Efento NB-IoT sensor has to set its internal time. After successful network
registration, the device will automatically fetch the time from the network. From now on, all the
measurements taken by the device will have the timestamp assigned. If for any reasons the device is
not able to fetch the time from the network, it will try to connect to the Efento Cloud platform and get time
from the server. If the connection with Efento Cloud is also not possible (e.g. device communicates with
a third party server, or APN is configured incorrectly), it is also possible to set the sensor’s time using
Efento Logger application.
In order to set the time:
1. Connect to the sensor with Efento Logger, tap on the three dots in the upper right corner ->
“Settings” -> “Device settings” -> “Device time”
2. Sensor will get the time from your mobile device. If the time set on your mobile phone is wrong,
the sensor will also has wrong time settings
Sensor synchronizes the time settings with the network every time it communicates. If you manually set
the time and the sensor will be able to fetch the time from the network, it will overwrite the manual
settings.
Sensor status
Efento sensors collect information about its current status. This information is useful for troubleshooting
and solving the connectivity issues. Information about current sensor status can be accessed with
Efento Logger application or remotely, from the server. If you want to integrate Efento sensors into your
cloud / server platform and want to receive the information about the sensor status, please refer to
“Efento NB-IoT sensors integration manual”.
Cellular status
Current device’s cellular status can be checked in the “Cellular status” tab (connect to the sensor ->
three dots in the upper right corner -> “Cellular status”). In the tab, you can see the following information:
●Supported technologies - what celular technologies are supported by the device. There are two
options: NB-IoT or NB-IoT & LTE-M
●Current technology - what technology is currently in use. For NB-IoT only sensors it will always
be NB-IoT, For NB-IoT & LTE-M sensor, current technology depends on the technology which is
www.getefento.com | +48 574 753 980 | [email protected]

Efento SP. J.
Ul.Krupnicza 14/5
31-123 Kraków
currently in use. Devices automatically switch between technologies, depending on the inserted
SIM card
●Registration status - indicates current network communication status:
○ REGISTERED - registered to the network - this is typical status of the device;
○ NOT REGISTERED, SEARCHING - not registered to the network, searching for it - this
status may be seen during device power up, when it did not manage to attach to the
network yet;
○ NOR REGISTERED_NOT_SEARCHING - not registered to the network, not searching
for it - this status is seen mainly, if there is no network coverage;
○ REGISTRATION DENIED - network did not allow device to register
○ REGISTERED ROAMING - if the device is registered in roaming
○ REGISTERED EMERGENCY ONLY
○ UNKNOWN - all the other states
●Registration reject cause - if the device is not able to register to the network, the cause is
displayed in this field. Reject causes are described in 3GPP TS 24.301 Annex A
●Signal strength - strength of the signal
●Communication status - describing current status of communication with the server. Possible
statuses: OK, server error, encoding error, socket error, timeout, mismatch, unauthorized,
unexpected error, not registered, not supported
●IMEI - IMEI number of the cellular module
● ICCID - ICCID of the SIM card in the device
●IP address - current IP address of the device
●ECL - ECL level. This parameter is a good indicator of the signal quality. The lower, the better.
ECL 1 or 2 may significantly reduce the battery life
●Cell ID - ID of the cell in to which the device is connected
●Last communication timestamp - timestamp of the last successful communication. All the
information on this card is refreshed during the communication / self check.
●Last status check timestamp - timestamp of the last self check. Self checks are performed on
the startup or may be performed on server’s demand. All the information on this card is refreshed
during the communication / self check.
Battery status
Efento sensors will inform you about the low battery level both on Efento Cloud platform and in Efento
Logger mobile application. Once a “low battery” status shows up, you will have 2-3 months to replace
the battery.
Efento sensors allow you to get the detailed information about the battery voltage and operation
parameters. In order to get the detailed battery parameters, connect to the sensor with Efento Logger ->
three dots in the upper right corner -> “Settings” -> “Device settings” -> “Battery status”.
You can get the following information:
●Battery status - information if the battery has to be replaced (“LOW”) or not (“OK”)
●Battery Voltage - current voltage of the battery in mV
www.getefento.com | +48 574 753 980 | [email protected]

Efento SP. J.
Ul.Krupnicza 14/5
31-123 Kraków
●MCU temperature - current temperature of the processor
●MCU min temperature - lowest temperature of the processor
●MCU max temperature - highest temperature of the processor
●Battery min voltage - lowest voltage of the battery
●Battery reset timestamp - beginning of the battery monitoring period
Installation mode
In the installation mode, the device continuously communicates with the network and Efento Cloud for
300 seconds (5 minutes), refreshing the signal strength and connection parameters. Starting the
installation mode allows you to check whether the sensor correctly logs into the network and whether the
signal strength of the NB-IoT network is sufficient for the correct operation of the sensor. Launching the
installation mode is not required for the correct device configuration. After starting installation mode, the
user can check:
●Seconds left - the number of seconds remaining until automatic exit from the installation mode
●Signal strength - NB-IoT signal strength in tenths of dBm. -120 is taken as the extreme value. If
the signal strength is below this value, the device may regularly lose connection and not be able
to correctly send data to the server
●Signal Quality - parameter defining the signal quality
●Last data fetch Timestamp - date and time of the last communication with the network. All
parameters related to communication with the network have been refreshed at this time
●Registration Status - network connection status. There are three possible statuses:
○ REGISTERED - registered on the network
○ NOT REGISTERED SEARCHING - not registered on the network, trying to find the
network and register on it.
○ NOT REGISTERED NOT SEARCHING - not registered on the network, does not try to
search for the network and register to it. If the sensor cannot register on the network for
any reasons (e.g. poor signal quality, SIM card error), this status will appear after several
unsuccessful registration attempts
●Ping status - information if the sensor is able to reach Efento Cloud platform. Ping status allows
you to verify the correct configuration of the APN - if the device is connected to the network, but
does not communicate with the platform, it is most likely caused by a wrong APN configuration
●Firmware Version - sensor’s software version
Software updates
Sensor software can be updated in two ways:
●Remotely (Software Over The Air) - the Efento team, after preparing and testing the new
software version, can remotely update the software on all connected sensors. The software
update is done by sending to the sensor only the difference between the new software version
and the current version. Thanks to this, the consumption of battery and data transmission during
the update is limited, which extends the working time of the sensor. This type of update does not
www.getefento.com | +48 574 753 980 | [email protected]

Efento SP. J.
Ul.Krupnicza 14/5
31-123 Kraków
require any action on the user side and is done in a way that does not have any impact on the
operation of the device.
●Locally - wirelessly using Efento Logger mobile application. This update method is mainly used
to upload test software versions provided by the Efento technical support team.
Troubleshooting
Sensor doesn’t switch on
If red and green diodes keep blinking, it means that the sensor is in reset loop due to the low voltage of
the batteries. To solve this problem replace the batteries with new ones (3.6 V, ER14505M).
Sensor doesn’t send the data
If the sensor is taking measurements, and they are visible in Efento Logger, but it doesn’t send the data
to Efento Cloud please check:
● SIM card – make sure that SIM card is active and dedicated for NB-IoT / LTE-M devices
● Range – make sure that there is NB-IoT / LTE-M coverage in the place where you want to use
the sensor
● APN settings – some networks require manual APN set up. Please contact your operator and
obtain APN configuration. Set APN with Efento Logger as described in Step 4.
● If the device is able to fetch time from the network - Efento sensors need to fetch the time from
the NB-IoT network in order to synchronize internal time with the network time. If this feature is
not available, you can set the time manually with Efento Logger by using the “Change device
time” option.
● Temperature in which sensor operates – If the temperature is below the range declared in the
datasheet, the sensor will not be able to send the data over NB-IoT. This is due to the voltage
required by the NB-IoT module. If you need to measure low temperatures, please use the sensor
with an external temperature probe
Other problems
If you experience any other problems with Efento NB-IoT sensors, please contact our support team. We
will be happy to assist you.
Appendices
Security
Wireless communication via the Bluetooth Low Energy interface can be encrypted. If the encryption is
turned on, then mobile devices that do not have an encryption key compatible with the key, with which
www.getefento.com | +48 574 753 980 | [email protected]
Table of contents


