EGO SYStems Waveterminal U2A User manual

1
All rights to this document are reserved. No part of this document may be copied
reproduced, or distributed in any form or by any means without the prior written permission
of EGO SYStems Inc.
WARRANTY
EGO SYStems Inc. warrants to the original purchaser that this product, under normal use, will
be free from defects in materials and workmanship for as long as purchaser owns this
product. EGO SYS will, at its sole option, repair or replace a product,which is found to be
defective. This warranty shall be null and void if, in the sole opinion of EGO SYS, a product
failure is the result of misuse, abuse, modification, or misapplication.
Except as expressly provided above, this product is provided “as is” without warranty of any
kind. No claim is made for merchantability or fitness for any purpose. In no event will EGO
SYS be liable for any direct, indirect, consequential, or incidental damages arising out of use
of this product.
You must contactEGO SYS or our regional representative for prior approval before returning
a failed product. All such returns must be shipped toEGO SYS or our regional representative
in original or equivalent protective packaging material, with freight prepaid and adequate
insurance. If product is deemed to be defective, the repaired or replacement product will be
returned to you at no charge via carrier chosen byEGO SYS.
TRADEMARKS
EGO SYS, Waveterminal U2A and U2A are trademarks of EGO SYStems Inc. Macintosh, G3,
G4, iMAC, iBook and Power Book are trademarks of Apple Computer Inc. MAC OS is a
trademark of Apple Computer Inc. Other product and brand names are trademarks or
registered trademarks of their respective companies.
RADIO FREQUENCY INTERFERENCE
NOTE: This equipment has been tested and found to comply with the limits for a Class A
device, pursuant to Part 15 of the FCC Rules., and EN50 081-1/2:1992 of CE Test
Specifications. This equipment generates, uses, and can radiate radio frequency energy. If
not installed and used in accordance with the instruction, it may cause interference to radio
communications.
CORRESPONDENCE
For technical support inquiries, contact your nearest Waveterminal U2A dealer or contact us
directly. Direct all other correspondence to:
EGO SYStems Inc.
Suite 1003,Shinhan Bldg. 45-11
Yoido-dong
Youngdungpo-gu, Seoul, Korea
Tel: +82 2 780-4451~3
Fax: +82 2 780-4454
Web Site: www.egosys.net
E-mail: webmaster@egosys.net
First Edition September. 2000

2
CONTENTS
1. OVERVIEW 3
FEATURES 4
2. INSTALLATION 6
WHAT’S IN THE BOX 6
SYSTEM REQUIREMENT
6
HARDWARE INSTALLATION7
3. EXTERNAL CONNECTIONS 9
BASIC CONNECTIONS 9
CABLES & ADAPTERS 10
APPLE SOUND MANAGER CONTROL PANEL 13
ASIO DRIVER 13
5. U2A C
ONTROL
P
ANEL
R
EFERENCE
15
INPUT/OUTPUT LEVEL FADERS 15
USB WAVE IN SELECT 16
DIGITAL IN SELECT 16
CLOCK SOURCE
16
ANALOG OUT MIXER 18
DIGITAL OUT MIXER 18
MIX MODE 19
SAMPLE RATE 20
REALTIME SAMPLE RATE CONVERTER
20
DIGITAL OUT (IEC 958) TYPE 21
BOTTOM OF THE CONTROLPANEL 21
6. APPLICATION 23
SPARK LE 23
7. TROUBLE SHOOTING 27
8. PRODUCT REGISTRATION & TECHNICAL SUPPORT 28
TECHNICAL SUPPORT 29
SPECIFICATIONS 30

3
1. Overview
Thank you for choosing Waveterminal U2A, an USB digital audio
interface.
Waveterminal U2A (U2A) is an USB digital audio interface employing
24-bit A/D, D/A converters for both of IBM compatible computer system
and Macintosh computer system. U2A can be used with your digital audio
recording software to record and/or playback stereo analog or stereo
digital audio sources simultaneously (full duplex) with exceptional audio
quality.
USB stands for Universal Serial Bus,which means it connects peripherals
to a computer. It is an evolved form of old serial or parallel bus.
USB makes installation of new peripherals much simpler, just plug and
play. You do not have to pry open the PC to add a peripheral any more,
just plug and turn it on. With USB-compliant computers and peripherals,
there are no more worries about IRQ setting, DIP switch setting, or card
installation. Even the computer turned on, it is no problem with attaching
and removing devices. Just plug and play!
Practically, there is no limit on number of devices that can be connected to
the computer. Up to 127 peripherals can be linked to the computer using
USB hubs.
USB even provide electrical power to the peripherals. It automatically
detectsnecessary power and supplies it, which eliminates messy power
cables from working space.
Windows 98 and Windows 2000 include built-in driver for USB
compliant devices. Just look for a port and plug in.
Best of all, take a listen and you will immediately notice the difference in
the sound quality. Digital or analog, not all audio interface cards are made
the same. If you are a professional or in need of a professional quality
USB audio interface, you have made a sound investment in Waveterminal
U2A.

4
FEATURES
24-bitAnalog-to-DigitalandDigital-to-AnalogConverters.
Highest quality 24-bit AD/DA converters in U2A provide unmatched
sound quality with exceptionally low noise.
2-In/2-OutAnalogAudioInputsand Outputs.
U2A provides 1/4”phone jacks for use with –10dBV nominal level
consumer audio equipment. Unlike some audio cards that deliberately
boost their output levels to give you a false sense of audio quality,
U2A givesyou a true indication of your levels. Nothing’s added or
taken away unless you intend to do so. If you need to adjust levels,
digital level adjustment is provided for analog inputs and outputs.
S/PDIFCoaxial,OpticalDigitalIn&Out
U2A offers S/PDIF digital input and output via Optical or Coaxial
ports. There’s no additional conversion process for signal already
recorded. With optional Dr. D audio interface/converter, you have
access to XLR type AES/EBU input and output simultaneously.
MultipleSampleRateSupport
Supports all denomination of 44.1kHz or 48kHz standard sample
rates from 32kHz, 44.1kHz and 48kHz. U2A can be used in a
variety of applications.
Real-timeHardwareSampleRateConversion

5
Regardless of the type of sample rates, U2A automatically converts
the incoming digital audio signal to the sample rate of your choice in
real-time.
FunctionsasanindependentSignalConverter
When Digital In Clock Source is selected, U2A can be operated as an
independent signal converter. In this mode, U2A is disconnected from the
computer, but it will send out any incoming signal to both analog and
digital output ports.

6
2.Installation
One of many benefits of USB device is easy installation. Just plug
and play, you don’t need to uncover the computer case or use a
screwdriver what so ever. Only thing that you have to remember is
that your computer system has to have an USB port.
WHAT’S IN THE BOX
WT2496 is shipped with the following contents:
1. Waveterminal U2A (1)
2. Control Panel/ASIO driver CD-ROM (1)
3. User’s Manual (1)
4. USB cable -2m (1)
5. Spark LE software CD-ROM (1)
SYSTEM REQUIREMENT
Most of all, your system has to have at least one available USB port
to use U2A.
1. Macintosh G3, G4, iMAC and Power Book (with USB port)
2. MAC OS 9 or better (USB Device Extension v1.4.1 or better)
3. 1 open USB port
4. 64MB RAM (greatly rely on software’s requirement)
5. Digital audio recording/playback software (which is included in
the package as bundled software)

7
HARDWARE INSTALLATION
Before you begin, make sure you have read your computer’s manual
on installing USB devices. Your computer’s manual should describe
the precautions you should take.
Shutting down computer wouldn’t need for installing an USB device to
the computer. However, we will take it from the start to make sure
you can follow every detail of installation.
1. Find the USB port on your Mac. USB port is looked
like below.
USB port on computer
2. Plug in appropriate plug of USB cable (called Series
A plug) to the USB port of computer. You will notice
that USB ports on computer and U2A are different.
Series A plug
3. Connect the other end of the USB cable (Series B
plug) to the USB port of U2A.
Series B plug

8
4. Hardware installation is done. Now you will see that
Power LED on the U2A is on. USB device is so easy
to install you can just plug it in to use.
)Series A Plug is used for those devices on which the
external cable is permanently attached like Mouse,
Keyboard and USB hub etc…
)Series B Plug is for that requires detachable external
cables and usedfor devices like Printers, Scanners,
Modems, Stand Alone Hubs.
Parts of this manual are continually being updated.
Please read the README.TXT file included in the
driver diskette for the latest update information,
and be sure to check our web site
http://www.egosys.net occasionally for the most
recent update information.
9
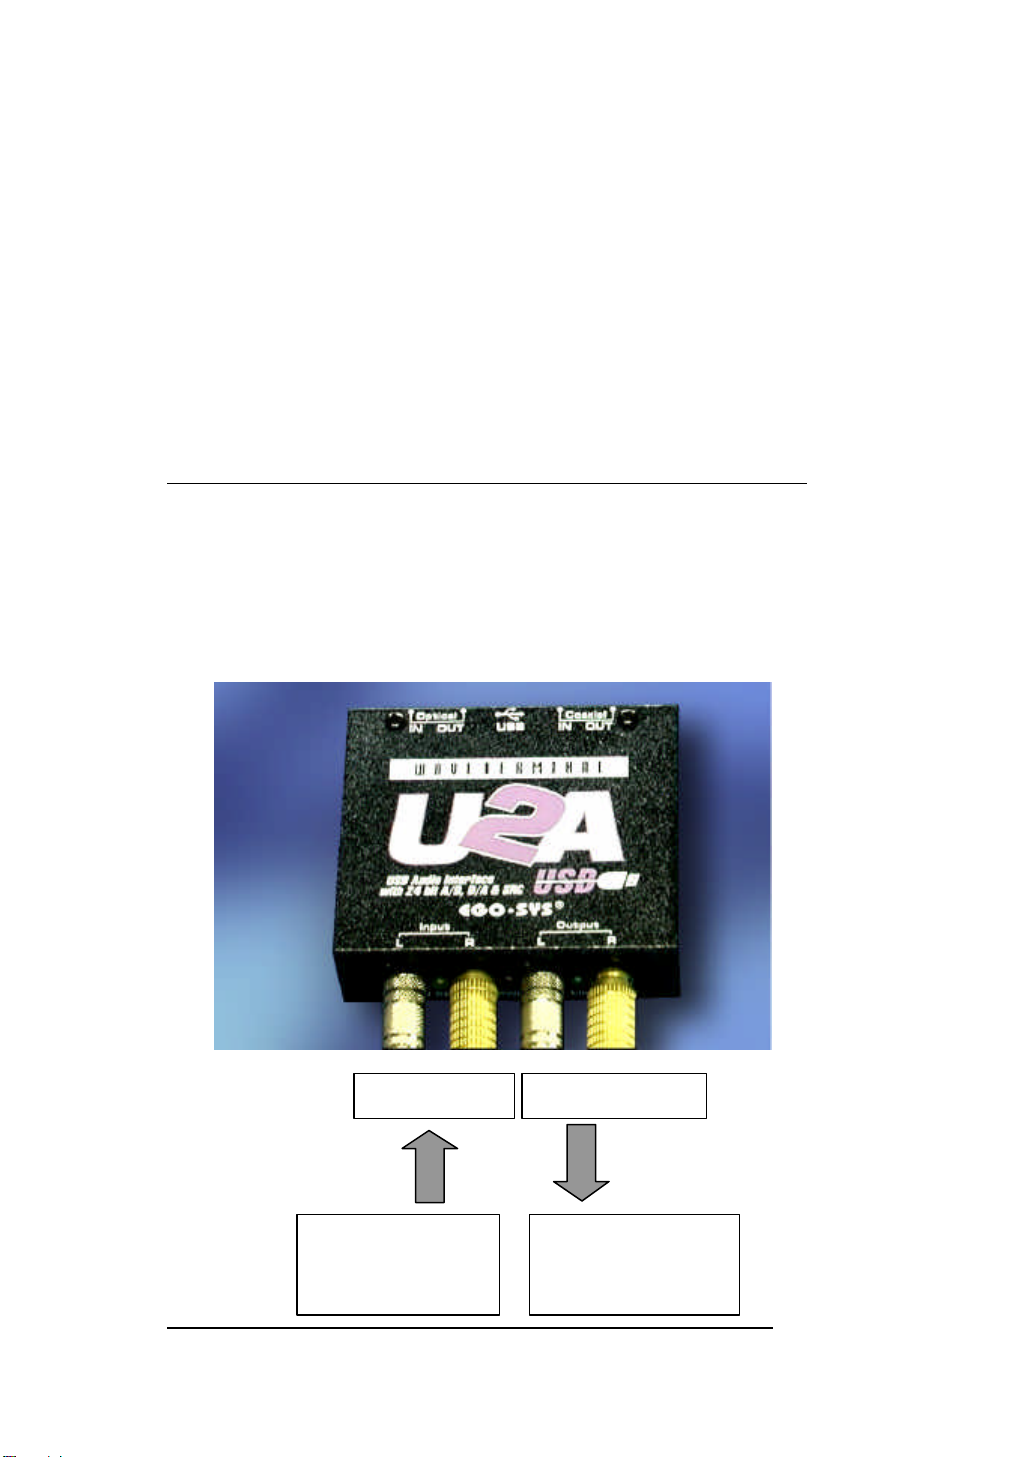
3.ExternalConnections
U2A has many features that can enhance your audio production
environment. If you are serious enough to about your digital audio, you
may want to take time to read through this section carefully. While you
may not need all of these features, and simply opt to plug in the cables
to get started right away, you should at least be aware of U2A’s
capabilities –in case you need them later on.
BASIC CONNECTIONS
In a typical audio production studio or workstation, where you have
both digital and analog devices, this set up treats your MAC as a
stereo master recorder. In this case, monitoring of U2A will be similar
to “through-the-tape”monitoring, where you monitor your input and
output sources from the tape recorder’s point.
IN SEL
SESEL
L -Analog In -RL -Analog Out -R
From the stereo
output of an external
analog audio device
To the monitor
system or stereo
input of mixer

10
If you plan to use U2A in a digital mastering environment, you may
choose to connect analog outputs of U2A directly to your power
amplifier’s inputs instead of sending it through the console/mixer.
Rear panel of U2A
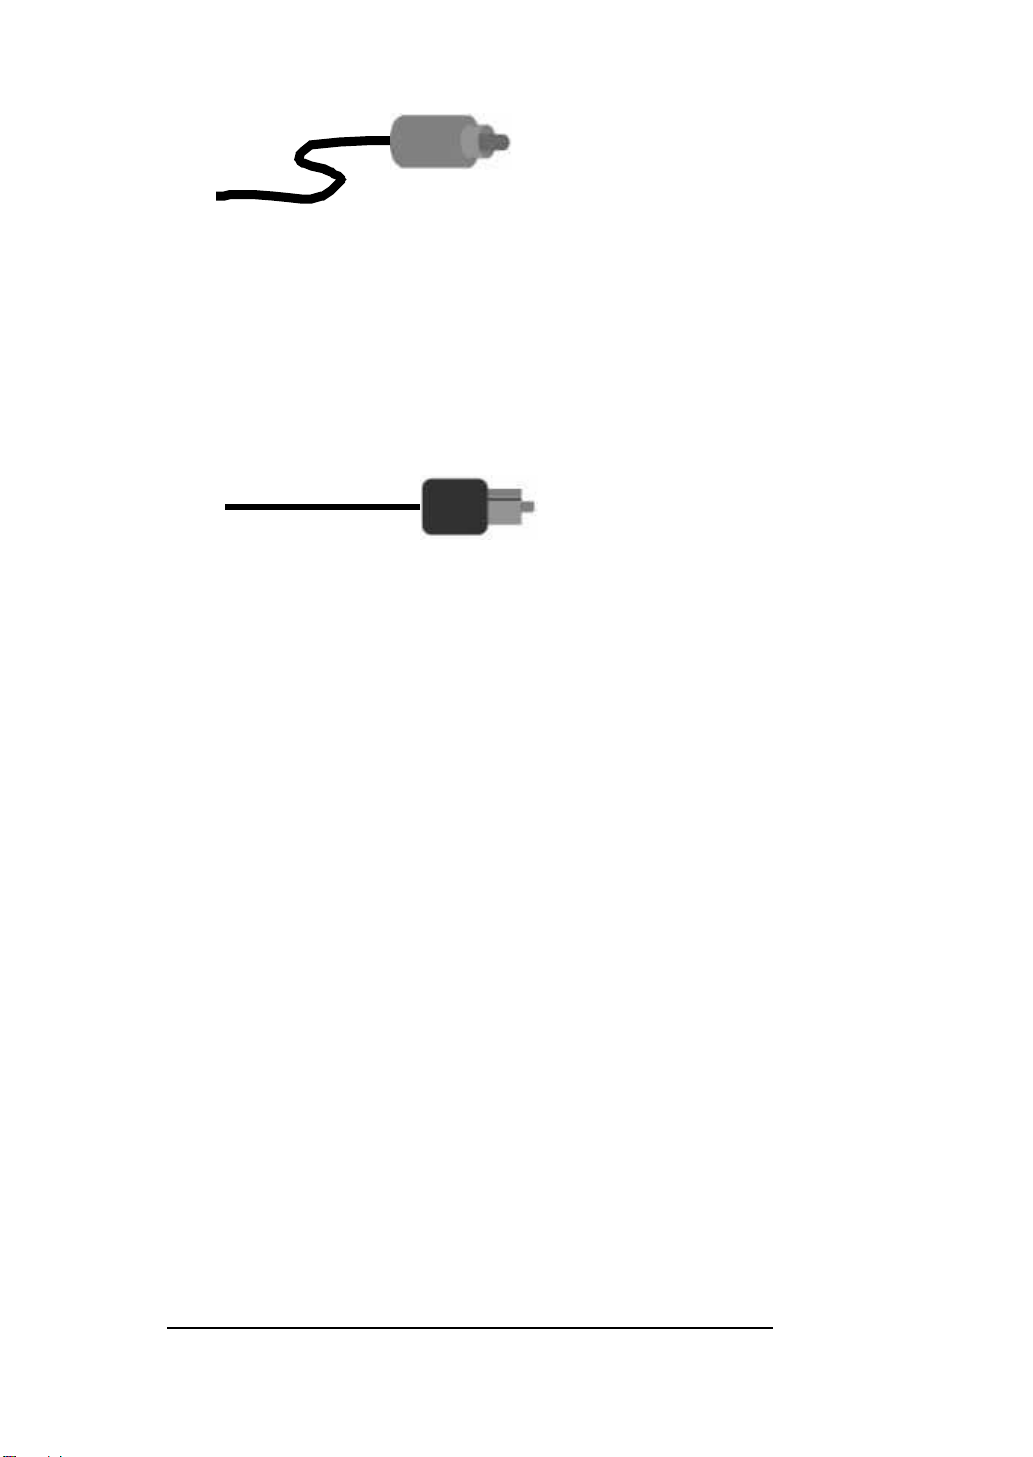
CABLES & ADAPTERS
Digital Input of
external digital devices
CD, MD, DAT
Digital Output of
external digital devices
CD, MD, DAT

11
Let’s talk about the cables and connectors those can be used with
U2A.
Analog connector
U2A uses 1/4”phone connectors for analog input/output connectors.
The wiring method for unbalanced connections with XLR connectors
to ¼” phone connectors (tip and sleeve only) using shielded twisted
pair cable (2 wire + shield) is as follows:
The wiring method for unbalanced connections with XLR connectors
to unbalanced ¼” phone connectors (tip and sleeve only) using coaxial
cable (1 wire + shield) is as follows
:
Digital connector
1. Coaxial connector
S/PDIF (IEC-958) uses 75ohm Coaxial cable and RCA connectors.
U2A uses RCA connector that is the same cable as used in video
transmission. Shown below is conventional RCA connector and you
can use this for transmitting/receiving S/PDIF digital audio data
from/to U2A.
12
2. Optical connector
Optical version of S/PDIF interface, which is usually, called Toslink,
because it uses Toslink optical components. The transmission media
is 1mm plastic fiber and the signals are transmitted using visible LED
light. The optical signals have exactly same format as the electrical
S/PDIF signal, they are just converted to light signals.

13
4.DriverInstallation
Provided software CD-ROM includes Apple Sound Manager driver
control panel and ASIO driver extension (with patch). Here we will
explain how you can set up for utilizing them.
APPLE SOUND MANAGER CONTROL PANEL
For the system sound monitoring (include audio CD monitoring) and
running Sound Manager driver supported application, you don’t need
to install or add any special driver or file. The moment you connect
the U2A to the USB port on the MAC, you can use U2A instantly.
However, as we mentioned in system requirement part, you must have
“USB Device Extension”version 1.4.1 or better to use U2A.
Only thing you have to do is double click the U2A control panel icon
to open control panel. You need to duplicate Control Panel into the
hard drive and select “Add to Favorites”from FILE menu to place it
in the Apple Menu so that you can open the Control Panel easily
whenever you need to.
U2A Control Panel Icon
ASIO DRIVER
To use ASIO driver with U2A, it requires some procedure you must
follow. Please read carefully and follow the steps below.
1. There is an “USB ASIO”folder in the CD-ROM. You will
find an extension named “PGEgoSysU2A”. You have to
drag it into system folder then the system will place the file
into the extension folder automatically.

14
2. Please reboot the computer to make the new extension
enable to use.
3. “USB ASIO”folder in the CD-ROM you can find ASIO
patch (pictured below) that should be placed in the “ASIO
drivers”folder of desired application (example shows the
ASIO drivers folder of Spark LE). Please drag it into the
ASIO driver folder of the application.
4. Now you can select Waveterminal U2A as an ASIO device
within the application.
Please read the README.TXT file included in the
driver diskette for the latest driver update
information, and be sure to check our web site
http://www.egosys.net occasionally for the most
recent update information

5. U2A Control Panel Reference
If you have properly installed hardware and software control panel for
U2A, you can use Apple Sound Manager Control Panel as you can
see below.
For user’s convenience, U2A control panel is designed to follow
logical route of audio signal. Upper left section of the control panel
shows input status, Clock Source, Sample Rate selector and selected
input goes to level fader section. Right section of the control panel is
for output status selection, Mix Mode section and Digital Out Type
selector. While reading through this section, it may help to actually sit
down in front of your MAC and experiment.
INPUT/OUTPUT LEVEL FADERS
1. Level Faders
Click and drag to change the input and output levels. U2A is
fixed to use –10dBV input/output reference level. Check the
manuals of the audio equipment you want to connect to

16
U2A’s inputs. It should be –10dBV device. The numbers on
the bottom show the relative levels in dB.
2. GANG MODE
Links the L-R faders for stereo operation. Un-select the Gang
Mode if you need to control the left and right levels
independently.
USB WAVE IN SELECT
Select the input source type for audio recording.
1. ANALOG IN
Selects the analog input port (-10dBV unbalanced) on the
U2A as the USB wave input source.
2. DIGITAL IN
Selects the digital input port (SPDI/F Coaxial or Optical) on
the U2A as the USB wave input source.
DIGITAL IN SELECT
Select the input connector type for your digital audio input.
1. COAXIAL
Selects the Coaxial input port (RCA type S/PDIF format) on
the U2A as the digital input source.
2. OPTICAL
Selects the Optical input port (Toslink, S/PDIF format) on the
U2A as the digital input source.
CLOCK SOURCE
Clock Source determines that U2A will reference to. Clock Source is
the time reference that determines precisely where each digital audio
sample begins and ends. Also, Clock Source in U2A control panel
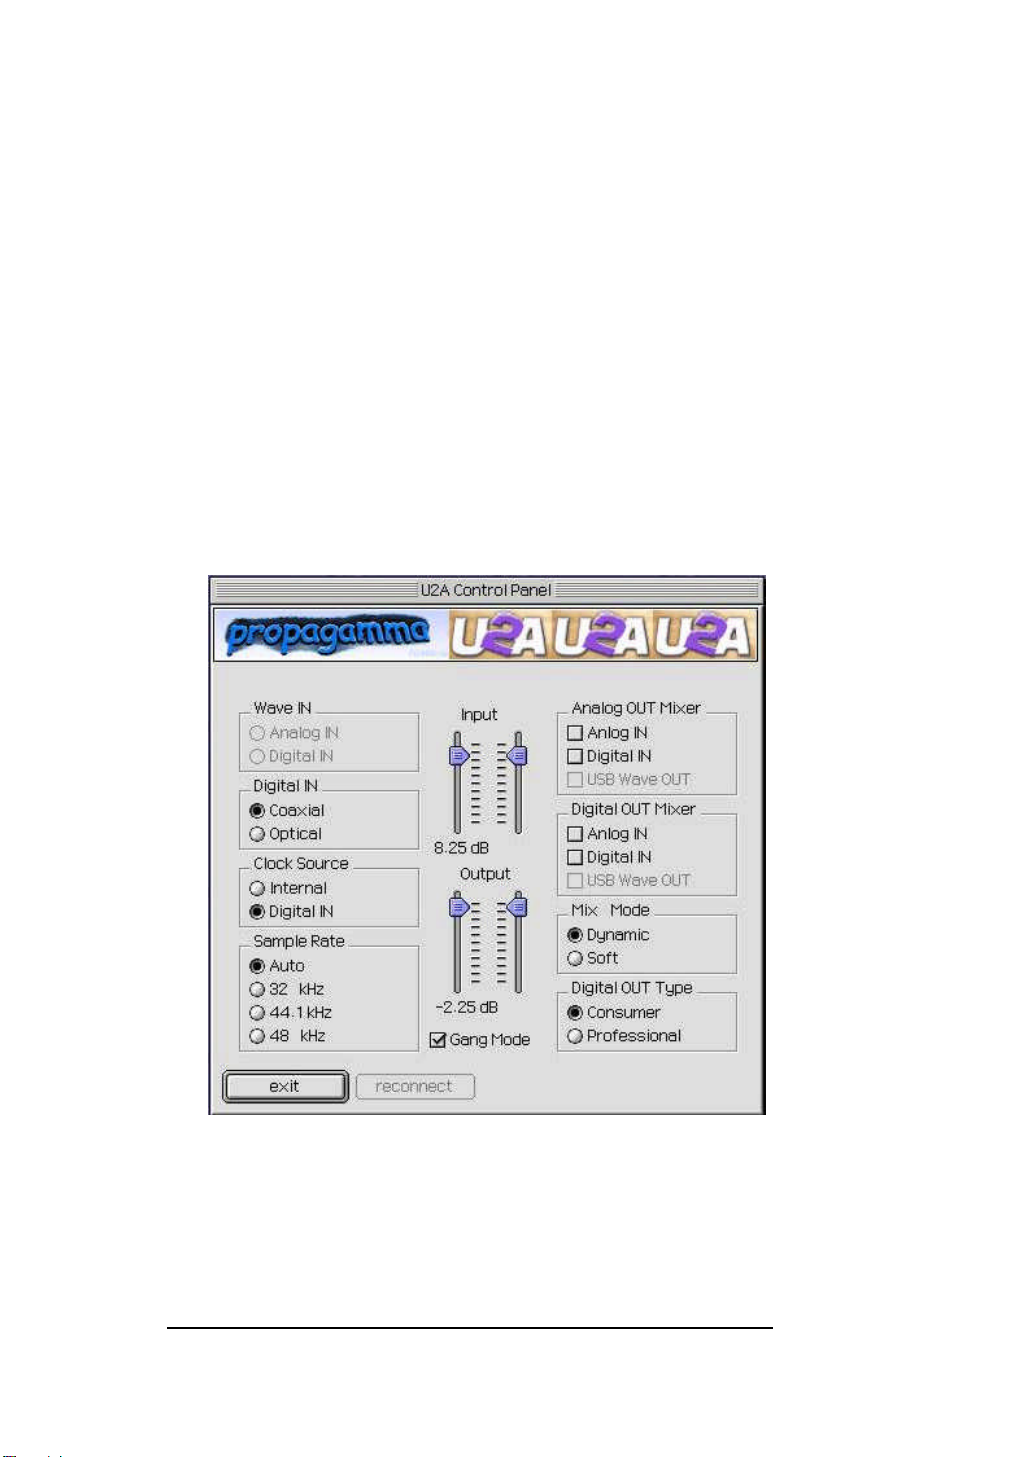
17
gives unique function to the unit by selecting between two different
sources.
1. INTERNAL
Selects U2A’s on-board clock source as the reference. This
is the default mode for recording analog/digital audio through
U2A. Use this mode if you are recording audio signal, playing
back audio file or using Realtime Sampling Rate Converter.
2. DIGITAL IN
Selects the digital audio input’s data as the clock source.
Selecting this mode causes U2A functions as an independent
operation status from computer. As you can see below, USB
WAVE IN section is disabled and USB WAVE OUT of
ANALOG/DIGITAL OUT MIXER section is disabled either.
In this mode, you can operate U2A as a signal converter, but
U2A is now completely separate from the computer. That
means you cannot record any input source to the computer
and play any audio source from the computer. However, any
incoming audio signal (either analog or digital) can be sent out
through three different output ports. Analog audio signal can

18
be converted to digital audio data, digital audio data would be
converted to analog audio signal and even digital audio data
can be transferred to different connector type.
ANALOG OUT MIXER
This is where you select the source that is routed to the Analog Output
jacks of U2A. You can select either Analog In or Digital In for input
monitoring. USB WAVE OUT can be selected simultaneously with
one of the input source monitoring.
1. ANALOG IN
Signal connected to Analog Input ports of U2A is routed to
the Analog Output ports for input monitoring.
2. DIGITAL IN
Signal connected to Digital Input port of U2A is routed to the
Analog Output ports for input monitoring.
3. USB WAVE OUT
Output of wave device selected to USB Audio Device is
routed to the Analog Output ports for monitoring.
DIGITAL OUT MIXER
This is where you select the source that is routed to the Digital Output
jacks (Coaxial and Optical) of U2A.
1. ANALOG IN
Signal connected to Analog Input ports of U2A is routed to
the Digital Output ports for input monitoring.
2. DIGITAL IN
Signal connected to Digital Input port of U2A is routed to the
Digital Output port for input monitoring.

19
3. USB WAVE OUT
Output of wave device selected to USB Aduio Device is
routed to the Digital Output port for monitoring.
MIX MODE
When more than one output source is selected to be played back
simultaneously in the Analog or Digital Out Mixer, you are actually
combining the data of two digital audio signals together, resulting in an
overall gain of about 6dB/bit for each signal combined. This can cause
the output circuit to overload and create a noticeable click or
distortions as the combined level can exceed 0 dB peak level. Mix
Mode gives you the choice as to how such excessive levels are
handled by U2A.
1. DYNAMIC
The combined signal levels are not adjusted by U2A. In this
mode clipping signals are audible, but left untouched. If you
want to adjust the levels, you can do so by adjusting the levels
from the audio software or by manually reducing the output
level faders of U2A.
2. SOFT
The combined signal levels are reduced automatically by U2A,
depending on the number of signal sources combined. For two
combined signals, the output signal is reduced by –6 dB.
If output monitoring sources don’t contain peak level (0 dB peak)
programs, combining them probably would not cause any clipping or
distortion. In such cases, you may opt for the Dynamic mode, as it will
allow you to add the signals for a much ‘hotter’output. On the other
hand, if your sources already contain peak level programs, you may
need to select the Soft mode or manually adjust the levels of each
output source you have selected.

20
SAMPLE RATE
Sample rate determines the number of samples per second that is used
to convert analog audio to digital audio.
As most of you may know, sample rate for CD-DA is 44.1kHz and
professional digital audio masters are usually recorded at 48kHz
sample rate. U2A may be used to sample analog audio at 48kHz, but
at some point in time it must be converted down to 44.1kHz for it to
be used in a viable consumer format, such as CD-DA. Once you
convert (dither) the data down to a lower sample rate format, you will
experience some losses in frequency response. However, analog
audio recorded with higher sample rate and bit resolution will sound
cleaner and retain more accurate frequency response when they are
dithered down to lower bit rate or converted to lower sample rate.
1. AUTO
Sample rate is automatically set by the selection you make in
your digital audio recording software during analog audio
recording or by the encoded signal format during digital audio
recording.
2. SAMPLE RATE
There are three different sample rates available –32kHz,
44.1kHz and 48kHz. If you want to convert sample rate in
real time, you can select desired sampling rate among them.
REALTIME SAMPLE RATE CONVERTER
U2A can function as a real-time sample rate converter. This is U2A’s
unique function that you cannot find from any other digital audio
interface. You can change the incoming digital signal to a different
sample rate by choosing Internal word clock and selecting a desired
sample rate. The maximum conversion ratio is 3:1, so if your input
signal’s sample rate is 96kHz, you can convert it down to 32kHz
(96/3) or convert 11kHz signal up to 32kHz (11x 3). Real Time
Sample Rate Converting functions only for incoming digital signal.
Connect digital source to Coaxial/Optical Input port and choose
Table of contents
Popular Recording Equipment manuals by other brands


Audio Hungary
Audio Hungary qualiton MC user manual

Simplex
Simplex 4100-6047 Installation and programming manual

LGB
LGB 55026 Installation

AUSTRALIAN MONITOR
AUSTRALIAN MONITOR EQ302 Installation and operation manual

Raypak
Raypak B6000 Installation and operating manual

SMC Networks
SMC Networks EX600-SPN3 instruction manual


