EIBENSTOCK Automix 1801 User manual

Originalbetriebsanleitung ..……...…........3 - 11
Original Instructions...…….....................12 - 20
Notice originale ………….……...……….21 - 29
Oorspronkelijke gebruiksaanwijzing…...30 - 38
Kullanıcı Talimatları...……....................39 - 47
Automix 1801
TR
NL
F
D
GB

12
ENGLISH
Important Safety Instructions
Important instructions and warning notices are allegorized on the machine
by means of symbols:
Before you start working, read the operating
instructions of the machine.
Work concentrated and carefully. Keep your
workplace clean and avoid dangerous
situations.
In order to protect the user, take precautions.
During work you should wear ear protectors, goggles, protective gloves and
sturdy work clothes!
Wear ear protectors
Wear goggles
Wear protective gloves
While working with the Automix important:
During mixing process do not reach with your
hand through the protective grid or put any object
through. Physical hazard!
13
Technical Data
Automix 1801
Nominal voltage 230 V ~ 110 V ~
Power drain 1500 W 1400 W
Rated current 7,0 A 13,3 A
Order No. 07614 07615 / 07616
Frequency: 50 - 60 Hz
Rated speed 50 rpm
Batches up to: 50 kg
Stirrer holder: M 20, female thread
Protection class: II
Degree of protection: IP 20
Weight: approx. 26.5 kg
Interference suppression: acc. to: EN 55014 and EN 61000
Supply
Stirrer with stand, bucket, stirrer basket, protective shield and operation
manual in cardboard box.
Intended Use
The Automix 1801 tool is intended be used to prepare and mix ready-
mixed plaster, mortar and concrete as well as gypsum, lime and other
building materials of medium to high viscosity and a maximum quantity of
50 kg.
General Instructions
The tool may be used only together with the stand supplied along with it.
The tool’s working spindle is equipped with a M20 female thread.
Thread and front surfaces must be kept clean.
When assemble the stirring rod put the ring supplied along with the tool
between spindle and stirring rod to simplify the removal of the stirring rod.
The stirrer basket should be detached using a SW 27 open-end wrench.

14
Safety Instructions
Safe use of the tool is only possible if the user had
studied the instruction manual and safety instructions
completely and is strictly following the instructions
contained therein.
Additionally, the general safety instructions of the leaflet
supplied with the tool must be observed. Prior to the first
use, the user should absolve a practical training.
If the mains cable gets damaged or cut during the use, do not
touch it, but instantly pull the plug out of the socket. Never use
the tool with damaged mains cable.
The tool must neither be wet nor used in humid environment.
Prior to every use, check the tool and its cable and plug.
Have damages only repaired by specialists. Insert the plug into the
socket only when the tool switch is off.
Ensure a safe state of the machine.
Use the unit only in the open air and with a residual-current circuit
breaker of max. 30 mA.
Never allow unattended work of the tool.
Unplug the tool and make sure that the switch is off if the tool is not
under supervision, e.g. during preparation and take-down works, at
power failures, for insertion or mounting accessories.
Unplug the tool if is stops for any reason. So you avoid sudden starts in
unattended condition.
Do not use the tool it its shell, switch, cable or plug are damaged.
Electrical tools have to be inspected by a specialist in regular intervals.
Do not touch rotating parts.
Persons under 16 years are not supposed to use the tool.
On using the tool, wear ear protectors and protective goggles.
For further safety instructions, see the enclosure.
15
Tool Assembly
Take the protective grid, stand with bucket, protective shield, draw bar,
stirrer basket and accessories plastic bag out of the cardboard box.
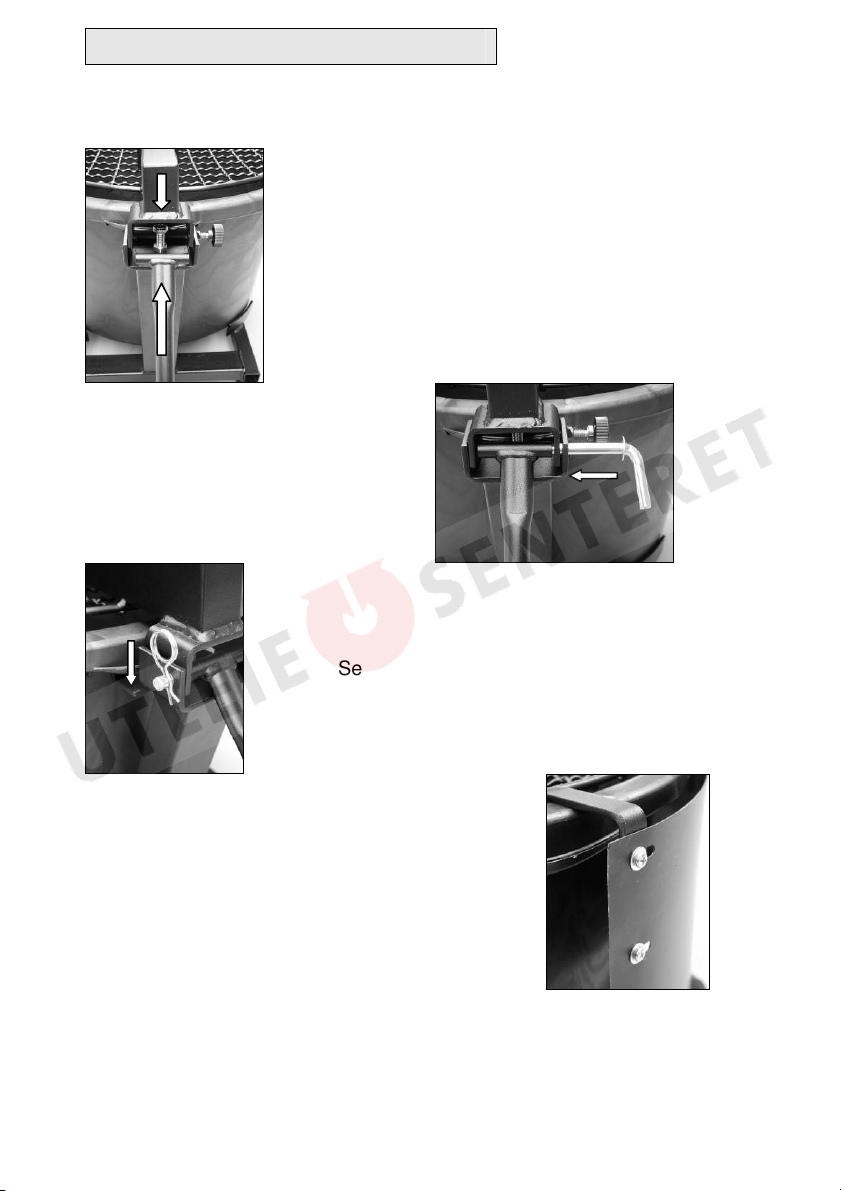
Fix the protective grid on the bucket and
place the draw bar.
Fix the three components by means
of the fixing bolt.
Secure the bolt by means of the split pin.
Fix the protector by means of the 6 Philips screws
M5 x 10 and washers.
16
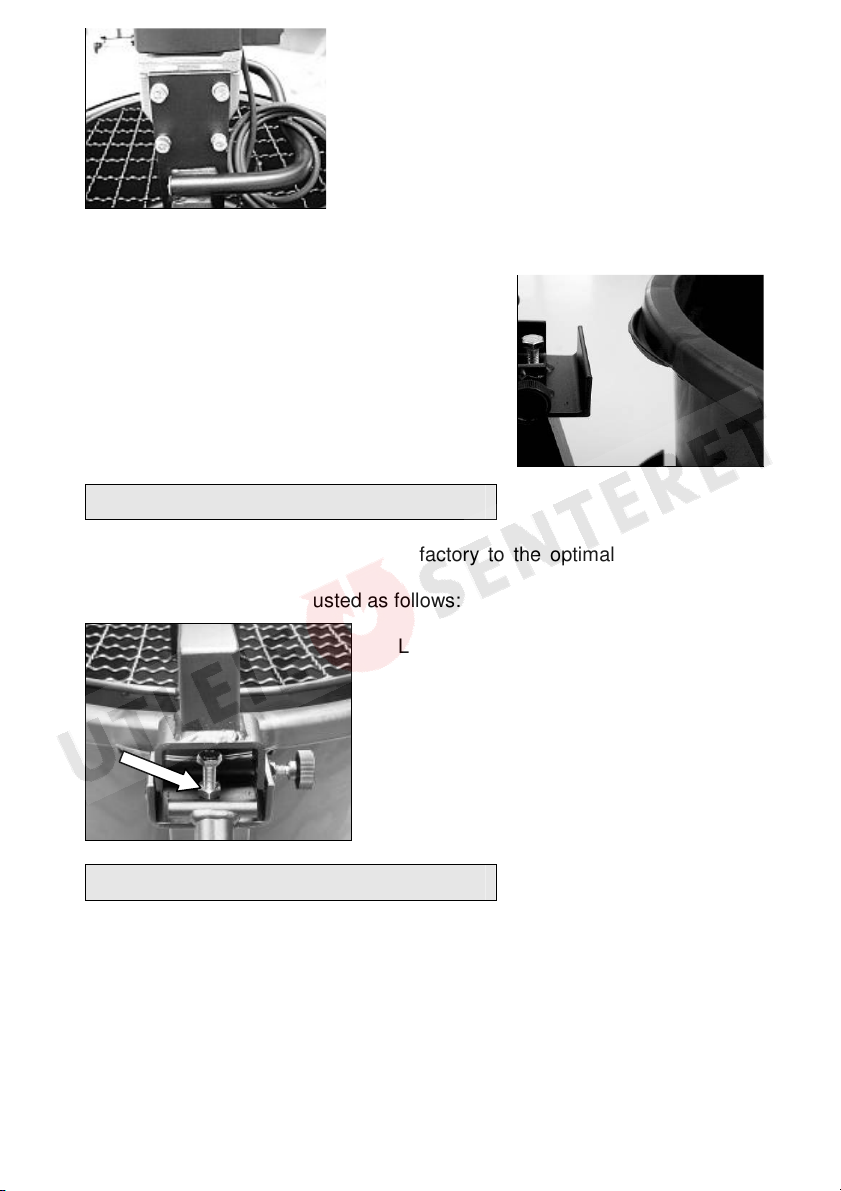
Fix the tool tightly to the stand by means of the
4 Allen screws M8 x 20 and the appropriate
locking rings.
Put down the tool arm and insert the stirrer basket.
Place the bucket into the lower frame in such a
way that one of its four handles snaps into the
holder provided for that. So you avoid
unintended turning of the bucket during the
mixing process.
Readjustment of the machine holder
The Automix 1801 is preset at the factory to the optimal position of the
stirring rods in the bucket.
This position can be readjusted as follows:
Loosen the hexagon nut with a jaw
wrench size 17. Adjust the hexagon
nut so that the stirring rod runs as far
as possible parallel to the border of the
bucket, but does not contact this.
Hold the screw in this position by
means of the jaw wrench and retighten
the nut. Check the correct position.
Electrical Connection
Prior to putting the tool into operation, check the mains voltage for
conformity with the requirements of the tool’s nameplate.
Voltage variations between + 6 % and – 10 % are permissible.
The Automix 1801 tool was designed according to protection class II.
Use only extension cords with a sufficient cable cross section (min. 2.5
mm²). Too small a cross section may result in loss of power and
overheating of tool and cable.

17
Tool Protection
Inadequate use may result in damages.
Therefore, it is strictly required to observe the following instructions:
Use only stirring baskets recommended by the manufacturer.
Do not stress the tool to such a extend that it stops by itself.
In order to protect user and motor, the Automix is equipped with a
mechanical overload protection.
In case of sudden blocking of the stirring rod, the mixing spindle is
mechanically disengaged from the motor by means of a clutch.
In order to maintain the efficiency, the clutch should slide 2 seconds max.
through. In case of considerable wear, it has to be replaced by an
authorised service workshop.
Switching on and off
The tool may be started only with put
-
up and locked tool
arm. After having the tool switched off, the locking may
be opened and the tool arm put down only after the
stirrer basket has stopped.
Use
Insert the motor head with the stirrer basket into the
bucket and lock it by turning the knurled screw in the
direction of the arrow.
For insert the stirrer basket into the bucket, please
see that the stirrer is positioned across the tool arm.
Prepare the mix as follows:
Always start the tool without load.
Depending on the material to be processed, proceed as follows:
Floor and Wall Tile Adhesives
Carefully read the instructions on the material bag.
To prepare the desired quantity of adhesive, fill the required quantity of
water into the bucket.
Switch the tool on. Add the content of the first bag (25 kg) with a feed of
approx. 10 kg/min through the protective grid into the bucket.
Continue to do so in an uninterrupted and regular way with the second bag
(25 kg).
So you can avoid clumping of the mix.
If required, allow the adhesive to stand for 5 to 10 min, and then mix again
for some minutes.
18
Cement
The stirrer is well suited to mix ready-mixed mortar, plaster and the like.
Automix is not designed to mix concrete or mortar with medium-size gravel
and admixtures.
To prepare ready-mixed mortar or plaster, process as described in section
‘Floor and Wall Tile Adhesives’ above.
Since mortar is heavily hygroscopic, in view of excessive mix hardening it is
necessary to carefully observe the quantities of adhesive, cement or
additives for the desired mix.
Epoxy Resins
To process epoxy resins, it is necessary to check the viscosity and the
specific weight of the mix to be prepared in order to avoid overload of the
Automix tool.
Fill the quantities of resin, hardener and powder as advised by the producer
into the bucket.
Carefully mix the components in order to avoid formation of bubbles or
clumps
Paints
Fill the paint into the bucket and add the quantity of water or admixtures
required for the solution.
IMPORTANT!
!
The use of chemicals or solvents may impair the properties
of the bucket.
Before using the Automix tool, check the products to be
mixed for compliance with the tool manufacturer’s
requirements.
Removal of the Bucket
Switch the tool off and wait until the stirrer basket has stopped.
Open the locking of the tool arm.
Move the tool arm out of the bucket.
Lift the bucket out of the holder of the stand.
Care and Maintenance
Repairs may be executed only by appropriately qualified and experienced
personnel. After every repair the machine has to be inspected by an
electric specialist. Due to its design, the machine needs a minimum of care
and maintenance. However, the following points always have to be
observed:

19
Always keep the power tool and the ventilation slots clean.
During work, please pay attention that no particles get inside the
machine.
In case of failure, a repair has to be carried out by an authorised
service workshop.
Environmental Protection
Raw material recycling instead of waste disposal
To avoid damages on transportation, the power tool has to be delivered in
a sturdy packing. The packing as well as the tool and its accessories are
made of recyclable materials which makes it possible to remove
environmental friendly und differentiated because of available collection
facilities.
Only for EU countries
Do not dispose of electric tools together with household
waste material!
In observance of the European Directive 2012/19/EC on
waste electrical and electronic equipment and its
implementation in accordance with national law, electric
tools that have reached the end of their life must be
collected separately and returned to an environmentally
compatible recycling facility.
Noise Emission / Vibration
The indication of noise emission is measured according to DIN 45 635, part
21. The level of acoustic pressure on the work place could exceed 85 dB
(A); in this case protection measures must be taken.
Wear ear protectors!
The typical hand-arm vibration is below 2.5 m/s².
Measured values determined according to EN 60 745.
The declared vibration emission level represents the main applications of
the tool. However if the tool is used for different applications, with different
accessories or poorly maintained, the vibration emission may differ. This
may significantly increase the exposure level over the total working period.
An estimation of the level of exposure to vibration should also take into
account the times when the tool is switched off or when it is running but not
20
actually doing the job. This may significantly reduce the exposure level over
the total working period.
Identify additional safety measures to protect the operator from the effects
of vibration such as: maintain the tool and the accessories, keep the hands
warm, organisation of work patterns.
Warranty
According to our general terms of delivery for business dealings, suppliers
have to provide to companies a warranty period of 12 months for
redhibitory defects (to be documented by invoice or delivery note).
Damages due to natural wear, overstressing or improper handling are
excluded from this warranty.
Damages due to material defects or production faults shall be eliminated
free of charge by either repair or replacement.
Complaints will be accepted only if the tool is returned in non-dismantled
condition to the manufacturer or an authorized Eibenstock service centre.
Declaration of Conformity
We declare under our sole responsibility that the product described under
“Technical Data” is in conformity with the following standards or
standardization documents:
EN 61 029-1
according to the provisions of the directives 2011/65/EU, 2004/108/EG,
2006/42/EG
Technical file (2006/42/EC) at:
Elektrowerkzeuge GmbH Eibenstock
Auersbergstraße 10
D – 08309 Eibenstock
Lothar Lässig Frank Markert
General Manager Head of Engineering
23.01.2015
Other manuals for Automix 1801
1
Table of contents


