Eicon Networks SHIVA 500 Service manual

Shiva VPN Gateway
Model 500 and 1100
System Administrator’s Guide
Connecting People to Information

Second Edition (March 2005) 206-463-02
Copyright © 2005 Eicon Networks Corporation. All Rights Reserved. You may not reproduce this document
in whole or in part without permission in writing from Eicon Networks Corporation.
All contents of this document are subject to change without notice and do not represent a commitment on
the part of Eicon Networks Corporation. Reasonable effort is made to ensure the accuracy of the
information contained in the document. However, due to ongoing product improvements and revisions,
Eicon Networks Corporation does not warrant the accuracy of this information and cannot accept
responsibility for errors or omissions that may be contained in this document. It is possible that the use or
implementation of any one of the concepts, applications, or ideas described in this document, in marketing
collateral produced by or on web pages maintained by Eicon Networks Corporation or its subsidiaries may
infringe one or more patents or other intellectual property rights owned by third parties. Eicon Networks
Corporation does not provide any intellectual property licenses with the sale of Eicon products other then a
license to use such product in accordance with intellectual property owned or validly licensed by Eicon
Networks Corporation or its subsidiaries. More detailed information about such intellectual property is
available from Eicon Networks Corporation's legal department at 9800 Cavendish Blvd., Montreal,
Quebec, Canada H4M 2V9. Eicon Networks Corporation encourages all users of its products to procure all
necessary intellectual property licenses required to implement any concepts or applications and does not
condone or encourage any intellectual property infringement and disclaims any responsibility related
thereto. These intellectual property licenses may differ from country to country and it is the responsibility of
those who develop the concepts or applications to be aware of and comply with different national license
requirements. The software referred to in this document is provided under a Software License Agreement.
Refer to the Software License Agreement for complete details governing the use of the software.
All names, products, and services mentioned herein are the trademarks or registered trademarks of their
respective organizations and are the sole property of their respective owners. Eicon, Eicon Networks,
Shiva, and Connecting People to Information are registered trademarks or trademarks of Eicon Networks
Corporation or its subsidiaries.
To contact Eicon Customer Support, refer to the 'Customer Services' section in the printed guide that came
with the Eicon product which you purchased or visit our web site at www.eicon.com.

Contents
Chapter 1 Introduction . . . . . . . . . . . . . . . . . . . . . . . . . . . . . . . . . . . . . . . . 7
Getting started. . . . . . . . . . . . . . . . . . . . . . . . . . . . . . . . . . . . . . . . . . . . . . 8
Overview . . . . . . . . . . . . . . . . . . . . . . . . . . . . . . . . . . . . . . . . . . . . . . . . . . 9
Package contents . . . . . . . . . . . . . . . . . . . . . . . . . . . . . . . . . . . . . . . . . . . . . . 10
Document conventions . . . . . . . . . . . . . . . . . . . . . . . . . . . . . . . . . . . . . . 11
Formatting conventions. . . . . . . . . . . . . . . . . . . . . . . . . . . . . . . . . . . . . . . . . . 11
Specifying IP addresses . . . . . . . . . . . . . . . . . . . . . . . . . . . . . . . . . . . . . . . . . 11
Status lights. . . . . . . . . . . . . . . . . . . . . . . . . . . . . . . . . . . . . . . . . . . . . . . 13
Ports/connectors . . . . . . . . . . . . . . . . . . . . . . . . . . . . . . . . . . . . . . . . . . . 14
Chapter 2 Network connections . . . . . . . . . . . . . . . . . . . . . . . . . . . . . . . 15
Connections tab . . . . . . . . . . . . . . . . . . . . . . . . . . . . . . . . . . . . . . . . . . . 16
LAN port settings. . . . . . . . . . . . . . . . . . . . . . . . . . . . . . . . . . . . . . . . . . . 17
Direct LAN. . . . . . . . . . . . . . . . . . . . . . . . . . . . . . . . . . . . . . . . . . . . . . . . . . . . 17
Bridged LAN . . . . . . . . . . . . . . . . . . . . . . . . . . . . . . . . . . . . . . . . . . . . . . . . . . 17
Internet port settings . . . . . . . . . . . . . . . . . . . . . . . . . . . . . . . . . . . . . . . . 18
Connecting a modem . . . . . . . . . . . . . . . . . . . . . . . . . . . . . . . . . . . . . . . . . . . 18
Setting up an Internet connection . . . . . . . . . . . . . . . . . . . . . . . . . . . . . . . . . . 18
COM port settings . . . . . . . . . . . . . . . . . . . . . . . . . . . . . . . . . . . . . . . . . . 21
Connecting a modem . . . . . . . . . . . . . . . . . . . . . . . . . . . . . . . . . . . . . . . . . . . 21
Setting up a dial out Internet connection. . . . . . . . . . . . . . . . . . . . . . . . . . . . . 21
Wireless port settings . . . . . . . . . . . . . . . . . . . . . . . . . . . . . . . . . . . . . . . 24
Wireless network performance . . . . . . . . . . . . . . . . . . . . . . . . . . . . . . . . . . . . 24
Setting up the wireless network . . . . . . . . . . . . . . . . . . . . . . . . . . . . . . . . . . . 24
Setting up an ACL. . . . . . . . . . . . . . . . . . . . . . . . . . . . . . . . . . . . . . . . . . . . . . 26
Advanced wireless settings. . . . . . . . . . . . . . . . . . . . . . . . . . . . . . . . . . . . . . . 27
Bridging . . . . . . . . . . . . . . . . . . . . . . . . . . . . . . . . . . . . . . . . . . . . . . . . . . 29
Bridging between network ports . . . . . . . . . . . . . . . . . . . . . . . . . . . . . . . . . . . 29
Bridging across a VPN connection . . . . . . . . . . . . . . . . . . . . . . . . . . . . . . . . . 29
Internet failover . . . . . . . . . . . . . . . . . . . . . . . . . . . . . . . . . . . . . . . . . . . . 30
Enable the primary connection for failover . . . . . . . . . . . . . . . . . . . . . . . . . . . 30
Set up a secondary backup Internet connection . . . . . . . . . . . . . . . . . . . . . . . 31
Routes. . . . . . . . . . . . . . . . . . . . . . . . . . . . . . . . . . . . . . . . . . . . . . . . . . . 32
Additional routes . . . . . . . . . . . . . . . . . . . . . . . . . . . . . . . . . . . . . . . . . . . . . . . 32
Route management. . . . . . . . . . . . . . . . . . . . . . . . . . . . . . . . . . . . . . . . . . . . . 32
Interface aliases . . . . . . . . . . . . . . . . . . . . . . . . . . . . . . . . . . . . . . . . . . . 33
LAN port alias . . . . . . . . . . . . . . . . . . . . . . . . . . . . . . . . . . . . . . . . . . . . . . . . . 33
Internet port alias . . . . . . . . . . . . . . . . . . . . . . . . . . . . . . . . . . . . . . . . . . . . . . 33

Contents
4System Administrator’s Guide
Changing the MAC address . . . . . . . . . . . . . . . . . . . . . . . . . . . . . . . . . . 34
Advanced network settings . . . . . . . . . . . . . . . . . . . . . . . . . . . . . . . . . . . 35
Hostname . . . . . . . . . . . . . . . . . . . . . . . . . . . . . . . . . . . . . . . . . . . . . . . . . . . . 35
DNS Proxy . . . . . . . . . . . . . . . . . . . . . . . . . . . . . . . . . . . . . . . . . . . . . . . . . . . 35
Network address translation (NAT/masquerading) . . . . . . . . . . . . . . . . . . . . . 36
Dynamic DNS . . . . . . . . . . . . . . . . . . . . . . . . . . . . . . . . . . . . . . . . . . . . . . . . . 36
QoS traffic shaping . . . . . . . . . . . . . . . . . . . . . . . . . . . . . . . . . . . . . . . . . 37
Chapter 3 DHCP services . . . . . . . . . . . . . . . . . . . . . . . . . . . . . . . . . . . . . 39
DHCP server configuration . . . . . . . . . . . . . . . . . . . . . . . . . . . . . . . . . . . 40
To configure the DHCP server . . . . . . . . . . . . . . . . . . . . . . . . . . . . . . . . . . . . 40
DHCP relay . . . . . . . . . . . . . . . . . . . . . . . . . . . . . . . . . . . . . . . . . . . . . . . 43
Chapter 4 Firewall . . . . . . . . . . . . . . . . . . . . . . . . . . . . . . . . . . . . . . . . . . . 45
Incoming access . . . . . . . . . . . . . . . . . . . . . . . . . . . . . . . . . . . . . . . . . . . 46
Administration services . . . . . . . . . . . . . . . . . . . . . . . . . . . . . . . . . . . . . . . . . . 46
Shiva web server. . . . . . . . . . . . . . . . . . . . . . . . . . . . . . . . . . . . . . . . . . . . . . . 47
Packet filtering. . . . . . . . . . . . . . . . . . . . . . . . . . . . . . . . . . . . . . . . . . . . . 49
Service groups . . . . . . . . . . . . . . . . . . . . . . . . . . . . . . . . . . . . . . . . . . . . . . . . 50
Addresses . . . . . . . . . . . . . . . . . . . . . . . . . . . . . . . . . . . . . . . . . . . . . . . . . . . . 51
Rules . . . . . . . . . . . . . . . . . . . . . . . . . . . . . . . . . . . . . . . . . . . . . . . . . . . . . . . . 52
NAT . . . . . . . . . . . . . . . . . . . . . . . . . . . . . . . . . . . . . . . . . . . . . . . . . . . . . . . . . 53
Connection tracking . . . . . . . . . . . . . . . . . . . . . . . . . . . . . . . . . . . . . . . . 57
Rules . . . . . . . . . . . . . . . . . . . . . . . . . . . . . . . . . . . . . . . . . . . . . . . . . . . . 58
Intrusion detection. . . . . . . . . . . . . . . . . . . . . . . . . . . . . . . . . . . . . . . . . . 59
Setting up intrusion detection and blocking. . . . . . . . . . . . . . . . . . . . . . . . . . . 59
Universal plug and play gateway . . . . . . . . . . . . . . . . . . . . . . . . . . . . . . 61
Configuring the UPnP gateway . . . . . . . . . . . . . . . . . . . . . . . . . . . . . . . . . . . . 61
Access control. . . . . . . . . . . . . . . . . . . . . . . . . . . . . . . . . . . . . . . . . . . . . 62
User authentication . . . . . . . . . . . . . . . . . . . . . . . . . . . . . . . . . . . . . . . . . . . . . 62
IP lists . . . . . . . . . . . . . . . . . . . . . . . . . . . . . . . . . . . . . . . . . . . . . . . . . . . . . . . 64
Web lists . . . . . . . . . . . . . . . . . . . . . . . . . . . . . . . . . . . . . . . . . . . . . . . . . . . . . 65
Chapter 5 Virtual private networking . . . . . . . . . . . . . . . . . . . . . . . . . . . 67
Overview . . . . . . . . . . . . . . . . . . . . . . . . . . . . . . . . . . . . . . . . . . . . . . . . . 68
VPN client . . . . . . . . . . . . . . . . . . . . . . . . . . . . . . . . . . . . . . . . . . . . . . . . 69
PPTP client . . . . . . . . . . . . . . . . . . . . . . . . . . . . . . . . . . . . . . . . . . . . . . . . . . . 69
L2TP client . . . . . . . . . . . . . . . . . . . . . . . . . . . . . . . . . . . . . . . . . . . . . . . . . . . 70
VPN server . . . . . . . . . . . . . . . . . . . . . . . . . . . . . . . . . . . . . . . . . . . . . . . 71
PPTP server . . . . . . . . . . . . . . . . . . . . . . . . . . . . . . . . . . . . . . . . . . . . . . . . . . 71
L2TP server. . . . . . . . . . . . . . . . . . . . . . . . . . . . . . . . . . . . . . . . . . . . . . . . . . . 74

Contents
System Administrator’s Guide 5
IPSec. . . . . . . . . . . . . . . . . . . . . . . . . . . . . . . . . . . . . . . . . . . . . . . . . . . . 75
Scenario . . . . . . . . . . . . . . . . . . . . . . . . . . . . . . . . . . . . . . . . . . . . . . . . . . . . . 75
Set up the branch office . . . . . . . . . . . . . . . . . . . . . . . . . . . . . . . . . . . . . . . . . 75
Set up the head office . . . . . . . . . . . . . . . . . . . . . . . . . . . . . . . . . . . . . . . . . . . 84
Tunnel List. . . . . . . . . . . . . . . . . . . . . . . . . . . . . . . . . . . . . . . . . . . . . . . . . . . . 86
Connection . . . . . . . . . . . . . . . . . . . . . . . . . . . . . . . . . . . . . . . . . . . . . . . . . . . 87
Remote party. . . . . . . . . . . . . . . . . . . . . . . . . . . . . . . . . . . . . . . . . . . . . . . . . . 87
Status . . . . . . . . . . . . . . . . . . . . . . . . . . . . . . . . . . . . . . . . . . . . . . . . . . . . . . . 87
NAT traversal support . . . . . . . . . . . . . . . . . . . . . . . . . . . . . . . . . . . . . . . . . . . 90
Dynamic DNS Support . . . . . . . . . . . . . . . . . . . . . . . . . . . . . . . . . . . . . . . . . . 90
Troubleshooting . . . . . . . . . . . . . . . . . . . . . . . . . . . . . . . . . . . . . . . . . . . . . . . 90
Certificate management . . . . . . . . . . . . . . . . . . . . . . . . . . . . . . . . . . . . . 94
Adding certificates. . . . . . . . . . . . . . . . . . . . . . . . . . . . . . . . . . . . . . . . . . . . . . 94
Adding a CA or CRL certificate . . . . . . . . . . . . . . . . . . . . . . . . . . . . . . . . . . . . 94
Adding a local certificate . . . . . . . . . . . . . . . . . . . . . . . . . . . . . . . . . . . . . . . . . 95
GRE . . . . . . . . . . . . . . . . . . . . . . . . . . . . . . . . . . . . . . . . . . . . . . . . . . . . 96
Setting up a GRE tunnel . . . . . . . . . . . . . . . . . . . . . . . . . . . . . . . . . . . . . . . . . 96
Port Tunnels . . . . . . . . . . . . . . . . . . . . . . . . . . . . . . . . . . . . . . . . . . . . . . 98
Setting up a port tunnel . . . . . . . . . . . . . . . . . . . . . . . . . . . . . . . . . . . . . . . . . . 98
Chapter 6 Management. . . . . . . . . . . . . . . . . . . . . . . . . . . . . . . . . . . . . . 101
Setting the date and time . . . . . . . . . . . . . . . . . . . . . . . . . . . . . . . . . . . 102
Locality . . . . . . . . . . . . . . . . . . . . . . . . . . . . . . . . . . . . . . . . . . . . . . . . . . . . . 103
User list . . . . . . . . . . . . . . . . . . . . . . . . . . . . . . . . . . . . . . . . . . . . . . . . . 104
Adding a user . . . . . . . . . . . . . . . . . . . . . . . . . . . . . . . . . . . . . . . . . . . . . . . . 104
Administrator password security . . . . . . . . . . . . . . . . . . . . . . . . . . . . . . . . . . 106
Management settings . . . . . . . . . . . . . . . . . . . . . . . . . . . . . . . . . . . . . . 107
Management configuration . . . . . . . . . . . . . . . . . . . . . . . . . . . . . . . . . . . . . . 107
Local names . . . . . . . . . . . . . . . . . . . . . . . . . . . . . . . . . . . . . . . . . . . . . . . . . 108
Diagnostics . . . . . . . . . . . . . . . . . . . . . . . . . . . . . . . . . . . . . . . . . . . . . . 109
Diagnostics . . . . . . . . . . . . . . . . . . . . . . . . . . . . . . . . . . . . . . . . . . . . . . . . . . 109
Network tests . . . . . . . . . . . . . . . . . . . . . . . . . . . . . . . . . . . . . . . . . . . . . . . . 110
System log . . . . . . . . . . . . . . . . . . . . . . . . . . . . . . . . . . . . . . . . . . . . . . 111
Access logging . . . . . . . . . . . . . . . . . . . . . . . . . . . . . . . . . . . . . . . . . . . . . . . 112
Creating custom log rules . . . . . . . . . . . . . . . . . . . . . . . . . . . . . . . . . . . . . . . 113
Rate Limiting . . . . . . . . . . . . . . . . . . . . . . . . . . . . . . . . . . . . . . . . . . . . . . . . . 115
Administrative Access Logging . . . . . . . . . . . . . . . . . . . . . . . . . . . . . . . . . . . 115
Boot Log Messages . . . . . . . . . . . . . . . . . . . . . . . . . . . . . . . . . . . . . . . . . . . 116
Configuration files . . . . . . . . . . . . . . . . . . . . . . . . . . . . . . . . . . . . . . . . . 117
Flash upgrade . . . . . . . . . . . . . . . . . . . . . . . . . . . . . . . . . . . . . . . . . . . . 118
Before upgrading. . . . . . . . . . . . . . . . . . . . . . . . . . . . . . . . . . . . . . . . . . . . . . 118
Upgrade procedure . . . . . . . . . . . . . . . . . . . . . . . . . . . . . . . . . . . . . . . . . . . . 118
Reboot. . . . . . . . . . . . . . . . . . . . . . . . . . . . . . . . . . . . . . . . . . . . . . . . . . 120
Reset button . . . . . . . . . . . . . . . . . . . . . . . . . . . . . . . . . . . . . . . . . . . . . . . . . 120

Technical Support. . . . . . . . . . . . . . . . . . . . . . . . . . . . . . . . . . . . . . . . . . 121
Chapter 7 Terminology . . . . . . . . . . . . . . . . . . . . . . . . . . . . . . . . . . . . . 123
Chapter 8 International Regulatory Information . . . . . . . . . . . . . . . . . 133
Shiva 500 VPN Gateway . . . . . . . . . . . . . . . . . . . . . . . . . . . . . . . . . . . . 134
Regulatory information for the USA . . . . . . . . . . . . . . . . . . . . . . . . . . . . . . . 134
Regulatory information for Canada. . . . . . . . . . . . . . . . . . . . . . . . . . . . . . . . 134
Regulatory information for Europe . . . . . . . . . . . . . . . . . . . . . . . . . . . . . . . . 135
Shiva 1100 VPN Gateway . . . . . . . . . . . . . . . . . . . . . . . . . . . . . . . . . . . 136
Information for the user . . . . . . . . . . . . . . . . . . . . . . . . . . . . . . . . . . . . . . . . 136
Regulatory information . . . . . . . . . . . . . . . . . . . . . . . . . . . . . . . . . . . . . . . . . 139


Getting started
8System Administrator’s Guide
Getting started
To get started with the Shiva VPN Gateway
refer to the printed Quick Start guide.
Once your Shiva VPN Gateway is operational you can customize its settings as
described in this document.
Chapter Description
Chapter 2 This chapter describes the Network Setup section of the Web
Management Console. Here you can configure each of your Shiva
VPN Gateway's network ports (Ethernet, serial). Network ports
may be configured for Internet connection, LAN connection,
remote dial-in access or Internet failover.
Chapter 3 The Shiva 500 VPN Gateway enables remote and secure access
to your office network. This chapter shows how to set up the dial-in
features.
Chapter 3 The Shiva VPN Gateway can act as a DHCP server for machines
on your local network. To configure your Shiva VPN Gateway as
a DHCP server, you must set a static IP address and netmask on
the LAN port.
Chapter 4 The Shiva VPN Gateway is equipped with a fully featured, stateful
firewall. The firewall allows you to control both incoming and
outgoing access, so that computers on the LAN can have tailored
Internet access facilities and are shielded from malicious attacks.
By default the firewall is active, and allows all outgoing
connections and blocks all incoming connections.
Chapter 5 This chapter details how to configure the PPTP client, how to
establish an IPSec tunnel, and also provides an overview of GRE
and L2TP VPN tunneling.
Chapter 6 This chapter describes how to configure various management
options such as date and time, users, administrator settings, and
diagnostics.
Chapter 7 This chapter describes terms that are commonly used in this
document.
Chapter 8 This chapter provides regulatory information for all regions.

Overview
System Administrator’s Guide 9
Overview
The Shiva VPN Gateway provides Internet security and privacy of communications for
small and medium enterprises. It simply and securely connects your office to the
Internet, and with its robust stateful firewall, shields your computers from outside
threats. The Shiva VPN Gateway checks and filters data packets to prevent
unauthorized intruders gaining access.
The Shiva VPN Gateway is a price/performance leader designed for securing small
offices and remote workers. The Shiva VPN Gateway makes it simple and easy to set
up and secure a small or home office that connects to a corporate network over the
Internet via broadband connections like ADSL or cable. For optimum security, the
Shiva VPN Gateway has a powerful stateful inspection firewall with service-based
intrusion detection to help protecting the remote PCs or offices. This, combined with
support for industry-standard VPN and authentication protocols, makes the Shiva
VPN Gateway a fully featured security device that will also help maximize productivity
by assuring uninterrupted connectivity, or high availability, through the combination of
WAN and serial ports.
The Shiva VPN Gateway enables you to significantly cut the telecommunications
costs associated with dial-up, leased-line, and frame relay connections by leveraging
the Internet to securely provide remote access, LAN-to-LAN, and Extranet
connectivity. By including the Shiva CMS with your purchase (please refer to the Shiva
CMS System Administrator’s Guide on the Shiva VPN Gateway CD for more
information), Eicon significantly reduces the initial deployment and maintenance costs
involved with rolling out your networks and provides you with one of the most complete
solutions available on the market today.
Internet
Internet
Modem
Local computers
Shiva 500 VPN Gateway
new picture for the 1100 when graphics become available

Overview
10 System Administrator’s Guide
Package contents
The following items are included with your Shiva VPN Gateway gateway:
• Power adapter
• Installation CD
• Quick Install guide
• Install Map
• Two six-foot straight-through Ethernet cables

Document conventions
System Administrator’s Guide 11
Document conventions
The following conventions are used in this guide.
Formatting conventions
This manual uses the following formatting conventions.
Specifying IP addresses
When using the web-based management console to configure the Shiva VPN
Gateway, you will need to specify IP addresses and address ranges. The following
syntax conventions are used to do this:
Example Description
Network
or
mkdir rootCA
When referring to the web-based
management console, items in bold type
identify menu commands or input fields.
They are presented exactly as they appear
on screen.
Bold text is also used to present command
line output or program listings.
Network Setup > Routes When referring to the web-based
management console, submenus and tabs
are indicated using the ‘>’ sign. The
example refers to the Routes tab, which is
found after selecting the Network Setup
option.
Syntax Description
a.b.c.d Use this form to specify a single IP address. Replace each
letter by a digit in the range 0 to 255.
a.b.c.d-e Use this form to specify an IP address range, where a.b.c.d
specifies the starting address and a.b.c.e specifies the ending
address. The start and end addresses are included in the
range.
a.b.c.d-e.f.g.h Use this form to specify an IP address range, where a.b.c.d
specifies the starting address and e.f.g.h specifies the ending
address. The start and end addresses are included in the
range.

Document conventions
12 System Administrator’s Guide
a.b.c.d/e Use this form to specify an IP address range that covers an
entire subnet. The value of e specifies the number of bits in
the IP address range.
For example:
• a.b.c.d/24 covers the entire C class network/subnet
a.b.c.0 and is equivalent to specifying the range as
a.b.c.0-255.
• a.b.c.d/32 is equivalent to the single IP address a.b.c.d.
• 192.168.12.150/26 is equivalent to the range
192.168.12.128-191 and it includes 64 IP addresses.
Syntax Description

Status lights
System Administrator’s Guide 13
Status lights
The Shiva VPN Gateway provides the following status lights on its top panel.
.
Label State Description
PWR On Power is supplied to the Shiva VPN
Gateway.
TST
Flashing The Shiva VPN Gateway is operating
correctly.
On The unit is restarting or an operating error
has occurred.
LAN1
LAN2
LAN3
LAN4
Flashing Traffic is being sent or received on the
indicated LAN port.
WAN Flashing Traffic is being sent or received on the
WAN port.
LAN2
PWR
LAN1
TST
WAN
LAN3
LAN4
1100 tba
Ports/connectors
14 System Administrator’s Guide
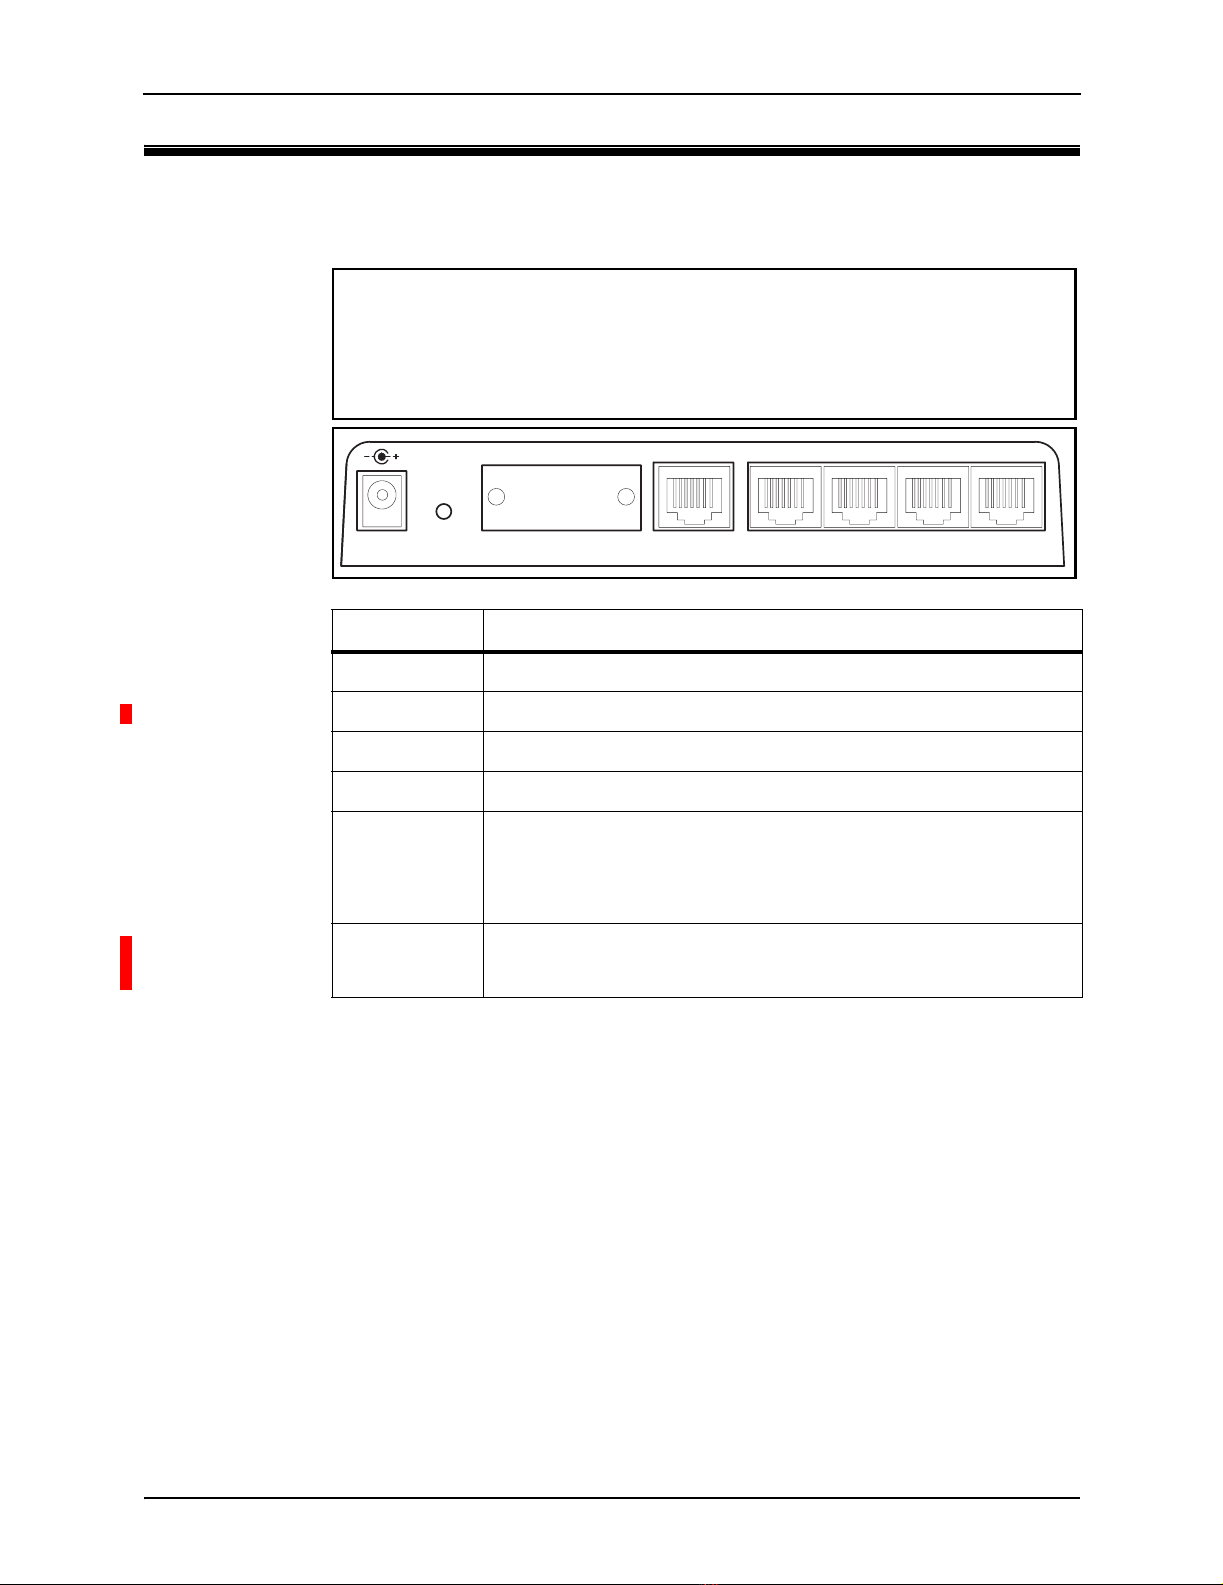
Ports/connectors
The rear panel contains the following connector:
Label Description
POWER Connect the power adapter here.
ERASE Details ?????.
SERIAL Serial port with DB-9 connector supporting speeds up to 115200.
WAN 10/100 auto-sensing Ethernet port.
LAN1
LAN2
LAN3
LAN4
10/100 auto-sensing Ethernet ports.
ANT1
ANT2
Shiva 1100 VPN Gateway only.
Details ?????.
1100 tba
POWER
12VDC 0.5A
12VDC 0.5A
WA N
10/100Mbit
ERASE 4 3 2 1SERIAL
LAN 10/100Mbit
LAN 10/100Mbit

Chapter 2: Network connections
Chapter 2
Network connections
This chapter describes the Network Setup section of the Web Management Console.
Here you can configure each of your Shiva VPN Gateway's network ports (Ethernet,
serial). Network ports may be configured for Internet connection, LAN connection,
remote dial-in access or Internet failover.

Connections tab
16 System Administrator’s Guide
Connections tab
The Connections tab displays each network port on the Shiva VPN Gateway along
with its Device Name and current Configuration. Initially, all network ports are
unconfigured, aside from the LAN port.
Port configuration
• To change the configuration of a port, select a new setting in the Configuration
column. This will automatically display additional configuration pages.
• To edit an existing configuration, select Edit current settings in the
Configuration column. This will automatically display additional configuration
pages that are described later in this chapter.
• If a port is experiencing difficulties auto-negotiating with another device, Ethernet
speed and duplex may be set manually by selecting Edit Ethernet
configuration.

LAN port settings
System Administrator’s Guide 17
LAN port settings
Network settings for the LAN port can be assigned statically, or dynamically by a
DHCP server (Direct LAN). Alternatively you may choose to configure the LAN port as
a bridge (Bridged LAN).
Direct LAN
1 Click Network Setup on the main menu.
2. Select Direct LAN in for the LAN port.
3. Enter an IP Address and Netmask for the LAN network port. If you are using the
Shiva VPN Gateway in its default, network address translation mode, (“Network
address translation (NAT/masquerading)” on page 36), this will typically be part
of a private IP range, such as 192.168.1.1 / 255.255.255.0. Ensure DHCP
assigned is unchecked.
If you want to have your Shiva VPN Gateway obtain its LAN network settings
from an active DHCP server on your local network, check DHCP assigned then
Apply. Note that anything in the IP Address and Netmask fields will be ignored.
You may also enter one or more DNS servers. Multiple servers may be entered
separated by commas.
4. Click Apply.
Bridged LAN
For details, see “Bridging” on page 29.

Internet port settings
18 System Administrator’s Guide
Internet port settings
The Shiva VPN Gateway can connect to the Internet using an external dialup analog
modem, an ISDN modem, a permanent analog modem, a cable modem or DSL link.
Connecting a modem
The first step in connecting your office network to the Internet is to physically attach
your Shiva VPN Gateway to the modem device.
If you are configuring an analog modem or ISDN connection as your primary Internet
connection, see the section “COM port settings” on page 21.
Connect your Shiva VPN Gateway's Internet port to the modem device using a straight
through Ethernet cable. Apply power to the modem and give it some time to power up.
Ensure that the Ethernet link LEDs are illuminated on both the Shiva VPN Gateway
and modem device.
Setting up an Internet connection
1 Click Network Setup on the main menu.
2. Select a connection type (all options are detailed below) for the Internet port. A
configuration page for the connection type will open.
Internet
Internet
Modem
Local computers
Shiva 500 VPN Gateway

Internet port settings
System Administrator’s Guide 19
Cable Internet
Select your cable ISP from the list and click Next. If your provider does not appear,
select Generic Cable Modem Provider. For cable modem providers other than
Generic, enter your user name and password and click Finish. You are now ready to
connect. Click the Reboot button to save your configuration and reboot your Shiva
VPN Gateway.
ADSL Internet
If you are connecting to the Internet using ADSL, you may select the connection
method PPPoE, DHCP, or Manually Assign Settings. If you are unsure, you can let the
Shiva VPN Gateway attempt to Auto detect ADSL connection type. Click Apply to
continue.

Internet port settings
20 System Administrator’s Guide
Direct Internet
If you have a direct connection to the Internet, select this option. Typically your ISP will
have provided you with network settings (possibly a range of IP addresses), or asked
you to auto-configure using DHCP.
To use DHCP, check the DHCP Assigned check box. You may also enter one or
more DNS Server(s), however any DNS server addresses allocated by your ISP will
take precedence over these.
To manually configure your Internet network settings, enter the IP Address,
Netmask, Internet Gateway and DNS Server(s) supplied by your ISP. If you have
been given a range of IP addresses, they may be added as Interface Aliases. For
details, see “Interface aliases” on page 33.
Reboot your Shiva VPN Gateway to establish your Internet connection.
Bridged Internet
For details, see “Bridging” on page 29.
Failover direct/Cable/ADSL Internet
For details, see “Internet failover” on page 30.
This manual suits for next models
1
Table of contents
Popular Gateway manuals by other brands


MOKO
MOKO MKGW2-LW Configuration guide

ProSoft Technology
ProSoft Technology PLX30 Series user manual

Tadiran Telecom
Tadiran Telecom aeonix TGW4 user guide

OBLO Living
OBLO Living DOC400 user manual

ZyXEL Communications
ZyXEL Communications ZyWALL USG Series Application notes

Siemens
Siemens SIMATIC NET IE/WSN-PA Link Compact operating instructions


