EINHELL NEW GENERATION NTS 1500 User manual

Art.-Nr.: 23.420.42 I.-Nr.: 01017
Operating Instructions
Wet and Dry Vacuum Cleaner
NTS 1500
Anleitung_NTS_1500_SPK7:_ 23.11.2007 10:35 Uhr Seite 1

2
1
2 3
14
1
20
7
8
14
13
20
18
12
15
6
19
7
13
17
11
1
3
54
7
8
8
3
14
21
17
22
23 16
14
14
2
9
20
11
10
Anleitung_NTS_1500_SPK7:_ 23.11.2007 10:35 Uhr Seite 2
3
7
4
6
8
14
16
15
98
58
6
8
11 9
23
Anleitung_NTS_1500_SPK7:_ 23.11.2007 10:36 Uhr Seite 3
4
12
1110
2.
1.
1.
2.
18
12 12 19 12 12
6
Anleitung_NTS_1500_SPK7:_ 23.11.2007 10:36 Uhr Seite 4

Important!
When using equipment, a few safety precautions
must be observed to avoid injuries and damage.
Please read the complete operating manual with due
care. Keep this manual in a safe place, so that the
information is available at all times. If you give the
equipment to any other person, give them these
operating instructions as well.
We accept no liability for damage or accidents which
arise due to non-observance of these instructions
and the safety information.
1. Safety information
쎲Important: Read the operating instructions before
assembling and using the appliance for the first
time.
쎲Check that the mains voltage is the same as the
mains voltage specified on the rating plate.
쎲Only connect the appliance to a properly fitted
220 V, ~ 60 Hz shock-proof socket.
쎲Minimum 10 A fuse.
쎲Pull out the power plug in the following
circumstances: Whenever the appliance is not in
use, before opening the appliance and before all
cleaning and maintenance work.
쎲Never clean the appliance with solvents.
쎲Never pull the plug out of the socket by pulling the
cable.
쎲Never leave the appliance unattended when
operational.
쎲Keep away from children.
쎲Take care to ensure that the power cable does
not get damaged by being run over, crushed,
pulled or suchlike.
쎲Do not use the machine if the power cable is in a
less than perfect condition.
쎲If the power cable has to be replaced, the
replacement must comply with the design
specifications of the manufacturer. Power cable:
H 05 VV - F 2 x 1.0 mm2
쎲Never vacuum the following: Burning matches,
smoldering ash and cigarette butts, combustible,
caustic, inflammable or explosive substances,
vapor or liquids.
쎲This appliance is not suitable for vacuuming dust
which can be harmful to health.
쎲Store the appliance in a dry indoor location.
쎲Never use the appliance if it is damaged.
쎲Only allow the appliance to be serviced by an
authorized after sales service outlet.
쎲Only use the appliance to carry out work for which
has been designed.
쎲Take extra care when cleaning steps.
쎲Use only genuine accessories and spare parts.
Keep children and other persons away
from the electric tool while it is being
used. Allowing yourself to get distracted can
cause you to lose control of the tool.
Always pull the plug out of the socket
outlet before making any adjustments.
Exchange accessory parts or put away the
tool.
This precaution eliminates the possibility of
inadvertently starting the tool.
When not in use, store electric tools out of
the reach of children. Do not allow those
persons to use this tool who are
unfamiliar with it or who have not read
these instructions.
Electric tools are dangerous when they are
used by inexperienced persons.
If the power cable of the electric tool is
damaged, it must be replaced by a
specially prepared connection lead which
can be obtained from the customer
service center.
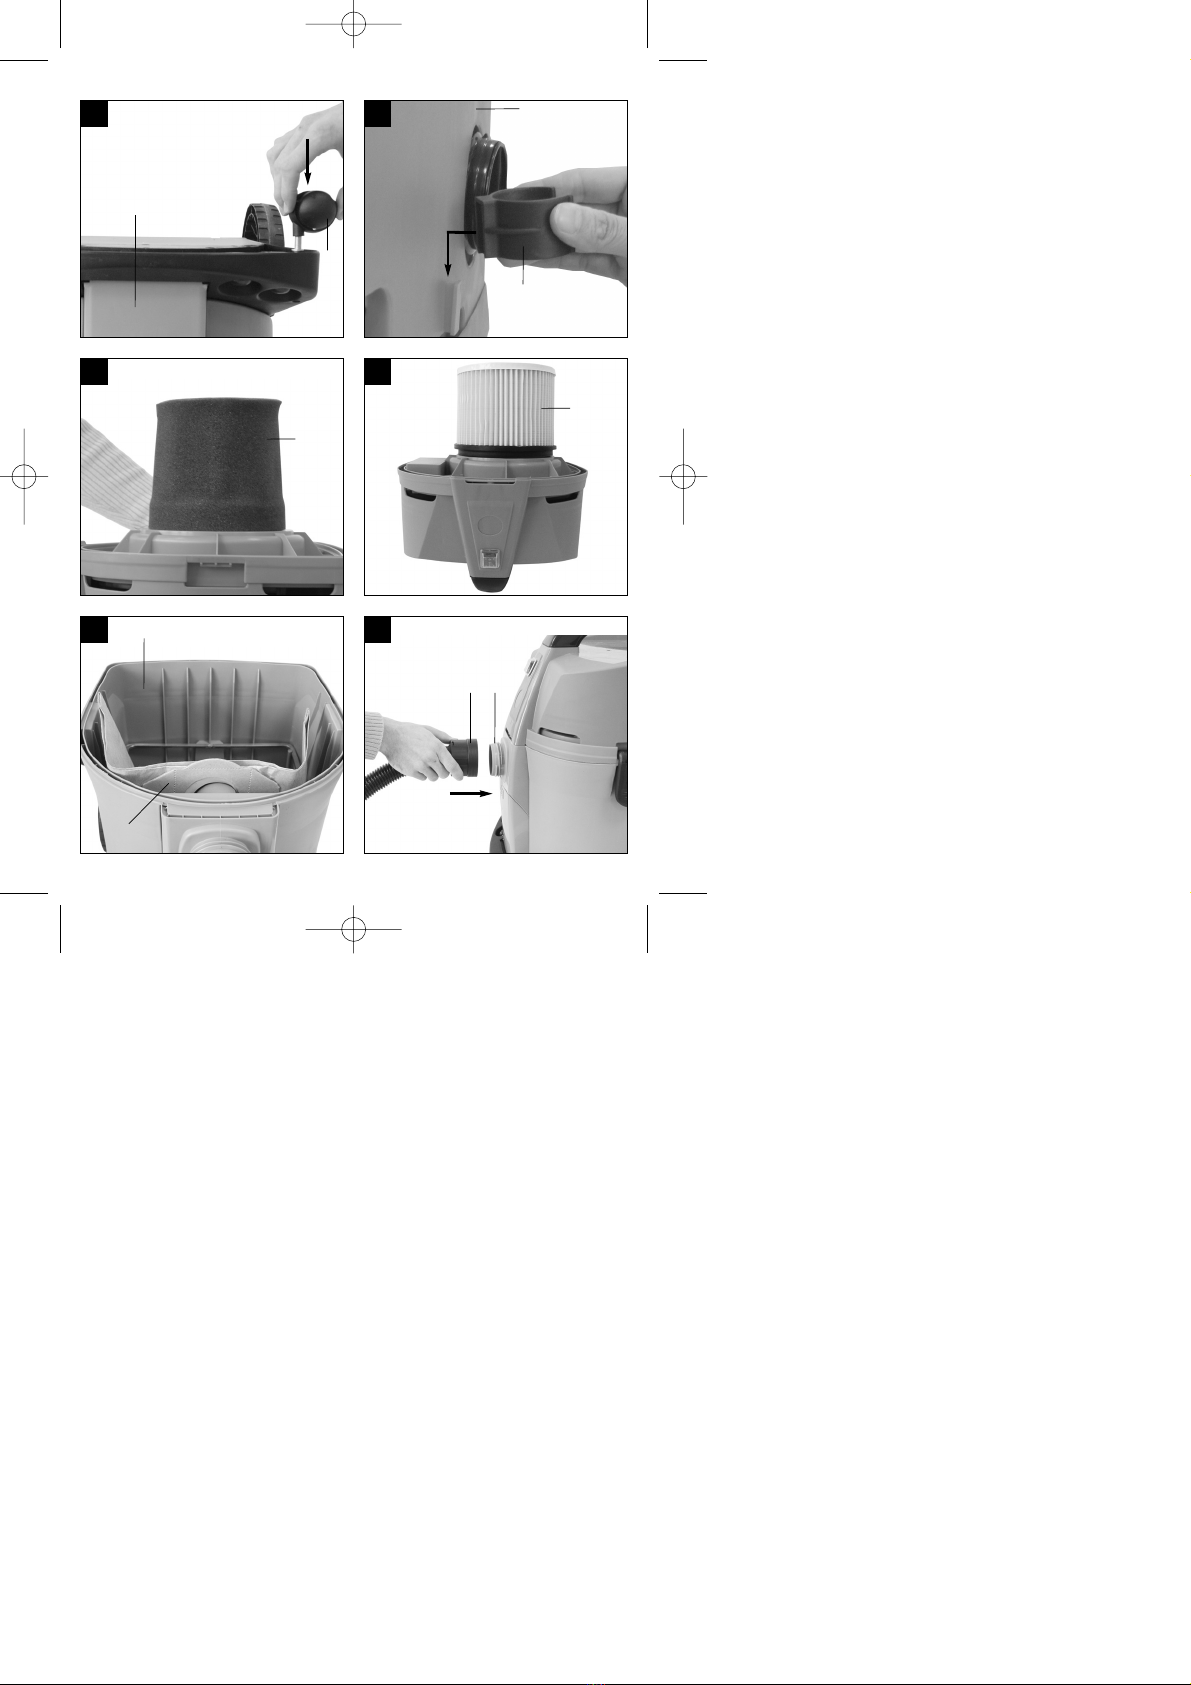
2. Layout and items supplied (Fig. 1)
1 Handle
2 ON/OFF switch
3 Head
4 Filter basket
5 Safety float valve
6 Vacuum tube holder
7 Locking hook
8 Tank
9 Hose connector
10 Blow connector
11 Flexible hose
12 Accessory holder
13 Dual purpose nozzle
14 Castors
15 Pleated filter
16 Foamed plastic filter
17 Handle with air regulator
18 Automatic cable rewind
19 Storage compartment
20 Vacuum tube
21 Crevice nozzle
22 Cushion nozzle
23 Dirt bag
GB
5
Anleitung_NTS_1500_SPK7:_ 23.11.2007 10:36 Uhr Seite 5

3. Intended use
The wet and dry vacuum cleaner is designed for wet
and dry vacuuming using the appropriate filter. The
appliance is not suitable for the vacuuming of
combustible, explosive or harmful substances.
The machine is to be used only for its prescribed
purpose. Any other use is deemed to be a case of
misuse. The user / operator and not the manufacturer
will be liable for any damage or injuries of any kind
caused as a result of this.
Please note that our equipment has not been
designed for use in commercial, trade or industrial
applications. Our warranty will be voided if the
machine is used in commercial, trade or industrial
businesses or for equivalent purposes.
4. Technical data
Mains voltage: 220 V ~ 60 Hz
Power input: 1,550 watts
Container volume: 20 l
Protection class: II/쏾
Weight: 5.5 kg
5. Before starting
Important!
쎲Before you connect the appliance to the mains
supply make sure that the data on the rating plate
are identical to the mains data.
쎲The appliance may only be connected to a shock-
proof socket.
5.1 Assembling the appliance
5.1 Appliance assembly
Fitting the appliance head (Fig. 2/3)
The appliance head (3) is fastened to the container
(8) by the locking hook (7). To remove the appliance
head (3), open the locking hook (7) and remove the
appliance head (3). When fitting the appliance head
(3), make sure that the locking hook (7) locks into
place correctly.
Assembling the wheels (Fig. 1/14)
Fit the wheels in accordance with Fig. 3-4.
Assembling the vacuum tube holder (Fig. 1/6)
Fit the vacuum tube holder in accordance with Fig. 5.
5.2 Fitting the filter
Important!
Never use the wet and dry vacuum cleaner without a
filter.
Check that the filter is securely fitted at all times.
Fitting the foam filter (Fig. 6/16)
For wet vacuuming, slip the supplied foam filter (16)
over the filter basket (Fig. 1/4). The pleated filter (15)
already fitted upon delivery is not suitable for wet
vacuuming.
Fitting the pleated filter (Fig. 7/15)
For dry-vacuuming, slip the pleated filter (Fig. 1/15)
over the filter basket (Fig. 1/4). The pleated filter (15)
is suitable for dry-vacuuming only.
Assembling the dirt bag (Fig. 8/23)
For vacuuming fine, dry dirt it is recommended that
you also fit the dirt bag. This will ensure that the
pleated filter (15) does not fill up so quickly and
therefore help the vacuuming power last longer. In
addition, it makes it easier to dispose of the dust. Slip
the dirt bag over the vacuuming hole. The dirt bag is
suitable for dry-vacuuming only.
5.3 Fitting the suction hose (Fig. 1/11)
Connect the suction hose (11) to the corresponding
connector on the wet and dry vacuum cleaner,
depending on the application required (Fig. 9).
Vacuuming
Connect the suction hose (11) to the suction hose
connector (9).
Blowing
Connect the suction hose (11) to the blow connector
(10).
To extend the vacuum tube (11) fit the vacuum hose
(20) onto the tube.
Air regulator (Fig. 1/17)
The air regulator (17) can be fitted between the
suction hose (11) and the suction tube (20). The
suction power of the nozzle can be infinitely adjusted
using the air regulator (17).
5.4 Suction nozzles
Dual-purpose nozzle (13)
For dry vacuuming surfaces use the dual-purpose
nozzle (13).
GB
6
Anleitung_NTS_1500_SPK7:_ 23.11.2007 10:36 Uhr Seite 6

Crevice nozzle (Fig. 1/21)
The crevice nozzle (21) is designed for vacuuming
solids and liquids in corners, edges and other areas
that are difficult to access.
Upholstery nozzle (Fig. 1/22)
For cleaning upholstery use the upholstery nozzle
(22).
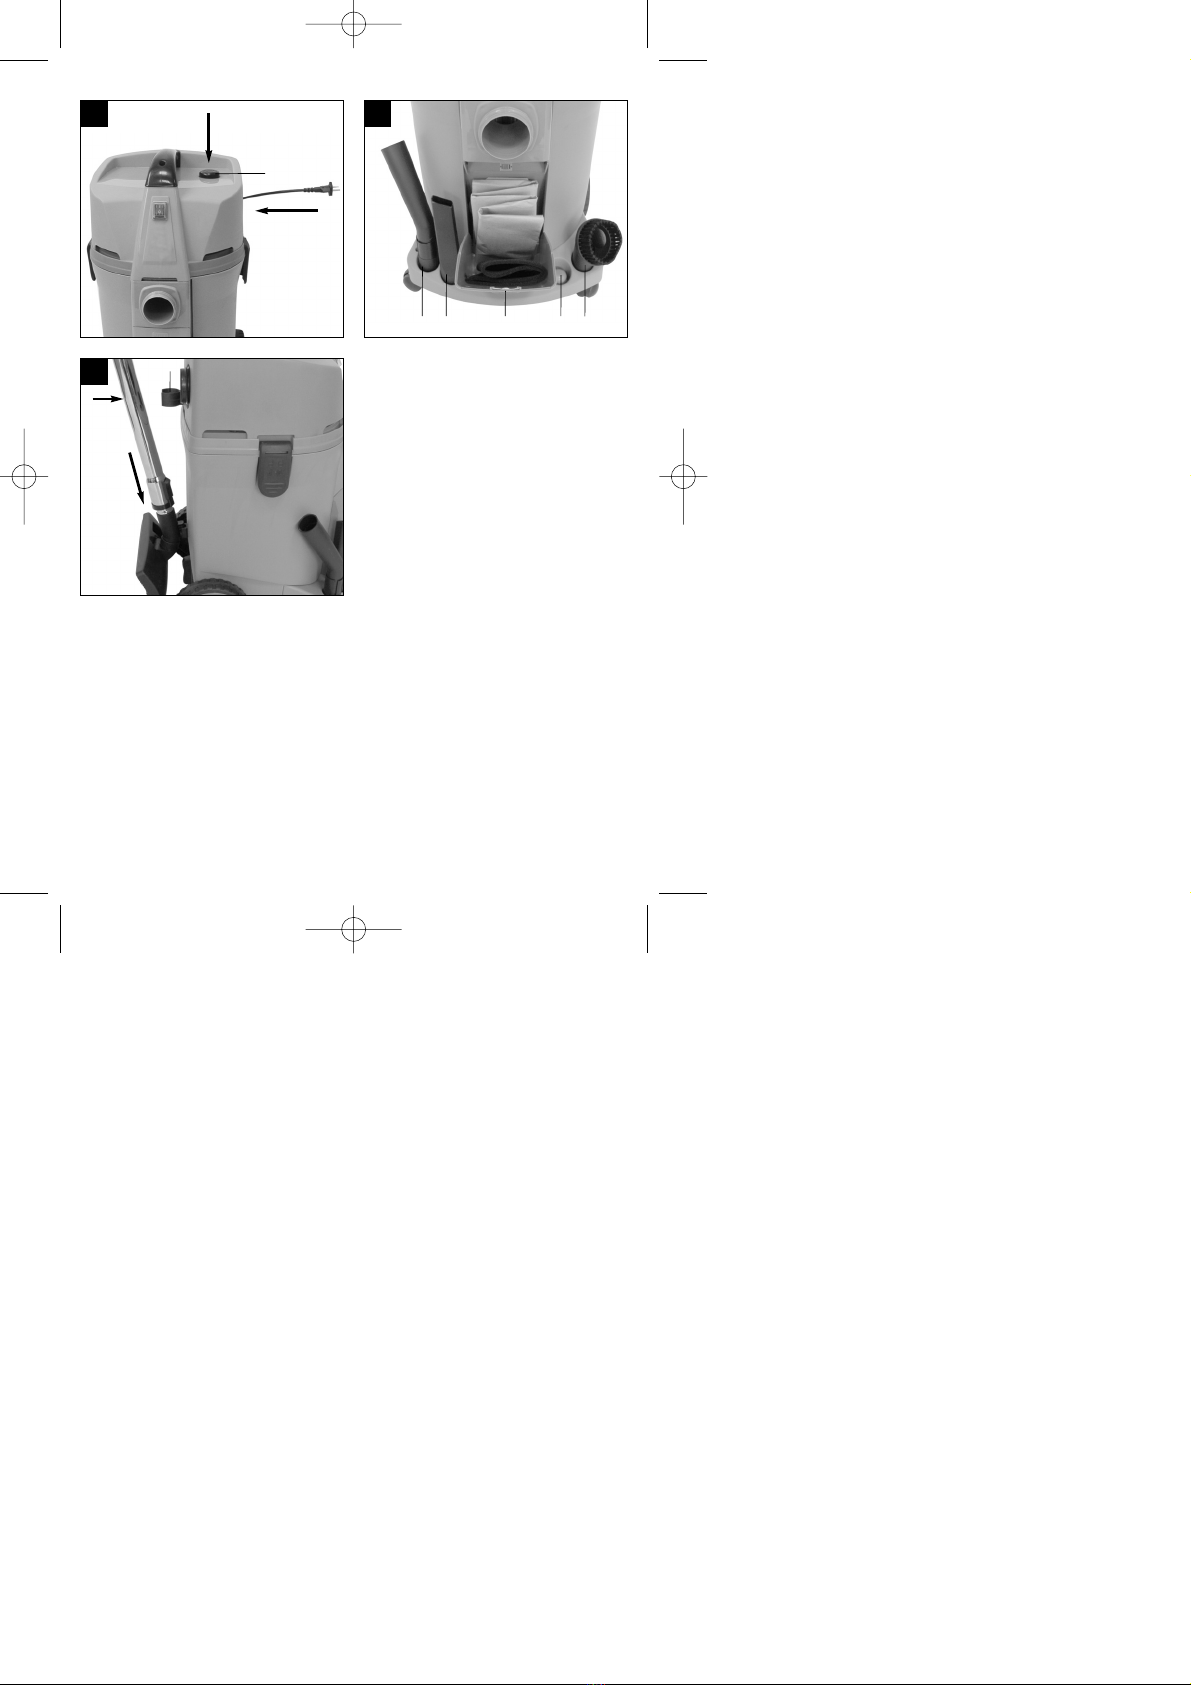
5.5 Automatic cable rewind (Fig. 10/18)
The wet and dry vacuum cleaner is fitted with an
automatic cable rewind (18).
Before using:
Pull the power cable out of the vacuum cleaner
slowly and evenly.
After using:
With one hand actuate the pushbutton of the
automatic cable rewind (18), with the other hand
guide the power cable while it is being pulled into the
appliance by the automatic cable rewind.
5.6 Storage compartment (Fig. 11/19)
The wet and dry vacuum cleaner is fitted with an
storage compartment (19) for accessory equipment.
Swing the storage compartment (19) towards the
front to open.
5.7 Accessory holder (Fig. 11/12)
The wet and dry cleaner is equipped with a holder for
the space-saving storage of vacuum nozzles.
5.8 Vacuum tube holder (Fig. 12/6)
Insert the vacuum tube into the vacuum tube holder
(6) as shown in the illustration.
6. Operation
6.1 ON/OFF switch (Fig. 1/2)
Switch position 0: Off
Switch position I: On
6.2 Dry vacuuming
For dry-vacuuming, use the pleated filter (15). In
addition, you can also fit the dirt bag. (see point 5.2)
Always ensure that the filters are perfectly secure.
6.3 Wet vacuuming
For wet-vacuuming, use the foam filter (16) (see point
5.2).
Check that the filter is securely fitted at all times.
Important!
When wet vacuuming, the floating safety switch (5)
turns off the wet and dry vacuum cleaner
automatically when the maximum level is reached.
Important!
The wet and dry vacuum cleaner is not suitable for
the vacuuming of combustible liquids.
For wet vacuuming, use only the supplied foam filter.
6.4 Blowing
Connect the suction hose (11) to the blow connector
(10) on the wet and dry vacuum cleaner.
7. Cleaning, maintenance and ordering
of spare parts
Important!
Always pull out the mains power plug before starting
any cleaning work.
7.1 Cleaning
쎲Keep all safety devices, air vents and the motor
housing free of dirt and dust as far as possible.
쎲We recommend that you clean the appliance
immediately after you use it.
7.2 Cleaning the appliance head (3)
Clean the appliance regularly with a damp cloth and
some soft soap. Do not use cleaning agents or
solvents; these may be aggressive to the plastic parts
in the appliance.
7.3 Cleaning the container (8)
The container can be cleaned with a damp cloth and
some soft soap or under running water, depending on
the amount of dirt.
7.4 Cleaning the filters
Cleaning the pleated filter (15)
Clean the pleated filter (15) regularly by carefully
patting it and cleaning it with a fine brush or hand
brush.
Cleaning the foam filter (16)
Clean the foam filter (16) with a little soft soap under
running water and allow it to air-dry.
7.5 Maintenance
At regular intervals and before each use, check that
the filters in the wet and dry vacuum cleaner are
securely fitted.
GB
7
Anleitung_NTS_1500_SPK7:_ 23.11.2007 10:36 Uhr Seite 7

7.6 Ordering replacement parts
Please quote the following data when ordering
replacement parts:
앬Type of machine
앬Article number of the machine
앬Identification number of the machine
앬Replacement part number of the part required
For our latest prices and information please go to
www.isc-gmbh.info
8. Disposal and recycling
The unit is supplied in packaging to prevent its being
damaged in transit. This packaging is raw material
and can therefore be reused or can be returned to
the raw material system.
The unit and its accessories are made of various
types of material, such as metal and plastic.
Defective components must be disposed of as
special waste. Ask your dealer or your local council.
GB
8
Anleitung_NTS_1500_SPK7:_ 23.11.2007 10:36 Uhr Seite 8

9
tGUARANTEE CERTIFICATE
Dear Customer,
All of our products undergo strict quality checks to ensure that they reach you in perfect condition. In the unlikely
event that your device develops a fault, please contact our service department at the address shown on this
guarantee card. Of course, if you would prefer to call us then we are also happy to offer our assistance under
the service number printed below. Please note the following terms under which guarantee claims can be made:
1. These guarantee terms cover additional guarantee rights and do not affect your statutory warranty rights.
We do not charge you for this guarantee.
2. Our guarantee only covers problems caused by material or manufacturing defects, and it is restricted to the
rectification of these defects or replacement of the device. Please note that our devices have not been
designed for use in commercial, trade or industrial applications. Consequently, the guarantee is invalidated
if the equipment is used in commercial, trade or industrial applications or for other equivalent activities. The
following are also excluded from our guarantee: compensation for transport damage, damage caused by
failure to comply with the installation/assembly instructions or damage caused by unprofessional
installation, failure to comply with the operating instructions (e.g. connection to the wrong mains voltage or
current type), misuse or inappropriate use (such as overloading of the device or use of non-approved tools
or accessories), failure to comply with the maintenance and safety regulations, ingress of foreign bodies
into the device (e.g. sand, stones or dust), effects of force or external influences (e.g. damage caused by
the device being dropped) and normal wear resulting from proper operation of the device.
The guarantee is rendered null and void if any attempt is made to tamper with the device.
3. The guarantee is valid for a period of 2 years starting from the purchase date of the device. Guarantee
claims should be submitted before the end of the guarantee period within two weeks of the defect being
noticed. No guarantee claims will be accepted after the end of the guarantee period. The original guarantee
period remains applicable to the device even if repairs are carried out or parts are replaced. In such cases,
the work performed or parts fitted will not result in an extension of the guarantee period, and no new
guarantee will become active for the work performed or parts fitted. This also applies when an on-site
service is used.
4. In order to assert your guarantee claim, please send your defective device postage-free to the address
shown below. Please enclose either the original or a copy of your sales receipt or another dated proof of
purchase. Please keep your sales receipt in a safe place, as it is your proof of purchase. It would help us if
you could describe the nature of the problem in as much detail as possible. If the defect is covered by our
guarantee then your device will either be repaired immediately and returned to you, or we will send you a
new device.
Of course, we are also happy offer a chargeable repair service for any defects which are not covered by the
scope of this guarantee or for units which are no longer covered. To take advantage of this service, please send
the device to our service address.
Anleitung_NTS_1500_SPK7:_ 23.11.2007 10:36 Uhr Seite 9

10
The reprinting or reproduction by any other means, in whole or in part,
of documentation and papers accompanying products is permitted only
with the express consent of ISC GmbH. Technical changes subject to change
DISTRIBUTOR & A/S CENTER in Korea :
Kubo-Tech, Inc.
D Block Room No. 35-310, Guro Machinery & Tools Shopping Center
604-1, Guro-dong, Guro-gu, Seoul 152-050 Korea
Tel : 02-2675-0942/0943 Fax : 02-2675-0944
EH 11/2007
Anleitung_NTS_1500_SPK7:_ 23.11.2007 10:36 Uhr Seite 10
This manual suits for next models
1
Table of contents


