Einstein LabMate+ User manual

1
Welcome to
™™
einstein LabMate+

2
Congratulations on receiving your einstein™Labmate+™, designed to turn any
tablet or PC into a tool for advanced science investigation.
Inthis bookletyou’llfindquickexperimentsyoucanrunusingyour
einstein
™
LabMate
+
right away. These are fun science investigations you can enjoy with just your
einstein
™
LabMate, a tablet or PC and some stuff you have lying around the house.
Also included is a guide to the
einstein
™
LabMate
+
features and technical
specifications so you can get to know the einstein
™
Labmate
+
better.
This, of course, is just a start; soon you’ll be setting up bigger, better challenges and
expanding your universe.
So pick up your
einstein
™
Labmate
+
and start exploring!
Have fun,
einstein
™
team
3

4
einstein
™
LabMate
+
ports and sensors
Temperature and
Humidity sensors
Heart rate
sensor (connect
finger clip)
Light sensor
UV sensor
Pressure
sensor
1
Ports for any of
the 65 einstein™
external sensors.
2
Micro USB
for charging and
connecting to PC
3
Ports for any of
the 65 einstein™
external sensors.
4
On/Off/Reset
LED indicator
lamp
How to read the LED indicator lamp:
Steady green- charging
Blinking green- on, but not paired
Rapidly blinking green- collecting data, but not paired with a device
Blinking blue- on and paired with a device
Rapidly blinking blue- collecting data
Red interspersed with the green/blue- needs to be charged
Get more info at www.REDPENtech.com
5

General operation
•Charge the battery:
•There are two ways to charge the einstein™LabMate+:
1
Connect the
einstein
™
LabMate
+
to a PC using the USB cable
2
Connect the
einstein
™
LabMate
+
to a wall socket with a USB power cable
•einstein™LabMate+ battery may not be fully charged upon first use.
•
The
einstein
™
LabMate
+
may become warm when charging.
•
Power oneinstein
™
LabMate
+
:
Press and hold the Power button for several seconds. The LED next tothe Power
button will begin flashing green.
•Pairing the einstein™LabMate+ For Tablets:
•Make sure the einstein™LabMate+ is turned on (the LED should be flashing green)
•Go to Settings and make sure Bluetooth is turned on.
•Tap the einstein™LabMate+ to pair it with the Tablet.
•
Pairing the einstein
™
LabMate
+
For PCs:
•Make sure the einstein™LabMate+ is turned on (the LED should be flashing green)
•Consult your computer manual for details on pairing with Bluetooth devices
•Resetting the einstein™LabMate+:
Turn the einstein™LabMate+ off by pressing the power button.
Then reset by holding the power button down for 10 seconds.
•Upgrading the einstein™LabMate+ Firmware: As new technologies come out,
we may upgrade the einstein™LabMate+ firmware to enhance its performance.
For further details and instructions go to www.REDPENtech.com/support
7
6
Download data collection
and analysis software:
•
MultiLab
™
•
MiLAB
™
•einstein™World
Download Free: www.redpentech.com

Quick Experiment:
Measuring UV
Ultraviolet (UV) radiation is the sectionof
the electromagnetic spectrum between
x-rays and visible light. Biology
students need to study the effects of
this phenomenon as it has significant
impact on our health. While we need UV
radiation to synthesize vitamin D it can
also cause health problems including
damage to eyesight.
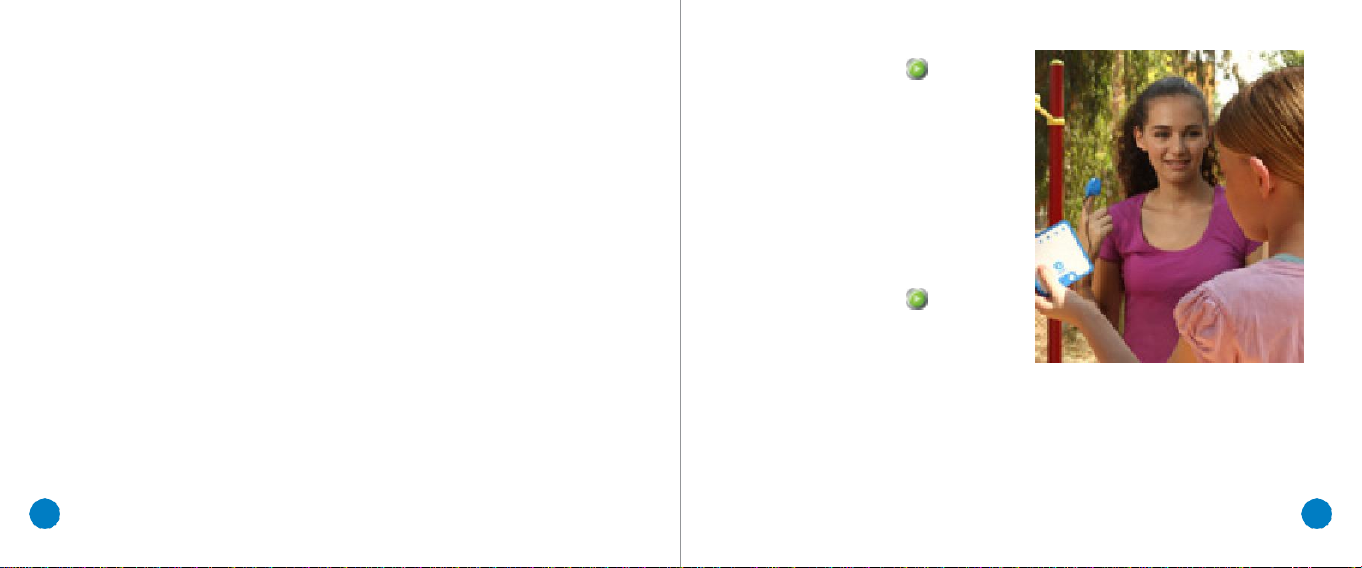
Using the einstein™LabMate+ children
can learn about UV radiation and test
their own sunglasses to see if they got
their money’s worth.
1
Pair your einstein™LabMate+ with your tablet or PC and open either MiLAB™
or MultiLab™4.
2
Make sure only the UV sensor is selected.
3
Leave the Rate and Duration at their default settings.
4
Click the Run button ) while aiming the sensor toward the sun for ten
seconds, Then click Stop.
5
Now place your sunglasses over the sensor and click the
Run
button again
while aiming the sensor towards the sun. After ten seconds select
Stop
)
.
Note
the difference between the two measurements. Significant changes are an
opportunity to discuss the damage UV radiation can do to eyesight and why.
Insignificant changes can show children how science can help them be
better consumers.
9
8

Quick Experiment:
Transparency
Transparency is a measure of how much light can penetrate a material.
Materials can be divided into 3types:
•Transparent: Light penetrates easily through the material
•Translucent: Light has difficulty penetrating thematerial
•Opaque: Light cannot penetrate the material.
Prepare one piece of aluminum foil, one piece of wax paper and one piece
of plastic wrap.
1
Pair your einstein™LabMate+ with your tablet or PC and open either
MiLAB or MultiLab4.
2
Make sure only the light sensor is selected.
3
Leave the Rate and Duration at their default settings.
4
Aim the light sensor toward a light source.
5
Click Run ).
6
Hold the piece of aluminum foil over the sensor for ten seconds and remove.
7
Hold the piece of wax paper over the light sensor for ten seconds and remove.
8
Hold the piece of plastic wrap over the light sensor for ten seconds and remove.
9
Select
Stop
)
.
Note
the difference in the measurements. The more light a material lets through
the more transparent or see-through it is.
11
10

Quick Experiment: Measuring Heart Rate
Understanding how the heart works is basic to all biology studies and is one of the
first experiments any science student should learn to perform. einstein™LabMate+
makes these first steps fun and easy. This simple experiment shows the effect of
exertion on our hearts.
1
Connect the heart rate sensor to your einstein™LabMate+.
2
Pair your einstein™LabMate+ with your tablet or PC and open either MiLAB™
or MultiLab4™.
3
Make sure only the heart rate sensor is selected.
4
Leave the Rate and Duration at their default settings.
5
Connect the heart rate sensor to your finger.
6
Click the Run button );
at about 8 seconds the heart rate
BPM will display.
7
Remove the heart rate sensor from
your finger, run in place for 30
seconds and reattach the heart rate
sensor.
8
Click the Run button );
at about 8 seconds the heart rate
BPM will display.
Note the difference between the two readings and how activity ramps up
our heart rate.
13
12

Connecting external sensors
•External sensors can be added by connecting a sensor cable to einstein™LabMate+.
Insert the sensor cable into one of einstein™LabMate+’s 4 sensor ports, then,
connect the other end of the sensor cable to the sensor. Up to 8 external sensors
can be added by adding a splitter to each port.
Please note the position of the sensor’s USB connector.
When properly positioned, the sensor should glide in smoothly.
•
einstein
™
LabMate
+
supports all Fourier Education’s sensors, though some
sensors may require an additional cable or adapter.
For a complete list of sensors, please visit our website. www.REDPENtech.com
Specifications:
CE & FCC
Internal sensors
Light:
0-600 lux, 0-6000 lux,
0-150 klux
Heart Rate:
0-200 bpm
Relative Humidity: Range: 0-100%
Temperature:
-30°C to 50°C
UV: 10 W/m2, 200 W/m2,
UV wave length 290-390 nm
Pressure:
20 to 400 kPa,
0.2 to 3.9 atm, 200 to 4000 mbar
15
14
Data Logging
Sampling Rate
Up to 100 ksps
Internal memory
capacity
Up to 250k samples
Power Source
Battery (Lithium
polymer; 1000mAh)
Rechargeable via
USB
Run mode
up to 24 hours
Standby mode
up to 450 hours
Charge time
3 hours
Standards Compliance

Get more Information
Please visit our website, for updates about the
einstein™ Science Learning Platform.
www.REDPENtech.com
Technical support
Help desk:
info@REDPENtech.com
Phone:
(888) 594-1001
(708) 273-1001
(Toll-free from within USA only)
Hours of operation:
M –F
9AM to 5PM
(UTC -06:00)
ALBERT EINSTEIN and EINSTEIN are either trademarks or registered trademarks of The Hebrew University of
Jerusalem. Represented exclusively by GreenLight. Official licensed merchandise. Website: einstein.biz
© 2014 Fourier Systems Ltd. All rights reserved. Fourier Systems Ltd. logos and all other Fourier product
or service names are registered trademarks or trademarks of Fourier Systems. All other registered
trademarks or trademarks belong to their respective companies.
Table of contents