Eircom Advantage User manual

Advantage IP Executive Installation Guide
1
eircom advantage IP
Executive Phone
Installation Guide

Advantage IP Executive Installation Guide
2
Specifications subject to change without notice.
This manual is based on Advantage IP Executive software version UN02007 Kernel 2_4_20 and
Advantage Call Server software version 56.348.
DM-950 Rev 2

Advantage IP Executive Installation Guide
3
1.
Introduction................................................................................................................................. 5
2.
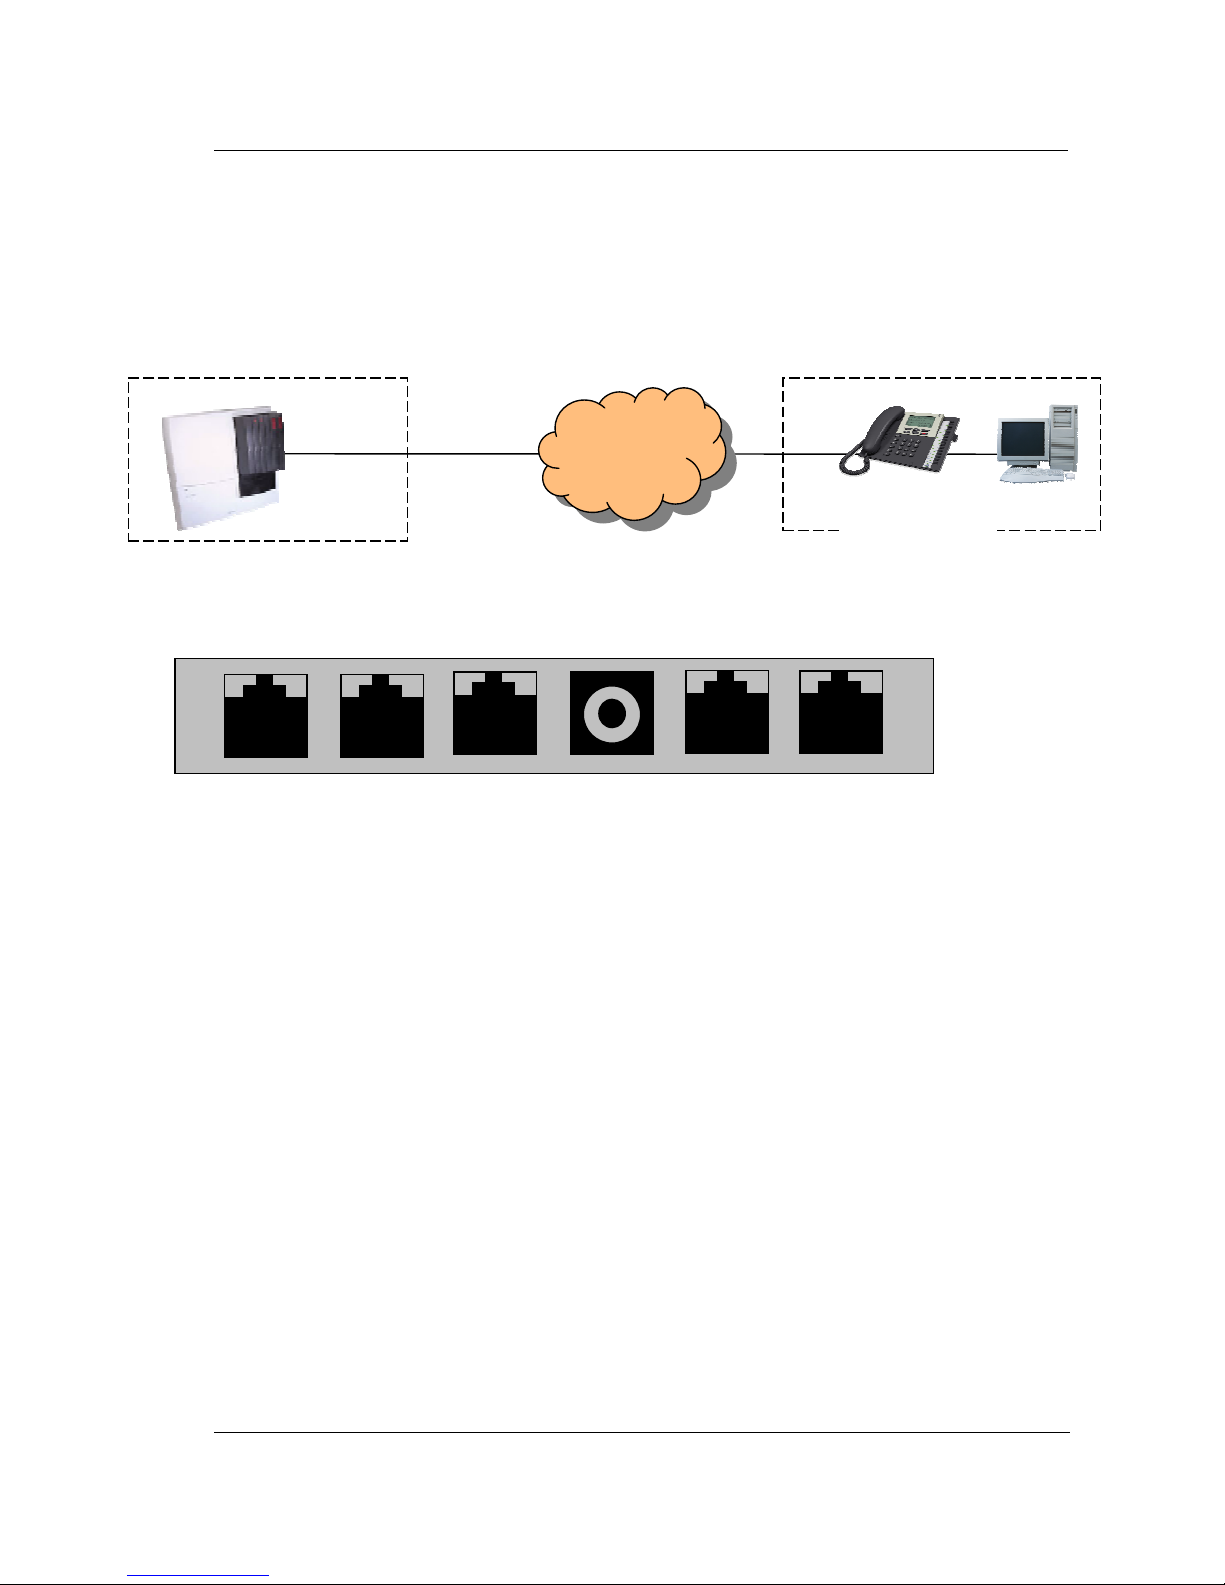
Remote Teleworker Connection.......................................................................................................6
2.1
Wiring Connections.................................................................................................................................6
2.2
Installing and Programming the Advantage IP Executive for Remote working ...............................7
Step 1
Cabling ........................................................................................................................................7
Step 2
Power ..........................................................................................................................................7
Step 3
Starting the phone .......................................................................................................................7
Step 4
Running the Installation wizard ..................................................................................................7
Step 5
Enter the address of the Advantage System ................................................................................8
Step 6
Extension Name and PIN ............................................................................................................8
Step 7
Quality of Service .......................................................................................................................8
2.3
Connected State .......................................................................................................................................9
2.4
Unconnected State ...................................................................................................................................9
2.5
Programming the phone with a web browser .......................................................................................9
3.
Local LAN Connection .........................................................................................................................10
3.1
Wiring Connections...............................................................................................................................10
3.2
Installing and Programming the Advantage IP Executive for use over a LAN ...............................11
Step 1
Cabling ......................................................................................................................................11
Step 2
Power ........................................................................................................................................11
Step 3
Starting the phone .....................................................................................................................11
Step 4
Running the Installation wizard ................................................................................................11
Step 5
Enter the address of the Advantage System ..............................................................................12
Step 6
Extension Name and PIN ..........................................................................................................12
Step 7
Quality of Service .....................................................................................................................12
3.3
Connected Stated...................................................................................................................................13
3.4
Unconnected State .................................................................................................................................13
3.5
Programming the phone with a web browser .....................................................................................13
4.
Configuring the Advantage system for IP telephones....................................................14
4.1
Hardware and Software requirements ................................................................................................14
4.2
Extension Name and Extension PIN ....................................................................................................16
4.3
Default Gateway ....................................................................................................................................17
4.4
Port Forwarding ....................................................................................................................................18
4.4.1
Example: How to Configure Port Forwarding on the eircom Netopia Modem Router Cayman 3346
18
5.
Trouble Shooting.......................................................................................................................................32
5.1.1
No information on the display ..............................................................................................................32
5.1.2
Failure to register with the Advantage system....................................................................................32
5.1.3
Echo during speech................................................................................................................................32
5.1.4
Loud noises, clicking or interruption of speech ..................................................................................32
5.1.5
Failure to boot up ..................................................................................................................................33
6. Summary - Advantage IP Executive............................................................................................34

Advantage IP Executive Installation Guide
4
Features............................................................................................................................................................34
Remote Worker solution ..................................................................................................................................34
Requirements at Remote site .............................................................................................................34
Requirements at Head office..............................................................................................................34
LAN IP solution...............................................................................................................................................35
Security ............................................................................................................................................................35
Recommendations............................................................................................................................................35
Technical Specification....................................................................................................................................35
Physical Characteristics ...................................................................................................................................36
Electronic Headset Volume Control.......................................................................................................36
Optional DSS (Direct Station Select) expansion module with 48 keys with dual colour LED’s.....................36

Advantage IP Executive Installation Guide
5
1. Introduction
The Advantage IP Executive is a user-friendly Voice Over IP (VoIP) telephone, which can be
connected remotely to the Advantage Systems via the Internet or locally via an internal IP
network. Whether locally or remotely connected, the Advantage IP Executive can be used as a
fully featured key set with LED’s indicating line and extension status and with access to the full
range of functions.
It is shipped with the following accessories:
-One Electrical Mains Plug top Power Supply Unit.
-One Ethernet cable (straight through)
-- One Installation guide (this guide)
-One Quick Reference Guide
There are two possibilities for connecting the Advantage IP Executive to the Advantage system
– as a remote teleworker or as a local extension connected to the Advantage system on a LAN.

Advantage IP Executive Installation Guide
6
2. Remote Teleworker Connection
A remote teleworker with a broadband Internet connection can connect the Advantage IP Executive to
the Advantage system in the main office across the Internet. The remote Advantage IP Executive will
have the full system phone capability the same as an internal Advantage IP extension.
2.1 Wiring Connections
There are six connection sockets at the back of the Advantage IP Executive as shown below.
Headset DSS LAN DC Power PC Handset
Headset: This port is used to connect an optional headset
DSS: This port is used to connect to the optional DSS (Direct Station Select) Module. This is a
block of 48 keys that can be used for single touch access to all extensions on the system.
LAN: This is an Ethernet port, which is connected to the broadband router using a straight
Ethernet cable. From here the calls are sent over the Internet to the remote Advantage
system.
DC Power: The DC connector of the plug top power supply unit is connected to this socket.
(Note: The phone is also capable of taking its power supply over the LAN from a power
source that complies with the 802.3af ‘Power over the LAN’ standard.)
PC: This Ethernet port can be connected to a PC using a straight Ethernet cable. This facilitates
a single Ethernet cable to the desk from the broadband router carrying both voice and data
traffic as shown in the diagram.
Handset: The telephone handset is plugged in to this port.
Advantage System Advantage IP
Executive
Office Home
Broadband
Modem
Router
Internet
Broadband
Modem
Router
PC

Advantage IP Executive Installation Guide
7
2.2 Installing and Programming the Advantage IP Executive for Remote
working
Step 1 Cabling
Connect the LAN port of the phone to the broadband router using the straight Ethernet cable.
Step 2 Power
Connect the plug top power supply to the DC Power socket on the phone and to the electrical mains.
The phone displays the message:
Step 3 Starting the phone
The phone displays the message:
While this message is being displayed the phone will attempt to obtain an IP address automatically from a
DHCP server. DHCP is the Dynamic Host Control Protocol that is commonly used to assign IP addresses
automatically on a network. There is usually a DHCP server present in the broadband router. When the
phone has received its IP address it proceeds to step 4.
(Note: If there is no DHCP server present, you must manually program the IP address and subnet
mask of the phone and the Internet gateway.
-In this event the phone will display a message ‘Could not connect to DHCP server’ and you must
press the Menus key.
-Under the menu option ‘Local IP Params’ select the option ‘DHCP client’, and disable it and press
set.
-Under the menu option ‘Change IP Address’ type in the IP address of the phone and press set.
-Similarly set the subnet mask and the IP address of the Internet gateway.
-Press Back and Exit to get to the next step in the process)
Step 4 Running the Installation wizard
The phone displays the message:
Pressing the start button will begin to step through the installation wizard.
Advantage IP Phone
Booting…..
* * Please Wait * *
Connecting to
DHCP server
Please Wait …
Press Start to run
Installation Wizard
Start

Advantage IP Executive Installation Guide
8
Step 5 Enter the address of the Advantage System
The Public Internet fixed IP address of the Advantage system is entered here. This is necessary
to allow the phone to connect to the Advantage system using the public Internet.
Press next when the IP address has been entered.
Step 6 Extension Name and PIN
The Advantage system administrator must allocate a unique extension name and extension PIN
to each IP phone connected to the system. The procedure for this is described in section 4 of
this document. This extension name and PIN must be entered in the Advantage IP Executive. If
you do not know the extension name and PIN, contact the system administrator and obtain
them. When the phone registers with the Advantage system through the public Internet, this
unique extension name and PIN are authenticated.
At the prompts, enter the Extension Name from the phone keypad. Please pay particular
attention to upper case and lower case letters.
Press Next and proceed to enter the Extension PIN.
Press Next to proceed to step 7.
Step 7 Quality of Service
The last option in the wizard allows you to enable quality of service. Once you have answered
Yes or No to this question, the setup wizard is complete and the Advantage IP Executive will
attempt to connect to the Advantage system over the public Internet.
During this time the phone will display the message:
Connecting to
Advantage at
213.031.079.150
Please wait...
Enter Server IP:
000.000.000.000
Next
Extension Name
_
Next Delete
Extension Pin
Enter Pin: _
Next
Enable
Quality of Service ?
Yes No

Advantage IP Executive Installation Guide
9
2.3 Connected State
When the above steps have been completed successfully, the Advantage IP Executive will
connect to the Advantage system, and the display will indicate the date, time and extension
number. The Advantage IP Executive now has access to the full range of system features and
functions in the same way as any other digital extension.
2.4 Unconnected State
Once the phone is in the connected state, the IP settings are no longer accessible. In order to
check or change the IP settings it is necessary to return the phone to the unconnected state.
This can be done by pressing the Menu button and holding it for more than 5 seconds.
In the unconnected state the following menu options can be verified or changed:
Local IP Parameters DHCP Client
Current Settings
Change IP Address
Change Subnet Mask
Change Gateway
Server IP Parameters Current Settings
Change IP Address
Change Alt IP
Change SIG Port
Change RTP Port
Registration Info Extension Name
Extension PIN
Audio Settings Codec
Frame size
Silence Compression
Restart Phone
View log
MAC address
Change Language
Firmware Upgrade Request Firmware
Set FTP Server
Restore defaults
QoS settings VLAN Tagging
Diffserv
Disable all QOS
Encryption
2.5 Programming the phone with a web browser
The Advantage IP Executive may be programmed via a web browser interface. Open a browser
on any PC that is on the same LAN and point it to the IP address of the Advantage IP Executive.
Authentication details are as follows:
Username: admin
Password: 1000
There is an online context sensitive help on each page to guide you.

Advantage IP Executive Installation Guide
10
3. Local LAN Connection
The Advantage IP Executive may be connected to the Advantage system on the same Local
area network. This allows additional digital IP telephones to be connected to the Advantage
system without the need for additional digital ports.
3.1 Wiring Connections
There are six sockets in the Advantage IP Executive access area shown below.
Headset DSS LAN DC Power PC Handset
Headset: This port is used to connect an optional headset
DSS: This port is used to connect to the optional DSS (Direct Station Select) Module. This
is a block of 48 keys that can be used for single touch access to all extensions on
the system.
LAN: This is an Ethernet port, which is connected to the LAN using a straight Ethernet
cable. From here the calls are sent over the LAN to the Advantage system.
DC Power: The DC connector of the plug top power supply unit is connected to this socket.
(Note: The phone is also capable of taking its power supply over the LAN from a
power source that complies with the 802.3af ‘Power over the LAN’ standard.)
PC: This Ethernet port can be connected to a PC using a straight Ethernet cable. This
facilitates a single Ethernet cable to the desk from the LAN carrying both voice and
data traffic as shown in the diagram.
Handset: The telephone handset is plugged in to this port.
PC
Advantage
Equipment Room
Desk
Local Area
Network
Office
Advantage IP
Executive

Advantage IP Executive Installation Guide
11
3.2 Installing and Programming the Advantage IP Executive for use over a
LAN
Step 1 Cabling
Connect the LAN port of the phone to the connection point of the local area network using the straight
Ethernet cable supplied.
Step 2 Power
Connect the plug top power supply to the DC Power socket on the phone and to the electrical mains.
The phone displays the message:
Step 3 Starting the phone
The phone displays the message:
While this message is being displayed the phone will attempt to obtain an IP address automatically from a
DHCP server. DHCP is the Dynamic Host Control Protocol that is commonly used to assign IP addresses
automatically on a network. When the phone has received its IP address it proceeds to step 4.
(Note: If there is no DHCP server present, you must manually program the IP address and subnet
mask of the phone and the Internet gateway.
-In this event the phone will display a message ‘Could not connect to DHCP server’ and you must
press the Menus key.
-Under the menu option ‘Local IP Params’ select the option ‘DHCP client’, and disable it and press
set.
-Under the menu option ‘Change IP Address’ type in the IP address of the phone and press set.
-Similarly set the subnet mask and the IP address of the Internet gateway.
-Press Back and Exit to get to the next step in the process)
Step 4 Running the Installation wizard
The phone displays the message:
Pressing the start button will begin to step through the installation wizard.
Advantage IP Phone
Booting…..
* * Please Wait * *
Connecting to
DHCP server
Please Wait …
Press Start to run
Installation Wizard
Start

Advantage IP Executive Installation Guide
12
Step 5 Enter the address of the Advantage System
The private LAN IP address of the Advantage system is entered here. This is necessary to
allow the phone to connect to the Advantage system.
Press next when the IP address has been entered.
Step 6 Extension Name and PIN
The Advantage system administrator must allocate a unique extension name and extension PIN
to each IP phone connected to the system. The procedure for this is described in section 4 of
this document. This extension name and PIN must be entered in the Advantage IP Executive. If
you do not know the extension name and PIN, contact the system administrator and obtain
them. When the phone registers with the Advantage system through the LAN, this unique
extension name and PIN are authenticated.
At the prompts, enter the Extension Name from the phone keypad. Please pay particular
attention to upper case and lower case letters.
Press Next and proceed to enter the Extension PIN.
Press Next to proceed to step 7.
Step 7 Quality of Service
The last option in the wizard allows you to enable quality of service. Once you have answered
Yes or No to this question, the setup wizard is complete and the Advantage IP will attempt to
connect to the Advantage system.
During this time the phone will display the message:
Connecting to
Advantage at
192.168.0.100
Please wait...
Enter Server IP:
000.000.000.000
Next
Extension Name
_
Next Delete
Extension Pin
Enter Pin: _
Next
Enable
Quality of Service ?
Yes No

Advantage IP Executive Installation Guide
13
3.3 Connected Stated
When the above steps have been completed successfully, the Advantage IP executive will
connect to the Advantage system, and the display will indicate the date, time and extension
number. The Advantage IP Executive now has access to the full range of system features and
functions in the same way as any other digital extension.
3.4 Unconnected State
Once the phone is in the connected state, the IP settings are no longer accessible. In order to
check or change the IP settings it is necessary to return the phone to the unconnected state.
This can be done by pressing the Menu button and holding it for more than 5 seconds.
In the unconnected state the following menu options can be verified or changed:
Local IP Parameters DHCP Client
Current Settings
Change IP Address
Change Subnet Mask
Change Gateway
Server IP Parameters Current Settings
Change IP Address
Change Alt IP
Change SIG Port
Change RTP Port
Registration Info Extension Name
Extension PIN
Audio Settings Codec
Frame size
Silence Compression
Restart Phone
View log
MAC address
Change Language
Firmware Upgrade Request Firmware
Set FTP Server
Restore defaults
QoS settings VLAN Tagging
Diffserv
Disable all QOS
Encryption
3.5 Programming the phone with a web browser
The Advantage IP Executive may be programmed via a web browser interface. Open a
browser on any PC that is on the same LAN and point it to the IP address of the Advantage IP
Executive. Authentication details are as follows:
Username: admin
Password: 1000
There is an online context sensitive help on each page to guide you

Advantage IP Executive Installation Guide
14
4. Configuring the Advantage system for IP telephones
4.1 Hardware and Software requirements
The Advantage system must be equipped with an applications card and a software license for
each Advantage IP Executive using an IP channel. The number of IP channels active on the
system can be checked, by logging into the Advantage system using the installer login and
password as described in the system manual. This results in the display of the page shown
below
By Clicking on the System Properties link in the System Settings column the following page is
displayed.

Advantage IP Executive Installation Guide
15
Click in the link called ‘more’ after the Applications Card version number to display the following
screen.
The number of active IP Compression channels is shown here. Each channel requires a
software license, which can be purchased from your Advantage System supplier.

Advantage IP Executive Installation Guide
16
4.2 Extension Name and Extension PIN
The Advantage system administrator must configure an extension name and extension PIN for
each Advantage IP Executive on the system. This is done by connecting to the Advantage
system, through the web browser interface, using the installer login and password as described
in the Advantage System Manual. This will result in the main Installation page being displayed
as shown above.
In the second column headed ‘Extension Settings’, Click on the link ‘Extension Names’ and then
on the link ‘Digital’ and the following page will be displayed.
The extension name is entered here opposite the relevant Extension number. In the example
shown here the default numbering scheme has allocated extensions 60 to 67 as digital IP
extensions with default names ‘Extn 60’ to ‘Extn 67’. The Administrator types the name of the
Advantage IP user opposite the extension number and clicks on the ‘Save‘ button. Press the
‘Back’ Button to return to the main page.
By clicking on the link ‘Pin Codes’ under the heading ‘Extension Settings’ and then on the link
’Digital’ the following page is displayed. The pin code must be entered in the white box opposite
the extension number and name. Press ‘Save’ and ‘’Back’ to exit.

Advantage IP Executive Installation Guide
17
The extension name and PIN code are now registered on the Advantage system.
4.3 Default Gateway
The Advantage system must be programmed with the IP address of the default gateway for
Internet access, which is entered on the IP Addresses page. This allows the Advantage system
to direct outgoing traffic to the correct Internet gateway. This page is reached by clicking on the
link in the Router Settings column.

Advantage IP Executive Installation Guide
18
4.4 Port Forwarding
In the Office location, incoming VoIP calls to the Advantage system are routed from the Internet through
a gateway modem/router on the LAN to the Advantage System. This modem/router must be configured
to direct this traffic to the local IP address of the Advantage system on the LAN.
Traffic on the following three ports must be sent to the local IP address of the Advantage system:
Port 5075 for TCP packets (allows registration and signaling)
Port 50000 for UDP packets (for speech)
Port 50001 for UDP packets (for speech)
4.4.1 Example: How to Configure Port Forwarding on the eircom Netopia Modem Router
Cayman 3346
This section describes how to configure port forwarding for Voice over IP traffic on the eircom Netopia
Modem Router Cayman 3346.
Voice traffic coming from the Internet to the eircom Advantage system in the Office location is routed
through the Netopia ADSL Modem router as shown in the diagram below. This device implements a
firewall to protect the internal LAN from intrusion from the Internet. The firewall must be opened up to
allow voice traffic from the Internet to pass through and it must be configured to forward this voice traffic
to the internal IP address of the Advantage system.
Office
Home
Netopia ADSL
Modem/ Router
eircom
Advantage
Internet
ADSL Modem
eircom
Advantage IP
Executi e
PC
LAN
PC

Advantage IP Executive Installation Guide
19
Step 1 Connect to the home page.
Using a PC connected on the LAN as shown in the diagram, open a browser and type in the LAN IP
address of the Netopia Modem Router. The default IP address is 192.168.1.254. However this may
have been changed by the LAN administrator at installation. In this case check with the LAN
administrator and enter the correct address. When this is done the home page of the modem/router is
displayed as shown below.
If you have difficulty connecting to this home page, please check that the PC you are using has an IP
address which is in the same subnetwork range as the Netopia modem router.

Advantage IP Executive Installation Guide
20
Step 2 Lower the level of Firewall protection
Click on the link Firewall in the top left corner of this page and the following screen will be displayed
Set the level of firewall protection to LOW and press the button ‘Save Changes’.
Other manuals for Advantage
2
Table of contents
Other Eircom IP Phone manuals
Popular IP Phone manuals by other brands

NUI Telecom
NUI Telecom M3904 user guide

Panasonic
Panasonic KX-TGF310BX operating instructions

Xblue Networks
Xblue Networks 45P Installation & maintenance manual

Sipura Technology
Sipura Technology SPA-841 Administration guide

Avaya
Avaya IP Office Basic Edition 9500 Series quick reference

Cortelco
Cortelco C62 VoIP Phone Quick installation guide