Eizo PCSK-03R User manual

Installation Manual

Introduction
This Installation Manual explains the procedure to install a PC compatible with PCSK-03R.
Compatible PCs
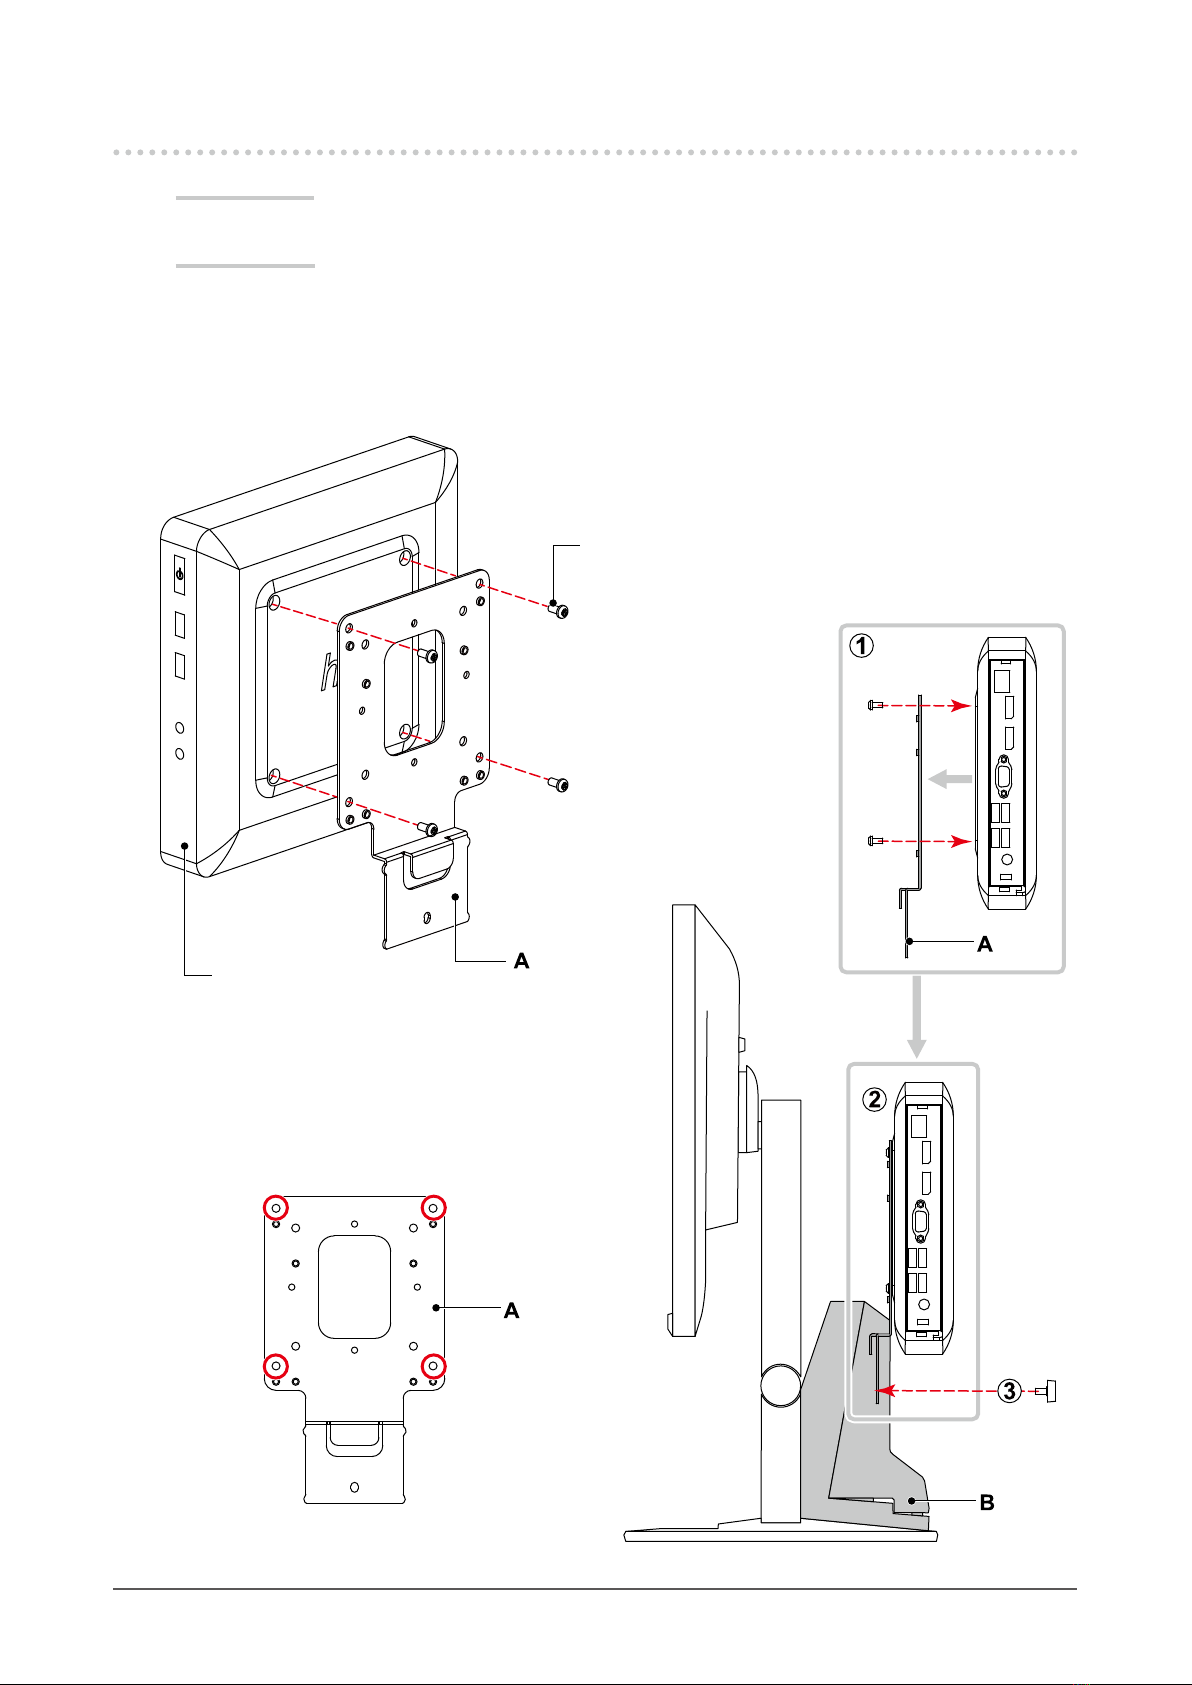
HP t520 Thin Client page 4
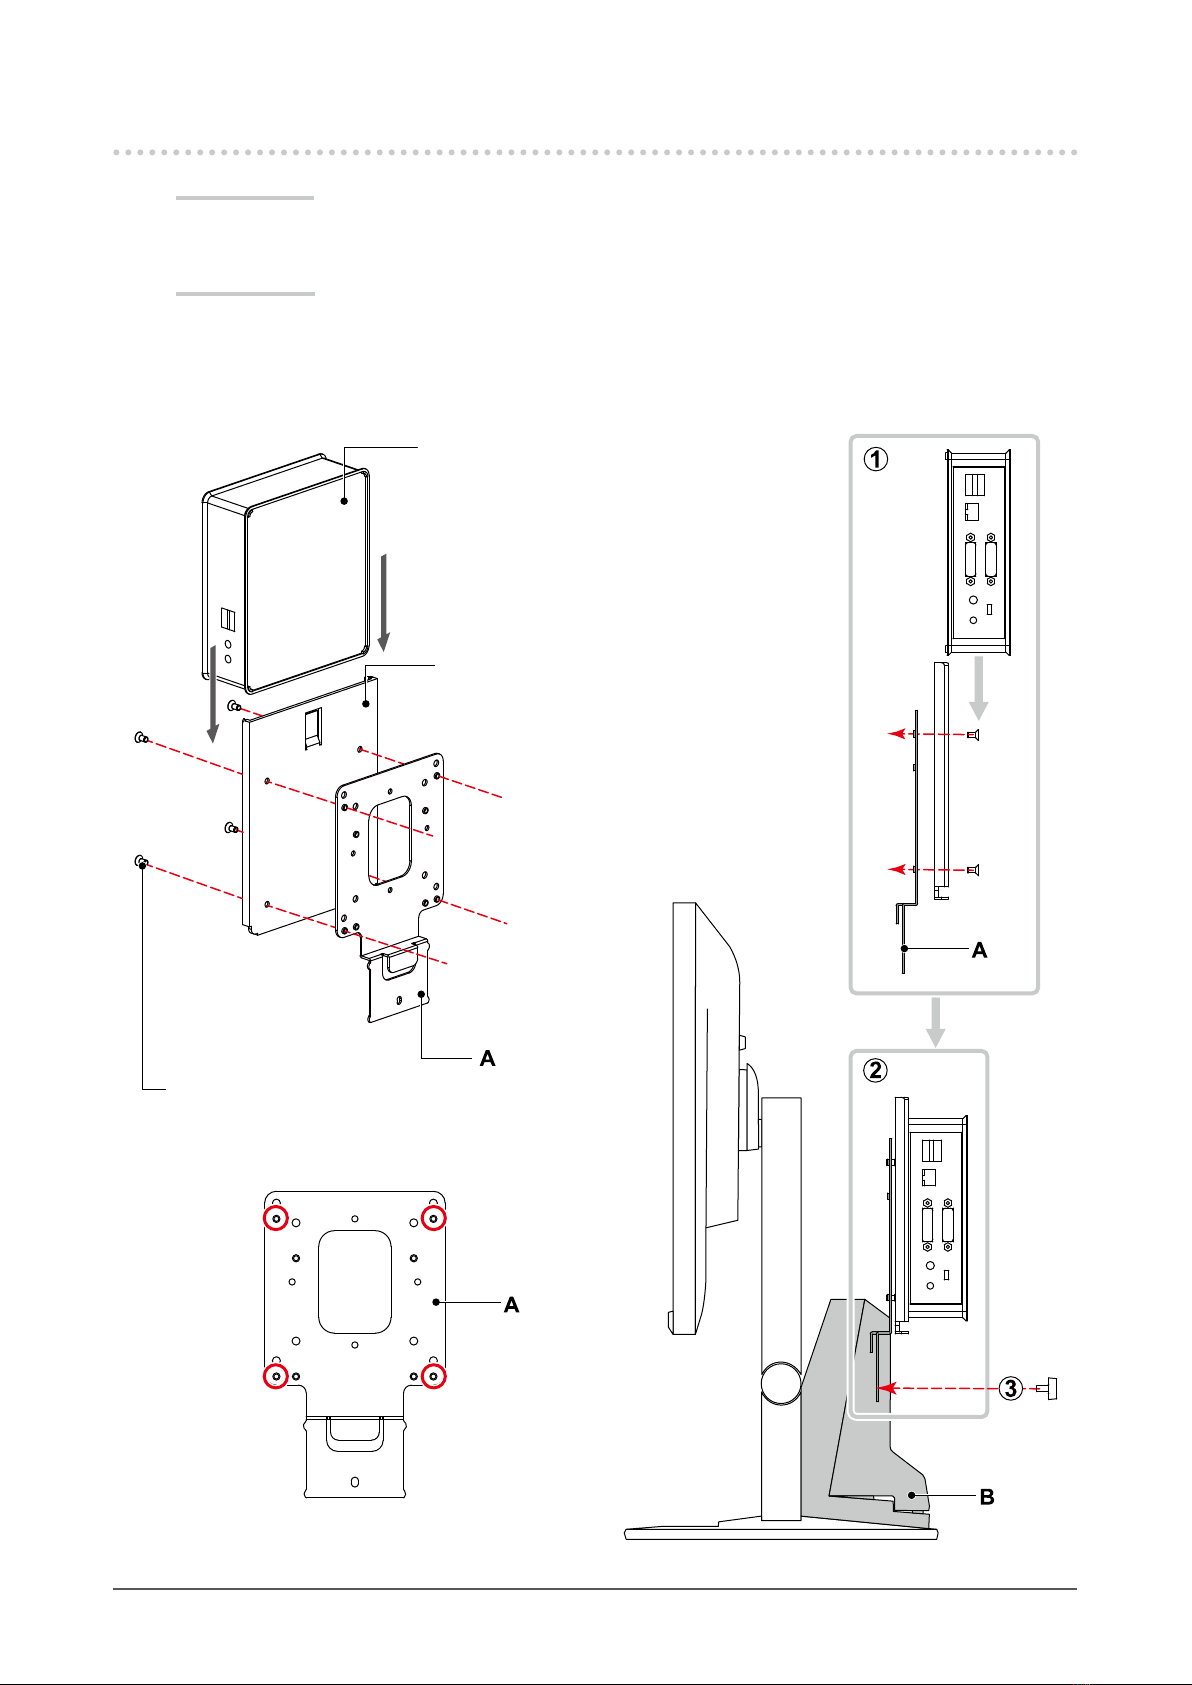
HP t310 Zero Client page 5
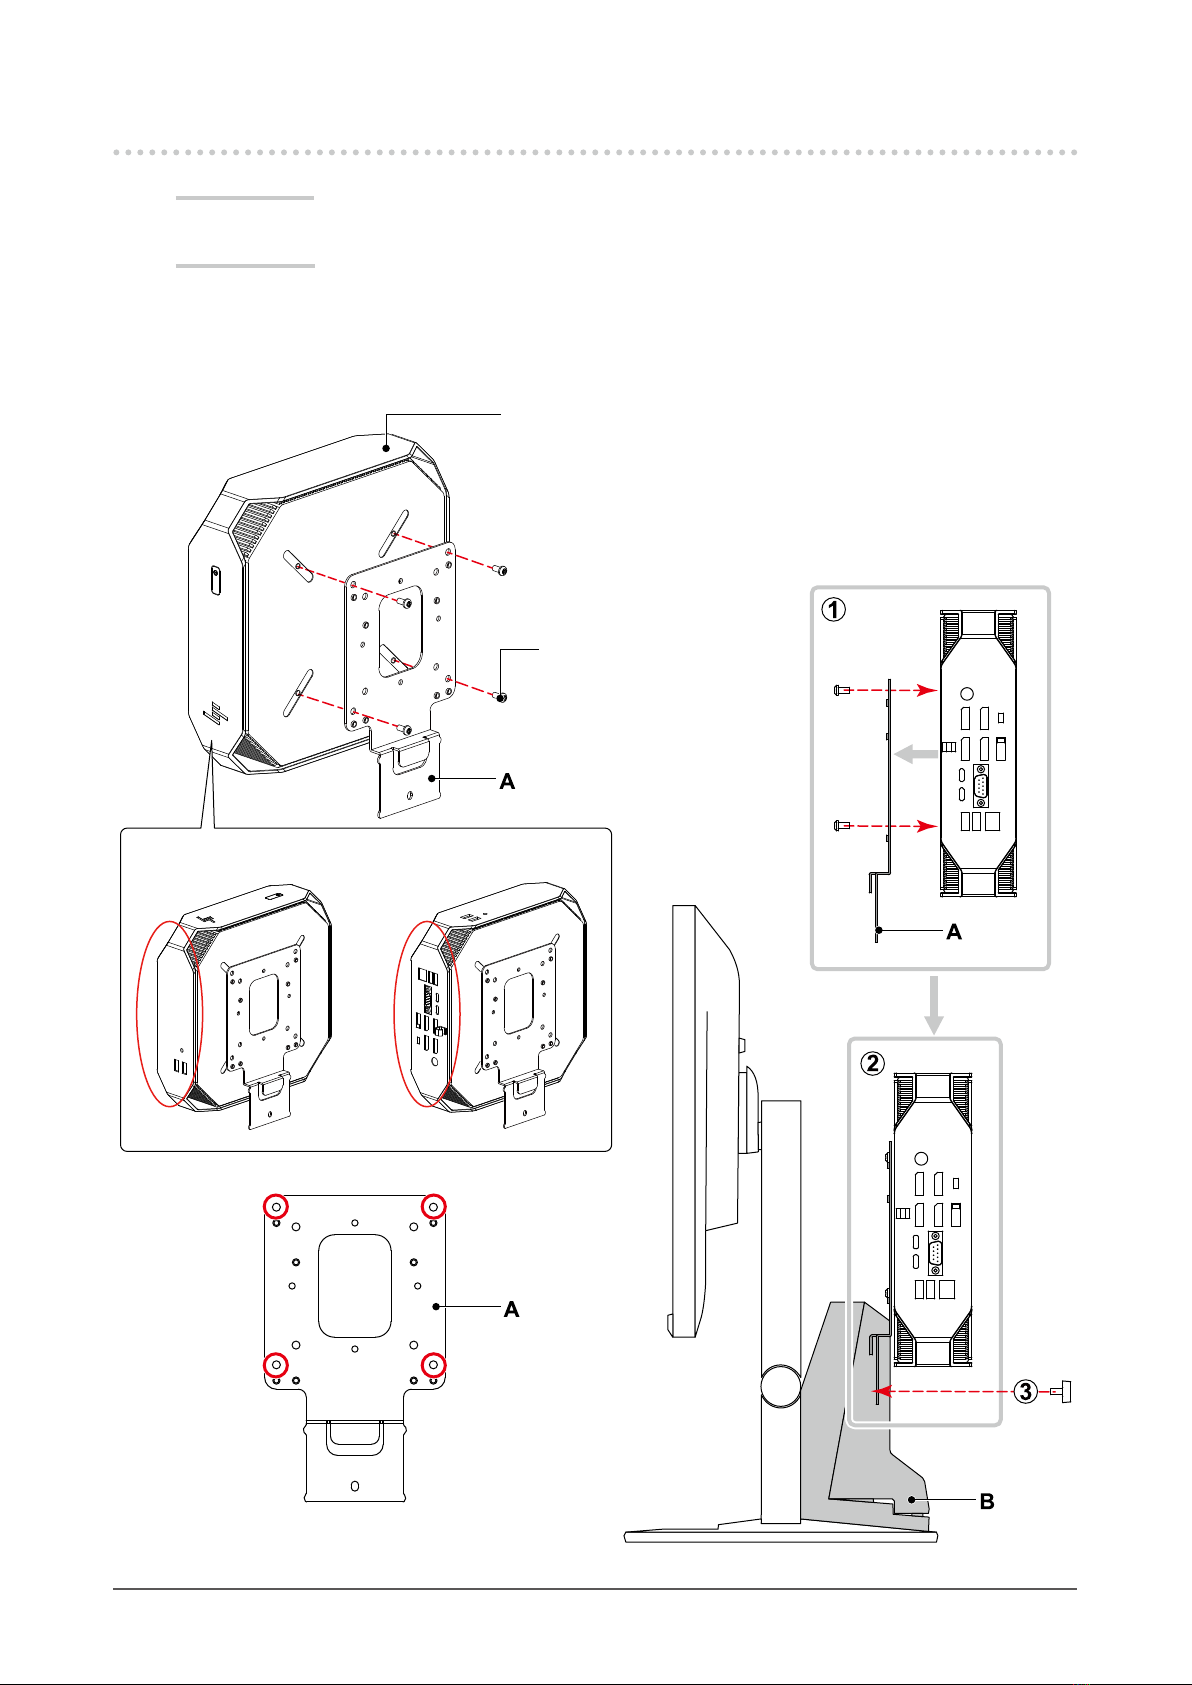
HP Z2 Mini G3 Workstation / G4 Workstation page 6
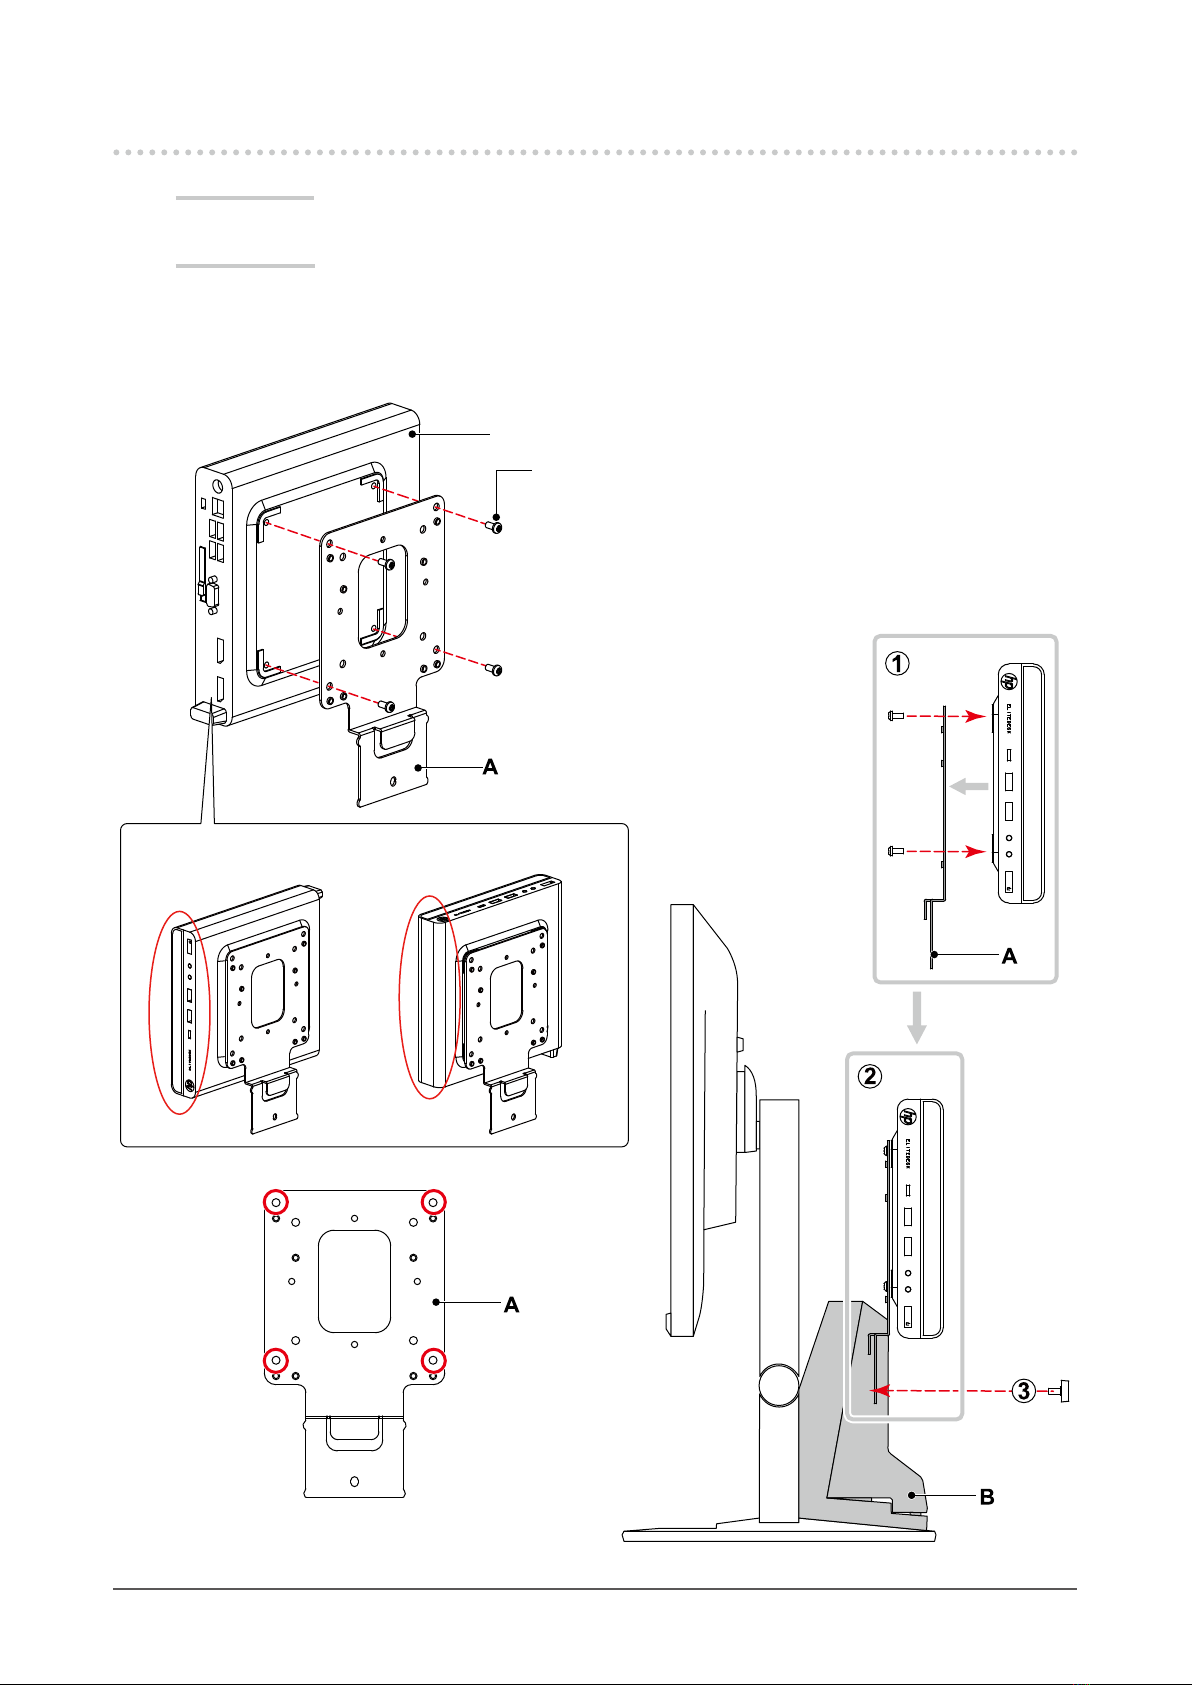
HP EliteDesk800 G3 DM page 7
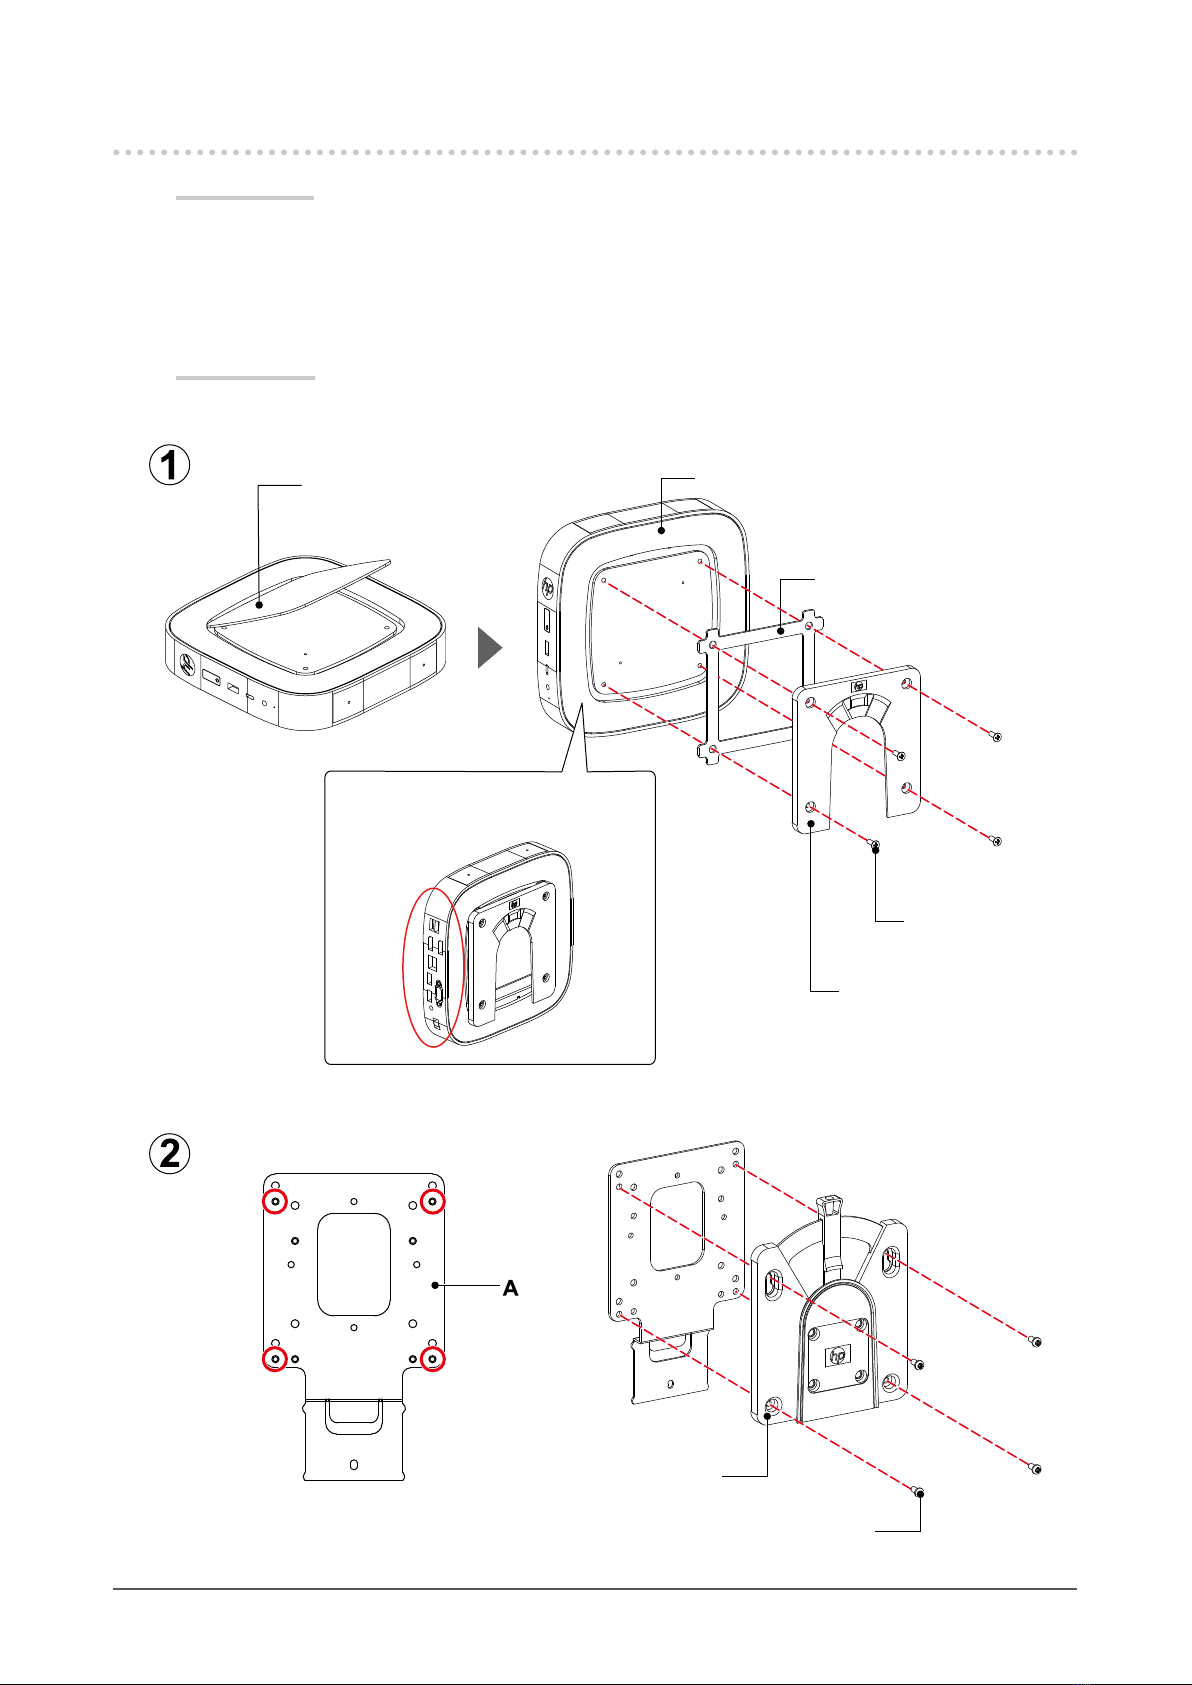
HP Elite Slice page 8
HP t310 G2 Zero Client page 9
HP t530 Thin Client page 10
Dell Wyse 3010TC / T10 / 5030PCoIP / P25 page 12
Dell Wyse 5010TC / D10D / D10DP page 13
GIGABYTE GB-BKi7HT2-7500 / GB-BKi7HT-7500 page 14
Lenovo ThinkStation P320 Tiny page 15
FUJITSU FUTRO S740 page 16
EIZO DuraVision DX0211-IP page 18
HP is a registered trademark of HP Hewlett Packard Group LLC.
EliteDesk and Elite Slice are a registered trademark of Hewlett-Packard Development Company, L.P.
Dell is a registered trademark of Dell Inc.
Wyse is a trademark or a registered trademark of Dell Inc.
GIGABYTE is a registered trademark of GIGA-BYTE Technology Co., Ltd.
Lenovo,ThinkCentre and ThinkStation are registered trademarks of Lenovo Corporation.
TORX is a registered trademark of Acument Intellectual Properties, LLC.
FUTRO is a registered trademark of Fujitsu Client Computing Limited.
EIZO, the EIZO Logo and DuraVision are registered trademarks of EIZO Corporation in Japan and other
countries.
All other company names, product names, and logos are trademarks or registered trademarks of their
respective companies.
2Introduction

How to Install a PC on a Monitor
Thumb screw : M4x8
(included with PCSK-03R; 1 pcs.)
Screw: M4x80
(included with PCSK-03R; 1 pcs.)
Compact PC
Cable holder
Attention
• Attaching PCSK-03R will reduce the monitor’s tilt range.
Without PCSK-03R: -5° to 35°
With PCSK-03R: -5° to 17°
3
How to Install a PC on a Monitor

4HP t520 Thin Client
HP t520 Thin Client
Parts required
• Screws: M4x8 (included with PCSK-03R; 4 pcs.)
Tools required
• Phillips screwdriver (#2)
• TORX driver (T10)
Position of a screw hole (four positions)
Before installing A, remove the four TORX
screws attached to the PC.
HP t520 Thin Client
Screws: M4x8
(included with PCSK-03R; 4 pcs.)

5
HP t310 Zero Client
HP t310 Zero Client
Parts required
• F7X24AA (Optional mounting bracket for HP)
• Screws (included with F7X24AA; 4 pcs.)
Tools required
• Phillips screwdriver (#2)
HP t310 Zero Client
F7X24AA
(Optional mounting bracket for HP)
Screws
(included with F7X24AA; 4 pcs.)
Position of a screw hole (four positions)

6HP Z2 Mini G3 Workstation / G4 Workstation
HP Z2 Mini G3 Workstation / G4 Workstation
Parts required
• Screws: M4x8 (included with PCSK-03R; 4 pcs.)
Tools required
• Phillips screwdriver (#2)
Screws: M4x8
(included with PCSK-03R; 4 pcs.)
Before installing A, remove four rubber feet attached to the PC.
HP Z2 Mini G3 Workstation / G4 Workstation
You can also install the PC in the orientations shown below.
Position of a screw hole (four positions)

7
HP EliteDesk800 G3 DM
Screws: M4x8
(included with PCSK-03R; 4 pcs.)
HP EliteDesk 800 G3 DM
You can also install the PC in the orientations shown below.
Position of a screw hole (four positions)
HP EliteDesk800 G3 DM
Parts required
• Screws: M4x8 (included with PCSK-03R; 4 pcs.)
Tools required
• Phillips screwdriver (#2)

8HP Elite Slice
HP Elite Slice
X8U74A A
(Optional mounting bracket for HP)
Screws: M4x8
(included with PCSK-03R; 4 pcs.)
Position of a screw hole (four positions)
HP Elite Slice
Parts required
• X8U74AA (Optional mounting bracket for HP)
• Screws: M4x8 (included with PCSK-03R; 4 pcs.)
Tools required
• Phillips screwdriver (#2)

9
HP t310 G2 Zero Client
Parts required
• Screws: M4x8 (included with PCSK-03R; 4 pcs.)
Tools required
• Phillips screwdriver (#2)
Screws: M4x8
(included with PCSK-03R; 4 pcs.)
HP t310 G2 Zero Client
You can also install the PC in the
orientations shown below.
Position of a screw hole (four positions)

10 HP t530 Thin Client
HP t530 Thin Client
Parts required
• EM870AA (Optional HP Quick Release Attachment)
- Quick Release Attachment (2 types)
- Screws : M4x12 (4 pcs.)
- Spacer with a thickness of 2 mm
• Screws: M4x8 (included with PCSK-03R; 4 pcs.)
Tools required
• Phillips screwdriver (#2)
Screws: M4x8
(included with PCSK-03R; 4 pcs.)
HP t530 Thin Client
Remove the cover.
You can also install the PC in the
orientations shown below.
Attachment supplied
with the EM870AA
Position of a screw hole (four positions)
Spacer supplied with the EM870AA
Screws supplied with
the EM870AA
Attachment supplied with
the EM870AA

11
HP t530 Thin Client
4
5
3
Attachment supplied with the EM870AA
Screws supplied with the EM870AA
Spacer supplied with the EM870AA
HP t530 Thin Client
Screws: M4x8
(included with PCSK-03R; 4 pcs.)
Attachment supplied with the EM870AA

12 Dell Wyse 3010TC / T10 / 5030PCoIP / P25
Wyse 3010TC / T10 / 5030PCoIP / P25
Mounting bracket
(included with Wyse
3010TC / T10 /
5030PCoIP / P25)
Screws: M4x8
(included with PCSK-03R; 4 pcs.)
Position of a screw hole (four positions)
Dell Wyse 3010TC / T10 / 5030PCoIP / P25
Parts required
• Mounting bracket (included with Wyse 3010TC / T10 / 5030PCoIP / P25)
• Screws: M4x8 (included with PCSK-03R; 4 pcs.)
Tools required
• Phillips screwdriver (#2)

13
Dell Wyse 5010TC / D10D / D10DP
Parts required
• Screws: M4x8 (included with PCSK-03R; 4 pcs.)
Tools required
• Phillips screwdriver (#2)
Before installing A, remove four screws attached to the PC.
Wyse 5010TC / D10D / D10DP
Screws: M4x8
(included with PCSK-03R; 4 pcs.)
Position of a screw hole (four positions)

14 GIGABYTE GB-BKi7HT2-7500 / GB-BKi7HT-7500
Screws: M4x8
(included with PCSK-03R; 4 pcs.)
Screws
(included with GB-BKi7HT2-7500 / GB-BKi7HT-7500; 2 pcs.)
Mounting bracket
(included with GB-BKi7HT2-7500 /
GB-BKi7HT-7500)
GB-BKi7HT2-7500 /
GB-BKi7HT-7500
Before attaching A and the bracket, install two screws on the PC side.
Position of a screw hole (four positions)
GIGABYTE GB-BKi7HT2-7500 / GB-BKi7HT-7500
Parts required
• Mounting bracket (included with GB-BKi7HT2-7500 / GB-BKi7HT-7500)
• Screws (included with GB-BKi7HT2-7500 / GB-BKi7HT-7500; 2 pcs.)
• Screws: M4x8 (included with PCSK-03R; 4 pcs.)
Tools required
• Phillips screwdriver (#2)

15
Lenovo ThinkStation P320 Tiny
Parts required
• ThinkCentre Tiny VESA Mount II 4XF0N03161
(Optional mounting bracket for ThinkStation)
• Screws (included with 4XF0N03161: 2 types; total of 6 pcs.)
Tools required
• Phillips screwdriver (#2)
ThinkStation P320 Tiny
Stepped screws
(included with 4XF0N03161; 4 pcs.)
ThinkCentre Tiny VESA Mount II 4XF0N03161
(Optional mounting bracket for ThinkStation)
Screws
(included with 4XF0N03161; 2 pcs.)
Position of a screw hole (four positions)

16 FUJITSU FUTRO S740
FUJITSU FUTRO S740
Parts required
• Mounting bracket (included with FUTRO S740)
• Screws (included with FUTRO S740: 2 types; total of 8 pcs.)
Tools required
• Phillips screwdriver (#2)
FUTRO S740 Mounting bracket
(included with FUTRO S740)
Machine screws
(included with FUTRO S740; 4 pcs.)
Position of a screw hole (four positions) Thumb screw
(included with FUTRO S740; 4 pcs.)

17
FUJITSU FUTRO S740
Thumb screw
Mounting bracket
(included with FUTRO S740)
Hang the heads of the four
thumb screws on the four
hollows of the mounting
bracket to mount the unit.

18 EIZO DuraVision DX0211-IP
EIZO DuraVision DX0211-IP
Note
• Applies to products with Ver.5.2 of the software or newer versions.
Parts required
• Screws (included with DX0211-IP; 2 pcs.)
Tools required
• Phillips screwdriver (#2)
Screws
(Included with DX0211-IP; 2 pcs.)
Position of a screw hole (two positions)
Table of contents
Other Eizo TV Mount manuals
Popular TV Mount manuals by other brands

Viz-Art Automation
Viz-Art Automation CP-LIFT Series installation manual

Sony
Sony SU-WL850 Installation information

LEGRAND
LEGRAND CP Electronics MWS3A-DBB installation guide

Multibrackets
Multibrackets M Flexarm Pro Extenderkit 600x900 installation manual

Desalto
Desalto Sail 304 Assembly instruction

Toshiba
Toshiba WAL14C Operation manual