Ekahau T301W User manual

Ekahau T301W
Wi-Fi Location Tag
User Guide

Ekahau, the Ekahau logo, Ekahau Site Survey, Ekahau Location Survey, Ekahau Heatmapper,
Ekahau Engine, Ekahau RTLS Controller, Ekahau Positioning Engine, Ekahau Manager, Ekahau
Activator, Ekahau Finder, Ekahau Vision, Ekahau Tracker, Ekahau Logger, Ekahau T201, Ekahau
T301, Ekahau NIC-54, Ekahau NIC-300, Ekahau Client, and Ekahau Positioning Client are
trademarks or registered trademarks of Ekahau.
Other product and company names may be trademarks or trade names of their respective owners.
The enclosed software contains implementations of Ekahau’s patent pending inventions.
This manual and the Ekahau software described in it are copyrighted, with all rights reserved. This
manual and the Ekahau software described in it may not be copied, except as otherwise provided
in your software license.
The contents of this document are provided “as is.” Except as may be required by applicable law,
no warranties of any kind, either express or implied, including, but not limited to, the implied war-
ranties of merchantability and fitness for a particular purpose, are made in relation to the accuracy,
reliability or contents of this document. Ekahau reserves the right to revise this document or withdraw
it at any time without prior notice.
Export of this technology may be controlled by the United States Government. Diversion contrary
to U.S. law prohibited.
Your use of the Ekahau software described in this user manual and its documentation are governed
by the terms set forth in your license agreement. Your use of this Ekahau software contrary to the
terms of this User Manual may void the warranty, if any, described in your license agreement.
Under no circumstances shall Ekahau be responsible for any loss of data or income, or any special,
incidental, punitive, consequential or indirect damages howsoever caused.
You may not use any Ekahau software or hardware products in hazardous environments (such
as operation of nuclear facilities, aircraft navigation or control, environments containing high levels
of dust, or mines) or in Life-Critical Solutions, unless you have advised Ekahau that they will be
used in a hazardous environment or in a Life-Critical Solution and Ekahau has had an opportunity
to evaluate further whether, and on what terms and conditions, the software or hardware products
may be licensed for your intended use. The term “Life-Critical Solution” means an application
software package or hardware device whose functioning or malfunctioning may result directly or
indirectly in physical injury or loss of human life.
Ekahau tags must always be used in compliance with the user environment and instructions con-
tained in the User Manual for the tags.
Copyright © Ekahau, Inc. 2000-2011. All rights reserved.

Table of Contents
1 Introduction ....................................................................................................................... 1
1.1 Software Release Level ........................................................................................... 1
1.2 Features of T301W .................................................................................................. 1
1.3 User Interface .......................................................................................................... 2
1.4 Status Indication LEDs ............................................................................................. 2
2 Initial Activation of the Tag .............................................................................................. 3
2.1 Installing Ekahau Activator T301 ............................................................................. 3
2.2 Supported Wi-Fi Adapters. ....................................................................................... 3
2.3 Activation Procedure ................................................................................................ 3
2.3.1 Configuring Ekahau RTLS Controller Settings ............................................ 3
2.3.2 Configuring Scan Settings ........................................................................... 5
2.3.3 Configuring WLAN Settings ......................................................................... 6
2.3.4 Configuring IP Settings ................................................................................ 6
2.3.5 Activation ..................................................................................................... 7
2.3.6 List of Available Settings in the Activator ................................................... 11
3 Configuration After Initial Activation ............................................................................ 15
3.1 Tag Configuration Settings in ERC Configs Page .................................................. 15
3.2 Tag Actions Available in ERC Tags Properties Page ............................................. 17
4 Tag Operation ................................................................................................................. 19
4.1 Button Activated Location Update .......................................................................... 19
4.2 Maintenance Call ................................................................................................... 19
4.3 De-activation / Resetting to Factory Settings ......................................................... 19
4.4 Firmware Update ................................................................................................... 19
4.5 Optimizing Battery Life ........................................................................................... 20
4.6 Turning off the T301W Tag ..................................................................................... 20
4.7 Charging the T301W tag ........................................................................................ 20
5 Technical specifications ................................................................................................ 23
5.1 General .................................................................................................................. 23
5.2 Wi-Fi ....................................................................................................................... 23
5.3 Operating Ranges from an Access Point ............................................................... 23
5.4 Care and Maintenance ........................................................................................... 23
6 Certifications .................................................................................................................. 25
7 Limited Warranty ............................................................................................................ 27
8 Disposing ........................................................................................................................ 29
T301W
iii

T301W
iv

1 Introduction
The Ekahau T301W Wi-Fi tag is part of Ekahau RTLS (Ekahau Real-Time Location System) that
consists of Ekahau T301 family tags, Ekahau RTLS Controller (ERC) software platform and Ekahau
Vision end-user application. It is designed to be worn by patients, employees, children and other
individuals, and it enables real-time visibility into a person’s exact location – enterprise-wide, with
reliable room- and sub-room level accuracy.
1.1 Software Release Level
This User Guide documents the functionality available with software release level, 0.4.5.
1.2 Features of T301W
The following features are included with this software release:
● Works with standard 802.11b/g/n Wi-Fi networks
* 802.11b needs to be enabled in the Wi-Fi network if associated communication mode is
used such as for maintenance
● Support for 64/128-bit WEP key, WPA, and WPA2-PSK authentication
● Static and dynamic IP addressing
● Configurable button for sending and acknowledging emergency or status messages
●Location reporting triggered by button, periodic timer, motion, and by Ekahau Location Beacons
● Support for associated and beaconing modes such as Cisco CCX, Aruba, Meru, Aerohive,
and Motorola beaconing modes
● Two-color status indication LED
● Vibration alarm for alerting the person wearing it
● Battery monitoring and reporting
● IR Location Beacon sensor for room, sub-room, and bay level accuracy
● Waterproof enclosure allowing it to be thoroughly sanitized after use
● Activation using Ekahau Activator, standalone tag configuration software.
● Configuration using Ekahau RTLS Controller.
Chapter 1. Introduction
1
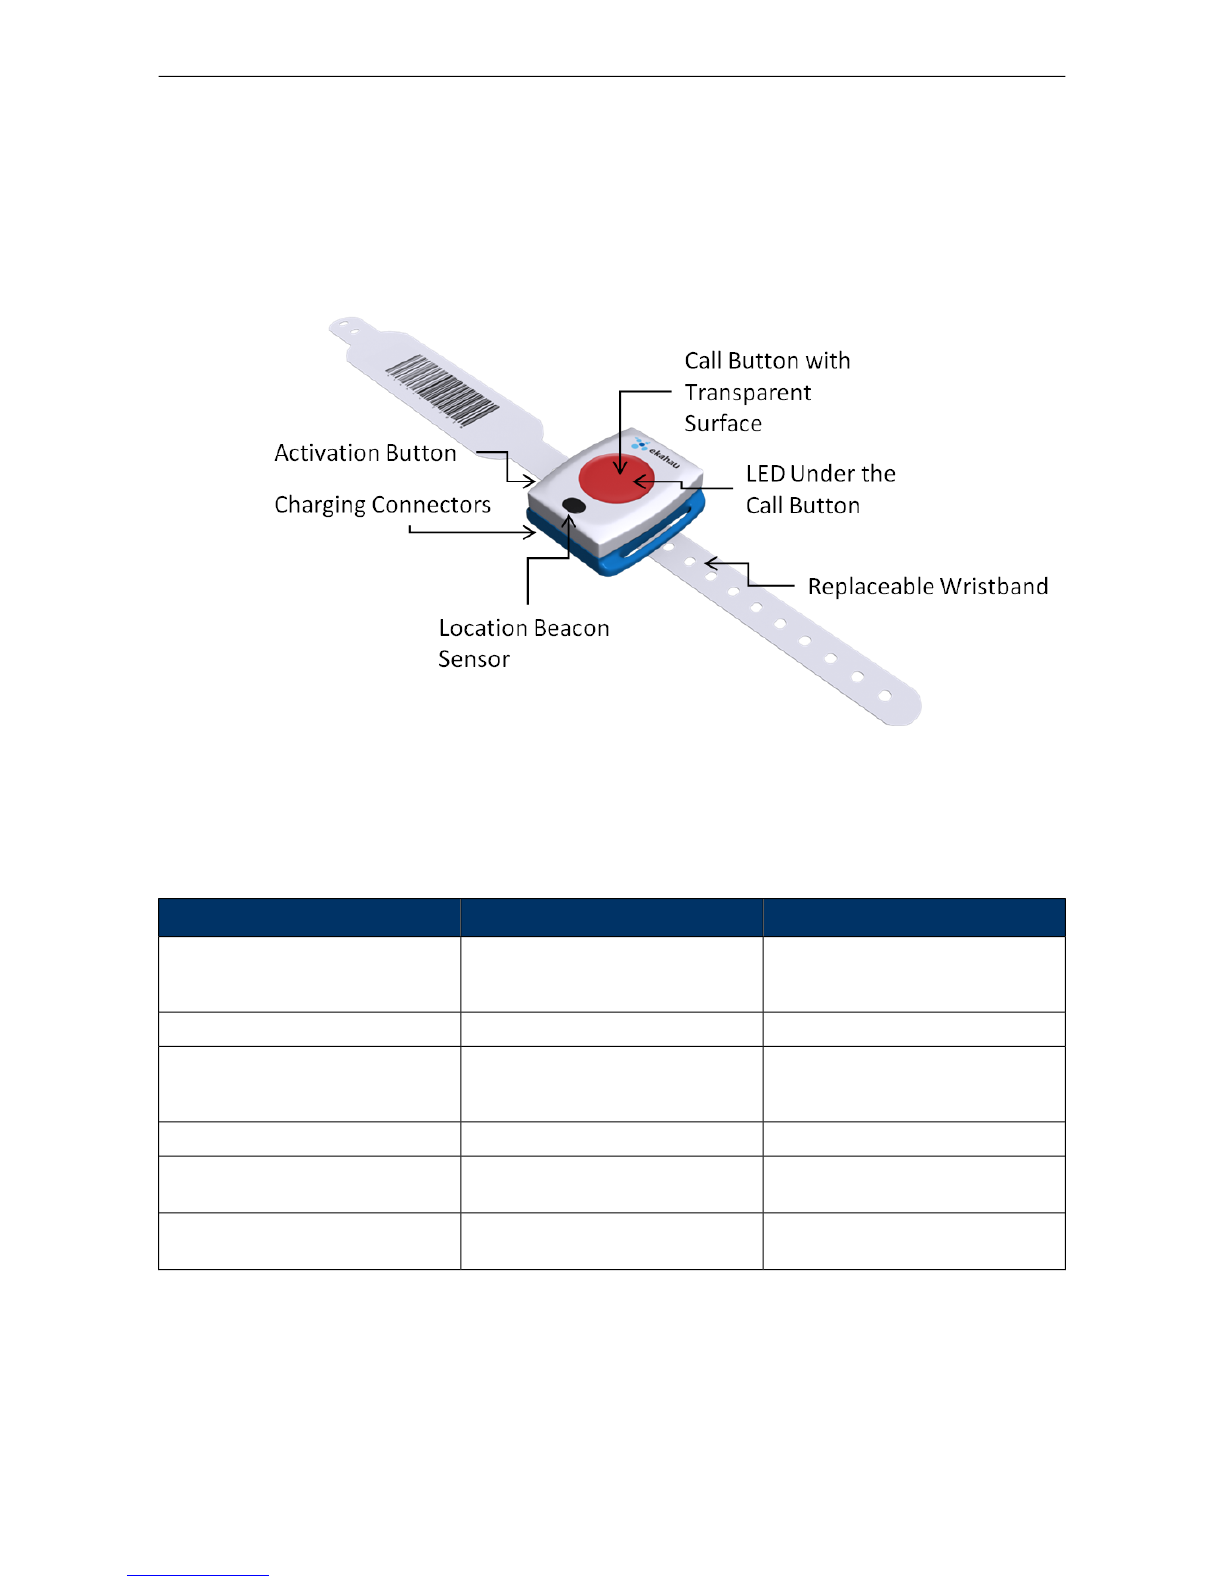
1.3 User Interface
Figure 1.1. T301W user interface
1.4 Status Indication LEDs
The tag is equipped with two multi-color LEDs that provide status indication. The table below lists
the different modes of the tag LEDs:
StatusLEDAction
Activation successful
Activation failed
3 x Green
3 x Red
Activation
Reset successful3 x Green and RedDe-activation (Reset)
Charging
Battery full
Orange
Green
Charging
Button press recognized1 x OrangeButton press
Success of the ELP / EMP packet
is no longer indicated with the LED
-ELP / EMP packet success
Can be configured to use any pat-
tern over EMP command
ConfigurableAlarm
2
Chapter 1. Introduction

2 Initial Activation of the Tag
When the tag is delivered it does not have any of the necessary configuration settings. These
environment specific settings need to be applied before the tag can connect to the network and
the ERC. The T301W tags are delivered with the battery charged to a storage charge.
Tag activation is done using Ekahau Activator software that configures Ekahau T301 family tags
wirelessly. The activation of the tags is explained in more details in chapter Installing Ekahau
Activator T301 on page 3.
After successful Activation you will see the MAC address of the tag appears on the ERC list of
tags. After successful connection with ERC the configurations can be managed directly from ERC
using Tag Configurations page.
2.1 Installing Ekahau Activator T301
The Ekahau Activator T301 can only be installed using the Ekahau RTLS installer. When you
install the Ekahau RTLS, you do not necessarily need to install the Ekahau Activator if the target
computer cannot be used to activate tags with a supported Wi-Fi adapter. If you want to install the
Ekahau Activator later on another computer, simply run the RTLS setup file on the target computer
and choose to install only the Ekahau Activator.
To install Ekahau Activator as a stand alone:
1. Choose a laptop (or a desktop with a supported Wi-Fi adapter) computer with Windows XP
or 2000, at least 256 MB of memory, PC card slot, and 100 MB of free hard disk space
2. Install a supported Wi-Fi adapter using the driver provided by Ekahau. For list of supported
adapters, please visit http://www.ekahau.com/devices
3. Run the RTLS setup file from it's location, and follow the on-screen instructions
2.2 Supported Wi-Fi Adapters.
You can find the latest supported Wi-Fi adapters from our website:
http://www.ekahau.com/devices
2.3 Activation Procedure
For the tags to be able to communicate with the Ekahau RTLS Controller, the tag needs to be
activated e.g. the tag needs to be given the necessarry parameter to associate with the network.
At least the IP address of the Ekahau RTLS Controller, SSID of the network used and the IP
configuration method are required. To activate T301W tags, you need to use the Ekahau Activator
T301 which you can run from Ekahau Programs menu. After that, follow the following Activator
configuration procedure:
2.3.1 Configuring Ekahau RTLS Controller Settings
Input the IP address of the Ekahau RTLS Controller. The Maintenance Interval is by default 240
seconds, but shorter interval can be used if LED and Vibration alerts are sent frequently to the
Chapter 2. Initial Activation of the Tag
3

T301W tag. After completing the "Positioning engine settings", the status bar should show "Engine
Ok". These are the minimum settings needed.
Figure 2.1. Specifying the Engine IP address and Maintenance interval
In case Engine Port, Maintenance port, and/or Maintenance IP needs to be changed, go to
"Advanced" mode.
Figure 2.2. Specifying advanced Positioning Engine settings
4
Chapter 2. Initial Activation of the Tag
Note
When activating the T301W tags, only an initial setup is required for the tag to associate with
the network. All the settings can be set and changed from the Ekahau RTLS Controller. Ekahau
Activator T301 only provides a set of basic settings.
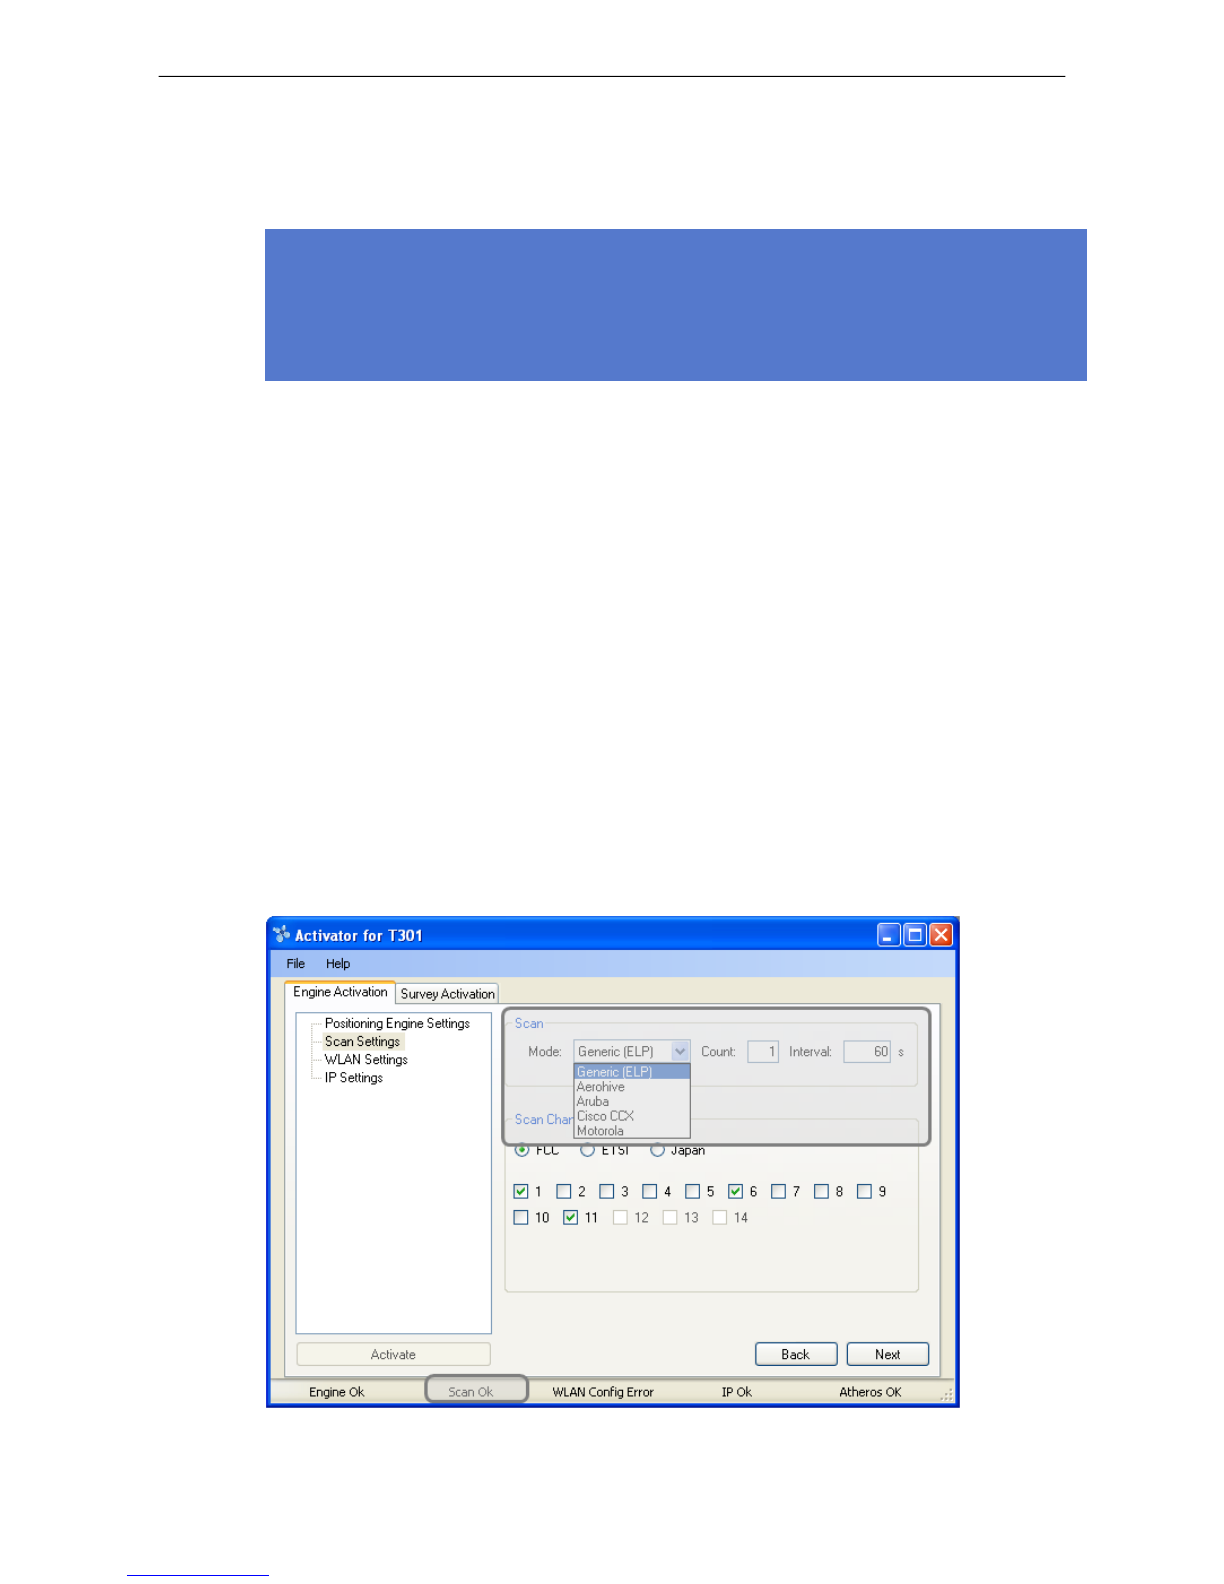
2.3.2 Configuring Scan Settings
Select which location update method you want to use. Select "Generic (ELP)" in case you want
the tag(s) to communicate with the Ekahau RTLS Controller in associated mode where the tag
associates to the network everytime it sends an ELP location update packet. If you want to use
the tag(s) in beaconing mode, select the mode that corresponds to your Wi-Fi network vendor. In
beaconing mode the tag does not associate with the network.
In the "Count" field you can define how many times the tag sends a location update packet during
each location update. By default, the Scan Interval is 60 seconds. You may also use shorter
interval, but it will drain faster the battery of the tag. Alternatively you can use longer Scan Interval
and enable Motion Sensor through the Ekahau RTLS Controller after activation. This way the tag
will scan only when it is in use and on move.
In addition to Scan Settings, you need to define the correct area the tag is used in. FCC for North
America, ETSI for Europe and Japan for Japan. The software automatically disables the channels
not available for the area selected. It is also recommended to only select the channels used in
you network. Activating the unused channels will only reduce the battery lifetime of the tag. After
completing the settings the status bar should show "Scan Ok"
Figure 2.3. Specifying the Scan Interval and the channels used in the network
Chapter 2. Initial Activation of the Tag
5

Warning
Only use channels that really exists in you Wi-Fi network. Activating unnecessary channels will
reduce the tag battery lifetime!
2.3.3 Configuring WLAN Settings
Input the Wi-Fi Network SSID and select the Encryption method used. If WEP 64/128 or WPA2-
PSK is used type in the network key. After WLAN settings are completed the status bar should
show "WLAN Ok"
Figure 2.4. Specifying Wi-Fi network settings
Tip
If WEP encryption is used the Activator automatically determines the key type and length from
what you type. WEP 64 require 5 Ascii characters or 10 hex digits, respectively WEP 128
requires 13 Ascii characters or 26 hex digits.
2.3.4 Configuring IP Settings
Check the IP settings. If DHCP is used nothing needs to be done. In case your network requires
Static IP to be used, type in the IP address range to be used, Netmask and Gateway addresses.
6
Chapter 2. Initial Activation of the Tag
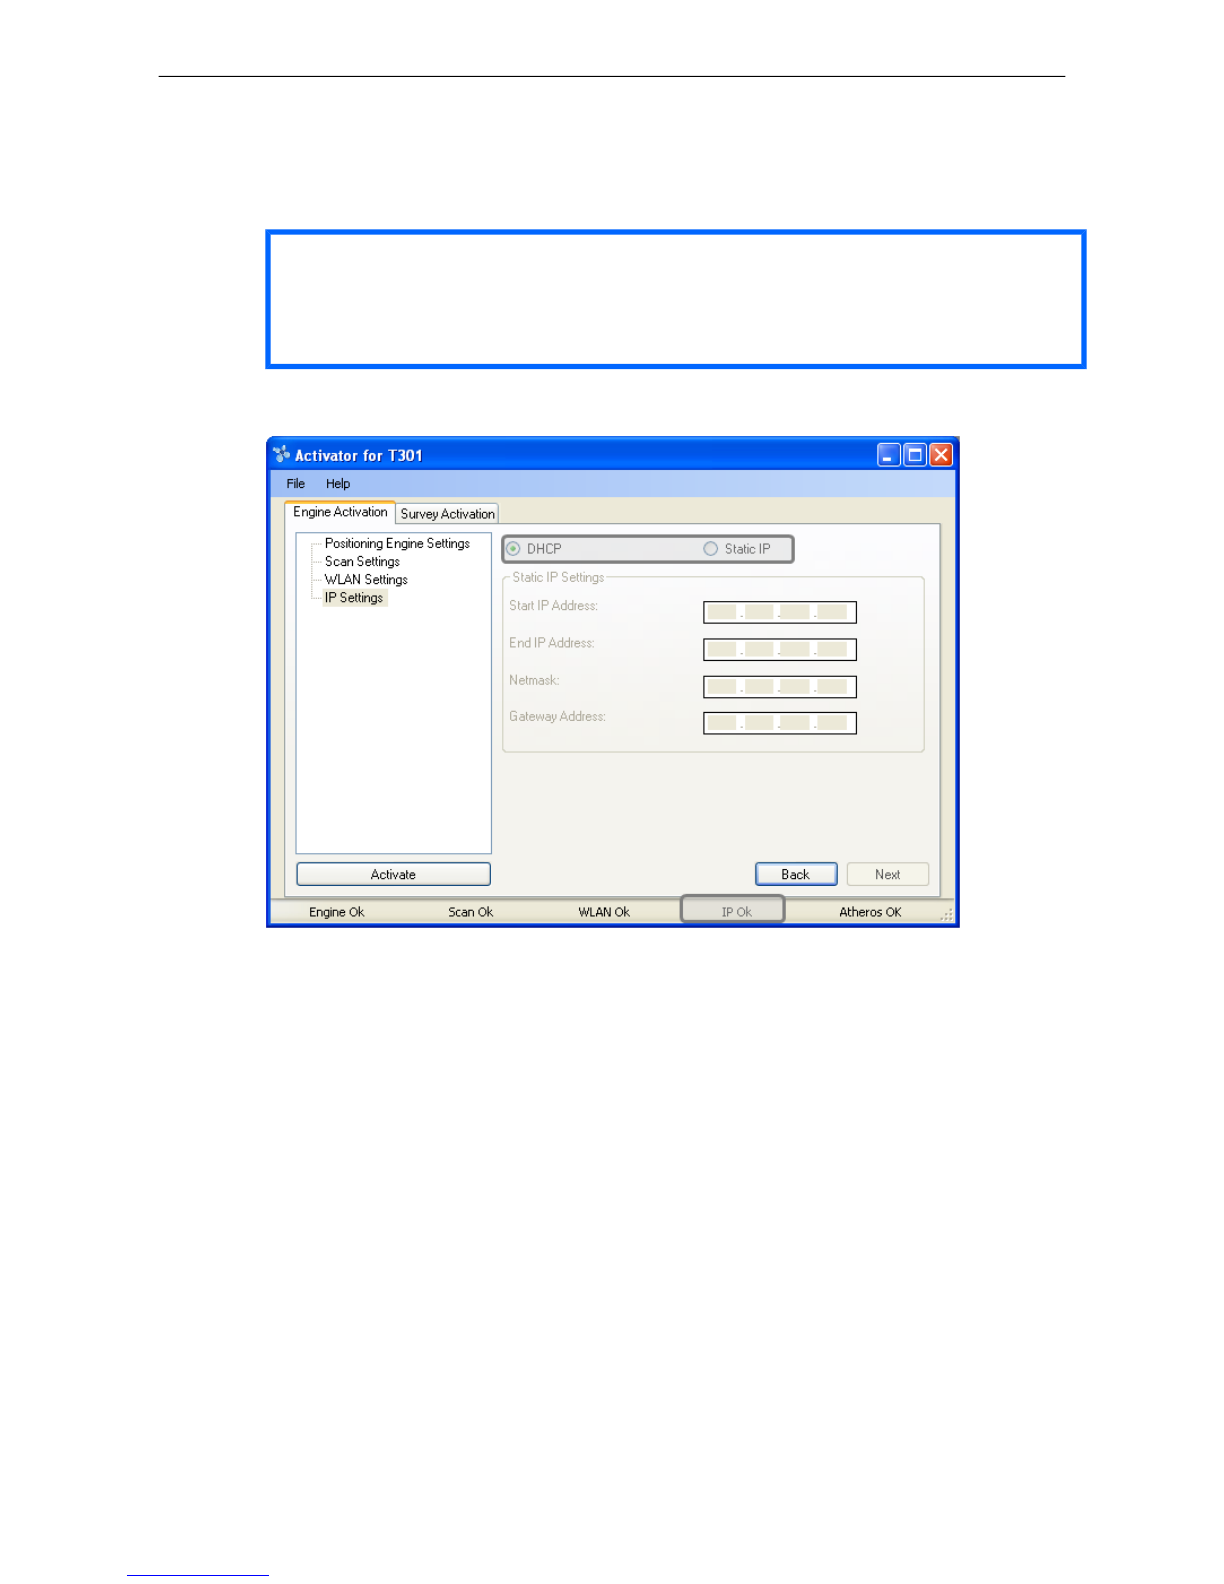
Tip
If you only activate a single tag and wish to use static IP setting. Please input Start IP Address
= End IP Address.
Figure 2.5. Specifying IP settings
2.3.5 Activation
If the supported Wi-Fi adapter is inserted and all the settings are shown OK in the status bar, the
Activate button should now be active. To continue Activating the Tags press the "Activate" button.
Chapter 2. Initial Activation of the Tag
7

Figure 2.6. When all the settings are OK, you can start activating the tags
The Activation window shows all the settings on the upper side of the window. The list of the
activated tags will appead on the area below.
8
Chapter 2. Initial Activation of the Tag

Figure 2.7. The Activator is ready to start activating the tags
When the activation window appears, the Activator is ready to start activating the tags. To activate
the tag, press the small Activation Button on the side of the tag. The tag will play the vibrator
when the Activation Button is pressed. After successful activation, the tag will blink green LED
three times. In addition, the TAG MAC address appears on the activation window, showing Ok
status. Repeat this for all the tags to be activated.
Note
If WPA2-PSK encryption is used, it might take even 10-15 seconds before the tag appears to
EPE's Tags list.
Chapter 2. Initial Activation of the Tag
9

Figure 2.8. The Activator has activated one tag
After completing activating the tags, close the activation window.
Tip
After you have finished the activation, you can save the configuration for future use from the
file menu. If you save the settings on Ekahau Activator T301.ini the setup will be the default
every time the Activator is started.
10
Chapter 2. Initial Activation of the Tag
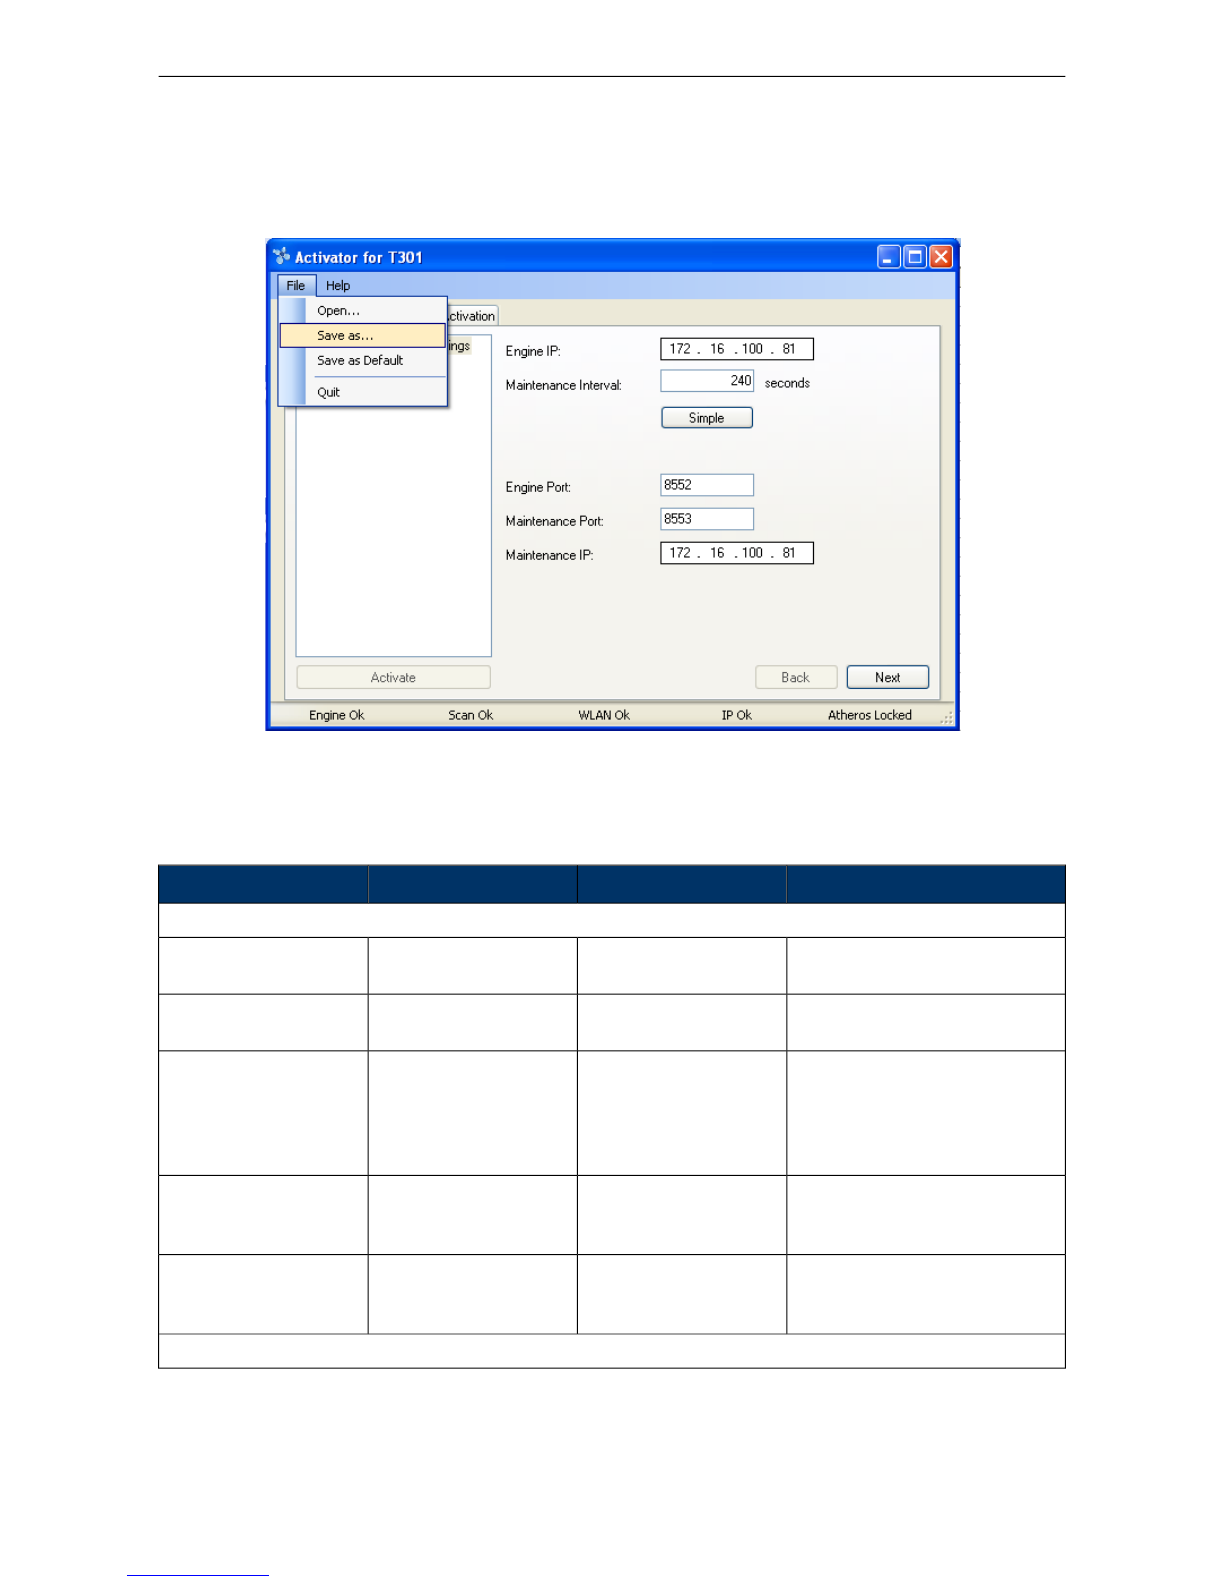
Figure 2.9. Saving the configuration for later use
2.3.6 List of Available Settings in the Activator
The list of available settings in the Activator:
Default valueValuesDescriptionSetting
Positioning Engine settings
0.0.0.0IP Address.IP Address Ekahau
RTLS Controller.
Engine IP
8552Port numberPort number of location
protocol port of ERC.
Engine Port (UDP)
0.0.0.0IP AddressIP Address of Ekahau
RTLS Controller, from
where TAG gets the set-
tings. Typically same as
the Engine IP
Maintenance IP
8553Port numberPort number of mainten-
ance protocol port of
ERC
Maintenance port (UDP)
100 - 63072000The interval of the peri-
odic maintenance calls
in seconds
Maintenance interval
Scan Settings
Chapter 2. Initial Activation of the Tag
11

Default valueValuesDescriptionSetting
Generic (ELP)Generic (ELP) (Associ-
ated Mode)
Aerohive (Beaconing
Mode)
Aruba (Beaconing
Mode)
Cisco CCX (Beaconing
Mode)
Meru (Beaconing Mode)
Defines the location
update mode. Select
either "Associated
Mode" or one of the
"Beacon Modes".
Mode
10 >Defines how many times
a location update packet
is sent during each loca-
tion update
Count
100 - 63072000The interval of the peri-
odic location scans in
seconds.
Interval
1 - 11 Enabled; 12 - 14 DisabledEnabled; DisabledSets the channels that
are scanned
Scan Channels
WLAN Settings
defaultSSID=max 32 digitsSets the Wi-Fi network
name -Service set identi-
fier
SSID
No EncryptionNo Encryption; WEP
64/128; WPA2-PSK
Selects if WEP encryp-
tion is used
Encryption
-ASCII: 5 or 13 charac-
ters
HEX: 10 or 26 hexa-
decimal numbers (0-f)
Sets the WEP pass-
phrase
WEP
11 - 4Sets the WEP index
used
WEP Index
-8 - 63 ASCII charactersSets the WPA2-PSK
encryption and pass-
phrase
WPA2-PSK
IP Settings
DHCPDHCP; StaticDefines the IP address
assigning method.
IP method
Static IP Settings
12
Chapter 2. Initial Activation of the Tag

Default valueValuesDescriptionSetting
0.0.0.0
0.0.0.0
IP address.Sets the start and end
address of the range
used to assign the IP
addresses to the tags
when Static IP is used
Address range
0.0.0.0IP addressTag netmask when
static addressing is
used.
Network mask
0.0.0.0IP addressIP network gateway
when static addressing
is used.
IP gateway
Chapter 2. Initial Activation of the Tag
13

14
Chapter 2. Initial Activation of the Tag

3 Configuration After Initial Activation
The tag can be adjusted for each application and network settings by adjusting a set of parameters.
The parameters can be changed wirelessly after resetting the tag by using the Ekahau Activator
software or through Tag Configurations in Ekahau RTLS Controller.
Ekahau Activator is used for configuring the initial configuration settings that allows connecting
the tag to ERC over the network. After connection is established with ERC, all configurations can
be managed through Ekahau RTLS Controller.
3.1 Tag Configuration Settings in ERC Configs Page
In Ekahau RTLS Controller it is possible to create a configuration to a single tag or a group config-
uration to multiple tags. After the tags are activated, the configurations are applied to tags from
the Tags page. It is also possible to apply a configuration automatically to all new tags via the
Configs page. The list of available settings is in the following table:
Values (Default underlined)DescriptionSetting
Network
Generic (ELP), Aerohive, Aruba
blink, Cisco CCX, Motorola
Allows using a vendor-specific
method for signal measurement.
The Generic method is vendor-
independent.
Scan Method
See Configuring WLAN Set-
tings on page 6 for details
SSID 1 name, Encryption, Pass-
phrase and WEP index.
SSID 1
See Configuring WLAN Set-
tings on page 6 for details
SSID 2 name, Encryption, Pass-
phrase and WEP index.
SSID 2
No association and scan only;
associate and scan; Disabled
Sets whether tag attempts to asso-
ciate on T301W SSID 2 network.
SSID 2 Association
Enabled; DisabledSets whether the tag uses broad-
cast probe when scanning.
Broadcast probe
Tag IP Settings
Use DHCP for each access point
Use DHCP once for all access
points
Preserve the IP-address that was
given by Activator
Sets the IP method used.IP Setting
Positioning Engine
IP AddressSets the ERC IP Address.IP Address
Port numberPort number of location protocol port
of ERC.
Location update Port (UDP)
Port numberPort number of maintenance pro-
tocol port of EPE.
Maintenance port (UDP)
General
Chapter 3. Configuration After Initial
Activation
15

Values (Default underlined)DescriptionSetting
Free textName for the configuration set.Name
Free textDescription for the configuration set.Description
Channels
1- 11; 12 (EU); 13 (EU); 14 (Japan)Sets the channels scanned during
a location scan.
Scan Channels
Periodic Location Update and Maintenance
Enabled; DisabledEnables or disables the periodic
location update.
Periodic Location Update
The interval in Seconds, Minutes,
Hours or Days
Sets the interval for the periodic
location update.
Location Update Interval
Enabled; DisabledEnables or disables the periodic
maintenance calls.
Periodic Maintenance
The interval in Seconds, Minutes,
Hours or Days
The interval of the periodic mainten-
ance calls in seconds.
Maintenance Interval
Sensors
Disabled
Profile 1 (in motion for 8s)
Profile 2 (in motion for 4s)
Profile 3 (in motion for 2s)
Profile 4 (in motion for 1s)
Enables or disables motion sensors.Motion Sensor
In-motion and after motion; After
motion
Sets whether location updates are
sent periodically during the motion
or just when the motion starts and
after the movement has ended.
Motion Update Method
5s; 10s; 30s; 1min; 2min; 5minSets the interval for motion updates.Motion Update Interval
Enabled; DisabledEnables or disables stagnant sens-
ing.
Motion Stagnant Event
The threshold in Seconds, Minutes,
Hours or Days
Sets how long the tag has to remain
stagnant to produce a stagnant
event.
Motion Stagnant Treshold
Disabled, Passive Mode, Active
Mode
Enable or disable the location
beacon sensor. In active mode a
location update is done immediately
when the tag notices a location
beacon. In passive mode the recent
observed location beacon ID is sent
to EPE only when location update
is initiated by other stimuli such as
periodic or motion wakeup.
Location Beacon Sensor
Advanced scan settings
16
Chapter 3. Configuration After Initial
Activation
Table of contents
Other Ekahau GPS manuals


