EKKO Quad 7 User manual

Quad 7
Owner’s Manual
Manual do Usuário
Manual del Usuário

“Este equipamento opera em caráter
secundário, isto é, não tem direito à proteção
contra interferência prejudicial, mesmo de
estações do mesmo tipo, e não pode causar
interfêrencia a sistemas operando em
caráter primário.”
(01)07898952649025
3816-13-8630
Agência Nacional de Telecomunicações

Contents
INTRODUCTION ......................................................3
SAFETY NOTICES .....................................................4
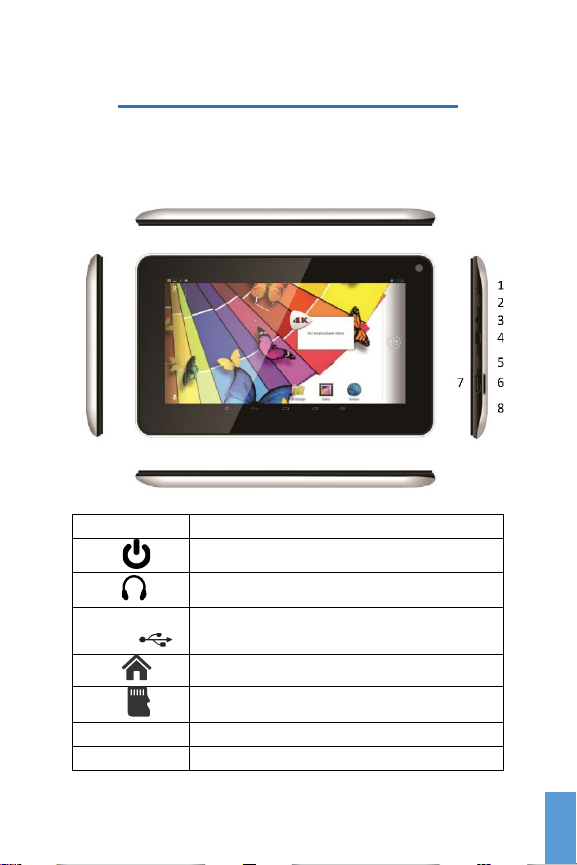
GETTING TO KNOW YOUR TABLET ..........................5
APPEARANCE AND BUTTONS ........................................ 5
PACKAGE CONTENTS................................................... 6
TECHNICAL SPECIFICATION ........................................... 6
QUICK GUIDE..........................................................7
CHARGING YOUR TABLET.............................................. 7
SWITCHING THE TABLET ON/OFF.................................... 8
SLEEP MODE............................................................. 8
WELCOME SCREEN /HOME SCREEN.............................. 9
NAVIGATION ICONS .................................................. 10
STATUS AND NOTIFICATION BAR.................................. 11
EXPLORING YOUR APPS ............................................. 12
MANAGING ICONS AND SCREENS ................................ 13
SETTING MAIN CONFIGURATIONS ........................14
WI-FI SETUP........................................................... 15
EMAIL CONFIGURATION............................................. 16
CONNECTING TO A PC............................................... 17
CHANGE SYSTEM LANGUAGE...................................... 19
FACTORY RESET ....................................................... 20
1
ENG
ENG

2
ENG

Introduction
Thank you for purchasing the EKKO Quad 7 Tablet. This
User Manual will show you some of the basics set up and
functions available in this device.
If you don’t find the information that you are looking for in
this manual, please feel free to contact us at
[email protected]. Or visit our Tech Support web page
at www.ekkotablet.com.
3
ENG
ENG

Safety Notices
1. Keep your tablet away from strong magnetic field to
avoid damaging the product
2. Do not expose your tablet to excessive heat or store
in high temperature places or with too much dust
3. Keep your tablet in a dry place, and never expose it
to rain or water
4. Do not use harsh chemicals, soaps or detergents to
clean your tablet
5. Use only the charger provided with your tablet and
do not charge the battery for more than 24 hours
6. To protect your hearing, make sure the volume level
is not set too high when plugging the headphones
7. Volume level should be adjusted to an appropriate
level to avoid permanent damages to your hearing
8. Do not power off the device during software update
or during download, or it may cause data lost
9. Respect other and obey the law, do not use this
device where prohibited
10. For your protection, perform regular backup of your
tablet’s data when doing upgrades or installing new
software
4
ENG

Getting to know your tablet
Appearance and Buttons
1 MIC
Microphone for recording
2
Power Button, turn on/off
3
Earphone Jack 3.5mm
4
DC-5V/
Micro USB Port for charging, data
transfer, and to use with accessories
5
Home button quickly go to home screen
6
Micro SD Card slot, up to 64GB card
7 HDMI
1080P HDMI output port
8 RESET
Reset button to be used with a pin
5
ENG
ENG

Package Contents
•
EKKOQuad7Tabletwithrechargeablelithium battery
•
AC charger / Output: 5.0V ~ 2.0A
•
Micro USB male to USB male cable
•
Micro USB male to USB female adapter cable
•
Earphones
•
User Manual
Technical Specification
Chipset
ARM CortexA7 Quadcore @1.2GHz
Operating System
Android ™ 4.2.2 Jelly Bean
Display
7” capacitive multitouch HD 1024 x 600 pixels
RAM Memory
1GB DDR3
Flash Memory
8GB (Expandable up to 64GB w/ SD Card)
Cameras
Front: 0.3 megapixels / Rear: 2.0 megapixels
Wi-Fi
Support 802.11 b/g/n
3G
Support optional 3G dongle
Power
Input: 100 ~ 240 VAC / Output: 5.0V – 2.0A
Battery
Rechargeable polymer lithium 3000mAh
Speaker
Yes
Earphone Jack
Yes 3.5mm
Microphone
Yes, records in mp3 format
Video Output
1080p mini HDMI output port
Data Transfer
1 x Micro USB port / 1 xMicro SD Card Slot
Dimensions
192mm x 117mm x 10.7mm
Weight
335 grams
6
ENG

Quick Guide
Charging your tablet
You must fullycharge the battery prior to using the tablet for
the first time. It takes approximately 8 hours to fully charge
the battery. Assemble the charger by connecting the
appropriate pin and the USB male cable to the charger.
Firmly insert the micro USBend of the cable into the DC-5V
port on the tablet. Plug the charger to anAC wall outlet.
PLEASE DO NOT FORCE the micro USB plug into the DC-
5V port. Make sure that the plug is facing the right side with
the port. Improperly connecting the micro USB plug will
damage the port and your tablet will not recharge.
Please take the following precautions when charging you
tablet with lithium battery:
1. Onlyuse theoriginal chargerprovided withyourtablet
2. Don’t charge in high temperature environment, such
as under direct sunshine
3. Lithium battery doesn’t have to be fully discharged
before recharging again
4. While charging, it is normal for the charger and tablet
to heat up
7
ENG
ENG

Switching the tablet on/off
To switch on the tablet, press and hold Power Button for 5
seconds. The boot up sequence will start and takes about a
minute to finish. When it finish you will be at the welcome
screen (locked interface)
Toswitchoffthetablet,pressandholdPowerButton.When
the “Power Off” options menu appears, select Power off.
The device will shut off completely.
Power off options menu
Sleep Mode
Tosave power, youcan turnoffthe screenand putthe tablet
in Sleep Mode by pressing Power Button once. The tablet
will automatically enter Sleep Mode if left untouched for two
minutes.
UnderSleepMode,onlythescreenwillturnoff,andthemain
system will still be on. To completely turn of the tablet and
conserve battery, you should Power Off the device.
8
ENG

Welcome Screen / Home Screen
As soon as you power on your tablet, you will see the
Welcome screen which will be locked.
Welcome Screen locked
With yourfinger, touch theLock Icon and slideit to the right
to unlock the device and go to the Home Screen.
The Home Screen provides access to the things you need
the most, and key information concerning the current status
of your tablet. At the bottom of the Home Screen is the
Navigation Bar Icons and on top you find the Status and
Notification Bar.
9
ENG
ENG

Home Screen
Navigation Icons
Navigations icons are the controls for your tablet. Tapping
each icon will perform a specific task.
1 2 3 4 5 6
Navigation icons
1 Volume Down decrease the volume level
2 RecentAppsopensathumbnaillistofrecentlyusedapps
3 Home opens or brings you back to the Home screen
4 ScreenShoottakesapictureofthescreenatthemoment
5 Back takes you back to the previous screen
6 Volume Up increase the volume level
10
ENG

Status and Notification Bar
The Status bar on top right show time, battery level, Wi-Fi
connection strength, and more. You can access a shortcut
to the settings of theseicons by touching the Status bar with
your finger and sliding down.
Status bar shortcut
The Notifications bar on top left show current notification
fromthesystem,likependingupdates,newpicturesnotices,
etc. To access a shortcut to the list of the notification, press
the notification bar with your finger and slide down.
11
ENG
ENG

Notifcation bar shortcut
Exploring yourApps
OntheHomeScreenyouhaveseven(7)defaulticonswhich
are shortcuts and apps that are most common used. You
cancustomizethembasedonyourownparticularneedsand
lifestyle.
Video App to play videos, movies
Camera to take pictures or record movie
Browser
Applications Menu brings up all installed apps
Picture Gallery to view pictures taken or saved
Email App
Settings shortcut
12
ENG

You can view a list of all the applications available in your
deviceby clickingtheApplication Menu icon. To open,just
click on the icon for the application you would like to run.
Application Menu
Managing Icons and Screens
Besides the Home Screen, you have 4 additional screens
that you cancustomize and populate with your favorite apps
or widgets.
To add icons to your Home Screen, Press and Hold the
icon for the app you would like to move around, and without
lifting your fingers from the screen, Drag the icon to the
desired location and lift your finger to drop the icon.
To deletean icon from the Home Screen, just Press, Hold
andDragtheicontothe “X Remove”markonthe toporthe
top left of the home screen and lift your finger.
13
ENG
ENG

To see a different screen, slide your finger to the left or to
therightfromtheHomeScreen.Therearetwomorescreens
to either side of the Home Screen that you can customize.
Scroll left or right
Setting Main Configurations
UnderSettingsyoucanconfigurethefollowingpreferences:
•Wireless & Networks (Wi-Fi, VPN…)
•Device (Sound, display, apps…)
•Personal (Security, language…)
•Accounts (Add or delete accounts)
•System (Date &Time…)
14
ENG

ToaccesstheSettingsMenu,justclicktheSettingiconfrom
the Home Screen or theApplication Menu.
SettingsMenu
Wi-Fi Setup
To configure your Wi-Fi, go to the Settings
Wireless &
Networks
Wi-Fi. OnceintheWi-Fisetupscreen,you will
have to slide the On/Off switch located on the top of the
screen to the On position. To turn off the Wi-Fi, just slide
the switch to Off position.
Slide to ON position
The tablet will automatically scan and list available Wi-Fi
networks. Choose your wireless access point, and proceed
to enter your credentials.
15
ENG
ENG

Enter your network credentials
Email Configuration
To configure you email, click the Email icon from the Home
Screen. You will be prompted to enter your full email
address and password.
Enter full email and password
16
ENG

Click Next when done and the system will automatically
search for the incoming and outgoing server settings. If
unable to configure automatically, you have the option to
manually set these parameters.
The next screen is the Email Account Settings menu,
which allows you configure certain emails parameters to
your specifications. When done setting parameters, click
Next to finalize email setup.
Setting Gmail account is similar, just click the Gmail icon
from theApplication Menu.
Connecting to a PC
To transfer files between the tablet and a computer you will
need to use the micro USB cable. Insert the micro USB
end of the cable into the tablet and the standard USB end
into the corresponding port of your computer.
PLEASE DO NOT FORCE the micro USB plug into the DC-
5V / port. Make sure that the plug is facing the right
sidewiththeport.ImproperlyconnectingthemicroUSBplug
will damage the port and your tablet will not recharge.
Once connected, a USB icon will appear in the Notification
bar (top left) as shown below:
17
ENG
ENG

USB Icon on Notificationbar
Bring down the Notification shortcut bar by pressing and
sliding down the bar. Then click USB connected to access
the USB mass storage option screen.
Click this bar to access USB mass storage
Once in the USB mass storage option screen, click Turn on
USBstoragethenOK.Younowcancopyfilesbetweenyour
computer and your tablet. Your tablet will be recognized by
the computer as a Removable Storage Device.
Click Turn on USB storage
18
ENG
Table of contents
Languages:
Other EKKO Tablet manuals