ELAC MIRACORD 60 Assembly instructions

BEDIENUNGSANLEITUNG & SICHERHEITSHINWEISE.
OPERATING & SAFETY INSTRUCTIONS


Herzlichen Glückwunsch!
Sie sind stolzer Besitzer des
Wir beglückwünschen Sie zum Kauf eines ELAC Plattenspielers, der unter strengen
Qualitäts- und Umweltauflagen hergestellt wurde. Um alle Leistungsmerkmale optimal
auszunutzen, lesen Sie bitte die Bedienungsanleitung gründlich durch. Wir raten Ihnen,
diese Anleitung für späteres Nachschlagen gut aufzubewahren.
Bitte beachten Sie die separaten Sicherheitshinweise, die der Verpackung Ihres neuen
Plattenspielers beigepackt sind. Bitte lesen, beachten und befolgen Sie alle diese Sicher-
heitshinweise und bewahren Sie diese ebenfalls auf. Beachten Sie alle Warnungen,
die auf dem Gerät und in der Bedienungsanleitung aufgeführt sind.
1

INHALTSVERZEICHNIS / CONTENTS
Seite / page
Deutsch Beschreibung 3
Erste Inbetriebnahme 5
Wartung 7
Störungshilfen 8
Service / Pflege / Fertigungskontrolle /
Entsorgung / Recycling 9
Technische Daten 18
English Description 11
Initial Starting-Up 13
Maintenance 15
Troubleshooting 16
Service / Production control / Disposal / Recycling 17
Specifications 19
2

BESCHREIBUNG
3
1. Gegengewicht
Das Gegengewicht dient zur genauen Einstellung des Auflagegewichtes der Tonabnehmernadel
auf der Schallplatte
2. Anti-Skating Einrichtung
Dieser Drehknopf dient zur Einstellung der Anti-Skating-Funktion des Tonarms.
3. Tonarm-Hebel
Dieser Hebel dient zum Heben und Senken des Tonarms.
4. Tonarm-Arretierung (Tonarmhalter)
Diese dient zur Arretierung des Tonarms in seiner Halterung, wenn er nicht verwendet wird.
5. Tonarmkopf
Dieser hält das Tonabnehmersystem an seiner Stelle und schützt die Nadel durch eine
abnehmbare Schutzkappe (nicht dargestellt).
6. Plattenteller
Auf den Plattenteller wird die Schallplatte gelegt, wenn sie gespielt werden soll.
7. Schalter 33 / 45 U/min (33 / 0 / 45)
Wählen Sie 33 oder 45 U/min zum Abspielen einer Schallplatte, schalten Sie auf „STOP“ um die
Wiedergabe anzuhalten. Schalten Sie wieder auf 33 oder 45, um die Wiedergabe ab dem
Haltepunkt fortzusetzen.
8. Staubschutzhaube
Aufnahme für die Staubschutzhaube.
8

BESCHREIBUNG
4
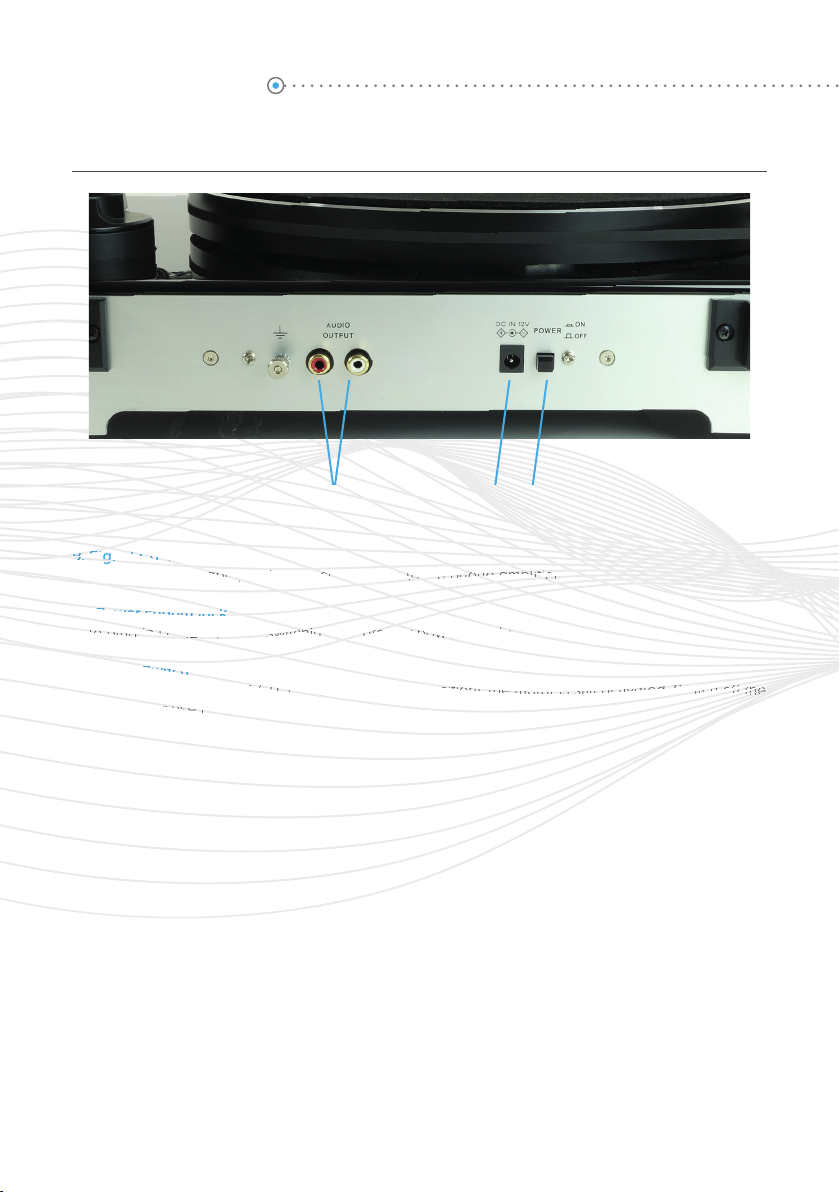
9. Ausgänge
Verbinden Sie den Miracord 60 mittels Cinch (RCA)-Kabeln mit einem Phono-Vorverstärker.
10. Stromversorgungsanschluss
Zum Anschließen des DC 12 V / 0,5 A Netzteil-Adapters für die Stromversorgung.
11. Stromschalter
Im PAUSE-Modus (der 33 / 0 / 45-Schalter ist in „0“-Stellung) ist die Elektronik des Plattenspielers
noch im Betrieb. Schalten Sie den Plattenspieler mit Hilfe dieses Schalters aus,
um Energie zu sparen.
119 10

AUFBAU UND EINSTELLUNG
1) Legen Sie den Plattenteller auf. Legen Sie nun den Riemen um den Antrieb. Drehen Sie den Teller
einige Male um sicherzustellen, dass der Riemen sauber auf dem Pulley und dem Plattenteller
läuft. Legen Sie nun die Filzmatte auf.
2) Montieren Sie einen Tonabnehmer auf den Tonarmkopf (Headshell). Verbinden Sie hierzu die vier
Verbindungskabel (mit Kabelschuhen) der Headshell mit dem Tonabnehmer. Achten Sie dabei
auf die Farbcodierung der Anschlüsse. Montieren Sie den Tonabnehmer auf der Headshell mit
Hilfe der beiden Schrauben. Installieren Sie eine Tonabnehmernadel, sofern diese nicht montiert
ist. Setzen Sie die Schutzkappe, sofern vorhanden, wieder auf die Tonabnehmernadel.
3) Setzen Sie das Gegengewicht am Ende des Tonarmes auf. Beachten Sie dabei, dass die
Skala zu Ihnen zeigt.
4) Drehen Sie den Anti-Skating-Drehknopf gegen den Uhrzeigersinn auf „0“.
5) Bringen Sie den Hebel zum Heben des Tonarms in die vordere Stellung, dass die Liftbühne
sich absenkt.
6) Öffnen Sie die Arretierung des Tonarms. Nehmen Sie den Griff des Tonarms und führen ihn
gerade vor den Plattenteller, so dass er nach oben und nach unten bewegt werden kann.
Entfernen Sie die Schutzkappe von der Nadel. Passen Sie auf, dass die Nadel nicht berührt wird.
7) Drehen Sie das Gegengewicht, bis der Tonarm in einer waagerechten Position bleibt und sich
nicht nach unten oder nach oben bewegt. Wenn der Tonarm sich nach oben bewegt: Drehen Sie
das Gegengewicht gegen den Uhrzeigersinn. Wenn der Tonarm sich nach unten bewegt,
drehen Sie das Gegengewicht im Uhrzeigersinn.
8) Arretieren Sie den Tonarm.
9) Das Gegengewicht verfügt über einen Drehring mit einer Skala. Die Kerbe auf dem Tonarm zeigt
auf einen Wert dieser Skala. Ohne das Gegengewicht zu drehen, drehen Sie den Ring
alleine auf „0“.
10) Die Skala zeigt das Auflagegewicht der Tonabnehmernadel in Gramm. Das Auflagegewicht
des Tonabnehmersystems könnte z.B. 2,0 g betragen. Drehen Sie das Gegengewicht in deisem
Fall (und nicht nur den Ring) gegen den Uhrzeigersinn auf „2“ und das Anti-Skating auf „2“.
Sollte eine andere Tonabnehmernadel verwendet werden, regulieren Sie das Auflagegewicht
und das Anti-Skating der Tonabnehmernadel, wie in den jeweiligen Spezifikationen angegeben.
Weitere Informationen und HInweise unter:
www.youtube.com/c/ELACElectroacusticGmbHKiel
ERSTE INBETRIEBNAHME
5

ERSTE INBETRIEBNAHME
6
NETZVERBINDUNG
Bei diesem Plattenspieler ist ein externer Netzteil-Adapter (DC 12 V / 0,5 A) im Lieferumfang ent-
halten. Das Netzteil kann mit einem Stromnetz von 110 V / 60 Hz oder 230 V / 50 Hz verbunden
werden.
VERSTÄRKERVERBINDUNG
Schließen Sie den Plattenspieler an einen geeigneten Phono-Vorverstärker mit RIAA-Entzerrung an.
Verbinden Sie hierzu die rote Ausgangsbuchse des Miracord mit dem rechten Eingangskanal des
Phono-Vorverstärkers und die weiße Ausgangsbuchse des Miracord mit dem linken Eingangskanal
des Phono-Vorverstärkers.
EINE SCHALLPLATTE ABSPIELEN
1) Legen Sie die Schallplatte auf den Plattenteller. Im Fall einer Single müssen Sie
den Puck auf die Achse legen.
2) Wählen sie die Abspielgeschwindigkeit.
3) Lösen Sie die Arretierung des Tonarms.
4) Setzen Sie den Tonabnehmer senkrecht über die erste Spur der Schallplatte.
5) Wenn die Schallplatte bis zum Ende abgespielt wurde, drücken Sie den Knopf
zum Heben des Tonarms und führen diesen zurück zum Tonarmhalter.
6) Wenn Sie die Wiedergabe anhalten wollen, schalten sie den Drehknopf auf „0“.
Um die Wiedergabe fortzusetzen, drehen Sie ihn wieder auf 33 oder 45.
7) Am Ende der Wiedergabe, schalten Sie bitte das Gerät auf OFF, um Energie zu sparen.

DIE TONABNEHMERNADEL ERSETZEN
- Arretieren Sie den Tonarm.
- Nehmen Sie die Schutzkappe von der Tonabnehmernadel ab.
- Ziehen Sie die Tonabnehmernadel nach unten vorn und entfernen Sie sie.
- Installieren Sie die neue Tonabnehmernadel, führen Sie dabei die Arbeitsschritte
in umgekehrte Reihenfolge durch.
- Setzen Sie die Schutzkappe wieder auf die Tonabnehmernadel.
AUSBAUEN DES TONABNEHMERS
- Arretieren Sie den Tonarm.
- Entfernen Sie die Tonabnehmernadel (siehe oberer Abschnitt).
- Lösen Sie die Schrauben des Systems und lassen Sie es herunter.
- Ziehen Sie die vier Kabelschuhe der Verbindungskabel vom System ab.
EINBAU EINES NEUEN TONABNEHMERS
- Verbinden Sie die vier Kabelschuhe der Verbindungskabel.
- Achten Sie auf die Farbcodierung der Anschlüsse.
- Montieren Sie den Tonabnehmer im Tonabnehmerkopf mit Hilfe der beiden Schrauben.
- Installieren Sie die Tonabnehmernadel wieder.
- Setzen Sie die Schutzkappe wieder auf die Tonabnehmernadel.
WICHTIGE HINWEISE
Damit Sie Ihre Schallplatten maximal und längerfristig genießen können, empfehlen wir die
Reinigung mit einem Lappen und einer antistatischen Bürste. Aus dem gleichen Grund sollte
Ihre Tonabnehmernadel regelmäßig ersetzt werden (ungefähr alle 250 Stunden). Reinigen
Sie gelegentlich die Tonabnehmernadel mit einer sehr weichen Bürste, die Sie in Alkohol
getaucht haben (bürsten des Tonabnehmers von hinten nach vorne).
WENN SIE IHREN PLATTENSPIELER TRANSPORTIEREN, VERGESSEN SIE NICHT:
Arretieren Sie den Tonarm.
Klappen Sie die Schutzkappe auf die Tonabnehmernadel.
Nehmen Sie den Antriebsriemen vom Pulley und verstauen Sie den Riemen.
Ziehen Sie den Plattenteller nach oben von der Welle ab.
WARTUNG
7

STÖRUNGSHILFEN
Symptom /
Betriebszustand
Mögliche Ursache Abhilfe
Motor dreht nicht Geschwindigkeitswahlschalter
steht auf „0“
Drehen Sie den Geschwindigkeitswahl-
schalter auf die korrekte Geschwindig-
keit der abzuspielenden Platte.
POWER-Schalter steht auf
„OFF“
Drücken Sie den POWER-Schalter auf
„ON“.
Tonsignale werden
sehr leise und evtl.
verzerrt wiederge-
geben
Der Plattenspieler ist an
einam Line-Eingang am Ver-
stärker angeschlossen.
Schließen Sie den Plattenspieler an
einem Phono-Input Ihres Verstärkers an.
Der rechte Kanal ist
links zu hören (und
umgekehrt)
Es liegt eine Vertauschung der
Ausgänge vor.
Vertauschen Sie am Plattenspieler die
Stecker, die an den beiden Ausgängen
links und rechts angeschlossen sind.
Laute
Brummgeräusche
Kontaktprobleme bei den
Signal-Verbindungen (z.B.
Cinch-Stecker, Adapter für
Verlängerungen)
Alle Verbindungen überprüfen; für
akustische Kontrolle grober Fehler den
Pegel am (Vor-) Verstärker auf geringe
Lautstärke reduzieren; evtl. müssen
Cinch-Stecker im Außendurchmesser
nachjustiert werden.
Leiser Brumm Metallgehäuse wirkt als
Antenne und fängt sich Brum-
men ein
Es kann hilfreich sein, die Metallteile des
Plattenspielers leitend mit der Masse des
(Phono-) Vorverstärkers zu verbinden. Zu
diesem Zwecke stellt der Plattenspieler
eine Erdungsklemme bereit. Nutzen Sie
eine ausreichend dicke Litze zum Her-
stellen der Masseverbindung.
Die Musik klingt nicht
wie gewohnt
Falsche Drehzahl gewählt. Schauen Sie auf der aufgelegten Schall-
platte nach, mit welcher Drehzahl diese
abgespielt werden muss. Es gibt auch
Platten im LP-Format (30 cm), die mit
45 U/min. abgespielt werden müssen
(„Maxi-Singles“) und kleine Platten im
Single-Format (17 cm), die mit 33 ⅓
U/min. abgespielt werden müssen
(sog. „EPs“).
8

SERVICE
Service / Pflege:
Ihr Plattenspieler ist wartungsfrei. Änderungen im akustischen Verhalten sind über viele Jahre so
minimal, dass man davon ausgehen kann, dass das menschliche Gehör sich im Laufe der Jahre
stärker verändert als der Plattenspieler. Einzig und allein die Nadel ist einem Verschleißprozess
unterworfen und sollte von Zeit zu Zeit überprüft und ggf. ausgewechselt werden.
Service / Pflege / Fertigungskontrolle / Entsorgung
Reinigen Sie Ihren Plattenspieler nur mit einem weichen, trockenen und fusselfreien Tuch be-
ziehungsweise mit einem Pinsel. Verwenden Sie auf keinen Fall Scheuermittel, Alkohol, Wasch-
benzin, Möbelpolitur oder Ähnliches. Setzen Sie Ihren Plattenspieler auch keinesfalls höherer
Feuchtigkeit aus. Starke Temperaturschwankungen, Feuchtigkeit und längere Lichtbestrahlung
können dem Plattenspieler Schaden zufügen und seine Optik verändern.
Im Falle einer Fehlfunktion Ihres Plattenspielers sollten Sie den Rat eines Fachmannes einho-
len. Ihr Fachhändler steht Ihnen gern zur Verfügung. Sollte z.B. durch eine Fehlbedienung einer
fremden Person ein Plattenspieler zerstört werden, so sind zur Reparatur einige Fachkenntnisse
erforderlich, um die einwandfreie Funktion wiederherzustellen.
Die heutigen Möbel sind mit einer Vielfalt von Lacken und Kunststoffen beschichtet und werden
mit den unterschiedlichsten Pflegemitteln behandelt. Es kann daher nicht völlig ausgeschlossen
werden, dass manche dieser Stoffe Bestandteile enthalten, die Gummifüße von Plattenspielern
angreifen und aufweichen. Legen Sie daher ggf. eine rutschfeste Unterlage unter den Platten-
spieler.
Fertigungskontrolle
Jeder Produktionsschritt wird einzeln überprüft. So wird jedes Teil eines Plattenspielers (z.B.
Motor oder Tonarm) mehrfach getestet, vom Wareneingang bis zur Endmontage. Bei der Endkon-
trolle wird jeder Plattenspieler akustisch geprüft, d.h. geschulte Ohren überzeugen sich von der
verzerrungsfreien Wiedergabe jedes Frequenzbereiches.
Außerdem werden diverse Messwerte (Drehzahl, Gleichlauf, Störabstand) überprüft, um die ein-
wandfreie Funktionsweise der einzelnen Baugruppen sicherzustellen.
Um enge Toleranzgrenzen einhalten zu können, ist es erforderlich, die Schwankungen z.B. der
Werte der elektrischen Bauelemente sehr stark einzuschränken, da sich Ungenauigkeiten der
Einzelkomponenten im Gesamtsystem addieren können. Um eine maximale Fertigungsqualität
zu realisieren, ist die Einhaltung der ELAC-Qualitätskriterien und Vorgaben größte Pflicht.
Entsorgung
Der Karton und das Verpackungsmaterial sollten aufbewahrt werden. Sie stellen einen idealen
Behälter für das Gerät dar und sollten im Hinblick auf spätere Transporte aufbewahrt werden.
Das Verpackungsmaterial stellt einen wichtigen Wertstoff dar. Es besteht aus Textilfasern
(Tücher), Kunststoffen (Beutel und Formteile) sowie Pappe, die zur Wiederverwertung dem Stoff-
kreislauf wieder zugeführt werden sollen. Wir haben mit Ihrem Fachhändler eine Rücknahme-
und Entsorgungsvereinbarung getroffen, die uns garantiert, dass die Wertstoffe dort, sortenrein
getrennt, entsorgt werden. Bitte bringen Sie daher Ihre Verpackung Ihrem Fachhändler zur
Entsorgung zurück.
Recycling
Tragen Sie bitte zur umweltgerechten Entsorgung von Elektronikschrott bei. Elektronische Altge-
räte dürfen nicht mit dem Hausmüll beseitigt werden! Umweltgerechtes Recycling muss nach den
jeweiligen Landesregeln erfolgen.
9

Congratulations!
You are the proud owner of the
Congratulations on the purchase of your ELAC turntable that has been designed in
accordance with strict quality and environmental requirements. Please read the
instruction manual carefully.
We recommend keeping it in a safe place for future reference. Please note the enclosed
safety instructions. Please follow the instructions and keep the safety instructions. Heed
all warnings on the appliance and in the manual.
10

11
DESCRIPTION
1. Counterweight
The counterweight is used for precise adjustment of the stylus pressure on the vinyl, to properly
balance the tonearm.
2. Anti-Skating Control
Use this to set the anti-skating force of the tonearm.
3. Tone arm Lever
Use this lever to lower and raise the tonearm.
4. Tone arm Lock (arm rest)
Use this to lock the tone arm in place when not in use.
5. Headshell
This holds the stylus (“needle”) in place and provide protection by means of its removable stylus
protection cap (not shown)
6. Platter
Place the record here when playing.
7. 33 / 45 RPM Switch (33 / 0 / 45)
Select 33 or 45 rpm for playing a vinyl, switch to “0” to pause the playing.
Switch to 33 or 45 again, to continue the playing from the pause point.
8. Clamps
Clamps for the dustcover.
8
12
DESCRIPTION
9. Signal Connectors
Plug in the RCA cable, and connect the cable to the phono amplifier.
10. Power supply jack
To plug-in DC 12 V / 0.5 A switching adaptor for power supply.
11. Power Switch
During PAUSE mode (33 / 0 / 45 switch is in “0” position), the motor is still activated. Switch off the
player after use to save energy.
9. Signal Connectors
During PAUSE mode (33 / 0 / 45 switch is in “0” position), the motor is still activated. Switch off the
During PAUSE mode (33 / 0 / 45 switch is in “0” position), the motor is still activated. Switch off the
During PAUSE mode (33 / 0 / 45 switch is in “0” position), the motor is still activated. Switch off the
During PAUSE mode (33 / 0 / 45 switch is in “0” position), the motor is still activated. Switch off the
During PAUSE mode (33 / 0 / 45 switch is in “0” position), the motor is still activated. Switch off the
During PAUSE mode (33 / 0 / 45 switch is in “0” position), the motor is still activated. Switch off the
During PAUSE mode (33 / 0 / 45 switch is in “0” position), the motor is still activated. Switch off the
player after use to save energy.
11. Power Switch
During PAUSE mode (33 / 0 / 45 switch is in “0” position), the motor is still activated. Switch off the
During PAUSE mode (33 / 0 / 45 switch is in “0” position), the motor is still activated. Switch off the
10. Power supply jack
To plug-in DC 12 V / 0.5 A switching adaptor for power supply.
To plug-in DC 12 V / 0.5 A switching adaptor for power supply.
To plug-in DC 12 V / 0.5 A switching adaptor for power supply.
Plug in the RCA cable, and connect the cable to the phono amplifier.
10. Power supply jack
To plug-in DC 12 V / 0.5 A switching adaptor for power supply.
To plug-in DC 12 V / 0.5 A switching adaptor for power supply.
9. Signal Connectors
Plug in the RCA cable, and connect the cable to the phono amplifier.
To plug-in DC 12 V / 0.5 A switching adaptor for power supply.
Plug in the RCA cable, and connect the cable to the phono amplifier.
Plug in the RCA cable, and connect the cable to the phono amplifier.
Plug in the RCA cable, and connect the cable to the phono amplifier.
Plug in the RCA cable, and connect the cable to the phono amplifier.
Plug in the RCA cable, and connect the cable to the phono amplifier.
Plug in the RCA cable, and connect the cable to the phono amplifier.
To plug-in DC 12 V / 0.5 A switching adaptor for power supply.
Plug in the RCA cable, and connect the cable to the phono amplifier.
To plug-in DC 12 V / 0.5 A switching adaptor for power supply.
10. Power supply jack
Plug in the RCA cable, and connect the cable to the phono amplifier.
Plug in the RCA cable, and connect the cable to the phono amplifier.
Plug in the RCA cable, and connect the cable to the phono amplifier.
9. Signal Connectors
Plug in the RCA cable, and connect the cable to the phono amplifier.
119 10

13
MOUNT AND ADJUST
1) Place the aluminum turntable platter over the center spindle.
Take the belt and stretch it over the motor pulley and platter. Be sure the belt is not twisted.
Spin the platter a few times to be sure the belt runs smoothly.
Now place the felt mat on top of the platter.
2) Mount a cartridge on the headshell with two screws.
Connect the four wires of the headshell with the cartridge and take care of the colored marks.
Insert the headshell into the tone arm and fix it by turning the collar. Install a stylus
if not already installed.
3) Insert the counterweight on the end of the tone arm, rotating it until it threads into place.
Make sure the gauge is pointing in your direction.
4) Rotate the antiskating knob counterclockwise until it is set to „0“.
5) Place the lever for the tone arm lift in the front position so that the lift bank lowers.
6) Open the tone arm lock. Seize the handle of the tone arm and move it just outside the edge of
the platter so that it can float up and down. Remove the protective cap from the stylus. (Be careful
not to hit the stylus against anything.)
7) Turn the counterweight until the tone arm floats level. If the tone arm moves up: Turn the
counterweight counter-clockwise. If the tone arm moves down: Turn the counterweight clockwise.
8) Put the tone arm back onto the arm rest and lock it.
9) The counterweight has a rotary ring with a scale. Without turning the counterweight, only turn the
ring until the zero “0” aligns with the indicator line.
10) The scale indicates the stylus pressure in grams. The pressure of the cartridge with this
turntable is 2.0 g for example, than turn the entire counterweight (not just the ring this time)
counter-clockwise to “2” and the antiskating to „2“. If a different cartridge is used, adjust the
stylus pressure and the antiskating indicated to the corresponding specifications.
Further information and instructions at:
www.youtube.com/c/ELACElectroacusticGmbHKiel
INITIAL STARTING UP
7) Turn the counterweight until the tone arm floats level. If the tone arm moves up: Turn the
counterweight counter-clockwise. If the tone arm moves down: Turn the counterweight clockwise.
9) The counterweight has a rotary ring with a scale. Without turning the counterweight, only turn the
ring until the zero “0” aligns with the indicator line.
10) The scale indicates the stylus pressure in grams. The pressure of the cartridge with this
8) Put the tone arm back onto the arm rest and lock it.
9) The counterweight has a rotary ring with a scale. Without turning the counterweight, only turn the
ring until the zero “0” aligns with the indicator line.
10) The scale indicates the stylus pressure in grams. The pressure of the cartridge with this
turntable is 2.0 g for example, than turn the entire counterweight (not just the ring this time)
6) Open the tone arm lock. Seize the handle of the tone arm and move it just outside the edge of
6) Open the tone arm lock. Seize the handle of the tone arm and move it just outside the edge of
6) Open the tone arm lock. Seize the handle of the tone arm and move it just outside the edge of
the platter so that it can float up and down. Remove the protective cap from the stylus. (Be careful
the platter so that it can float up and down. Remove the protective cap from the stylus. (Be careful
7) Turn the counterweight until the tone arm floats level. If the tone arm moves up: Turn the
counterweight counter-clockwise. If the tone arm moves down: Turn the counterweight clockwise.
9) The counterweight has a rotary ring with a scale. Without turning the counterweight, only turn the
8) Put the tone arm back onto the arm rest and lock it.
9) The counterweight has a rotary ring with a scale. Without turning the counterweight, only turn the
ring until the zero “0” aligns with the indicator line.
6) Open the tone arm lock. Seize the handle of the tone arm and move it just outside the edge of
6) Open the tone arm lock. Seize the handle of the tone arm and move it just outside the edge of
6) Open the tone arm lock. Seize the handle of the tone arm and move it just outside the edge of
the platter so that it can float up and down. Remove the protective cap from the stylus. (Be careful
the platter so that it can float up and down. Remove the protective cap from the stylus. (Be careful
7) Turn the counterweight until the tone arm floats level. If the tone arm moves up: Turn the
counterweight counter-clockwise. If the tone arm moves down: Turn the counterweight clockwise.
8) Put the tone arm back onto the arm rest and lock it.
9) The counterweight has a rotary ring with a scale. Without turning the counterweight, only turn the
counterweight counter-clockwise. If the tone arm moves down: Turn the counterweight clockwise.
8) Put the tone arm back onto the arm rest and lock it.
9) The counterweight has a rotary ring with a scale. Without turning the counterweight, only turn the
ring until the zero “0” aligns with the indicator line.
6) Open the tone arm lock. Seize the handle of the tone arm and move it just outside the edge of
6) Open the tone arm lock. Seize the handle of the tone arm and move it just outside the edge of
6) Open the tone arm lock. Seize the handle of the tone arm and move it just outside the edge of
the platter so that it can float up and down. Remove the protective cap from the stylus. (Be careful
the platter so that it can float up and down. Remove the protective cap from the stylus. (Be careful
7) Turn the counterweight until the tone arm floats level. If the tone arm moves up: Turn the
counterweight counter-clockwise. If the tone arm moves down: Turn the counterweight clockwise.
8) Put the tone arm back onto the arm rest and lock it.
6) Open the tone arm lock. Seize the handle of the tone arm and move it just outside the edge of
6) Open the tone arm lock. Seize the handle of the tone arm and move it just outside the edge of
6) Open the tone arm lock. Seize the handle of the tone arm and move it just outside the edge of
the platter so that it can float up and down. Remove the protective cap from the stylus. (Be careful
the platter so that it can float up and down. Remove the protective cap from the stylus. (Be careful
7) Turn the counterweight until the tone arm floats level. If the tone arm moves up: Turn the
counterweight counter-clockwise. If the tone arm moves down: Turn the counterweight clockwise.
8) Put the tone arm back onto the arm rest and lock it.
6) Open the tone arm lock. Seize the handle of the tone arm and move it just outside the edge of
6) Open the tone arm lock. Seize the handle of the tone arm and move it just outside the edge of
6) Open the tone arm lock. Seize the handle of the tone arm and move it just outside the edge of
the platter so that it can float up and down. Remove the protective cap from the stylus. (Be careful
7) Turn the counterweight until the tone arm floats level. If the tone arm moves up: Turn the
counterweight counter-clockwise. If the tone arm moves down: Turn the counterweight clockwise.
6) Open the tone arm lock. Seize the handle of the tone arm and move it just outside the edge of
not to hit the stylus against anything.)
6) Open the tone arm lock. Seize the handle of the tone arm and move it just outside the edge of
6) Open the tone arm lock. Seize the handle of the tone arm and move it just outside the edge of
the platter so that it can float up and down. Remove the protective cap from the stylus. (Be careful
the platter so that it can float up and down. Remove the protective cap from the stylus. (Be careful
7) Turn the counterweight until the tone arm floats level. If the tone arm moves up: Turn the
not to hit the stylus against anything.)
not to hit the stylus against anything.)
6) Open the tone arm lock. Seize the handle of the tone arm and move it just outside the edge of
6) Open the tone arm lock. Seize the handle of the tone arm and move it just outside the edge of
6) Open the tone arm lock. Seize the handle of the tone arm and move it just outside the edge of
the platter so that it can float up and down. Remove the protective cap from the stylus. (Be careful
the platter so that it can float up and down. Remove the protective cap from the stylus. (Be careful
the platter so that it can float up and down. Remove the protective cap from the stylus. (Be careful
not to hit the stylus against anything.)
not to hit the stylus against anything.)
6) Open the tone arm lock. Seize the handle of the tone arm and move it just outside the edge of
6) Open the tone arm lock. Seize the handle of the tone arm and move it just outside the edge of
6) Open the tone arm lock. Seize the handle of the tone arm and move it just outside the edge of
the platter so that it can float up and down. Remove the protective cap from the stylus. (Be careful
the platter so that it can float up and down. Remove the protective cap from the stylus. (Be careful
5) Place the lever for the tone arm lift in the front position so that the lift bank lowers.
6) Open the tone arm lock. Seize the handle of the tone arm and move it just outside the edge of
6) Open the tone arm lock. Seize the handle of the tone arm and move it just outside the edge of
the platter so that it can float up and down. Remove the protective cap from the stylus. (Be careful
6) Open the tone arm lock. Seize the handle of the tone arm and move it just outside the edge of
the platter so that it can float up and down. Remove the protective cap from the stylus. (Be careful
the platter so that it can float up and down. Remove the protective cap from the stylus. (Be careful
5) Place the lever for the tone arm lift in the front position so that the lift bank lowers.
5) Place the lever for the tone arm lift in the front position so that the lift bank lowers.
6) Open the tone arm lock. Seize the handle of the tone arm and move it just outside the edge of
6) Open the tone arm lock. Seize the handle of the tone arm and move it just outside the edge of
4) Rotate the antiskating knob counterclockwise until it is set to „0“.
5) Place the lever for the tone arm lift in the front position so that the lift bank lowers.
5) Place the lever for the tone arm lift in the front position so that the lift bank lowers.
4) Rotate the antiskating knob counterclockwise until it is set to „0“.
5) Place the lever for the tone arm lift in the front position so that the lift bank lowers.
5) Place the lever for the tone arm lift in the front position so that the lift bank lowers.
3) Insert the counterweight on the end of the tone arm, rotating it until it threads into place.
4) Rotate the antiskating knob counterclockwise until it is set to „0“.
5) Place the lever for the tone arm lift in the front position so that the lift bank lowers.
3) Insert the counterweight on the end of the tone arm, rotating it until it threads into place.
Make sure the gauge is pointing in your direction.
4) Rotate the antiskating knob counterclockwise until it is set to „0“.
4) Rotate the antiskating knob counterclockwise until it is set to „0“.
5) Place the lever for the tone arm lift in the front position so that the lift bank lowers.
Connect the four wires of the headshell with the cartridge and take care of the colored marks.
Insert the headshell into the tone arm and fix it by turning the collar. Install a stylus
3) Insert the counterweight on the end of the tone arm, rotating it until it threads into place.
Make sure the gauge is pointing in your direction.
4) Rotate the antiskating knob counterclockwise until it is set to „0“.
4) Rotate the antiskating knob counterclockwise until it is set to „0“.
5) Place the lever for the tone arm lift in the front position so that the lift bank lowers.
5) Place the lever for the tone arm lift in the front position so that the lift bank lowers.
Connect the four wires of the headshell with the cartridge and take care of the colored marks.
Insert the headshell into the tone arm and fix it by turning the collar. Install a stylus
3) Insert the counterweight on the end of the tone arm, rotating it until it threads into place.
Make sure the gauge is pointing in your direction.
4) Rotate the antiskating knob counterclockwise until it is set to „0“.
5) Place the lever for the tone arm lift in the front position so that the lift bank lowers.
5) Place the lever for the tone arm lift in the front position so that the lift bank lowers.
2) Mount a cartridge on the headshell with two screws.
Connect the four wires of the headshell with the cartridge and take care of the colored marks.
Insert the headshell into the tone arm and fix it by turning the collar. Install a stylus
3) Insert the counterweight on the end of the tone arm, rotating it until it threads into place.
Make sure the gauge is pointing in your direction.
4) Rotate the antiskating knob counterclockwise until it is set to „0“.
5) Place the lever for the tone arm lift in the front position so that the lift bank lowers.
5) Place the lever for the tone arm lift in the front position so that the lift bank lowers.
Spin the platter a few times to be sure the belt runs smoothly.
2) Mount a cartridge on the headshell with two screws.
Connect the four wires of the headshell with the cartridge and take care of the colored marks.
Insert the headshell into the tone arm and fix it by turning the collar. Install a stylus
3) Insert the counterweight on the end of the tone arm, rotating it until it threads into place.
Make sure the gauge is pointing in your direction.
4) Rotate the antiskating knob counterclockwise until it is set to „0“.
5) Place the lever for the tone arm lift in the front position so that the lift bank lowers.
5) Place the lever for the tone arm lift in the front position so that the lift bank lowers.
5) Place the lever for the tone arm lift in the front position so that the lift bank lowers.
counterweight counter-clockwise. If the tone arm moves down: Turn the counterweight clockwise.
5) Place the lever for the tone arm lift in the front position so that the lift bank lowers.
6) Open the tone arm lock. Seize the handle of the tone arm and move it just outside the edge of
6) Open the tone arm lock. Seize the handle of the tone arm and move it just outside the edge of
the platter so that it can float up and down. Remove the protective cap from the stylus. (Be careful
the platter so that it can float up and down. Remove the protective cap from the stylus. (Be careful
not to hit the stylus against anything.)
not to hit the stylus against anything.)
6) Open the tone arm lock. Seize the handle of the tone arm and move it just outside the edge of
not to hit the stylus against anything.)
6) Open the tone arm lock. Seize the handle of the tone arm and move it just outside the edge of
6) Open the tone arm lock. Seize the handle of the tone arm and move it just outside the edge of
the platter so that it can float up and down. Remove the protective cap from the stylus. (Be careful
the platter so that it can float up and down. Remove the protective cap from the stylus. (Be careful
5) Place the lever for the tone arm lift in the front position so that the lift bank lowers.
6) Open the tone arm lock. Seize the handle of the tone arm and move it just outside the edge of
6) Open the tone arm lock. Seize the handle of the tone arm and move it just outside the edge of
the platter so that it can float up and down. Remove the protective cap from the stylus. (Be careful
not to hit the stylus against anything.)
not to hit the stylus against anything.)
6) Open the tone arm lock. Seize the handle of the tone arm and move it just outside the edge of
not to hit the stylus against anything.)
6) Open the tone arm lock. Seize the handle of the tone arm and move it just outside the edge of
6) Open the tone arm lock. Seize the handle of the tone arm and move it just outside the edge of
the platter so that it can float up and down. Remove the protective cap from the stylus. (Be careful
the platter so that it can float up and down. Remove the protective cap from the stylus. (Be careful
6) Open the tone arm lock. Seize the handle of the tone arm and move it just outside the edge of
6) Open the tone arm lock. Seize the handle of the tone arm and move it just outside the edge of
the platter so that it can float up and down. Remove the protective cap from the stylus. (Be careful
the platter so that it can float up and down. Remove the protective cap from the stylus. (Be careful
not to hit the stylus against anything.)
not to hit the stylus against anything.)
6) Open the tone arm lock. Seize the handle of the tone arm and move it just outside the edge of
6) Open the tone arm lock. Seize the handle of the tone arm and move it just outside the edge of
the platter so that it can float up and down. Remove the protective cap from the stylus. (Be careful
the platter so that it can float up and down. Remove the protective cap from the stylus. (Be careful
6) Open the tone arm lock. Seize the handle of the tone arm and move it just outside the edge of
6) Open the tone arm lock. Seize the handle of the tone arm and move it just outside the edge of
the platter so that it can float up and down. Remove the protective cap from the stylus. (Be careful
the platter so that it can float up and down. Remove the protective cap from the stylus. (Be careful
not to hit the stylus against anything.)
not to hit the stylus against anything.)
6) Open the tone arm lock. Seize the handle of the tone arm and move it just outside the edge of
6) Open the tone arm lock. Seize the handle of the tone arm and move it just outside the edge of
the platter so that it can float up and down. Remove the protective cap from the stylus. (Be careful
the platter so that it can float up and down. Remove the protective cap from the stylus. (Be careful
6) Open the tone arm lock. Seize the handle of the tone arm and move it just outside the edge of
6) Open the tone arm lock. Seize the handle of the tone arm and move it just outside the edge of
the platter so that it can float up and down. Remove the protective cap from the stylus. (Be careful
the platter so that it can float up and down. Remove the protective cap from the stylus. (Be careful
not to hit the stylus against anything.)
not to hit the stylus against anything.)
6) Open the tone arm lock. Seize the handle of the tone arm and move it just outside the edge of
6) Open the tone arm lock. Seize the handle of the tone arm and move it just outside the edge of
the platter so that it can float up and down. Remove the protective cap from the stylus. (Be careful
6) Open the tone arm lock. Seize the handle of the tone arm and move it just outside the edge of
the platter so that it can float up and down. Remove the protective cap from the stylus. (Be careful
the platter so that it can float up and down. Remove the protective cap from the stylus. (Be careful
not to hit the stylus against anything.)
not to hit the stylus against anything.)
6) Open the tone arm lock. Seize the handle of the tone arm and move it just outside the edge of
6) Open the tone arm lock. Seize the handle of the tone arm and move it just outside the edge of
the platter so that it can float up and down. Remove the protective cap from the stylus. (Be careful
6) Open the tone arm lock. Seize the handle of the tone arm and move it just outside the edge of
the platter so that it can float up and down. Remove the protective cap from the stylus. (Be careful
the platter so that it can float up and down. Remove the protective cap from the stylus. (Be careful
not to hit the stylus against anything.)
not to hit the stylus against anything.)
6) Open the tone arm lock. Seize the handle of the tone arm and move it just outside the edge of
6) Open the tone arm lock. Seize the handle of the tone arm and move it just outside the edge of
the platter so that it can float up and down. Remove the protective cap from the stylus. (Be careful
the platter so that it can float up and down. Remove the protective cap from the stylus. (Be careful
6) Open the tone arm lock. Seize the handle of the tone arm and move it just outside the edge of
6) Open the tone arm lock. Seize the handle of the tone arm and move it just outside the edge of
the platter so that it can float up and down. Remove the protective cap from the stylus. (Be careful
the platter so that it can float up and down. Remove the protective cap from the stylus. (Be careful
not to hit the stylus against anything.)
not to hit the stylus against anything.)
6) Open the tone arm lock. Seize the handle of the tone arm and move it just outside the edge of
6) Open the tone arm lock. Seize the handle of the tone arm and move it just outside the edge of
the platter so that it can float up and down. Remove the protective cap from the stylus. (Be careful
the platter so that it can float up and down. Remove the protective cap from the stylus. (Be careful
6) Open the tone arm lock. Seize the handle of the tone arm and move it just outside the edge of
6) Open the tone arm lock. Seize the handle of the tone arm and move it just outside the edge of
the platter so that it can float up and down. Remove the protective cap from the stylus. (Be careful
the platter so that it can float up and down. Remove the protective cap from the stylus. (Be careful
not to hit the stylus against anything.)
not to hit the stylus against anything.)
6) Open the tone arm lock. Seize the handle of the tone arm and move it just outside the edge of
6) Open the tone arm lock. Seize the handle of the tone arm and move it just outside the edge of
the platter so that it can float up and down. Remove the protective cap from the stylus. (Be careful
the platter so that it can float up and down. Remove the protective cap from the stylus. (Be careful
6) Open the tone arm lock. Seize the handle of the tone arm and move it just outside the edge of
6) Open the tone arm lock. Seize the handle of the tone arm and move it just outside the edge of
the platter so that it can float up and down. Remove the protective cap from the stylus. (Be careful
the platter so that it can float up and down. Remove the protective cap from the stylus. (Be careful
not to hit the stylus against anything.)
not to hit the stylus against anything.)
6) Open the tone arm lock. Seize the handle of the tone arm and move it just outside the edge of
the platter so that it can float up and down. Remove the protective cap from the stylus. (Be careful
6) Open the tone arm lock. Seize the handle of the tone arm and move it just outside the edge of
6) Open the tone arm lock. Seize the handle of the tone arm and move it just outside the edge of
the platter so that it can float up and down. Remove the protective cap from the stylus. (Be careful
the platter so that it can float up and down. Remove the protective cap from the stylus. (Be careful
not to hit the stylus against anything.)
not to hit the stylus against anything.)
6) Open the tone arm lock. Seize the handle of the tone arm and move it just outside the edge of
6) Open the tone arm lock. Seize the handle of the tone arm and move it just outside the edge of
the platter so that it can float up and down. Remove the protective cap from the stylus. (Be careful
the platter so that it can float up and down. Remove the protective cap from the stylus. (Be careful
the platter so that it can float up and down. Remove the protective cap from the stylus. (Be careful
not to hit the stylus against anything.)
not to hit the stylus against anything.)
6) Open the tone arm lock. Seize the handle of the tone arm and move it just outside the edge of
6) Open the tone arm lock. Seize the handle of the tone arm and move it just outside the edge of
the platter so that it can float up and down. Remove the protective cap from the stylus. (Be careful
the platter so that it can float up and down. Remove the protective cap from the stylus. (Be careful
the platter so that it can float up and down. Remove the protective cap from the stylus. (Be careful
not to hit the stylus against anything.)
not to hit the stylus against anything.)
6) Open the tone arm lock. Seize the handle of the tone arm and move it just outside the edge of
6) Open the tone arm lock. Seize the handle of the tone arm and move it just outside the edge of
6) Open the tone arm lock. Seize the handle of the tone arm and move it just outside the edge of
the platter so that it can float up and down. Remove the protective cap from the stylus. (Be careful
the platter so that it can float up and down. Remove the protective cap from the stylus. (Be careful
not to hit the stylus against anything.)
not to hit the stylus against anything.)
5) Place the lever for the tone arm lift in the front position so that the lift bank lowers.
6) Open the tone arm lock. Seize the handle of the tone arm and move it just outside the edge of
6) Open the tone arm lock. Seize the handle of the tone arm and move it just outside the edge of
the platter so that it can float up and down. Remove the protective cap from the stylus. (Be careful
the platter so that it can float up and down. Remove the protective cap from the stylus. (Be careful
not to hit the stylus against anything.)
5) Place the lever for the tone arm lift in the front position so that the lift bank lowers.
6) Open the tone arm lock. Seize the handle of the tone arm and move it just outside the edge of
6) Open the tone arm lock. Seize the handle of the tone arm and move it just outside the edge of
6) Open the tone arm lock. Seize the handle of the tone arm and move it just outside the edge of
the platter so that it can float up and down. Remove the protective cap from the stylus. (Be careful
the platter so that it can float up and down. Remove the protective cap from the stylus. (Be careful
7) Turn the counterweight until the tone arm floats level. If the tone arm moves up: Turn the
not to hit the stylus against anything.)
not to hit the stylus against anything.)
the platter so that it can float up and down. Remove the protective cap from the stylus. (Be careful
6) Open the tone arm lock. Seize the handle of the tone arm and move it just outside the edge of
the platter so that it can float up and down. Remove the protective cap from the stylus. (Be careful
6) Open the tone arm lock. Seize the handle of the tone arm and move it just outside the edge of
the platter so that it can float up and down. Remove the protective cap from the stylus. (Be careful
6) Open the tone arm lock. Seize the handle of the tone arm and move it just outside the edge of
the platter so that it can float up and down. Remove the protective cap from the stylus. (Be careful
5) Place the lever for the tone arm lift in the front position so that the lift bank lowers.
6) Open the tone arm lock. Seize the handle of the tone arm and move it just outside the edge of
the platter so that it can float up and down. Remove the protective cap from the stylus. (Be careful
5) Place the lever for the tone arm lift in the front position so that the lift bank lowers.
6) Open the tone arm lock. Seize the handle of the tone arm and move it just outside the edge of
the platter so that it can float up and down. Remove the protective cap from the stylus. (Be careful
5) Place the lever for the tone arm lift in the front position so that the lift bank lowers.
6) Open the tone arm lock. Seize the handle of the tone arm and move it just outside the edge of
4) Rotate the antiskating knob counterclockwise until it is set to „0“.
5) Place the lever for the tone arm lift in the front position so that the lift bank lowers.

14
MAINS CONNECTION
An external switching power adaptor (DC 12 V / 0.5 A) is supplied with this turntable.
Your unit is ready to be connected to a mains voltage of 110 V / 60 Hz or 230 V / 50 Hz.
AMPLIFIER CONNECTION
Connect the Miracord to a phono preamplifier with RIAA equalization. Red plug into R channel in-
put, white plug into L channel input.
PLAYING A RECORD
1) Place the record on the turntable. If it is a 45 rpm, you need to place the adaptor
on the record spindle.
2) Choose the playing speed.
3) Release the pick-up arm clip.
4) Place the cartridge vertically over the first track of the record the turntable starts turning.
5) Lower the cue lever to place the stylus in the groove
6) When playback is complete, push the cue lever to lift the tone arm and move it
back to the arm rest.
7) If you want to pause the playback, switch the knob to “off”, and switch it to 33 or 45 to continue
the playback.
8) After finish the playback, please switch off the power to save energy.
INITIAL STARTING UP

15
TO REPLACE THE STYLUS
- Put the rest clip on the pick-up arm.
- Remove the protective cap from the stylus.
- Pull the stylus to the lower front and remove it.
- Put in the new stylus following the reverse procedure.
- Replace the protective cap on the stylus.
TO REMOVE THE CARTRIDGE
- Put the rest clip on the pick-up arm.
- Remove the stylus to prevent damage.
- Remove the two cartridge fixing screws.
- Disconnect the four link wires at the back of the cartridge.
TO INSTALL NEW CARTRIDGE
- Connect the four link wires.
- Take care of the receptacle’s colors.
- Install the cartridge in the head shell.
- Install the two cartridge fixing screws.
- Re-install the stylus.
- Replace the protective cap on the stylus.
IMPORTANT RECOMMENDATIONS
We advise you to clean your records using a rag impregnate with an antistatic
product for maximum enjoyment of your records and also to make them last.
We would also point out that for the same reason your stylus should be replaced
periodically (approximately every 250 hours).
Dust the stylus from time to time using a very soft brush dipped in alcohol
(brushing from back to front of the cartridge).
WHEN TRANSPORTING YOUR RECORD PLAYER DO NOT FORGET TO:
Put the rest clip into the pick-up arm.
Replace the protective cap on the stylus.
Remove the platter by pulling it straight up off the spindle.
MAINTENANCE

TROUBLESHOOTING
Symptom Possible root cause Remedy
Motor doesn’t work No connection to the mains
or mains fuse is blown Check mains plug, receptacle and fuse
Power supply not
connected properly
Check the low voltage plug for
correct fit and fix it.
Front switch in position „0“ Switch the front switch to correct position
(33⅓or 45).
Audio signals are
reproduced not
loud enough and
eventually distorted
The turntable is connected to
the pre amp’s line input.
Connect the turntable to the phono input
of your pre amp.
The right channel
appears on left
channel and vice
versa
The channels are swapped. Swap the two RCA plugs (left and right
channel) which are plugged into the
turntable’s RCA jacks.
Loud humming noise Metal housing acts as
antenna creating
AC Mains hum
Check all connections; for acoustical
check relating major problems reduce
the amp’s volume level to minimum.
Possibly the RCA plugs ground rings
should be readjusted.
Faint humming noise Ground wire not attached In certain cases, it makes sense to
connect the metal parts of the turntable
to signal ground of the (phono-) preamp.
On the rear side of the turntable there’s
an earthing screw for this purpose.
Please use the wire attached to the
included RCA cables for this.
The music pitch
is wrong
Wrong speed selected Check which speed should be chosen
for playing the current record. There
are also records on the market which
have the same diameter as an LP (30
cm) but must be played at 45 rpm (e.g.
maxi singles). On the other hand, there
are also records in single format (17 cm)
which should be played at 33 ⅓ rpm (so
called “EPs”).
16

SERVICE
Maintenance:
Your turntable is maintenance-free. Changes in acoustical behaviour are so minute, that the
human ear will probably change more than the turntable actually does. Only the needle should
be checked from time to time and eventually be replaced.
Production control / Disposal / Recycling
Clean your turntable only with a soft, dry and smooth cloth, with a dust brush. Do not use
scouring powder, alcohol, benzene, French polish, or other agents. Do not expose your turntable
to a relatively high humidity. Temperature variations, humidity and excessive sunlight may
damage the turntable and result in optical changes.
In the case of malfunction of your turntable apply to an expert. Your special dealer will be
pleased to help you. If a turntable should be destroyed through improper use by a second
person the repair requires special know-how in order to provide accurate performance of your
device. Many of today’s modern furniture are coated with multiple varnishes and plastics which
may be treated with chemical agents. Some of these agents might contain substances which
cauterize or soften the rubber feet. Therefore, we would like to advise you to place an anti slip
mat underneath the turntable.
Production Control
Every production step is controlled individually. Each part of the turntable (e.g. tonearm or motor)
is tested several times, from the purchase until the final assembly. In the final control, every
turntable is tested acoustically, i.e. skilled ears check the acoustic quality of each frequency
range. To be able to observe the tolerance limits, variations e.g. the values of the electric com-
ponents must be severely restricted, since inaccuracies of single components may add up in the
total system. To achieve maximum production quality, compliance with ELAC quality criteria and
guidelines can be regarded as the most important duty.
Turntable Disposal
Please keep the cardboard box and packaging. Since the box and packaging represent the ideal
container for the appliance, you should keep them for future transports.
Material-Specific Disposal
If you want to discard the packaging, please do not put it in the household waste, since here
it will be mixed up with other residual materials. Please, do not give the material to collecting
points for paper or other materials, but take it to the dealers. The packaging represents an
important recoverable material. It consists of fabric, plastic (bag and packing parts) as well as
cardboard, which should be returned to the material resources cycle for recycling. We have
an agreement with your special dealer to take back and dispose of the material in a way that
guarantees material-specific disposal. Thus, please, take the packaging back to your dealer for
disposal.
Recycling
Support the environmentally-friendly disposal of electronic industry waste.
Old electronic and electrical appliances must not be disposed of in the same manner as regular
household waste!
Environmentally-friendly recycling must take place according to each country’s regulations.
17

TECHNISCHE DATEN
18
PLATTENTELLER
• Antriebssystem Riemenantrieb
• Motor Gleichstrommotor
• Wählbare Geschwindigkeiten 33⅓ und 45 U/min
• Variation der Drehgeschwindigkeit +/- 0,33 %
• Wow and Flutter < 0,12 %
• Plattenteller Aluminiumguss
TONARM
• Typ Carbonrohr
• Überhang 18,6 mm
• Oset-Winkel 25 Grad
• Anti-Skating-Einstellung 0...4
• Hauptlager Edelstahl
AUSGANG Cinch
BETRIEBSSPANNUNG 100 bis 240 V AC / 50/60 Hz
AUFNAHMELEISTUNG 1,5 W
(weniger als 0,5 W im Standby)
Table of contents
Languages:
Other ELAC Turntable manuals


