elco iNELS RFDSC-71N User manual

R L C LED ESL
RFDSC-71N
Dimming socket
EN
02-156/2021 Rev.0
Made in Czech Republic
1/8
Characteristics /
• The dimmed socket is used to control light sources that are connected by power cord - especially
lamps:
R - classic lamps.
L - halogen lamps with wound transformer.
C - halogen lamps with electronic transformer.
ESL - dimmable energy-efficient fluorescent lamps.
LED - LED light sources (230V).
• They can be combined with detectors, controllers, iNELS RF Control or system components.
• Thanks to the socket design, installation is simple by direct insertion into the existing socket.
• Output load 300W.
• Multi-function 6 light functions - smooth increase or decrease with time setting 2s-30 min.
• When switched off, the set level is stored in the memory, and when switched back on, it returns
to the most recently set value.
• Thanks to setting the min. brightness by potentiometer, you will eliminate flashing of the LED
and ESL light sources.
• The universal dimmer may be controlled by up to 32 channels (1 channel represents 1 button on
the controller).
• The programming button on the socket is also used for manual control of the output.
• Memory status can be pre-set in the event of a power failure.
• Range up to 160 m (in open space), if the signal is insufficient between the controller and unit, use
the signal repeater RFRP-20N or protocol component RFIO2that support this feature.
• Communication frequency with bidirectional protocol iNELS RF Control2(RFIO2).
• You will find more on light sources and dimming options at www.elkoep.com/solutions.
• Produced in 3 designs of sockets and plugs: French, Schuko, British
WARNING /
• Newly produced drivers work in the RFIO2data protocol mode. These driv-
ers are loaded in the actuators in a different way than before. Among other
things, it eliminates the risk of inadvertently loading another randomly occur-
ring controller within range.
• Drivers can still be switched to so-called compatibility mode, and loaded
in a simpler (older way)
• The mode in which the controller is located is indicated after inserting the
battery and after 5 seconds have passed, at which the LED is lit by subsequent
different intervals of flashing of the LED.
RFIO2mode
= Double flash (flash, flash, gap, flash, flash)
Compatibility mode
= Flash fast (flash, flash, flash, flash, flash)
• If you do not want to change the function of the controller, you must not press any buttons during
this time.
• If we need to change the operating mode of the controller, after inserting the battery, when the
LED is permanently lit, we press at the same time:
• button 1 and 3 on RF KEY-40/60
• button 1 and 2 on RFWB-20/40
• button 1 and 2 on RFGB-20/40
• button 1 and 2 on RF KEY
you hold the buttons until the LED starts to signal the changed mode (double flash or fast flash).
After that, the buttons must be released. The selected mode of the function is stored in memory
and after replacing the battery, the controller continues to operate in the same mode.
NOTE: after each removal of the battery, we press one of the buttons several times to discharge the
device and reinsert the battery
UPDATE THE CONTROLLER ACTUATORS IN RFIO2MODE
If the controller is used in RFIO2mode, then to update the controller actuators, it is necessary to
switch not only the actuator to the update mode (according to the instructions for the actuator),
but also the controller in the following way: You remove the battery from the controller, press some
of the buttons several times to discharge the device, and reinsert the battery. At the moment when
the LED lights up, you press the 1 button and hold it down until the controller starts signaling the
updating mode with a short flashing of the LED. Then you release the button and the controller
now works in RFIO2update mode. To end the update mode, you remove the battery, press one of
the buttons several times, and then reinsert the battery. Now you do not press any button and the
controller starts again in RFIO2operating mode,
!
!
11 111 11
22 22
33 2
Priză cu dimmer
RO
www.elkoep.com
ELKO EP, s.r.o. | Palackého 493 | 769 01 Holešov, Všetuly | Česká republika | e-mail: [email protected]
EN Support: +420 778 427 366 | CZ Technická podpora: +420 775 444 609
Charakteristika
• Priza cu variator de tensiune servește la controlarea surselor de lumină care se conectează prin
cablul de alimentare - in special lămpile.
R - Bec, bec cu halogen
L - Transformator cu bobinaj pentru becuri cu halogen de joasă tensiune
C - Transformator electronic pentru becuri cu halogen de joasă tensiune
ESL - Becuri economice cu intensitate variabilă
LED - becuri cu LED-uri și surse de lumină cu LED-uri, 230V
• Acestea pot fi combinate cu Detectoare, Controlere sau Elemente de sistem iNELS RF Control.
• Datorită variantei de priză, instalarea este simplă prin introducerea directă într-o priză existentă.
• Putere de ieșire 300 W.
• Multifuncţionale - 6 funcţii de lumină - pornire sau stingere lină cu temporizare de 2 s - 30 min.
• La oprire, nivelul setat este salvat în memorie și la pornire ulterioară revine la ultima valoare setată.
• Datorită setării luminozităţii minime cu ajutorul potenţiometrului, eliminaţi clipirea surselor de
lumină LED și ESL.
• Dimerul universal poate fi controlat cu până la 32 de canale (1 canal reprezintă un buton de pe
controller).
• Butonul de programare de pe priză servește și pentru controlul manual al ieșirii.
• Posibilitate de setare a stării memoriei în cazul întreruperii curentului.
• Raza de acţiune de până la 160 m (în aer liber), în cazul unui semnal insuficient între controler și
unitate, utilizaţi repetorul de semnal RFRP-20N sau componente cu protocol RFIO2 care suportă
această funcţie.
Frecvenţa de comunicare cu protocolul bidirecţional iNELS RF Control2 (RFIO2).
AVERTIZARE
• Controlerele nou fabricate funcţionează în modul de protocol de date
RFIO2. Aceste controlere sunt învăţate în actori într-un mod diferit decât
înainte. Printre altele, acest lucru a eliminat riscul de a învăţa din greșeală un alt
controler care se afla din întâmplare în raza de acţiune.
• Controlerele pot fi în continuare comutate în așa-numită compatibilitate și
pot fi învăţate într-un mod mai simplu (modul mai vechi).
• Modul în care se află controlerul este indicat după introducerea bateriei
și după 5 secunde în care LED-ul este aprins, și anume de diferite intervale de
clipire a diodei LED.
Mod RFIO2
= Clipire dublă (clipire, clipire, pauză, clipire, clipire)
Mod de Compatibilitate
= Clipire rapidă (clipire, clipire, clipire, clipire, clipire)
• Dacă nu doriţi să modificaţi funcţia controlerului, nu trebuie să apăsaţi niciun buton în acest timp.
• Dacă trebuie să schimbăm modul de funcţionare al controlerului, după introducerea bateriei, când
LED-ul este aprins permanent, apăsaţi simultan:
• butoanele 1 și 3 la RF KEY-40/60
• butoanele 1 și 2 la RFWB-20/40
• butoanele 1 și 2 la RFGB-20/40
• butoanele 1 și 2 la RF KEY
ţineţi apăsate butoanele până când LED-ul începe să indice modul schimbat (clipire dublă sau clip-
ire rapidă). Butoanele trebuie apoi eliberate. Modul de funcţionare selectat este salvat în memorie,
iar controlerul continuă să funcţioneze în același mod și după înlocuirea bateriei.
NOTĂ: după fiecare scoatere a bateriei, apăsaţi unul dintre butoane de mai multe ori pentru ca dis-
pozitivul să se descarce, apoi introduceţi bateria înapoi.
Învățarea controlerelor în actori în modul RFIO2
Dacă controlerul este utilizat în modul RFIO2, atunci pentru a învăţa controlerul la actor, este nec-
esar să comutaţi în modul de învăţare nu numai actorul (potrivit manualului pentru actor) , ci și
controlerul după cum urmează: Scoateţi bateria din controler, apăsaţi unul dintre butoane de mai
multe ori pentru a descărca dispozitivul și introduceţi bateria înapoi. În momentul în care LED-ul se
aprinde apăsaţi butonul 1 și ţineţi-l apăsat până când controlerul începe să indice modul de învăţare
prin clipiri scurte ale LED-ului. Apoi eliberaţi butonul, iar controlerul funcţionează acum în modul
de învăţare RFIO2. Pentru a ieși din modul de învăţare, scoateţi bateria, apăsaţi de mai multe ori unul
dintre butoane, apoi introduceţi bateria înapoi. Acum nu apăsaţi niciun buton și controlerul va porni
din nou în modul de funcţionare RFIO2.

R L C LED ESL
RFDSC-71N
Dimming socket
EN
02-156/2021 Rev.0
Made in Czech Republic
2/8
Indication, manual control /
• Green LED - stays lit upon connecting the supply voltage.
• Red LED STATUS - indication of a closed contact.
Indicators of memory function:
On - LED blinks x 3.
Off - The LED lights up once for a long time.
• Manual control is performed by pressing the PROG button for less than 0.5s.
• Programming is performed by pressing the PROG button for more than 1s.
In the programming and operating mode, the LED on the component lights up at the same time
each time the button is pressed - this indicates the incoming command.
RFRP-20N
Assembly /
Radio frequency signal penetration through various construction materials /
60 - 90 % 80 - 95 % 20 - 60 % 0 - 10 % 80- 90 %
brick walls wooden structures
with plaster boards reinforced
concrete metal partitions common glass
1
2
3
4
1. PROG button
2. LEDindication
• Green -input indication
• Red -output ON
3.Setting the load type
4.Set the minimum brightness
Priză cu dimmer
RO
www.elkoep.com
ELKO EP, s.r.o. | Palackého 493 | 769 01 Holešov, Všetuly | Česká republika | e-mail: [email protected]
EN Support: +420 778 427 366 | CZ Technická podpora: +420 775 444 609
indicaţie, control manual
• LED verde - aprins permanent la conectarea sursei de alimentare.
• LED STATUS roșu - indicarea contactului închis.
Indicarea funcţiei de memorie:
Pornit - LED-ul luminează intermitent de 3x.
Oprit - LED-ul se aprinde mai lung 1x.
• Controlul manual se face cu butonul PROG < 0,5s.
• Programarea se face prin apăsarea butonului PROG > 1s
În modul de programare și ștergere, la fiecare apăsare a butonului controllerului se aprinde lung
concomitent LED-ul de pe unitate - indică primirea comenzii.
Montare
Trecerea semnalului de radiofrecvenţă prin diferite materiale de construcţie
Pereţi din
cărămidă
structuri din
lemn cu plăci de
gips-carton beton armat pereţi despărţitori
metalici sticlă obișnuită
1. Buton de programare
2. Indicarea stării dispozitivului
• Verde -indică alimentare
• Roșu-ieșire ON
3.Setarea tipului de sarcină
4.Reglarea luminozității minime
R L C LED ESL
RFDSC-71N
Dimming socket
EN
02-156/2021 Rev.0
Made in Czech Republic
1 x
1
PROG > 1s
1 x
3
PROG < 1s
1 x
2
1 x
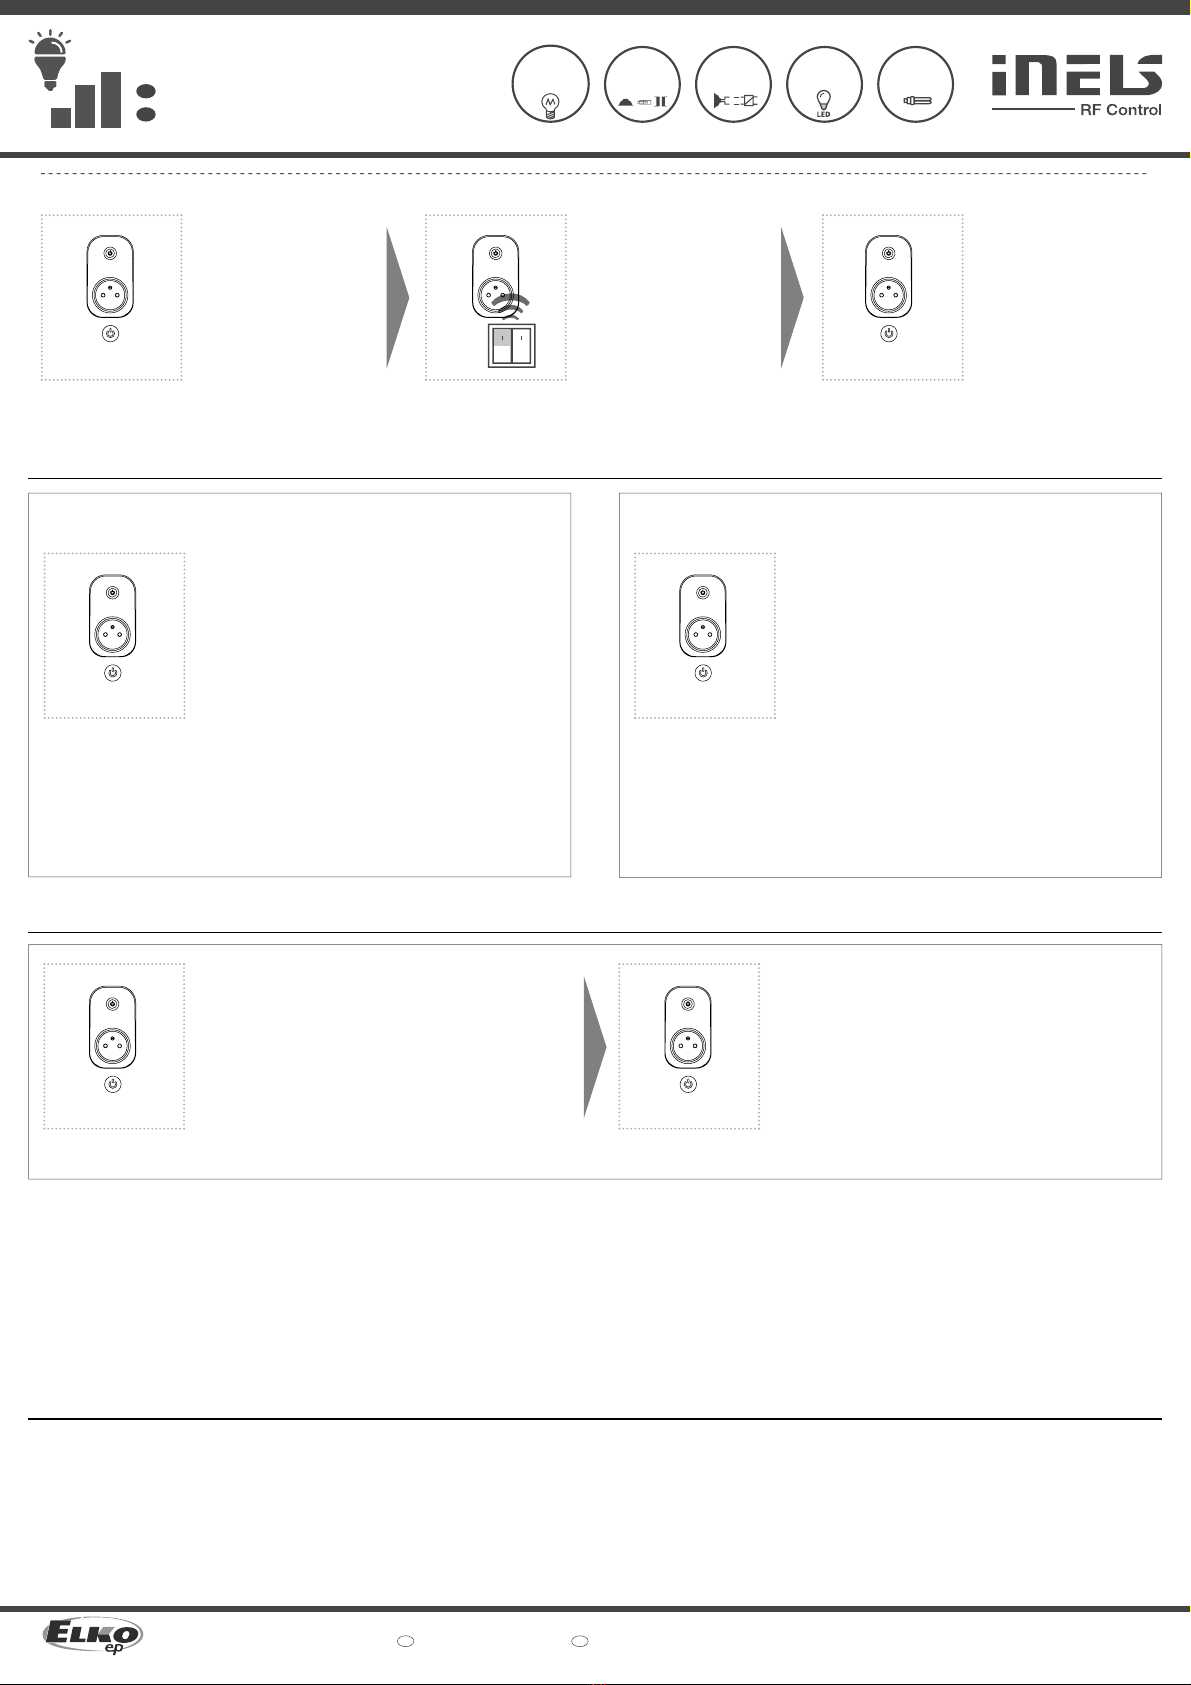
Functions and programming with RF transmitters /
Light scene function 1 /
Description of light scene 1 /
a) By pressing the programmed button for less than 0.5s, the light illuminates; it
goes out by pressing again.
b) By pressing the programmed button for more than 0.5s, fluid brightness regula-
tion will occur. After releasing the button, the brightness level is saved in the
memory, and pressing the button shortly later will switch the light on /off to
this intensity.
c) It is possible to readjust the change in intensity at any time by a long press of
the programmed button.
The socket remembers the adjusted value even after disconnecting from the
power supply.
Programming /
Press of programming but-
ton on socket RFDSC-71N for
1second will activate socket
RFDSC-71N into programming
mode. LED is flashing in 1s in-
terval.
A press of your selected button
on the RF transmitter assigns
the function light scene 1.
Press of programming button
on socket RFDSC-71N shorter
then 1 second will finish pro-
gramming mode. The LED
lights up according to the pre-
set memory function.
3/8
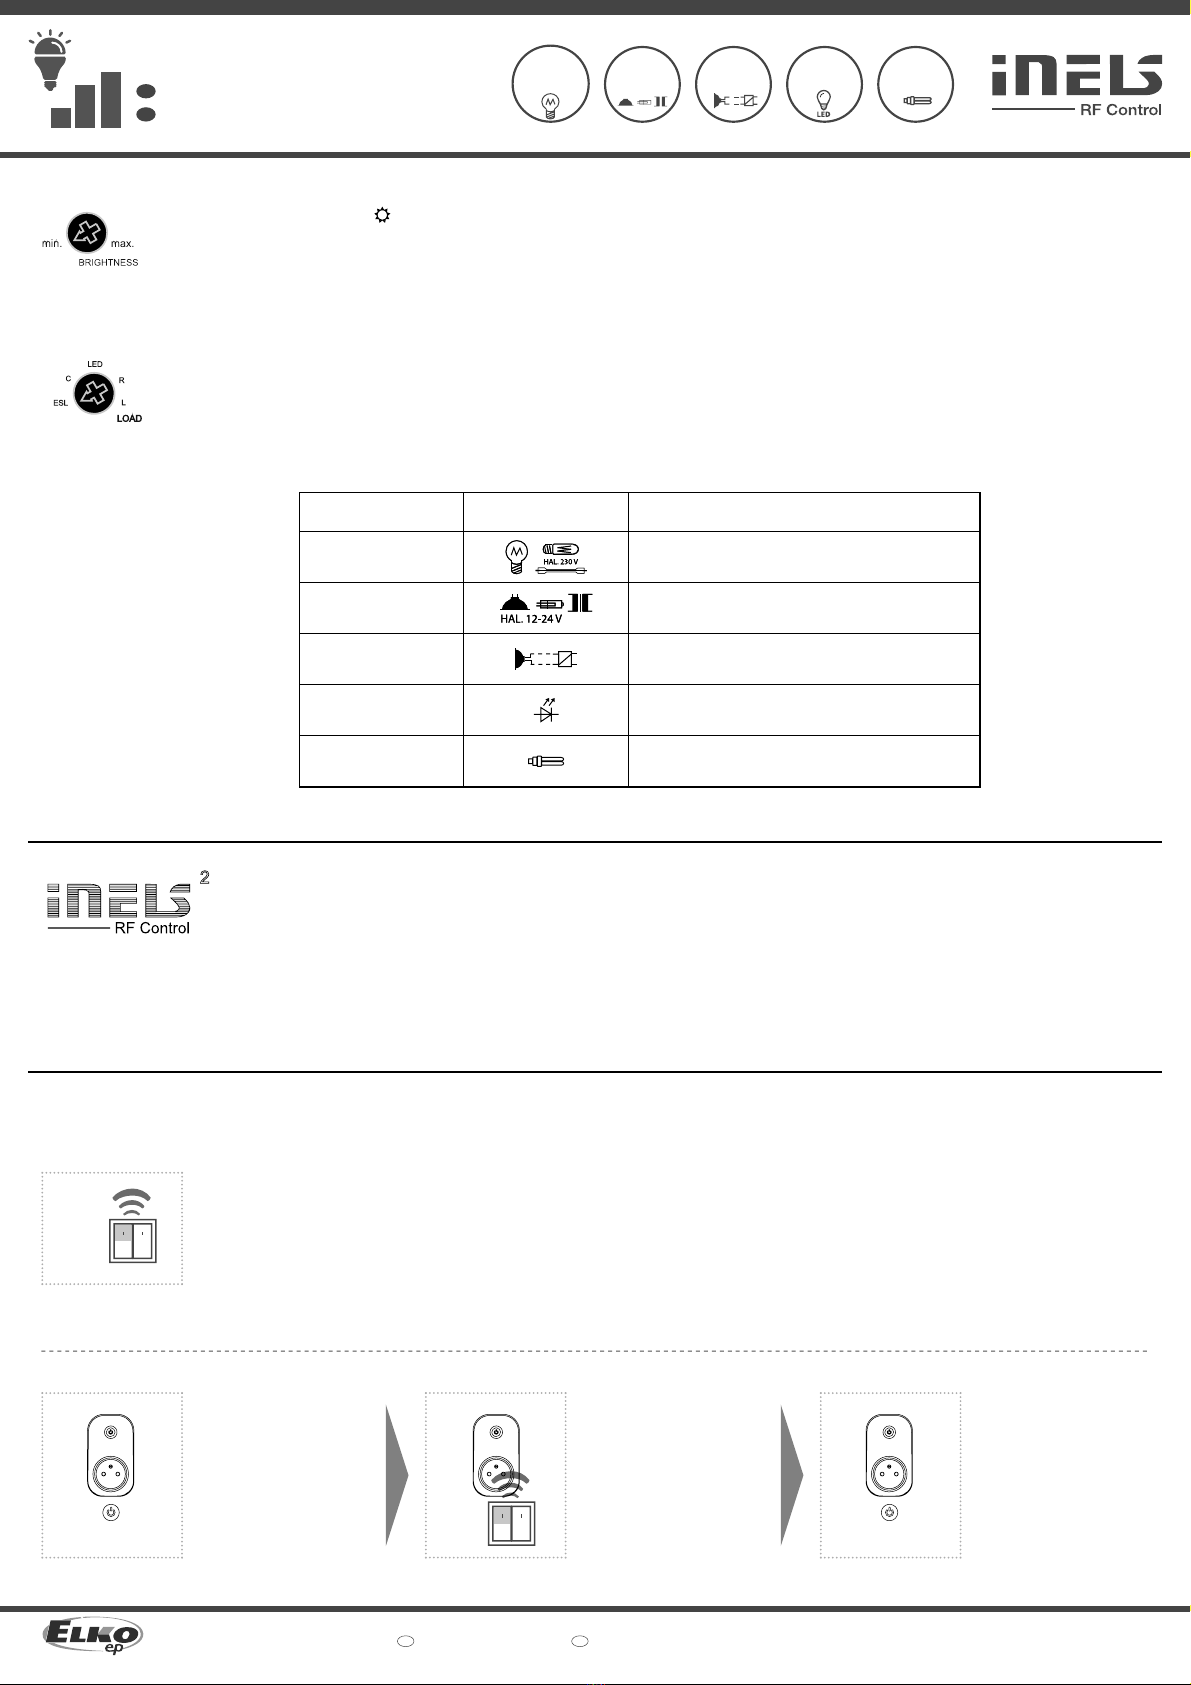
type of source / symbol / description /
R
resistive /
ordinary light bulb, halogen lamp /
L
inductive /
coiled transformer for low-voltage halogen lamps /
C
capacitive /
electronic transformer for low-voltage halogen lamps /
LED LED lamps and LED light sources, 230 V /
ESL dimmable energy-saving fluorescent tubes /
Set the minimum brightness - min. :
- Minimum brightness setting turned on when we perform load by turning the po-
tentiometer min. brightness to the desired value.
- Min. brightness is automatically stored after cca. 3 seconds since the last potenti-
ometer position change.
Setting min. brightness by potentiometer on the front side of device eliminates
flashing of various types of light sources.
Setting the load type - LOAD:
- Setting the type of load is performed with disconected load by turning the light
source selector to the desired position.
For the ESL load, when the lamp is switched off, a short press increases the bright-
ness to the maximum level (when the energy saver “lights up“) and then drops to
the preset level.
Compatibility /
The device can be combined with all system components, controls and devices
of iNELS RF Control and iNELS RF Control2.
The detector can be assigned an iNELS RF Control2(RFIO2) communication pro-
tocol.
Priză cu dimmer
RO
www.elkoep.com
ELKO EP, s.r.o. | Palackého 493 | 769 01 Holešov, Všetuly | Česká republika | e-mail: [email protected]
EN Support: +420 778 427 366 | CZ Technická podpora: +420 775 444 609
Funcţii și programare cu controlere RF
Funcţie scenă luminoasă 1
Descrierea funcției scenă luminoasă 1
a) Prin apăsarea butonului programat mai puţin de 0.5s se va aprinde lampa, prin
reapăsare se va stinge.
b) Prin apăsarea butonului programat mai mult de 0,5s, se ajunge la reglarea conti-
nuă a luminozităţii. La eliberarea butonului, nivelul de intensitate a luminozităţii
este salvat în memorie, iar celelalte apăsări scurte aprind/sting lumina la această
intensitate.
c) Modificarea intensităţii poate fi făcută în orice moment prin apăsarea mai lungă
a butonului programat.
Priza reţine setarea intensităţii de luminozitate și la întreruperea alimentării.
Programare
Prin apăsarea butonului de
programare de pe priza RFD-
SC-71N timp de 1 secundă,
priza trece în modul de pro-
gramare. Dioda LED clipește în
roșu la intervale de 1 secundă.
Apăsarea butonului selectat de
dvs. de pe controllerul RF va atri-
bui funcţia scenă luminoasă 1. Prin apăsarea butonului de
programare de pe priza RFD-
SC-71N pentru mai puţin de 1
secundă, se va termina modul
de programare. LED-ul lumi-
nează în funcţie de funcţia de
memorie setată.
• Reglarea luminozităţii minime - min.:
- Setarea luminozităţii minime se face cu sarcina pornită, prin rotirea potenţiometrului
„min” la valoarea dorită.
- Salvarea luminozităţii minime decurge după aproximativ 3s după ultima modificare
a poziţiei potenţiometrului.
Setarea luminozităţii minime servește la setarea celei mai mici lumini, suprimarea pâl-
pâirii spontane sau stingere.
Setarea tipului de sarcină - LOAD:
- Setarea tipului corespunzător de sarcină se face cu sarcina oprită prin rotirea pote-
nţiometrului „LOAD” în poziţia dorită.
Pentru sarcinile ESL, dacă lampa este stinsă, printr-o apăsare scurtă luminozitatea
crește la nivelul maxim (când tubul fluorescent „se aprinde”), iar apoi luminozitatea
scade la nivelul de luminozitate setat.
tipul sursei
rezistivă
inductivă
capacitivă
descriere
bec, bec cu halogen
transformator cu bobinaj pentru becuri cu halogen de joasă tensiune
transformator electronic pentru becuri cu halogen de joasă tensiune
becuri cu LED-uri și surse de lumină cu LED-uri, 230 V
becuri economice cu intensitate variabilă
simbol
Kompatibilität
Elementul poate fi combinat cu toate elementele de sistem, controlerele și ele-
mentele sistemului iNELS RF Control și iNELS RF Control2.
La element pot fi alocate și detectoare marcate cu protocolul de comunicare
iNELS RF Control2 (RFIO2).

R L C LED ESL
RFDSC-71N
Dimming socket
EN
02-156/2021 Rev.0
Made in Czech Republic
4/8
3
PROG < 1s
1 x
2
3 x
1
PROG > 1s
1 x
Programming /
Press of programming but-
ton on socket RFDSC-71N for
1second will activate socket
RFDSC-71N into programming
mode. LED is flashing in 1s in-
terval.
Three presses of your selected
button on the RF transmitter
assigns the function light scene 3
(must be a lapse of 1s between
individual presses).
Press of programming button
on socket RFDSC-71N shorter
then 1 second will finish pro-
gramming mode. The LED
lights up according to the pre-
set memory function.
1 x
Light scene function 4 /
Description of light scene 4 /
a) By pressing the programmed button for less than 0.5s, the light illuminates. By
pressing the button shortly again, the light will continuously switch off for 3 sec-
onds (at 100% brightness).
b) By pressing the programmed button for more than 0.5s, fluid brightness regula-
tion will occur. After releasing the button, the brightness level is saved in the
memory, and pressing the button shortly later will switch the light on /off to
this intensity.
c) It is possible to readjust the change in intensity at any time by a long press of
the programmed button.
The socket remembers the adjusted value even after disconnecting from the
power supply.
1 x
1
PROG > 1s
1 x
2
2 x
3
PROG < 1s
1 x
Light scene function 2 /
Description of light scene 2 /
a) By pressing the programmed button for less than 3s, the light illuminates; it goes
out by pressing again.
b) In order to limit undesirable control of brightness, fluid brightness control oc-
curs only by pressing a programmed button for over 3s. After releasing the but-
ton, the brightness level is saved in the memory, and pressing the button shortly
later will switch the light on / off to this intensity.
c) It is possible to readjust the change in intensity at any time by pressing the
programmed button for over 3s.
The socket remembers the adjusted value even after disconnecting from the
power supply.
Programming /
Press of programming but-
ton on socket RFDSC-71N for
1second will activate socket
RFDSC-71N into programming
mode. LED is flashing in 1s in-
terval.
Two presses of your selected
button on the RF transmitter as-
signs the function light scene 2
(must be a lapse of 1s between
individual presses).
Press of programming button
on socket RFDSC-71N shorter
then 1 second will finish pro-
gramming mode. The LED
lights up according to the pre-
set memory function.
1 x
Light scene function 3 /
Description of light scene 3 /
a) By pressing the programmed button for less than 0.5s, the light fluidly illumi-
nates for a period of 3s (at 100% brightness). By pressing the button shortly
again, the light will continuously switch off for 3 seconds.
b) By pressing the programmed button for more than 0.5s, fluid brightness regula-
tion will occur. After releasing the button, the brightness level is saved in the
memory, and pressing the button shortly later will switch the light on /off to
this intensity.
c) It is possible to readjust the change in intensity at any time by a long press of
the programmed button.
The socket remembers the adjusted value even after disconnecting from the
power supply.
Priză cu dimmer
RO
www.elkoep.com
ELKO EP, s.r.o. | Palackého 493 | 769 01 Holešov, Všetuly | Česká republika | e-mail: [email protected]
EN Support: +420 778 427 366 | CZ Technická podpora: +420 775 444 609
Programare
Prin apăsarea butonului de
programare de pe priza RFD-
SC-71N timp de 1 secundă,
priza trece în modul de pro-
gramare. Dioda LED clipește în
roșu la intervale de 1 secundă.
Trei apăsări ale butonului se-
lectat pe controllerul RF atribuie
funcţia de scenă luminoasă 3 (în-
tre fiecare apăsare trebuie să fie
o pauză de 1s).
Apăsarea butonului de progra-
mare de pe priza RFDSC-71N
pentru mai puţin de 1 secun-
dă, va termina modul de pro-
gramare. LED-ul luminează în
funcţie de funcţia de memorie
setată.
Funcţie scenă luminoasă 4
Descrierea funcției scenă luminoasă 4
a) Prin apăsarea butonului programat mai puţin de 0,5s lampa se va aprinde. Prin
reapăsare scurtă, lampa se stinge continuu timp de 3s (la o luminozitate de
100%).
b) Prin apăsarea butonului programat mai mult de 0,5s, se ajunge la reglarea conti-
nuă a luminozităţii. La eliberarea butonului, nivelul de intensitate a luminozităţii
este salvat în memorie, iar celelalte apăsări scurte aprind/sting lumina la această
intensitate.
c) Setarea intensităţii poate fi făcută în orice moment prin apăsarea mai lungă a
butonului programat.
Priza reţine setarea intensităţii de luminozitate și la întreruperea alimentării.
Funcţie scenă luminoasă 2
Descrierea funcției scenă luminoasă 2
a) Prin apăsarea butonului programat mai puţin de 3s se va aprinde lampa, prin
reapăsare se va stinge.
b) Pentru a evita reglarea nedorită a luminozităţii, la reglarea continuă a lumino-
zităţii se ajunge doar la apăsarea butonului programat mai mult de 3s. La elibe-
rarea butonului, nivelul de intensitate a luminozităţii este salvat în memorie, iar
celelalte apăsări scurte aprind/sting lumina la această intensitate.
c) Modificarea intensităţii poate fi făcută în orice moment prin apăsarea butonului
programat mai mult de 3s.
Priza reţine setarea intensităţii de luminozitate și la întreruperea alimentării.
Programare
Prin apăsarea butonului de
programare de pe priza RFD-
SC-71N timp de 1 secundă,
priza trece în modul de pro-
gramare. Dioda LED clipește în
roșu la intervale de 1 secundă.
Două apăsări ale butonului se-
lectat pe controllerul RF atribuie
funcţia de scenă luminoasă 2
(între fiecare apăsare trebuie să
fie o pauză de 1s).
Apăsarea butonului de pro-
gramare de pe priza RFDSC-
-71N pentru mai puţin de 1
secundă, va termina modul
de programare. LED-ul lumi-
nează în funcţie de funcţia de
memorie setată.
Funcţie scenă luminoasă 3
Descrierea funcției scenă luminoasă 3
A) Prin apăsarea butonului programat mai puţin de 0,5s, lampa se aprinde con-
tinuu timp de 3s (la o luminozitate de 100%). Prin reapăsare scurtă, lampa se
stinge continuu timp de 3s.
b) Prin apăsarea butonului programat mai mult de 0,5s, se ajunge la reglarea conti-
nuă a luminozităţii. La eliberarea butonului, nivelul de intensitate a luminozităţii
este salvat în memorie, iar celelalte apăsări scurte aprind/sting lumina la această
intensitate.
c) Setarea intensităţii poate fi făcută în orice moment prin apăsarea mai lungă a
butonului programat.
Priza reţine setarea intensităţii de luminozitate și la întreruperea alimentării.

R L C LED ESL
RFDSC-71N
Dimming socket
EN
02-156/2021 Rev.0
Made in Czech Republic
5/8
5
PROG < 1s
1 x
After the desired time has
elapsed, the timing mode
ends by pressing the but-
ton on the RF transmitter, to
which the sunrise function is
assigned. This stores the set
time interval into the socket
memory.
Press of programming button
on socket RFDSC-71N shorter
then 1 second will finish pro-
gramming mode. The LED
lights up according to the pre-
set memory function.
4
1 x
t = 2s . . . 30min.
1 x
Function sunset /
Description of sunset function /
After pressing the programmed button, the light begins to dim in the pro-
grammed time interval in a range of 2 seconds to 30 minutes.
1
PROG > 1s
1 x
2
4 x
3
PROG < 1s
1 x
Programming /
Press of programming but-
ton on socket RFDSC-71N for
1second will activate socket
RFDSC-71N into programming
mode. LED is flashing in 1s in-
terval.
Four presses of your selected
button on the RF transmitter
assigns the function light scene 4
(must be a lapse of 1s between
individual presses).
Press of programming button
on socket RFDSC-71N shorter
then 1 second will finish pro-
gramming mode. The LED
lights up according to the pre-
set memory function.
1 x
3
PROG >5s
1 x
2
5 x
1
PROG > 1s
1 x
Function sunrise /
Description of sunrise function /
After pressing the programmed button, the light begins to illuminate in the pro-
grammed time interval in a range of 2 seconds to 30 minutes.
Programming /
Press of programming but-
ton on socket RFDSC-71N for
1second will activate socket
RFDSC-71N into programming
mode. LED is flashing in 1s in-
terval.
Assignment of the sunrise func-
tion is performed by five presses
of the selected button on the RF
transmitter (must be a lapse of
1s between individual presses).
Press of programming button
longer then 5 seconds, will
activate socket into timing
mode. LED flashs 2x in each
1s interval. After releasing the
button, the time of the sun-
rise function begins to count
down (period of complete il-
lumination of the light).
Priză cu dimmer
RO
www.elkoep.com
ELKO EP, s.r.o. | Palackého 493 | 769 01 Holešov, Všetuly | Česká republika | e-mail: [email protected]
EN Support: +420 778 427 366 | CZ Technická podpora: +420 775 444 609
După cronometrarea timpului
dorit, modul de temporizare se
încheie prin apăsarea butonu-
lui de controllerul RF căruia îi
este atribuită funcţia răsărit de
soare. Astfel, intervalul de timp
setat se salvează în memoria
prizei.
Modul de programare este ter-
minat prin apăsarea butonului
de programare de pe priza
RFDSC-71N mai scurtă de 1
secundă. LED-ul luminează în
funcţie de funcţia de memorie
setată.
Funcţia răsărit de soare
Descrierea funcției răsărit de soare
La apăsarea butonului programat, iluminarea începe să se stingă la intervalul de
timp programat, între 2 secunde și 30 de minute.
Programare
Prin apăsarea butonului de
programare de pe priza RFD-
SC-71N timp de 1 secundă, pri-
za trece în modul de progra-
mare. Dioda LED clipește în
roșu la intervale de 1 secundă.
Patru apăsări ale butonului se-
lectat pe controllerul RF atribuie
funcţia de scenă luminoasă 4
(între fiecare apăsare trebuie să
fie o pauză de 1s).
Apăsarea butonului de pro-
gramare de pe priza RFDSC-
-71N pentru mai puţin de 1
secundă, va termina modul
de programare. LED-ul lumi-
nează în funcţie de funcţia de
memorie setată.
Funcţie răsărit de soare
Descrierea funcției răsărit de soare
La apăsarea butonului programat, iluminarea începe să se aprindă la intervalul de
timp programat, între 2 secunde și 30 de minute.
Programare
Prin apăsarea butonului de pro-
gramare timp de 1 secundă pe
priza RFDSC-71N, priza va trece
în modul de programare. LED-
-ul roșu clipește la intervale de
o secundă.
Atribuirea funcţiei răsărit de soa-
re se face prin apăsarea de 5 ori
a butonului selectat de pe con-
trollerul RF (între fiecare apăsare
trebuie să fie o pauză de 1 s). Apăsarea butonului de progra-
mare mai mult de 5 secunde,
va trece priza în modul de
temporizare. LED-ul roșu cli-
pește de 2x la intervale de o
secundă. La eliberarea buto-
nului începe să decurgă tim-
pul funcţiei răsărit de soare
(ora când lampa se aprinde
complet).

R L C LED ESL
RFDSC-71N
Dimming socket
EN
02-156/2021 Rev.0
Made in Czech Republic
6/8
3
PROG < 1s
1 x
2
7 x
Programming /
Press of programming but-
ton on socket RFDSC-71N for
1second will activate socket
RFDSC-71N into programming
mode. LED is flashing in 1s in-
terval.
Seven presses of your selected
button on the RF transmitter
assigns the function ON/OFF
(must be a lapse of 1s between
individual presses).
Press of programming button
on socket RFDSC-71N shorter
then 1 second will finish pro-
gramming mode. The LED
lights up according to the pre-
set memory function.
1 x
Function ON/OFF /
Description of ON/OFF /
If the light is switched off, pressing the programmed button will switch it on. If the
light is switched on, pressing the programmed button will switch it off.
1
PROG > 1s
1 x
1 x
Function switch off /
Description of switch o /
The dimmer output switches off by pressing the button.
2
6 x
3
PROG > 5s
1 x
5
PROG < 1s
1 x
4
1 x
t = 2s . . . 30min.
1
PROG > 1s
1 x
Programming /
Press of programming but-
ton on socket RFDSC-71N for
1second will activate socket
RFDSC-71N into programming
mode. LED is flashing in 1s in-
terval.
Assignment of the sunset func-
tion is performed by six presses
of the selected button on the RF
transmitter (must be a lapse of
1s between individual presses).
Press of programming button
longer then 5 seconds, will
activate socket into timing
mode. LED flashs 2x in each
1s interval. After releasing the
button, the time of the sun-
set function begins to count
down (period of complete
dimming of the light).
After the desired time has
elapsed, the timing mode
ends by pressing the but-
ton on the RF transmitter, to
which the sunset function is
assigned. This stores the set
time interval into the socket
memory.
Press of programming button
on socket RFDSC-71N shorter
then 1 second will finish pro-
gramming mode. The LED lights
up according to the pre-set
memory function.
Priză cu dimmer
RO
www.elkoep.com
ELKO EP, s.r.o. | Palackého 493 | 769 01 Holešov, Všetuly | Česká republika | e-mail: [email protected]
EN Support: +420 778 427 366 | CZ Technická podpora: +420 775 444 609
Programare
Prin apăsarea butonului de
programare de pe priza RFD-
SC-71N timp de 1 secundă,
priza trece în modul de pro-
gramare. Dioda LED clipește în
roșu la intervale de 1 secundă.
Prin șapte apăsări ale butonului
selectat pe controllerul RF atri-
buie funcţia de ON/OFF (între
fiecare apăsare trebuie să fie o
pauză de 1s).
Apăsarea butonului de pro-
gramare de pe priza RFDSC-
-71N pentru mai puţin de 1
secundă, va termina modul
de programare. LED-ul lumi-
nează în funcţie de funcţia de
memorie setată.
Funcţia ON/OFF
Descrierea funcției ON/OFF
Dacă iluminarea este stinsă, prin apăsarea butonului programat se aprinde. Dacă
iluminarea este aprinsă, prin apăsarea butonului programat se stinge.
Funcţia de decuplare
Descrierea funcției de decuplare
Variatorul de tensiune decuplează prin apăsarea butonului.
Programare
Prin apăsarea butonului de pro-
gramare timp de 1 secundă pe
priza RFDSC-71N, priza va trece
în modul de programare. LED-
-ul roșu clipește la intervale de
o secundă.
Atribuirea funcţiei apus de soare
se face prin apăsarea de 6 ori a
butonului selectat de pe cont-
rollerul RF (între fiecare apăsare
trebuie să fie o pauză de 1 s). Apăsarea butonului de pro-
gramare mai mult de 5 secun-
de, va trece priza în modul de
temporizare. LED-ul clipește
de 2x la intervale de o secun-
dă. La eliberarea butonului
începe să decurgă timpul fun-
cţiei apus de soare (ora când
lampa se stinge complet).
După cronometrarea timpului
dorit, modul de temporizare
se termină prin apăsarea bu-
tonului de pe controllerul RF
căruia îi este atribuită funcţia
apus de soare. Astfel, interva-
lul de timp setat se salvează în
memoria prizei.
Modul de programare este ter-
minat prin apăsarea butonului
de programare de pe priza RFD-
SC-71N mai scurtă de 1 secundă.
LED-ul luminează în funcţie de
funcţia de memorie setată.
R L C LED ESL
RFDSC-71N
Dimming socket
EN
02-156/2021 Rev.0
Made in Czech Republic
7/8
Selecting the memory function /
• Memory function on:
- For functions 1-4, 7, 8 used to store the last state of the relay output before a power supply
failure, changing the state of the output relay is written to the memory 15s after the change
is made.
- For function 5-6, the target state of the output relay is instantly written to the memory after
the timing of the delay had been entered, after the power supply is reconnected, the output
relay is set to the target state.
• Memory function off:
When the power supply is reconnected, the output remains off.
Press of programming button on receiver RFDSC-71N for 1 second
will activate receiver RFDSC-71N into programming mode. LED is
flashing in 1s interval.
Pressing the programming button on the RFDSC-71N receiver for
less than 1 second will finish the programming mode, this will re-
verse the memory function. The LED lights up according to the
current pre-set memory function. The set memory function is
saved.
Every other change is made in the same way.
Additional information /
Incorrect setting of the type of light source affects the extent and dimming (but no damage to
the dimmer or load).
Incorrect setting of the type of load can cause overheating of dimmer.
Do not try to use energy saving bulbs that are not labeled as dimmable!
Do not mix more types of light sources!
Maximum number of light sources depends on their internal structure.
1
PROG > 1s
1 x
2
PROG < 1s
1 x
Programming /
Press of programming but-
ton on actuator RFDSC-71N for
1 second will activate actua-
tor RFDSC-71N into program-
ming mode. LED is flashing in
1s interval.
Eight presses of selected but-
ton on the RF transmitter as-
signs the function OFF (must be
a lapse of 1s between individual
presses).
Press of programming but-
ton on actuator RFDSC-71N
shorter then 1 second will fin-
ish programming mode. The
LED lights up according to the
pre-set memory function.
3
PROG < 1s
1 x
2
8 x
1
PROG > 1s
1 x
PROG > 8s
1 x
PROG > 5s
1 x
Delete actuator /
Deleting one position of the transmitter / Deleting the entire memory /
By pressing the programming button on the actuator for 5 sec-
onds, deletion of one transmitter activates. LED flashs 4x in each
1s interval.
Pressing the required button on the transmitter deletes it from
the actuator's memory.
To confirm deletion, the LED will confirm with a flash long and the
component returns to the operating mode. The memory status
is not indicated.
Deletion does not affect the pre-set memory function.
By pressing the programming button on the actuator for 8 sec-
onds, deletion occurs of the actuator's entire memory. LED flashs
4x in each 1s interval.
The actuator goes into the programming mode, the LED flashes
in 0.5s intervals (max. 4 min.).
You can return to the operating mode by pressing the Prog but-
ton for less than 1s. The LED lights up according to the pre-set
memory function and the component returns to the operating
mode. Deletion does not affect the pre-set memory function.
Priză cu dimmer
RO
www.elkoep.com
ELKO EP, s.r.o. | Palackého 493 | 769 01 Holešov, Všetuly | Česká republika | e-mail: [email protected]
EN Support: +420 778 427 366 | CZ Technická podpora: +420 775 444 609
Selectarea funcţiei de memorie
• Funcţia de memorie activată:
- La funcţiile 1-4, 7, 8 servește la salvarea ultimei stări a ieșirii înainte de întreruperea alimentării
cu tensiune, schimbarea stării ieșirii este salvată în memorie la 15 secunde de la schimbare.
- La funcţiile 5-6 starea ţintă a ieșirii este salvată imediat în memorie după ce a fost activată
funcţia de întârziere, după reconectarea alimentării, ieșire este setată în starea ţintă.
• Funcţia de memorie dezactivată:
La reconectarea alimentării, ieșirea rămâne decuplată.
Prin apăsarea butonului de programare timp de 1 secundă pe
unitatea RFDSC-71N, unitatea va trece în modul de programare.
LED-ul clipește la intervale de o secundă.
Programarea se termină prin apăsarea butonului de programare
de pe unitatea RFDSC-71N pentru mai puţin de 1 secundă, astfel
se ajunge la reversarea funcţiei de memorie. LED-ul se va aprinde
în funcţie de funcţia de memorie actual setată. Funcţia de me-
morie setată va fi salvată.
Fiecare modificare ulterioară a setărilor se face în același mod.
Informaţii suplimentare
Setarea incorectă a tipului sursei de lumină va afecta gradul și decurgerea diminuării, nu se
ajunge la nicio deteriorare a regulatorului sau a sarcinii.
Setarea incorectă a tipului de sarcină poate cauza supraîncălzirea unităţii.
Nu poate fi micșorată intensitatea becurilor economice care nu sunt marcate ca fiind dimabil!
Nu utilizaţi mai multe tipuri de surse de lumină!
Numărul maxim de surse de lumină dimabile depinde de structura internă a acestora.
Programare
Prin apăsarea butonului Prog
de pe unitatea RFDSC-71N
timp de 1 secundă, unitatea
trece în modul de programa-
re. LED-ul clipește la intervale
de 1 secundă.
Prin opt apăsări ale butonului
selectat pe controllerul RF atri-
buie funcţia de OFF (între fieca-
re apăsare trebuie să fie o pauză
de 1s).
Prin apăsarea butonului de
programare de pe unitatea
RFDSC-71N pentru mai puţin
de 1 secundă, va fi terminat
modul de programare. LED-ul
luminează în funcţie de fun-
cţia de memorie setată.
Ștergerea unităţii
Ștergerea unei poziții a contro-
llerului
Ștergerea întregii memorii
Prin apăsarea butonului de programare de pe priza RFDSC-71N
timp de 5 secunde, se activează ștergerea unui controller. LED-ul
clipește de 4x la intervale de o secundă. Apăsarea butonului dorit
de pe controller îl șterge din memoria prizei.
Pentru confirmarea ștergerii LED-ul va clipi lung iar unitatea revine
în modul de operare. Starea memoriei nu este indicată.
Ștergerea nu are influenţă asupra funcţiei de memorie setate.
Prin apăsarea butonului de programare de pe priza RFDSC-71N
timp de 8 secunde, va fi ștearsă întreaga memorie a prizei. LED-ul
clipește de 4x la intervale de o secundă.
Priza trece în modul de programare, LED-ul clipește la intervale
de 0,5s (max. 4 min).
Revenirea la modul de funcţionare se face prin apăsarea butonu-
lui Prog pentru mai puţin de 1s. LED-ul se va aprinde potrivit fun-
cţiei de memorie setate, iar unitatea trece în modul de operare.
Ștergerea nu are influenţă asupra funcţiei de memorie setate.

R L C LED ESL
RFDSC-71N
Dimming socket
EN
02-156/2021 Rev.0
Made in Czech Republic
Warning
Instruction manual is designated for mounting and also for user of the device. It is always a part of its packing.
Installation and connection can be carried out only by a person with adequate professional qualification upon
understanding this instruction manual and functions of the device, and while observing all valid regulations. Trouble-
free function of the device also depends on transportation, storing and handling. In case you notice any sign of
damage, deformation, malfunction or missing part, do not install this device and return it to its seller. It is necessary
to treat this product and its parts as electronic waste after its lifetime is terminated. Before starting installation, make
sure that all wires, connected parts or terminals are de-energized. While mounting and servicing observe safety
regulations, norms, directives and professional, and export regulations for working with electrical devices. Do not
touch parts of the device that are energized – life threat. Due to transmissivity of RF signal, observe correct location
of RF components in a building where the installation is taking place. RF Control is designated only for mounting in
interiors. Devices are not designated for installation into exteriors and humid spaces. The must not be installed into
metal switchboards and into plastic switchboards with metal door – transmissivity of RF signal is then impossible. RF
Control is not recommended for pulleys etc. – radiofrequency signal can be shielded by an obstruction, interfered,
battery of the transceiver can get flat etc. and thus disable remote control.
Technical parameters /
* capacity for power factor cos φ=1
The power factor of dimmable LEDs and ESL bulbs ranges from:
cos φ = 0.95 up to 0.4.
An approximate value of maximum load may be obtained by multiplying
the load capacity of the dimmer by the power factor of the connected
light source.
Attention:
When you instal iNELS RF Control system, you have to keep minimal dis-
tance 1 cm between each units.
Between the individual commands must be an interval of at least 1s.
8/8
xxxxxx
Programming with RF control units /
The address listed on the back of the socket is used for programming and
controlling sockets by RF control units.
address /
Supplyvoltage:
Supplyvoltagefrequency:
Apparent power:
Dissipated power:
Supplyvoltagetolerance:
Output
Contactless:
Load capacit:
Dimming load:
Control
Wirelessly:
Communication protocol:
Frequency:
Function repeater:
Manual control:
Range:
Other data
Operating temperature:
Working position:
Mounting:
Protection:
Overvoltagecategory:
Contamination degree:
Dimensions:
Weight:
Related standards:
Priză cu dimmer
RO
www.elkoep.com
ELKO EP, s.r.o. | Palackého 493 | 769 01 Holešov, Všetuly | Česká republika | e-mail: [email protected]
EN Support: +420 778 427 366 | CZ Technická podpora: +420 775 444 609
Avertizare
Avertizare: Instrucţiunile de utilizare sunt destinate montatorului și utilizatorului dispozitivului. Instrucţiunile sunt în-
totdeauna incluse. Instalarea și conectarea pot fi efectuate numai de către un personal cu calificare corespunzătoare,
cu respectarea tuturor reglementărilor în vigoare, care este familiarizat cu aceste instrucţiuni și cu funcţionarea ele-
mentului. Funcţionarea fără probleme a elementului depinde, de asemenea, de modul de transport, depozitare și
manipulare anterior. Dacă găsiţi orice semne de deteriorare, deformare, funcţionare defectuoasă sau lipsă a vreunei
piese, nu instalaţi elementul și reclamaţi-l la vânzător. La sfârșitul duratei sale de viaţă utilă, elementul sau părţile sale
trebuie tratate ca deșeuri electronice. Înainte de a începe instalarea, asiguraţi-vă că toate firele, piesele conectate sau
conectoarele sunt scoase de sub tensiune. În timpul instalării și întreţinerii trebuie respectate reglementările de sig-
uranţă, standardele, directivele și dispoziţiile profesionale pentru lucrul cu echipamente electrice. Nu atingeţi părţile
sub tensiune ale elementului - pericol de moarte. Din cauza permeabilităţii semnalului RF, aveţi grijă ca elementele RF
să fie amplasate corect în clădirea în care urmează să fie efectuată instalarea. RF Control este proiectat numai pentru
instalare în interior. Elementele nu sunt destinate instalării în zone exterioare și umede, nu trebuie instalate în dulapuri
metalice și dulapuri din plastic cu uși metalice - acest lucru va împiedica trecerea semnalului de radiofrecvenţă. RF
Control nu este recomandat pentru controlul dispozitivelor de menţinere a vieţii sau pentru controlul echipamentelor
periculoase, cum ar fi pompele, încălzitoarele electrice fără termostate, ascensoarele, palanele etc. - transmisia de
radiofrecvenţă poate fi obstrucţionată, interferată, bateria emiţătorului poate fi descărcată etc., ceea ce face imposibilă
comanda de la distanţă.
230VAC
50-60 Hz
1.1 VA
0.8 W
+10 %; -15 %
2x MOSFET
max.200 W
R, L, C, LED, ESL
32chanels(buttons) / până la32de canale(butoane)
RFIO2
866–922 MHz
no / nu
button / buton PROG (ON/OFF)
up to / până la200 m
-15 to + 50 °C
any / arbitrară
plug into asocket / prin introducere înpriză
IP30
III.
2
63 x 110 x 74 mm
129 g
EN 60730, EN 63044, EN 300 220, EN 301 489
Parametrii tehnici
Tensiune de alimentare:
Frecvențatensiunii de alimentare:
Putere consumată aparentă:
Putere consumată de pierdere:
Toleranțatensiunii de alimentare:
Ieșire
Fără contact:
Sarcinilecontactate:
Sarcină reglabilă:
Control
Fără r:
Protocol de comunicare:
Frecvența:
Funcția repeater:
Control manual:
Raza de acțiune:
Alte date
Temperatura de lucru:
Poziția de lucru:
Fixare:
Protecție:
Categoria de supratensiune:
Gradul de poluare:
Dimensiuni:
Greutate:
Standarde relevante:
Atenţie:
La instalarea sistemului iNELS RF Control, trebuie păstrată o distanţă mini-
mă de 1 cm între unităţile individuale.
Între fiecare comandă trebuie să fie un interval de cel puţin 1s.
Programare cu unităţi de control RF
Pentru programarea și controlul prizelor cu unităţi de control RF, se utilizează
adresa de pe partea din spate a prizei.
abordare
Table of contents
Other elco Accessories manuals


Popular Accessories manuals by other brands


Comcast
Comcast Secromm XHS2-SE Installation

Baumer
Baumer UNDK 20P7903/S35A quick start guide

Summit Treestands
Summit Treestands Peak SU82084 manual

ABC Spa Cover Removal
ABC Spa Cover Removal Universal Spa Cover Lifter Directions for assembly and use

Aroma360
Aroma360 VanGogh360 instructions

Panasonic
Panasonic HL-C2 Series user manual


