elco OSM40 User manual

Reference value
ON
OFF
+Settings
-Settings
ON
OFF
OFF
p-2
p-1
ON
OFF
OFF p-3
(p-1 + p-2)/2
(p-2 + p-3)/2
ON
OFF
OFF p-2
p-1
Reference value
OSM40-KL800CBLI86Q12.1
M12
150mm~800mm NPN /PNP
IOUT:4~20mA
92879
Dimensions
10...30VDC
<1W
400mm
150mm~800mm
0.5mm(150mm~400mm)
1mm (400mm~600mm)
Linearity ±0.2%F.S.(150mm~400mm)
±0.3%F.S.(400mm~600mm)
Light source
Red semiconductor laser 2,
655nm
Beam diameter 1mm@150mm
Control output NPN/PNP
Analog output 4~20mA9
Response time 10ms/5ms/1.5ms
Wiring diagram
NPN
Mechanical
Housing material 316L
Windows material PMMA
Connections
Environmental
Ambient temperature -20℃...60℃
Protection IP67
1
2
3
4
Power negative
External input
NPN/PNP
Function
Gray
Brown
Blue
Black
Fig1
5
White
Harness color
Current output
3(Bu) 4(Bk)
2(Wh) 1(Bn)
Wiring diagram
5(Gy)
M12
Connector
*1:
*1
INSTRUCTION MANUAL
OSM40 High Precision Laser Distance Sensor
Detection
mode Type Sensing range Beam Output Connection Wiring
diagram
LASER
Connector
Fig1
Technical Specification
Electrical
Power supply
Power Consumption
Measurement center distance
Measurement range
Repeatability
Ambient illuminance under 3000lux
A alarm Indicator
B Function setting key
C Function adjustment key
D
Transmitter
E
M12*1 Connector
F
Display screen
Positive power supply
Sensing mode illustrate:
Preset "sensing mode setting" to the corresponding function
mode in menu.
1.Normal sensing mode
Press the TEACH Key in the sensing object present condition.
2. 1-point teaching
Press the TEACH Key in the sensing object present condition.
Teaching
3. 2-point teaching
Press the TEACH Key in the sensing object p-1 present
condition.
Press the TEACH Key in the sensing object p-2 present
4. 3-point teaching
Press the TEACH Key in the sensing object p-1 present
condition.
Press the TEACH Key in the sensing object p-2 present
condition.
Press the TEACH Key in the sensing object p-3 present
condition.
This is a laser product,it should be used after warming up for ten minutes.
10VDC-30VDC±10%
150mA MAX
4-20mA
3mm (600mm~800mm)
±0.5%F.S.(600mm~800mm)
2mm@600mm
G
G
Receiver
Color code
(Brown) +V
(Gray) External input
(Black) Control output
(Blue) 0V
External connection example
External
input
(White) Analog current output Analog
input
device
Load
+
-
Wiring diagram
PNP
10VDC-30VDC±10%
150mA MAX
4-20mA
Color code
(Brown) +V
(Gray) External input
(Black) Control output
(Blue) 0V
External
input
(White) Analog current output Analog
input
device
Load
+
-
TEACH
DOWN
UP
Set response
speed
TEACH
SPEd H.rSo
10ms
Std
5ms
FASt
1.5ms
UP
DOWN
TEACH
L-d L-on
d-on
TEACH
SEnS _|_N_.1 _N_.2 _N_.3
TEACH
P-n
nPn PnP
NPN PNP
TEACH
HySt short pressUP/DOWNstep0.1mmlong pressUP/DOWN above 3sstep1mm
UP
DOWN
UP
DOWN
UP
DOWN
STEP
UP/
DOWN
(TEACH)
UP/
DOWN
(TEACH)
UP/
DOWN
(TEACH)
UP/
DOWN
(TEACH)
UP/
DOWN
(TEACH)
UP/
DOWN
(TEACH)
UP/
DOWN
(TEACH)
Long pressTEACHEnter the menu interface
TEACH
Eco
oFF
on
close
open
DOWN
UP/
DOWN
(TEACH)
Erig
TEACH
InPt L-oF L-on
DOWN
UP/
DOWN
(TEACH)
UP/
DOWN
(TEACH)
external input
TEACH
rSEt
no
yES
DOWN
UP/
DOWN
(TEACH)
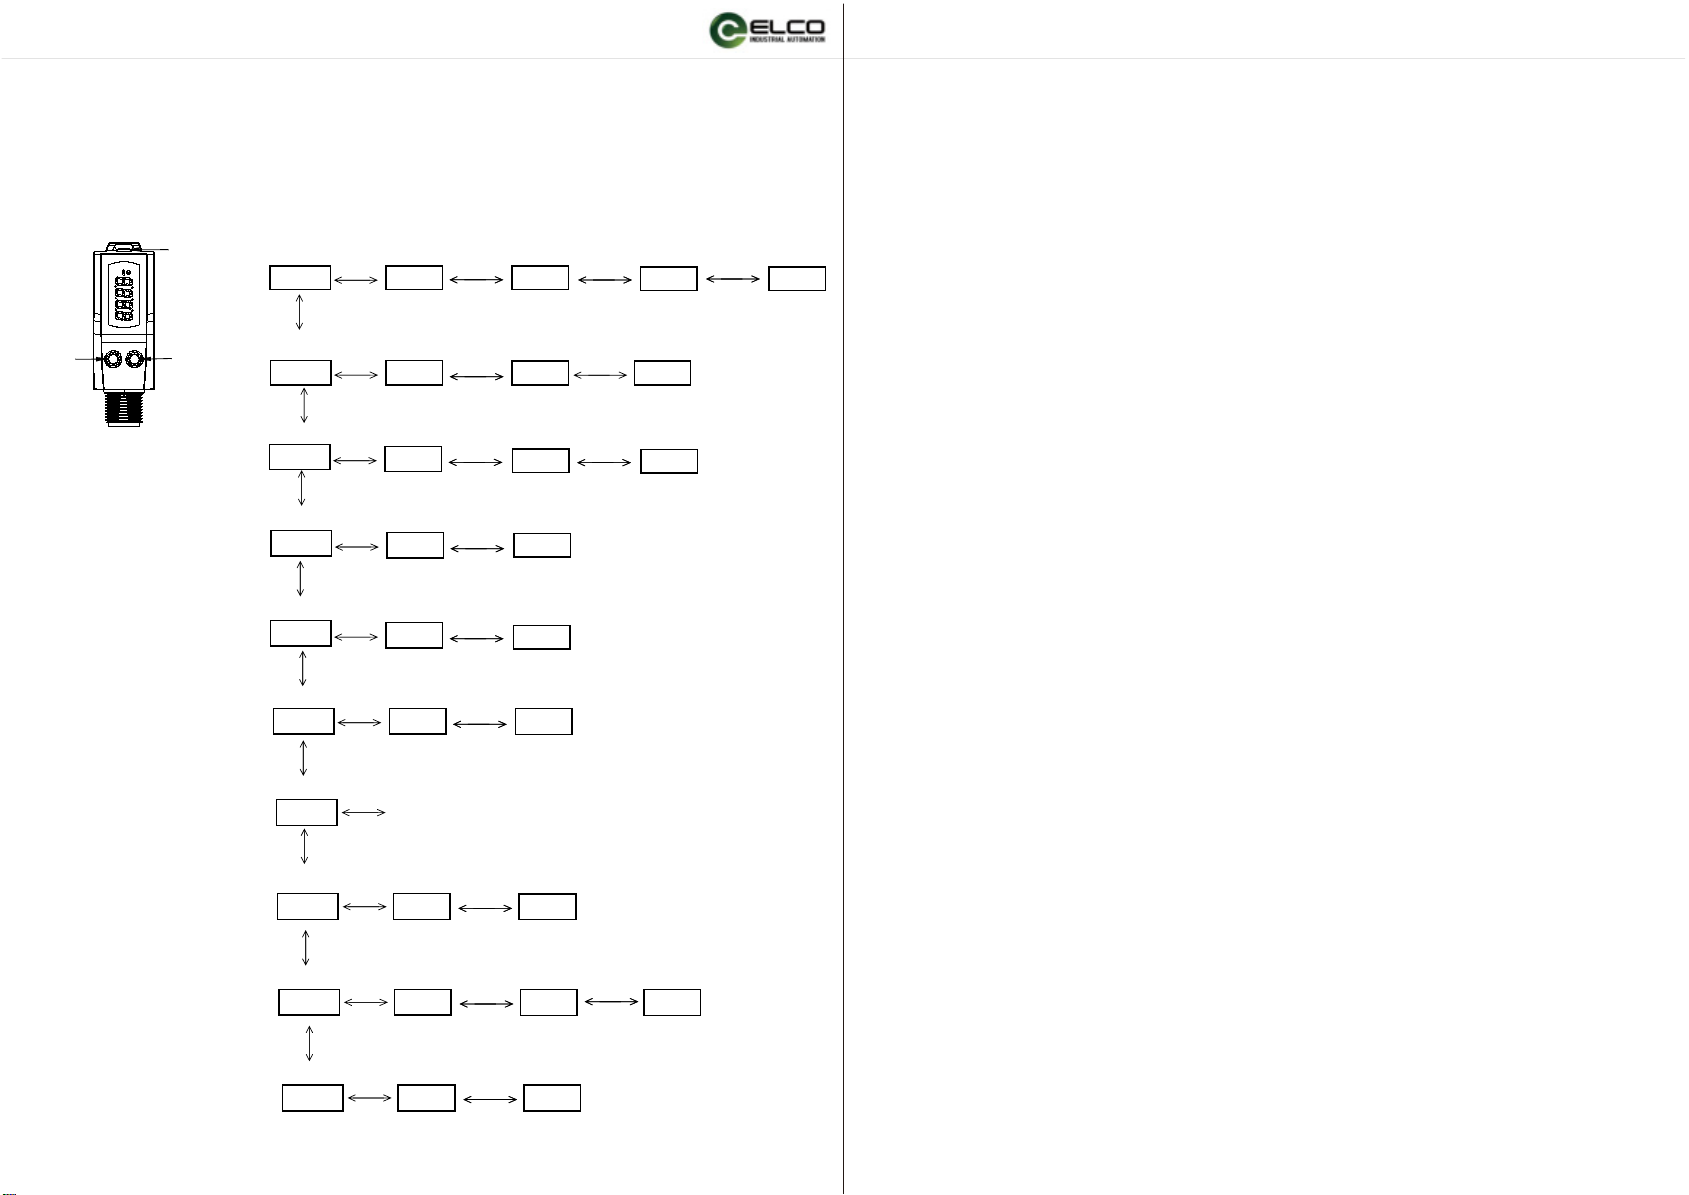
1.Ranging diaplay
Measurement interfaceShow actual measurement distanceresolution is 0.1mmwhen the
distance is out of detected distance,it diaplays“----”2.Menu and key operation
2.1 Enter the menuLong pressTEACH above 3s when it is in the measurement interfaceenter the menu interfaceExit menuLong pressTEACH above 3s when it is in the menu interfaceor no key operation for 20sreturn to measurement interface2.2 Menu operation
Enter the menu interface,diaplay the main menu,switch the menu options by pressing the up/down key.
On the main menu interface,enter the submenu options by short pressing TEACH key.Unter the submenu,
short press up/down to select the parameter.Short press the TEACH key to confirm and return to the
previous main menu.
1)Set detection output
The main menu showsSEnSpress TEACH to enter the submenu;
Submenu itemsusually detected modedefaultN11-point teaching window comparison modeN_.22-point teaching window comparison modeN_.33-point teaching window comparison modeWhenteaching window comparison mode at 1-point ,short press the TEACH key to enter the window size setting
interfacethenitial value is 0.5mm,press up/down to adjust the window size parameter,step 0.5mm,long press up/down
for more than 3s,step 5mm.
After selecting the teaching mode,you can teach on the measurement interface.If the teaching succeeds,“good” will be
displayed,if the teaching fails,“FAil” will be displayed.
Please refer to the specific mode description for the above 3 teaching modes.
2)Set response speed:
The main menu shows“SPEd”press TEACH to enter the submenu;
Submenu itemsH.rSohigh precision10msStdstandard5msFASthigh speed1.5msdefault3)Set diaplay mode
The main menu showsdiSPpress TEACH to enter the submenu;
Submenu items“norN”normal displacement modedefault“rEv”reverse displacement mode“dist”distance mode4)Set analog output ditection
The main menu showsAo.dpress TEACH to enter the submenu;
Submenu itemsAo-FforwarddefaultAo-rreverse5)Set output action
The main menu showsL-dpress TEACH to enter the submenu;
Submenu itemsL-onluminousdefaultd-ondark pass6)Set switch output
The main menu showsP-npress TEACH to enter the submenu;
Submenu itemsnPnNPNoutput modedefaultPnPPNPoutput mode7)Anti-shake settings
The main menu showsHyStpress TEACH to enter the submenu;
Submenu initial diaplay0.10.1mm is hysteresis distanceshort pressUP/DOWNstep0.1mmlong pressUP/DOWN above 3sstep1mmSetting range is 0~5mminitial value is 3mm8)Environmental protection settings
The main menu showsEcopress TEACH to enter the submenu;
Environmental protection function noteAfter the function is turned on,the LED will automatically turn off the display in
30s without any button.
9)External output settings
The main menu showsInPtpress TEACH to enter the submenu;
Submenu itemsL-oFstop cast lightL-onturn on cast lightErigexternal inputdefaultExternal inputnoteWhen the external input is low,stop cast lightno external input,default turn on cast light10)Reset settings
The main menu showsrSEtpress TEACH to enter the submenu;
Submenu itemsnodo not perform resetyESperform resetrestore default settings.
2.3 Key lock function
On the measurement interfaceboth press TEACH and DOWN key for above 3sinterface display“Lc.on”the key lockmenu function failureautomatic return to the measurement interface after a delay of 3s.both press TEACH and DOWN
key for above 3s againinterface display“Lc.oF”key function recoveryautomatic return to the measurement interface
after a delay of 3s.
UP/
DOWN
TEACH
diSP norN
rEv
UP
DOWN
UP/
DOWN
(TEACH)
dist
UP/
DOWN
(TEACH)
TEACH
Ao.d Ao-F
Ao-r
Set analog
output ditection
UP/
DOWN
(TEACH)
UP
DOWN
OPERATION GUIDE
OSM40 High Precision Laser Distance Sensor
1-point
teaching
2-point
teaching
3-point
teaching
Set diaplay mode normal reverse distance
reverse
forward
Set output action dark pass
luminous
Set detection output
usually
detected
Set switch output
Anti-shake settings
Environmental
protection settings
External output settings
stop
cast light
turn on
cast light
Reset settings perform reset
do not
perform reset
This manual suits for next models
1
Other elco Accessories manuals


