elco OSM40 User manual
Light source
Control output
Analog output
voltage and
current can be set
Response time
ELCO(Tianjin) Electronics Co.,Ltd
NO.12, 4th XEDA Branch Road, Xiqing Economic Development Area, Tianjin, P.R.China
Tel: +86 22 23888288
Fax: +86 22 23788399
www. elco-holding .com
Germany Tel +49 70626599-260
Germany Fax +49 70626599-261
Manufactured in China
Housing material
Windows material
Connections
Ambient temperature
Protection
M12
Connector
/
Cable
*1:
INSTRUCTION MANUAL
OSM40 High Precision Laser Distance Sensor
Power supply
Power Consumption
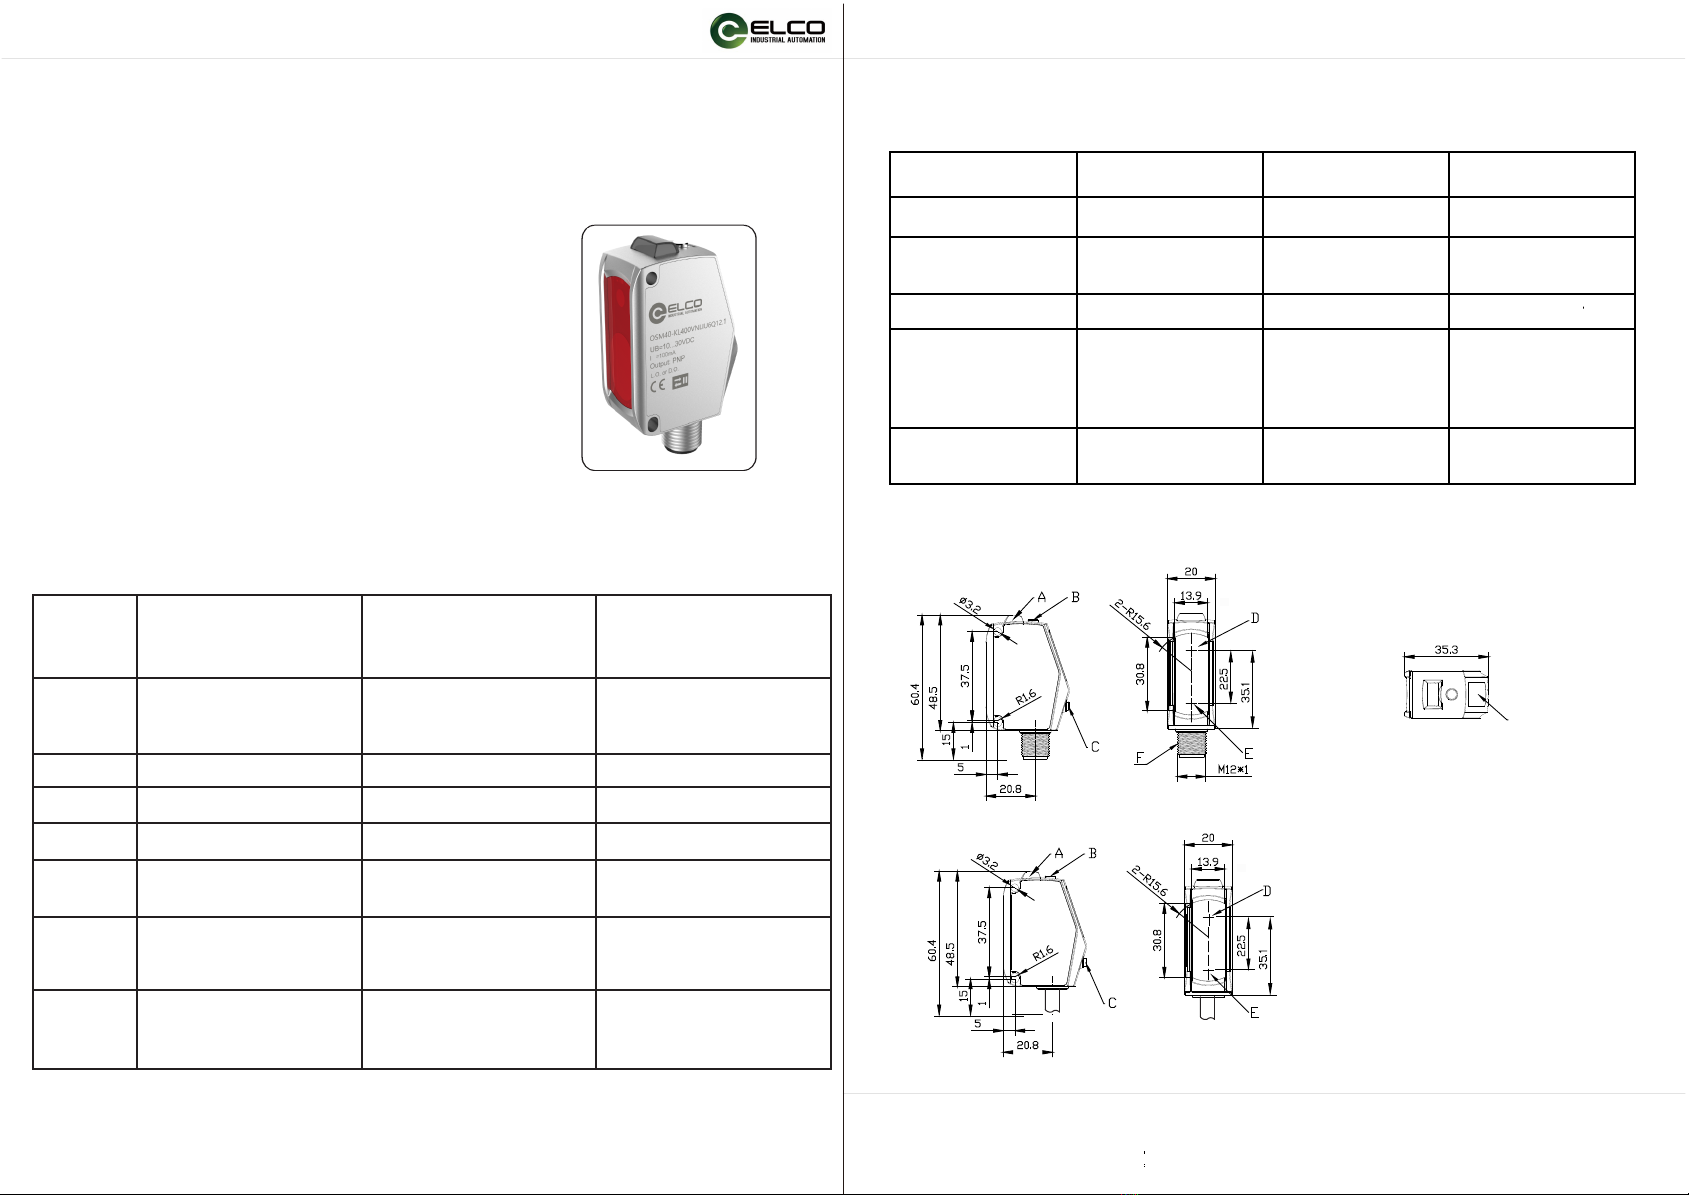
A alarm Indicator
B Function setting key
C Function adjustment key
D
Transmitter
E
M12*1 Connector
F
Display screen
This is a laser product,it should be used after warming up for ten minutes.
G
Receiver
short distance
10...30VDC
<1W
NPN/PNP
current4~20mA
(beyond,0mA)
15ms/5ms/1.5ms
316L
GLASS
-20℃...60℃
Ambient illuminance under 3000lux
IP67
4Dimensions
G
3Specifications
Type
connector
Measurement
range
Measurement
center distance
OSM40-KL70CBLI6Q12.1
Type
cable
OSM40-KL70CBLI6
OSM40-KL160CBLI6Q12.1
OSM40-KL160CBLI6
OSM40-KL800CBLI6Q12.1
OSM40-KL800CBLI6
Repeatability
Linearity
Beam diameter
50mm 400mm
150mm~800mm
60mm~160mm
35mm~70mm
1mm 1mm
1mm@150mm
30μm 70μm
0.5mm
1mm
±0.1%F.S. ±0.1%F.S.
±0.2%F.S.
±0.3%F.S.
(150mm~400mm)
(400mm~600mm)
(150mm~400mm)
(400mm~600mm)
±0.5%F.S. (600mm~800mm)
3mm
(600mm~800mm)
2mm@600mm
100mm
2Model description
OSM40-KL70CBLU6 OSM40-KL160CBLU6 OSM40-KL800CBLU6
OSM40-KL70CBLU6Q12.1 OSM40-KL160CBLU6Q12.1 OSM40-KL800CBLU6Q12.1
Measurement
type
Red semiconductor
laser 2 655nm
1Product features
Short,medium and long distances are available.
Support switch output,NPN/PNP can be set.
Support analog output,current output/voltage output
can be set.
Support laser light source control through external
input.
Support ECO mode setting.
Four white digital tubes,clear and bright.
Full metal shell,sturdy and durable,better protection
performence.
Small size, small spot, high precision.
Support multiple detection modes,multi-scene applications.
middle distance long distance
voltage0~5V
beyond,5.2V

Wiring diagram
NPN
1
2
3
4
Power negative
External input
NPN/PNP
Function
Gray
Brown
Blue
Black
5Pink
Harness color
Current output
3(Bu) 4(Bk)
2(Wh) 1(Bn)
Wiring diagram
5(Gy)
Positive power supply
External input
Control output
External
input
Analog output Analog
input
device
Load
Wiring diagram
PNP
External input
Control output External
input
Analog output Analog
input
device
Load
ELCO(Tianjin) Electronics Co.,Ltd
NO.12, 4th XEDA Branch Road, Xiqing Economic Development Area, Tianjin, P.R.China
Tel: +86 22 23888288
Fax: +86 22 23788399
www. elco-holding .com
Germany Tel +49 70626599-260
Germany Fax +49 70626599-261
Manufactured in China
Detection mode setting description
1.Normal detection mode
In the menuselect the “__|” modeautomatically enter the detection
interface;Select the target object(*) within the effective detection distance and
press the TEACH key,and prompt “GOOD” to complete the setting.The
location of the target object is the judgement distance.
2. 1-point teaching window comparison mode
In the menu,select the “_N_.1”mode,first enter the wisdow size setting
interface;The default setting value is 0.5mm,press UP/DOWN to adjust the
window size setting value.Press the TEACH key to enter the measurement
interface;within the effective measurement distance,select the target object(*),
press TEACH key,prompt ”GOOD”,complete the setting.The position of the
target object is the center,plus and minus setting value as window edge,
and perform window mode judgement.
3.
4.
ON
OFF
+
-
ON
OFF
OFF
p-2
p-1
ON
OFF
OFF p-3
(p-1 + p-2)/2
(p-2 + p-3)/2
ON
OFF
OFF p-2
p-1
Teach
It is necessary to set the “Detection Mode Setting”in the menu to the
curresponding function mode in advance.
ON
OFF
p-2
p-1
(p-1 + p-2)/2
5.
midpoint teaching mode
In the menuselect the “Nid” modeautomatically enter the measurement
interface.Select the target object 1(*) within the effective detection distance and
press the TEACH key,and prompt “LP1” to complete p-1 setting.Select the
target object 2(*) within the effective detection distance and press TEACH
key,prompt ”GOOD” to complete the p-2 setting.
Take the middle distance between p-1 and p-2 as the judgement distance.
6Teaching mode description
Gray
Brown
Blue
Black
White
Harness color
5Interface definition and wiring diagram
6AGND Shielded wire None
Cabel Connector
2-point teaching window comparison mode
In the menuselect the “_N_.2” modeautomatically enter the measurement
interface.Select the target object 1(*) within the effective detection distance and
press the TEACH key,and prompt “LP1” to complete p-1 setting.Select the
target object 2 (*)within the effective detection distance and press TEACH
key,prompt ”GOOD” to complete the p-2 setting.
Use the distance between the location of target object 1 and target object 2 as
the window to determine the window mode.
3-point teaching window comparison mode
In the menuselect the “_N_.3” modeautomatically enter the measurement
interface.Select the target object 1(*) within the effective detection distance and
press the TEACH key,and prompt “LP1” to complete p-1 setting.Select the
target object 2(*) within the effective detection distance and press TEACH
key,prompt ”LP2” to complete the p-2 setting.Select the target object 3(*) within
the effective detection distance and press TEACH key,prompt ”GOOD” to
complete the p-3 setting.
Take the middle distance between p-1 and p-2 as window edge 1,and the
middle distance between p-2 and p-3 as window edge 2,and perform window
mode judgement.
10VDC-30VDC±10%
150mA MAX
+V
0V
+
-
AGND
10VDC-30VDC±10%
150mA MAX
+V
0V
+
-
Analog ground AGND
The
Main
Circuit
AGND
The
Main
Circuit
Analog ground AGND
*Represents fine adjustment:After selecting the target object,you can fine-tune the distance of the target object with the
UP/DOWN key,and then press the TEACH key to confirm.

ELCO(Tianjin) Electronics Co.,Ltd
NO.12, 4th XEDA Branch Road, Xiqing Economic Development Area, Tianjin, P.R.China
Tel: +86 22 23888288
Fax: +86 22 23788399
www. elco-holding .com
Germany Tel +49 70626599-260
Germany Fax +49 70626599-261
Manufactured in China
TEACH
DOWN
UP
STEP Long pressTEACHEnter the menu interface
7.OPERATION GUIDE
1-point
teaching
2-point
teaching
3-point
teaching
Teaching
output
usually
detected
1.Ranging diaplay
Measurement interfaceShow actual measurement distanceresolution is 0.1mm(KL70 is 10μm)when the
distance is out of detected distance,it diaplays“----”
Display description:Take the center distance as 0 point,the distance less than the center is positive,the distance greater than the center
is negative,and the displayed value is the offset value.
2.Menu and key operation
2.1 Enter the menuLong pressTEACH above 3s when it is in the measurement interfaceenter the menu interface
Exit menuLong pressTEACH above 3s when it is in the menu interfaceor no key operation for 20sreturn to measurement interface
2.2 Menu operation
Enter the menu interface,diaplay the main menu,switch the menu options by pressing the up/down key.
On the main menu interface,enter the submenu options by short pressing TEACH key.Unter the submenu,short press up/down to select
the parameter.Short press the TEACH key to confirm and return to the previous main menu.
1)Teaching output
The main menu shows“SEnS”press TEACH to enter the submenu;
Submenu items“__|”usually detected modedefault“_N_.1”1-point teaching window comparison mode
“_N_.2”2-point teaching window comparison mode“_N_.3”3-point teaching window comparison mode“nid”midpoint teaching mode.
The above teaching modes are detailed in 6.Teaching mode description.
2)Set response speed:
The main menu shows“SPEd”press TEACH to enter the submenu;
Submenu items“H.rSo”high precision 15ms;“Std”standard 5msdefault; “FASt”high speed 1.5ms
3)Set digital output ditection
The main menu shows“ L-d”press TEACH to enter the submenu;
Submenu items“ L-on”luminousdefault“d-on”dark pass;
4)Anti-shake settings
The main menu shows“HySt”press TEACH to enter the submenu;
Submenu initial diaplay“ 0.1”,0.1mm is hysteresis distanceshort press UP/DOWNstep 0.1mm(KL70 is 0.01mm)long press
UP/DOWN above 3sstep 1mm(KL70 is 0.1mm)Setting range is 0~5mminitial value is 1mm(KL70 is 0.1mm)
5)Digital output keep setting
The main menu shows“dELy”press TEACH to enter the submenu;
Submenu initial diaplay“ 0”,no delayshort press UP/DOWNstep 10mslong press UP/DOWN above 3sstep 100ms
Setting range is 0~1000msinitial value is 0ms
6)Set digital output type
The main menu shows“ P-n”press TEACH to enter the submenu;
Submenu items“ nPn”NPN output modedefault“ PnP”PNP output mode.
7)Analog output mode setting
The main menu shows“ Ao.N”press TEACH to enter the submenu;
Submenu items“ioUt”current output modedefault“voUt”voltage output mode.
8)Set analog output ditection
The main menu shows“Ao.d”press TEACH to enter the submenu;
Submenu items“Ao-F”forwarddefault“Ao-r”reverse
Forward direction:short distance corresponds to small current/voltage,long distance corresponds to large current/voltage.The reverse
is the opposite.
9)Set analog output range
The main menu shows“Ao.S”press TEACH to enter the submenu;
Submenu items“FULL”full scale modedefault“rAng”window mode
When set to window mode,the analog output range can be set through the two-point teaching mode.
10)Set display mode
The main menu shows“diSP”press TEACH to enter the submenu;
Submenu items“norN”normal displacement modedefault“rEv”reverse displacement mode“dist”distance mode.
11)Environmental protection settings
The main menu shows“ Eco”press TEACH to enter the submenu;
Environmental protection function noteAfter the function is turned on,the LED will automatically turn off the display in
30s without any button.
12)External output settings
The main menu shows“InPt”press TEACH to enter the submenu;
Submenu items“L-oF”stop cast light“L-on”turn on cast light“Erig”external inputdefault
External input noteWhen the external input is low,stop cast lightno external input,default turn on cast light
13)Reset settings
The main menu shows“rSEt”press TEACH to enter the submenu;
Submenu items“ no”do not perform reset“ yES” perform resetrestore default settings.
2.3 Key lock function
Turn on key lock:In the measurement interfacepress the UP and DOWN keys at the same time for more than 3s
the interface displays “Lc.on”and the menu function is invalid at this time.
Turn off the key lock:After the key lock is turned on,press the UP and DOWN keys at the same time for more than 3s
the interface displays “Lc.FA”press the UP and DOWN keys at the same time for more than 3s again
the interface displays “Lc.oF”and the key function are restored.
TEACH
15ms 5ms 1.5ms
UP
DOWN
TEACH
UP
DOWN
UP/
DOWN
(TEACH)
UP/
DOWN
(TEACH)
UP/
DOWN
(TEACH) (TEACH) (TEACH) (TEACH)
TEACH
UP
DOWN
UP/
DOWN
(TEACH)
TEACH
DOWN
UP/
DOWN
UP
TEACH
TEACH
NPN PNP
UP/
DOWN
(TEACH)
UP
DOWN
UP
DOWN
Analog output mode setting
TEACH
UP/
DOWN
(TEACH)
UP
DOWN
TEACH
UP/
DOWN
(TEACH)
UP
DOWN
TEACH
UP
DOWN
UP/
DOWN
(TEACH)
TEACH
UP
DOWN
UP/
DOWN
(TEACH)
UP/
DOWN
(TEACH)
TEACH
UP/
DOWN
(TEACH)
TEACH
DOWN
UP/
DOWN
(TEACH)
UP/
DOWN
(TEACH)
TEACH
DOWN
UP/
DOWN
(TEACH)
UP/
DOWN
UP/
DOWN
UP/
DOWN
Set response
speed
Set digital output ditection
Anti-shake settings
Set analog
output ditection
Set analog
output range
Set display mode
Environmental
protection settings
External output settings
Reset settings
dark pass
luminous
reverseforward
window mode
full scale
normal reverse distance
close
open
external input
stop
cast light turn on
cast light
perform reset
do not
perform
reset
short pressUP/DOWNstep0.1mm(KL70 is 0.01)long pressUP/DOWN
above 3sstep1mm(KL70 is 0.1)
short pressUP/DOWNstep10mslong pressUP/DOWN above 3s
step100ms
Set digital output type
Digital output keep setting no delay
Current output
mode
Voltage output
mode
midpoint
teaching

ELCO(Tianjin) Electronics Co.,Ltd
NO.12, 4th XEDA Branch Road, Xiqing Economic Development Area, Tianjin, P.R.China
Tel: +86 22 23888288
Fax: +86 22 23788399
www. elco-holding .com
Germany Tel +49 70626599-260
Germany Fax +49 70626599-261
Manufactured in China
8.Digital tube diaplay interpretation 9.Installaton diagram
set response speed
high precision
15ms
standard
5ms
high speed
1.5ms
set analog output direction
teaching output
usually detected
1-point teaching
set switch output
NPN
PNP
anti-shake settings
environmental protection settings
environmental protection
close
environmental protection open
external output settings
stop cast light(turn off the laser)
turn on cast light(turn on the laser)
external input
Reset settings
do not perform reset
perform reset
luminous
dark pass
set diaplay mode
normal displacement mode
reverse displacement mode
distance mode
set switch output ditection
forward
reverse
2-point teaching
3-point teaching
1.In the case of color or material
difference
When the material or color of moving
object is extremely diffetent,install it
in the direction shown on the left to
keep the measurement error to a
minimum.
2.Detect rotating objects
When detecting a rotating object,
install it in the direction shoen on the
left,which can suppress the influence
of the object’s vertical vibration and
position shift.
3.When there is a step
If there is a step in the moving
detection object,install it according to
the method shown on the left,so as to
suppress the influence of the step
edge during measurement.
4.Measure in narrow places and
recessed parts
In the case of measuring in a
narrow place or hole,please be
careful not to block the light psth
from the light emitting part to the
light receiving part when installing.
5.When installed on the wall
Please install according to the
method shown on the left to avoid
the multiple reflected light from the
wall entering the light receiving part.
set analog output mode
full scale
window mode(corresponding to two-point teaching mode)
midpoint teaching
switch output keep settings
no delay
current output mode
voltage output mode
set analog output range
sens
__m
_m_1
_m_3
_m_2
_mid
sped
h.ros
std
fast
l-d
l-on
d-on
hyst
dely
0
p-n
npn
pnp
rom
iout
vout
rod
ao-f
ao-r
aos
full
rang
disp
norm
rev
dist
eco
off
on
inpt
l-of
l-on
erig
rest
no
yes
Other elco Accessories manuals


